Create a beautiful space in your home with these DIY mudroom lockers using our easy to follow woodworking plans! Transform your mudroom with storage and seating for beautiful and functional organization when entering your home!
This post was sponsored by National Hardware, a great place to get hardware and kits for your DIY needs. All opinions are our own. Thank you for supporting the brands that make Charleston Crafted Possible!
It's amazing how different seasons can highlight the parts of your home that are insufficient and need an upgrade.
When winter rolled around and we started using light jackets one day, coats another, hats and gloves for a few days, everything was a mess.
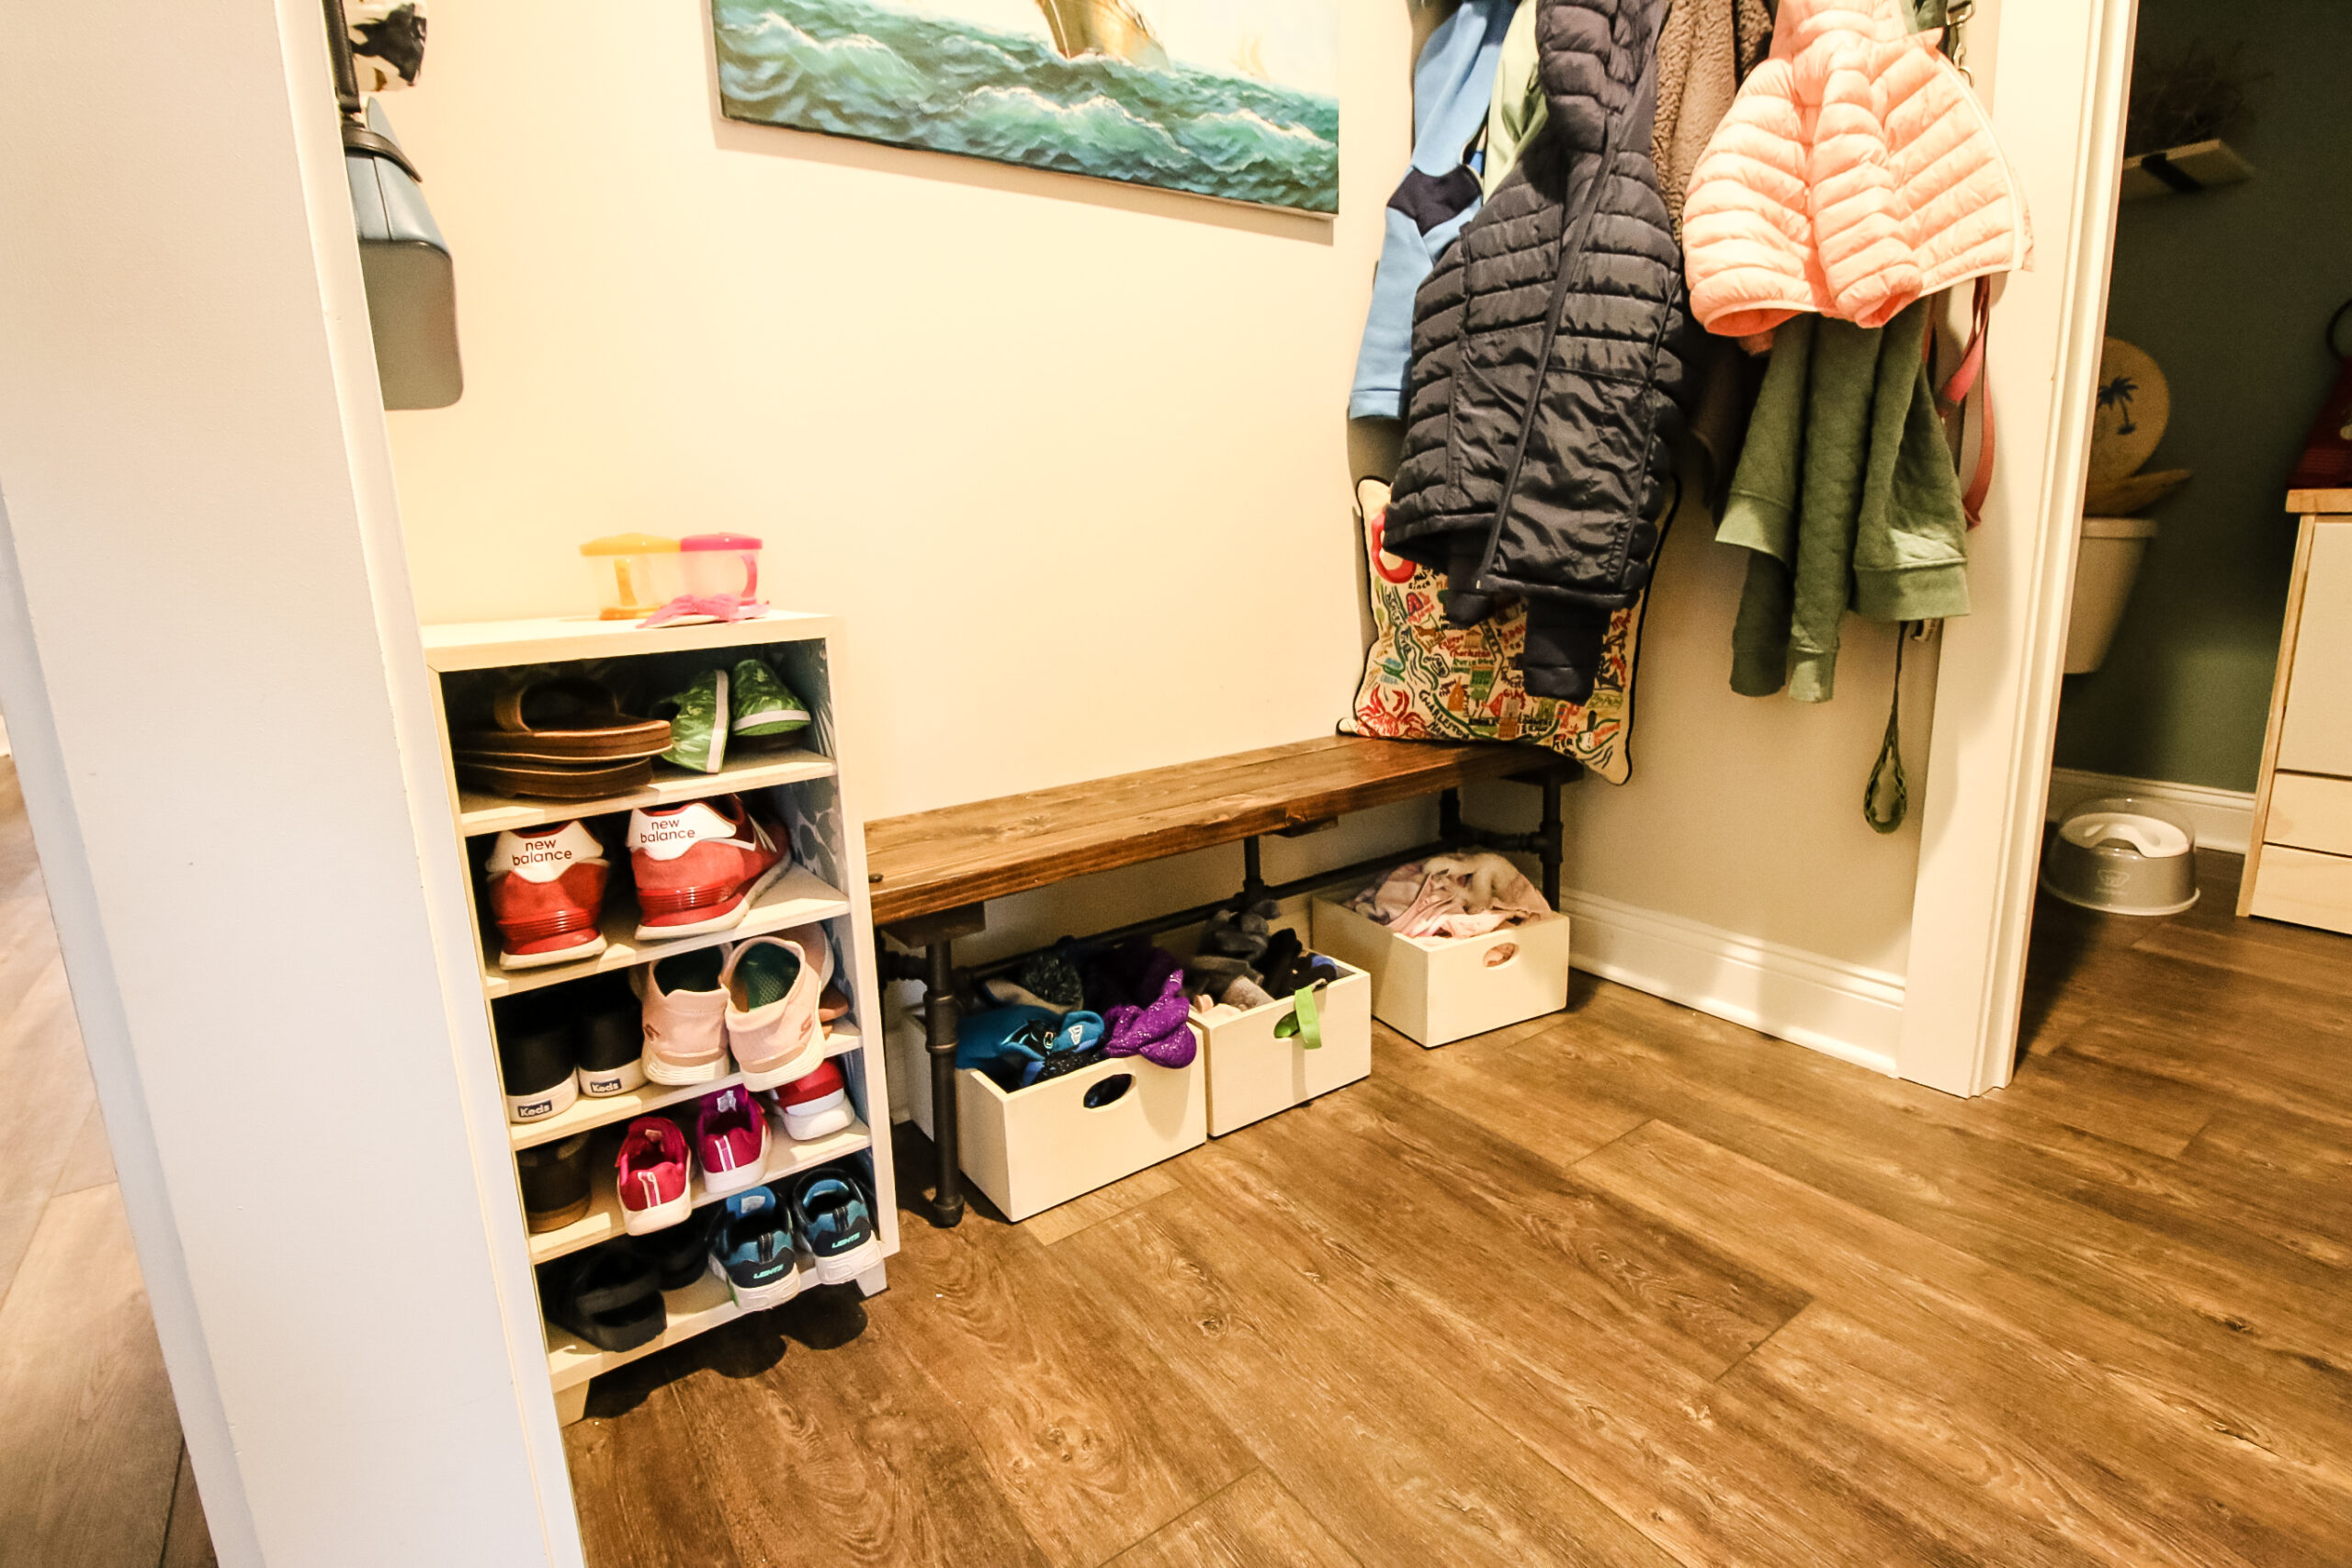
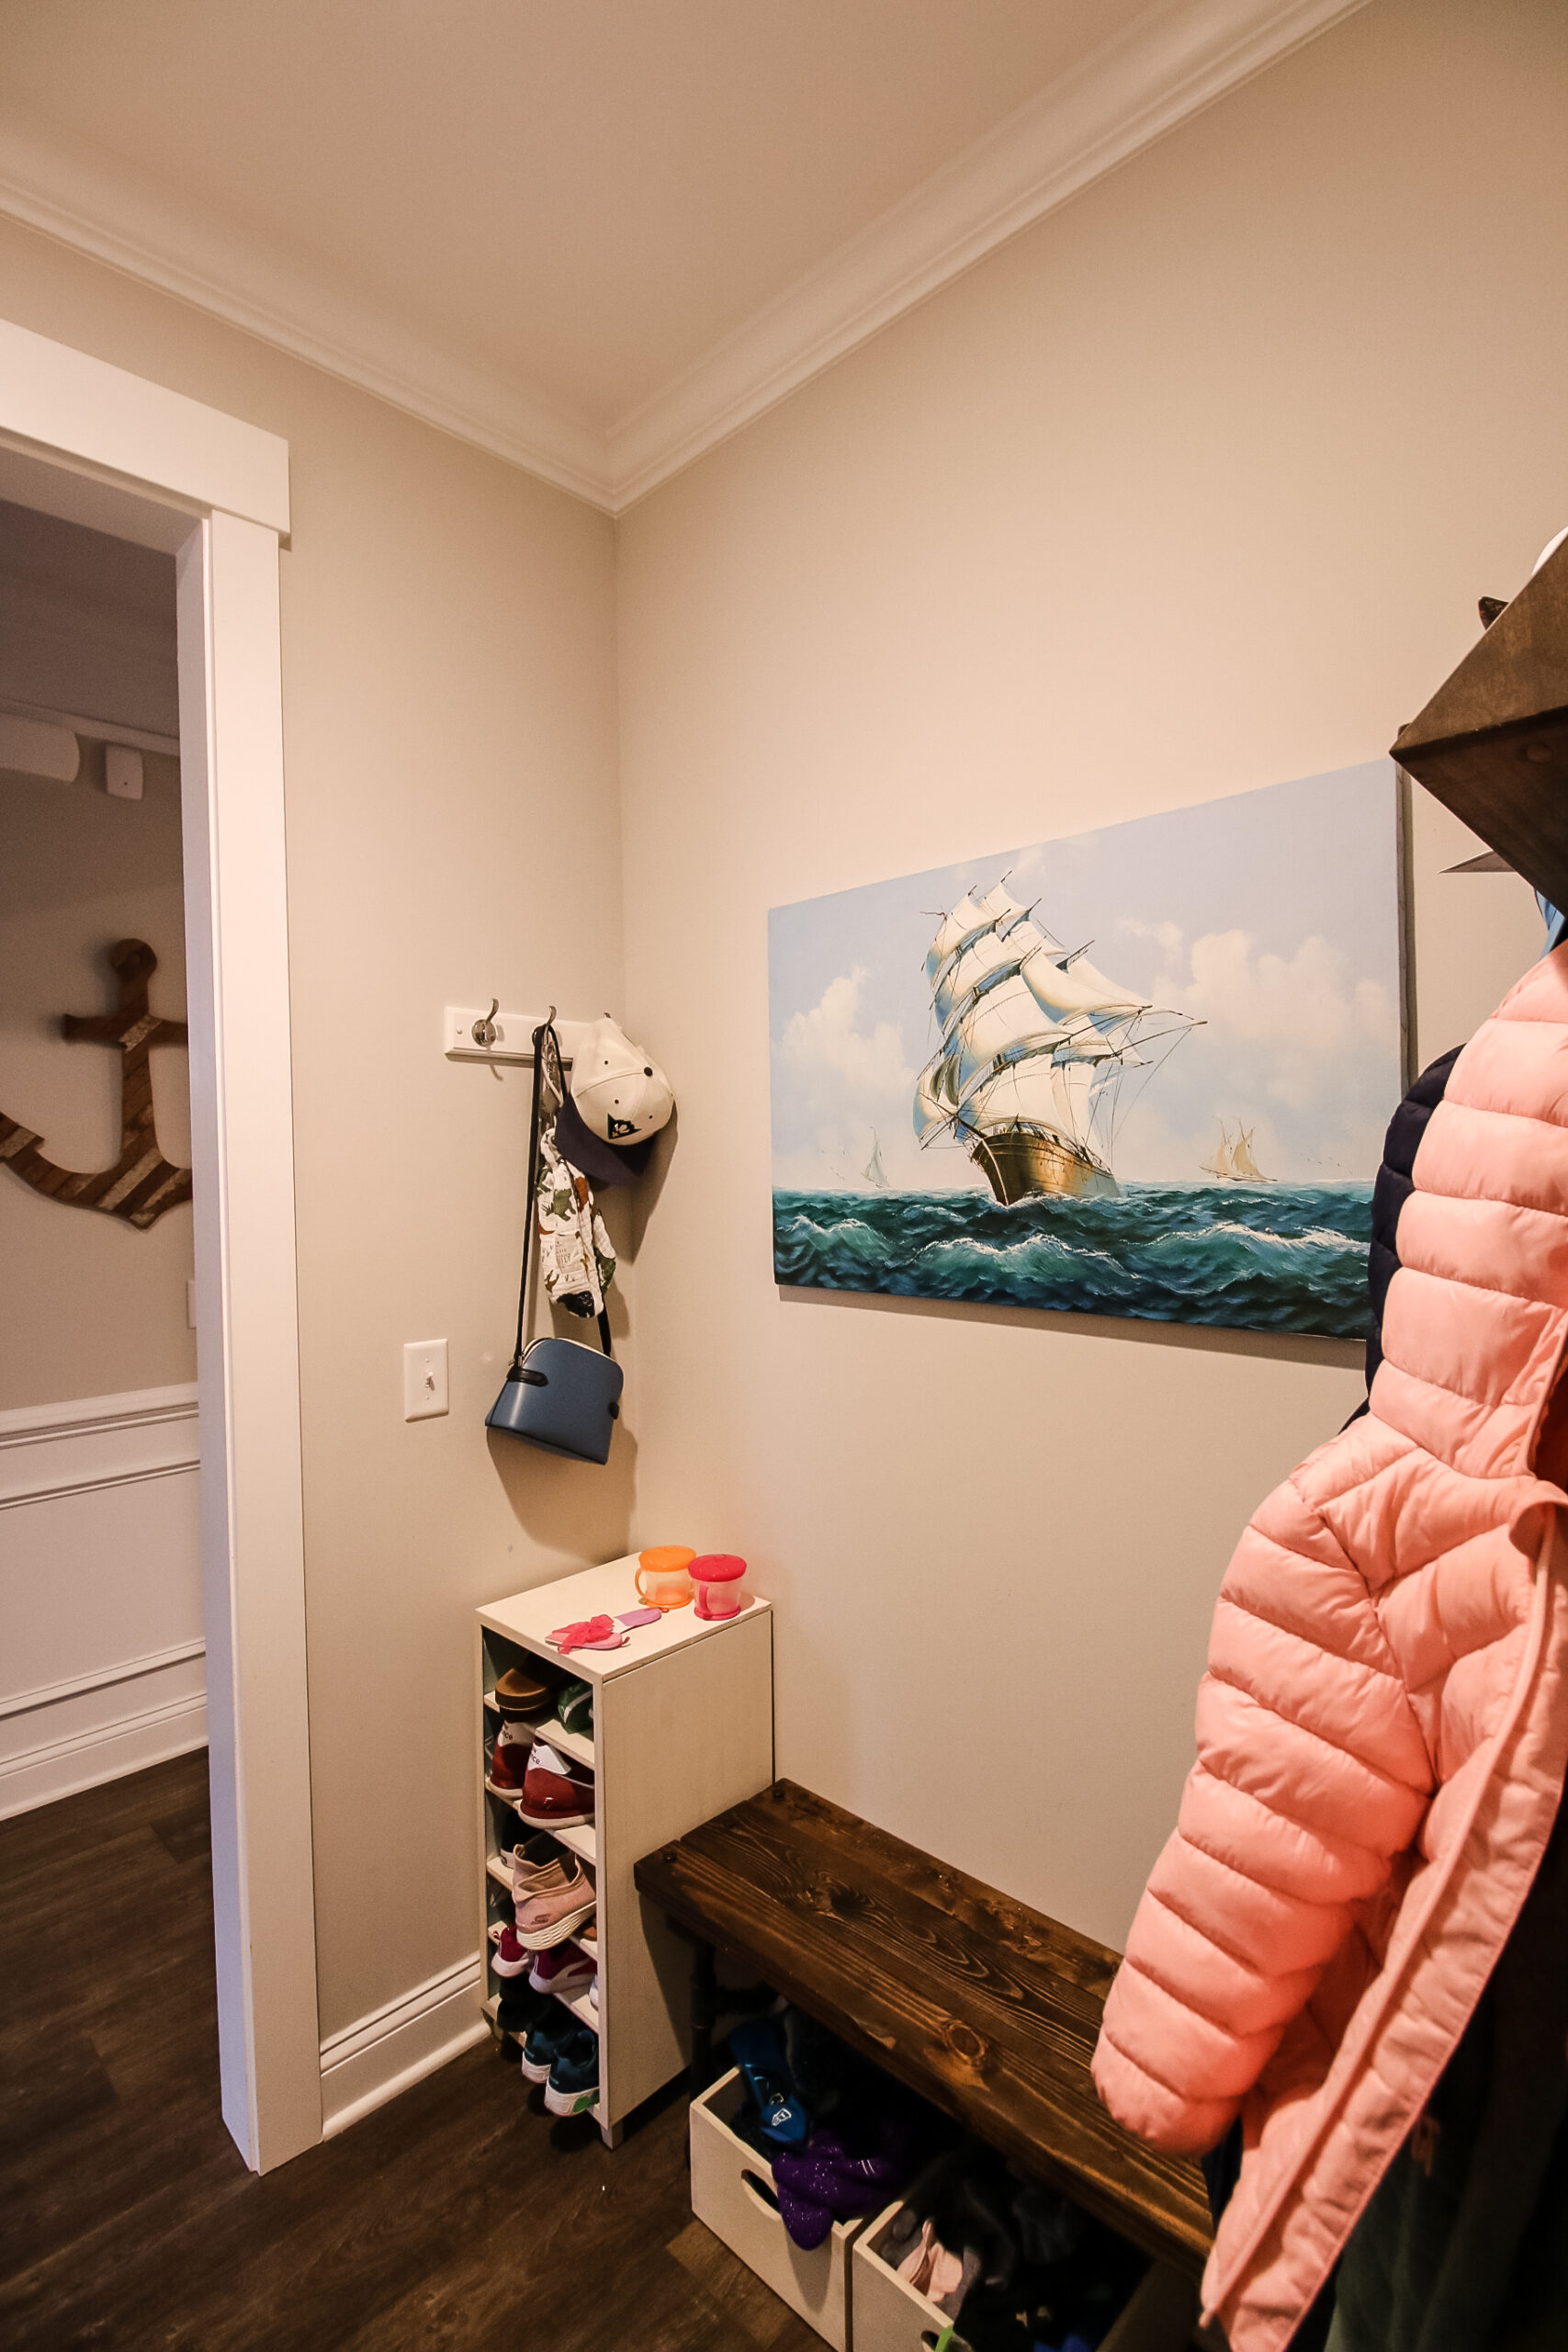
In our home, our mudroom has been an incohesive mismatch of storage options since we moved in. We moved our DIY wood and lead pipe bench from our old house for the kids to sit on, built a DIY plywood shoe tower, and hung up a DIY storage shelf with coat hooks.
These were all great, but they didn't work together and didn't solve all of our needs.
We decided to design a set of built-in DIY mudroom lockers that would provide storage, functionality and beauty right inside our home.
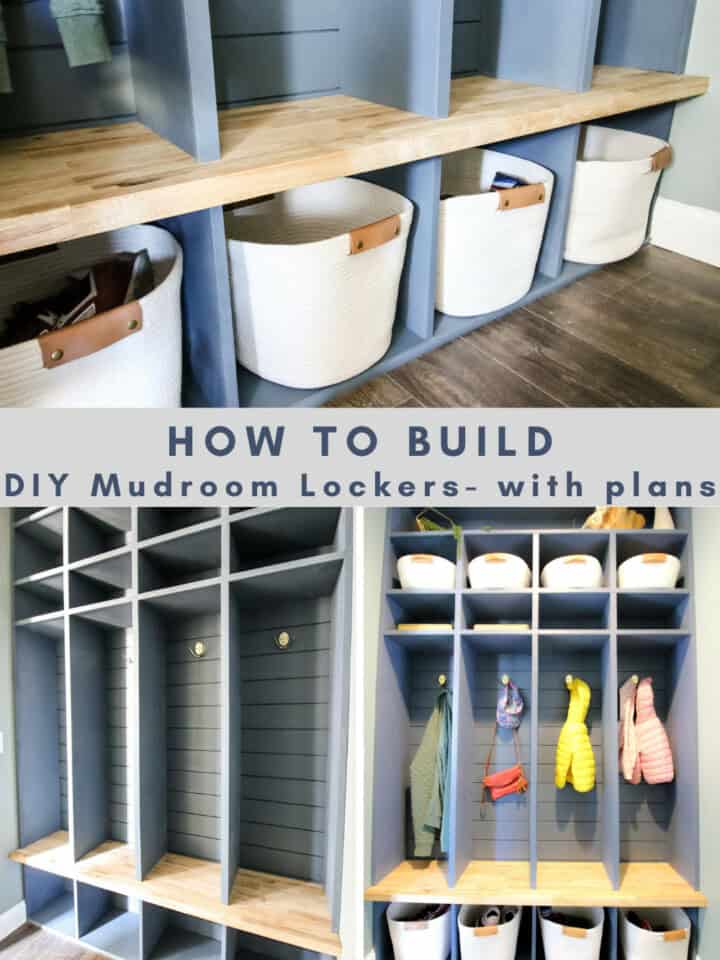
DIY mudroom lockers with bench and storage
Our mudroom is right inside the entryway to our house and serves as a pass-through for any guests using the restroom. For that reason, we needed a spaced that looked good and tucked everything out of the way.
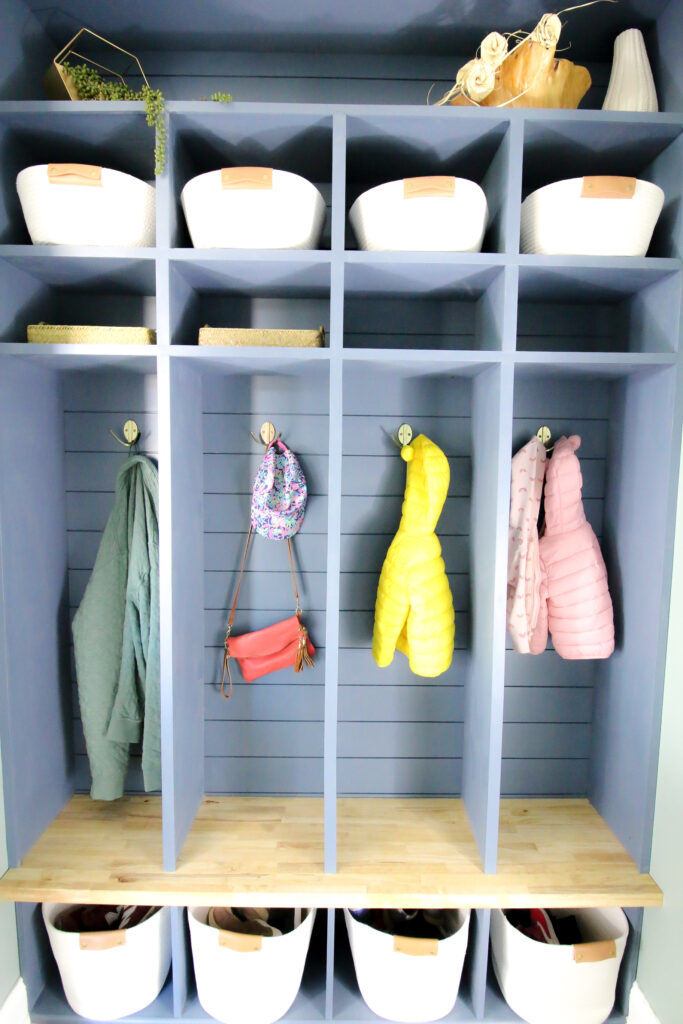
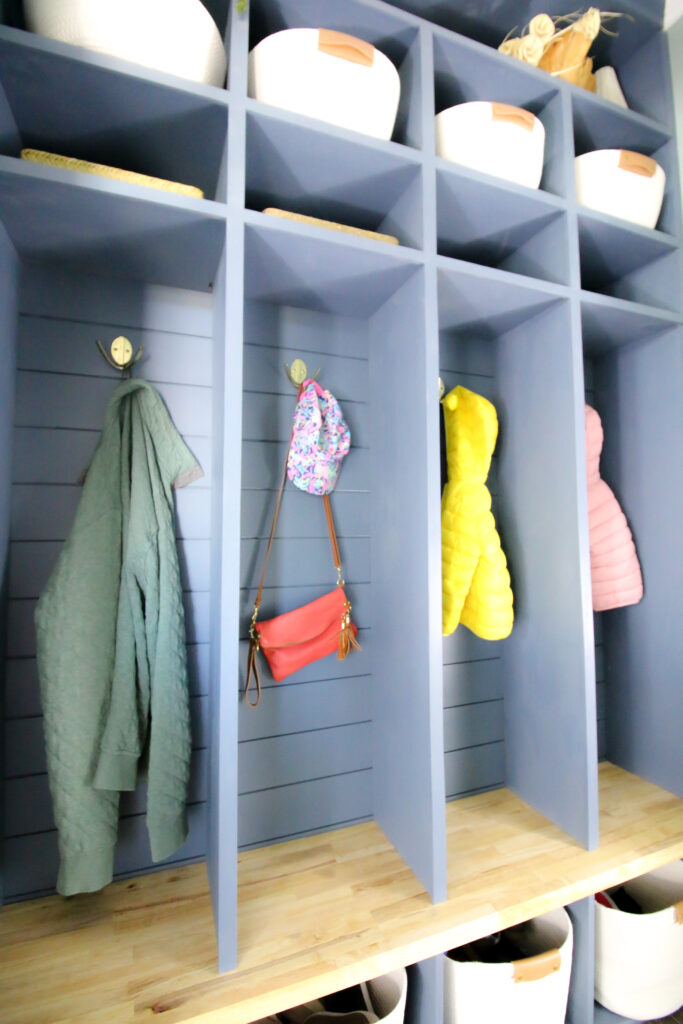
We designed mudroom lockers with cubbies for shoes, hooks for jackets and bags, a bench to sit on while getting ready and much more.
We also mimicked the look of our shiplap fireplace to help flow from the entry into our overall living room space.

What is a mudroom in a house?
A mudroom in a house is traditionally a drop point for your family's shoes, jackets, bags, hats, etc. as they come in the door from outside.
Some homes will feature a mudroom inside the back door or as part of a large laundry room, and some will be just a space in the entry or foyer of a home.
Our mudroom is a pass-through nook between our entryway and downstairs half bathroom. It's not huge, which is why we needed to maximize our mudroom storage to be able to fit four peoples' stuff!
It's also worth noting that our house does NOT have a coat closet or in fact any sort of living room area closet at all. So, this is it for the space!
Our mudroom layout is custom to our home and the number of people in our family, but it is fairly standard for what most homes would look for.
How to build lockers for a mudroom
We're going to show you how to build a great set of lockers for a mudroom that will look great and provide your family with great storage! There are a lot of mudroom storage ideas and open lockers are a great way to have versatility.
You could also choose to build mudroom lockers with doors, but that adds an extra level of effort and craftsmanship you might not want to undertake.
Tools needed to build DIY mudroom lockers
- Table saw
- Miter saw
- Brad nailer
- Cordless drill
- Pocket hole jig
- Level
- Measuring tape
Materials needed to build DIY mudroom lockers
- ¾" plywood
- Butcher block (optional for bench, more on this later)
- Trim molding
- Pocket hole screws
- Brad nails
- Paint
- Coat hooks
- Storage baskets
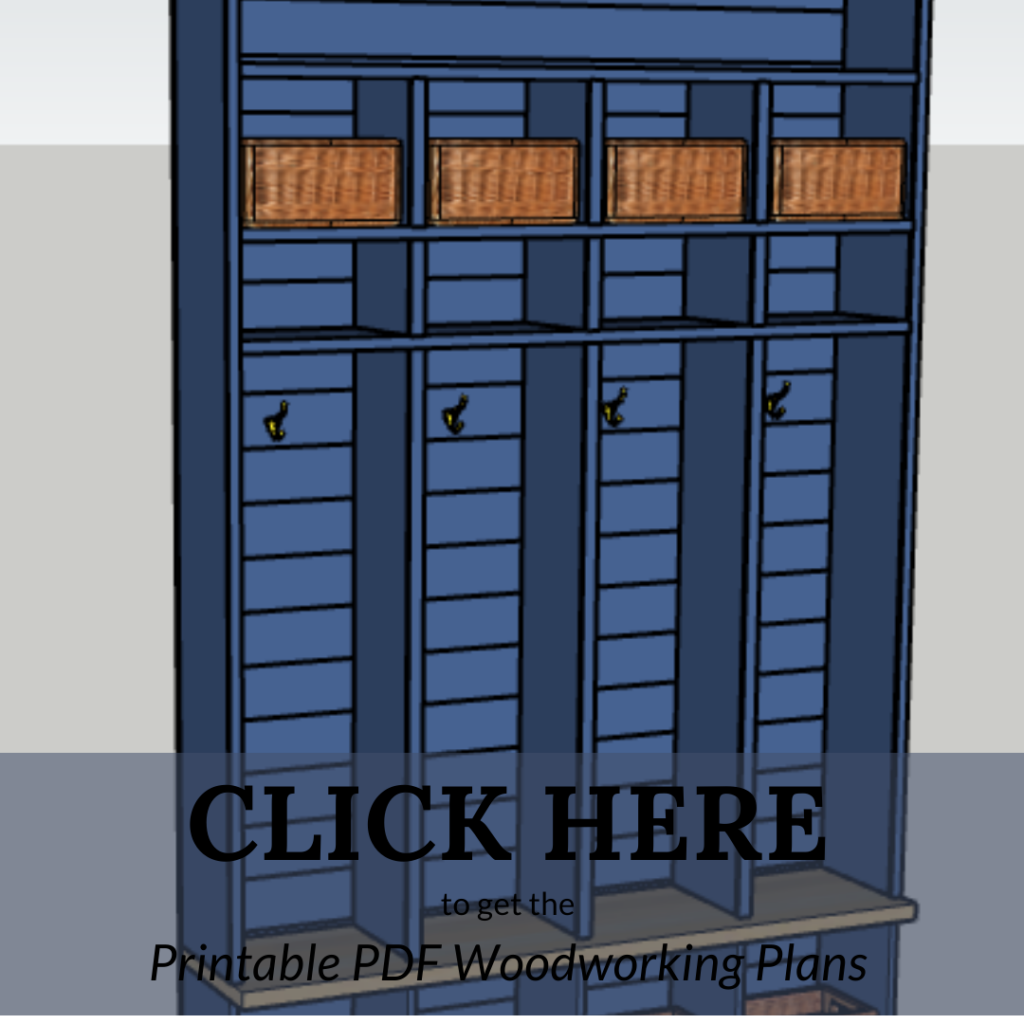
Before we show you how we built our mudroom lockers, we'd recommend grabbing the printable PDF plans. Our mudroom locker with bench plans will make it much easier to build the project for yourself!
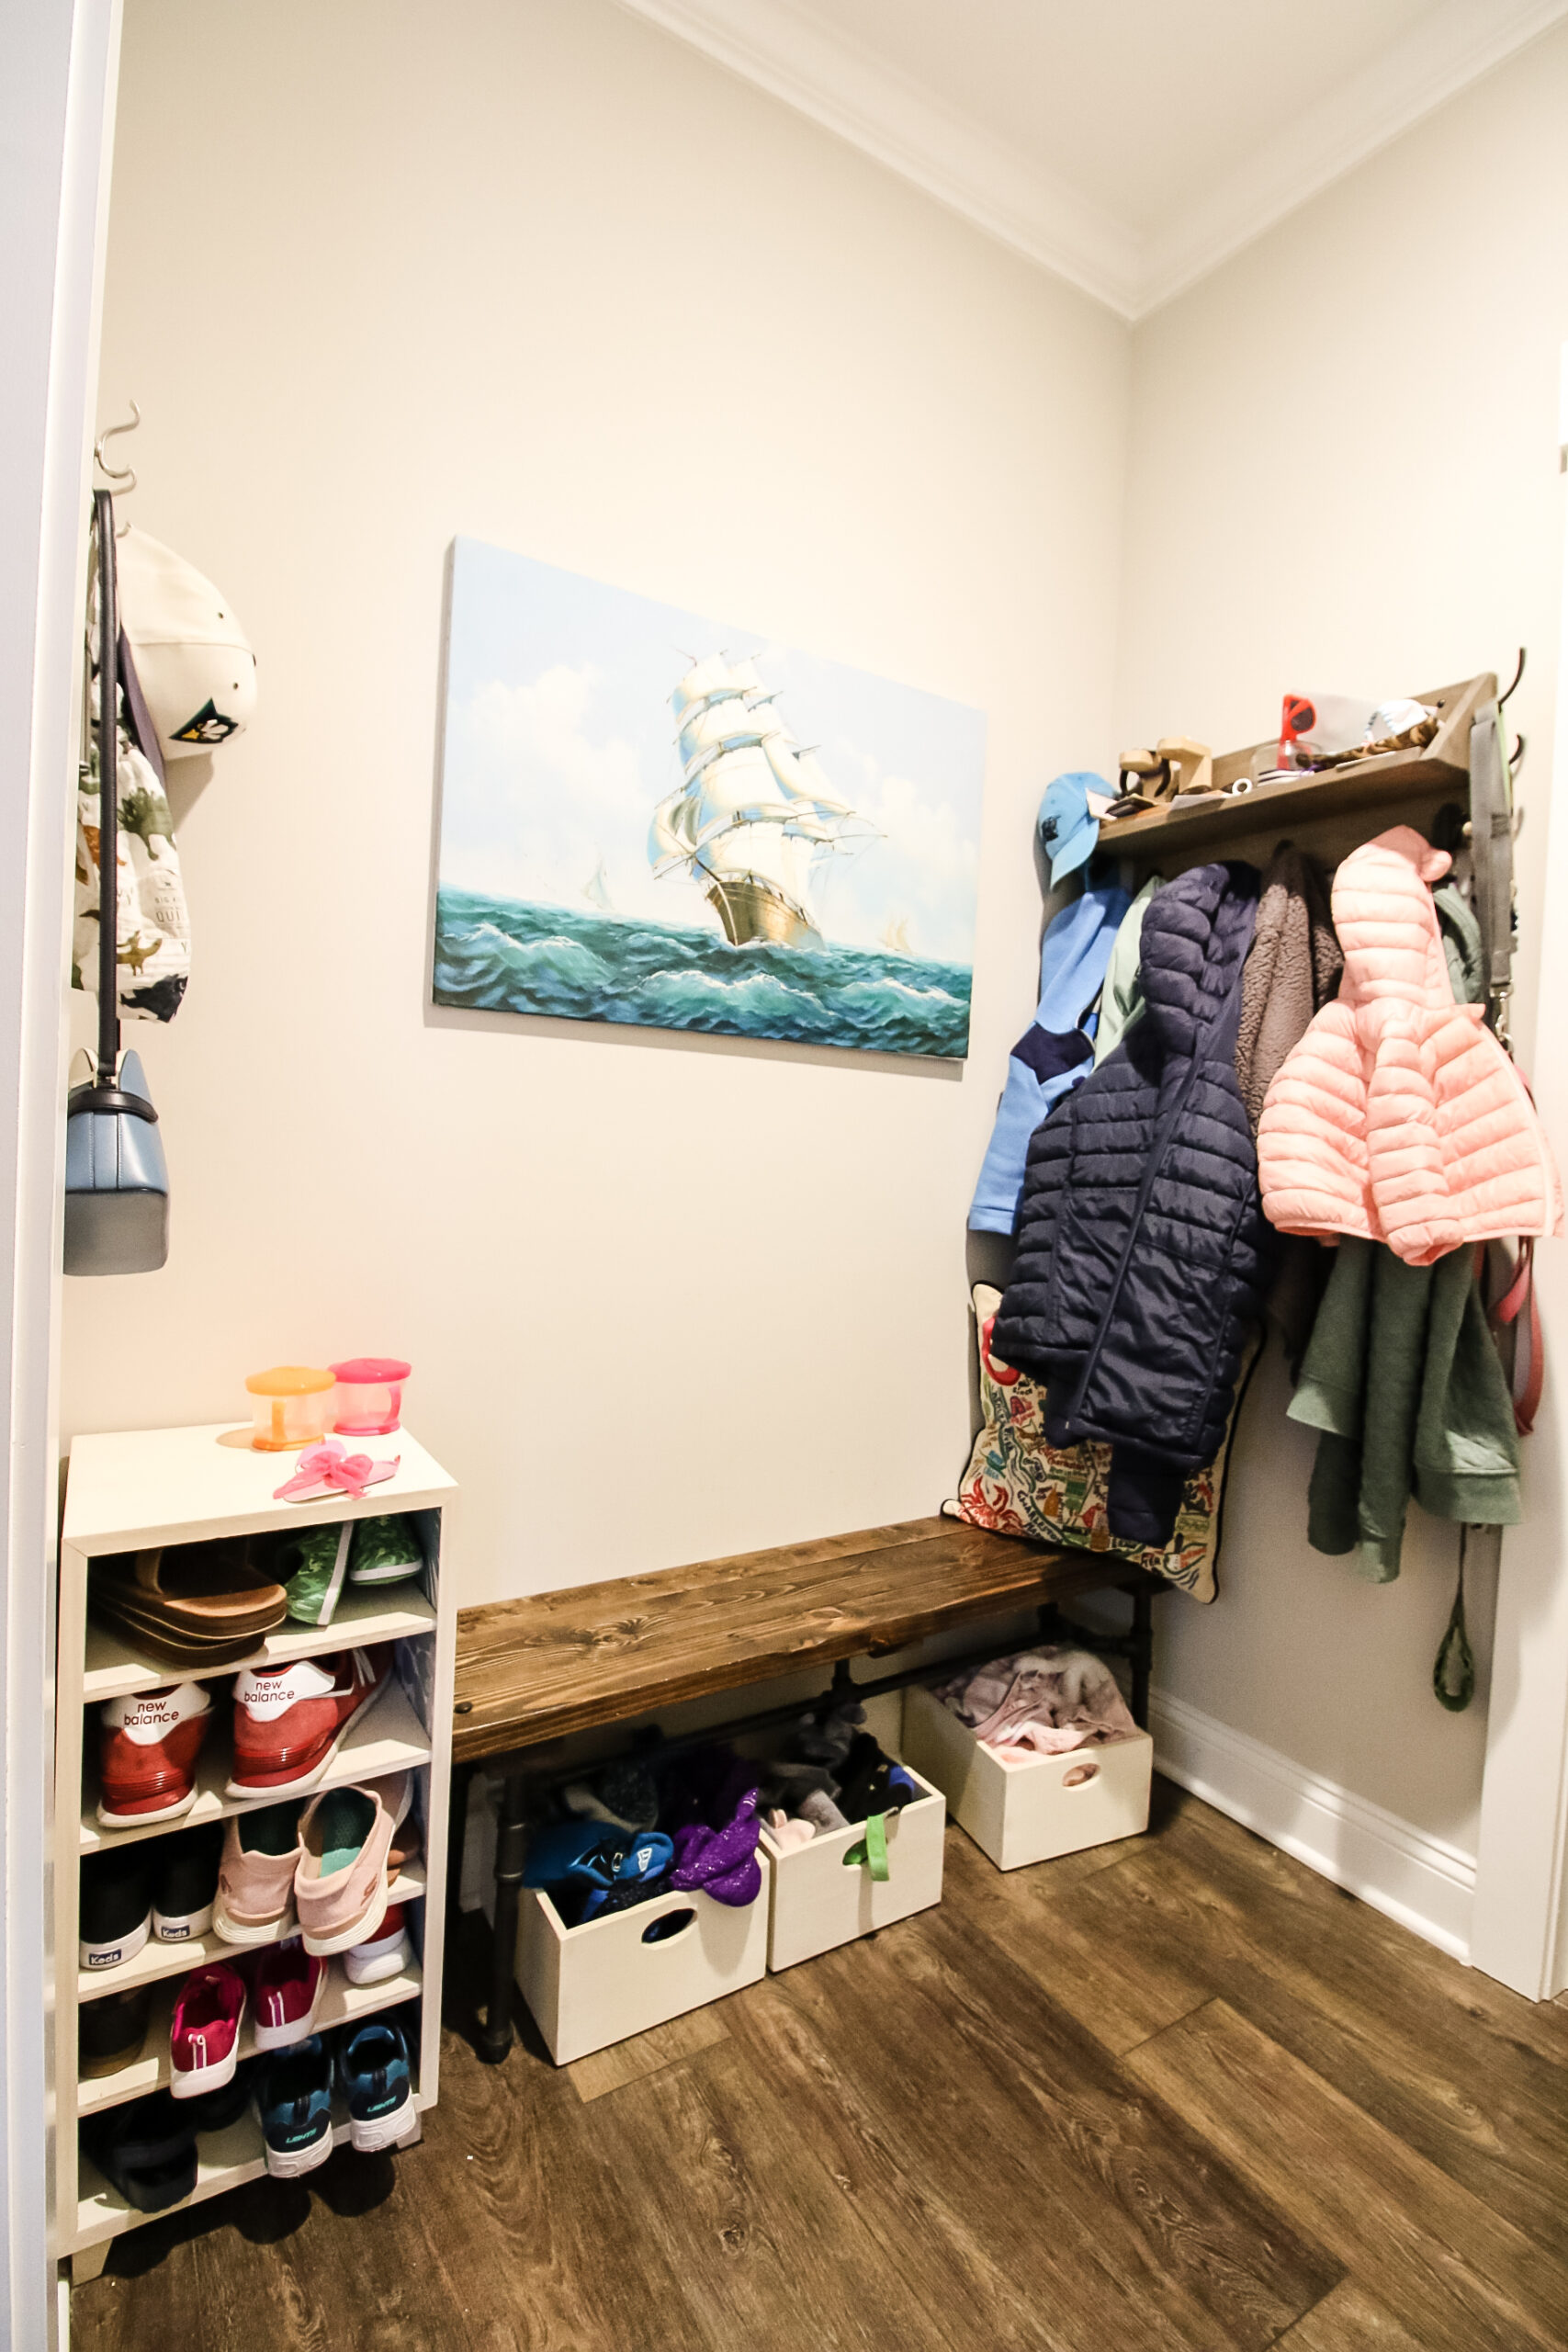
Also, here's a quick look at what we were working with before we started.
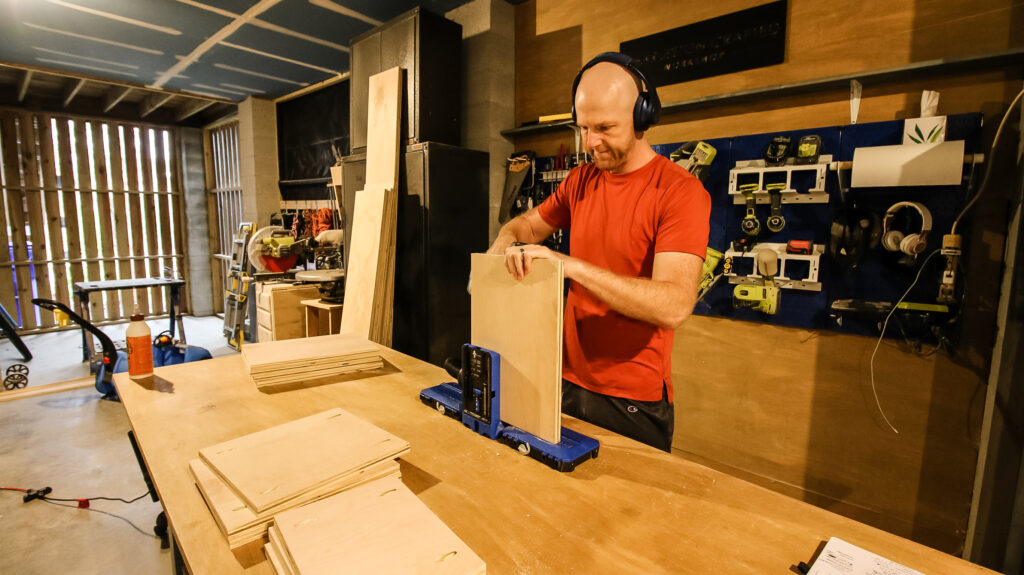
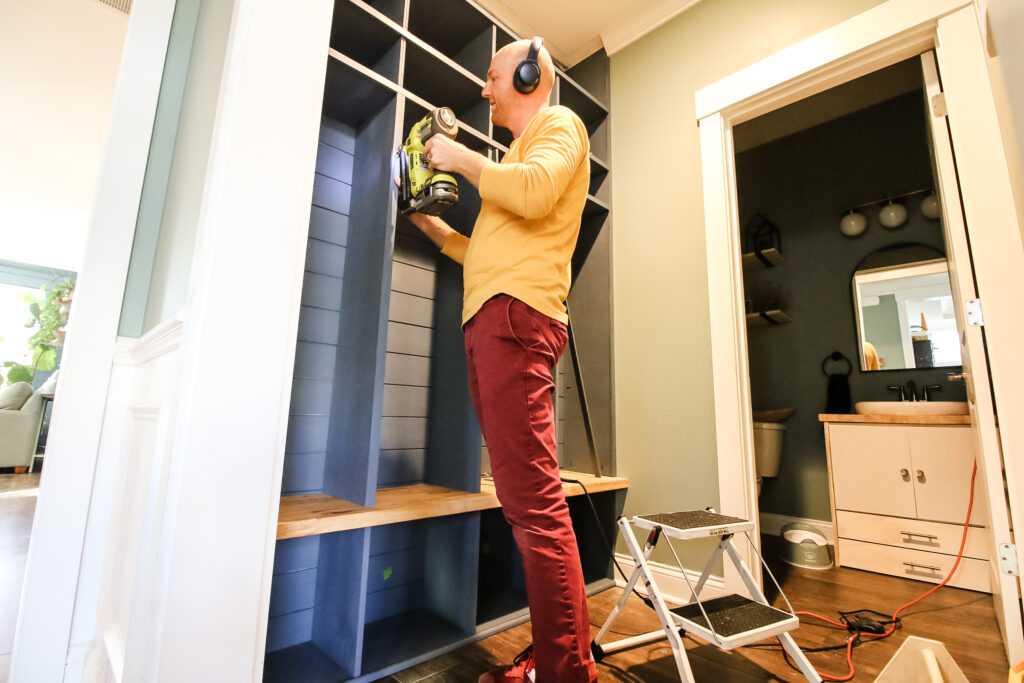
Step One: Make cuts and drill holes
The first thing to do to build mudroom lockers is to make all the cuts needed. It's always good to be able to make the cuts, drill pocket holes and sand everything smooth in bulk, that way the fun assembly can come later!
All of our cuts are in our woodworking plans to build these yourself, but our mudroom locker dimensions are 65" wide, 9' tall and 11 ¼" deep.
These dimensions will fit into a standard 9' ceiling home, but you can also eliminate the upper storage section if you want to make this a freestanding set of lockers and need them to be shorter.
After all the cuts, we drilled all the pocket holes we needed using our Kreg 720 Pro and 520 pocket hole jigs.
Time for the fun part- assembly!
Step Two: Assemble base and cubbies
With everything ready, we assembled what pieces we could.
This included the shoe storage cubbies for the bottom and the upper storage shelves.
When all these sections were assembled, we went ahead and painted all the pieces we had. This way, they could fully cure before we began install.
You could choose to paint everything in place once it's installed, but we wanted to paint things in the shop first and just do touchup paint later.
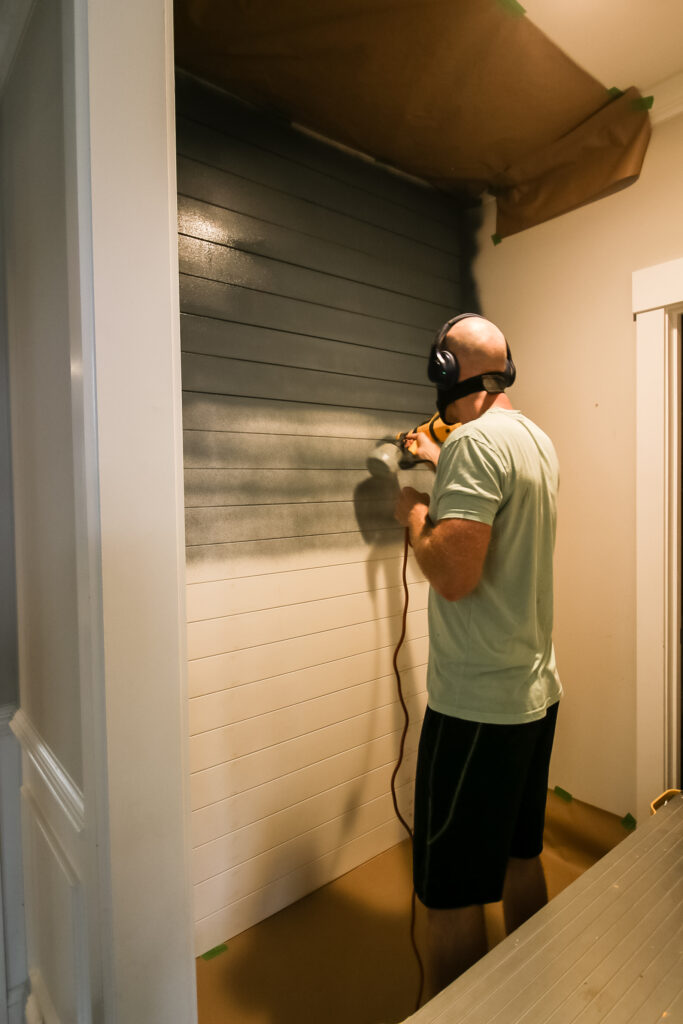
Step Three: Install Shiplap
We wanted to mimic the look of our shiplap fireplace accent wall with this project, so we added shiplap to the wall behind the lockers.
Click here to see how to paint shiplap!
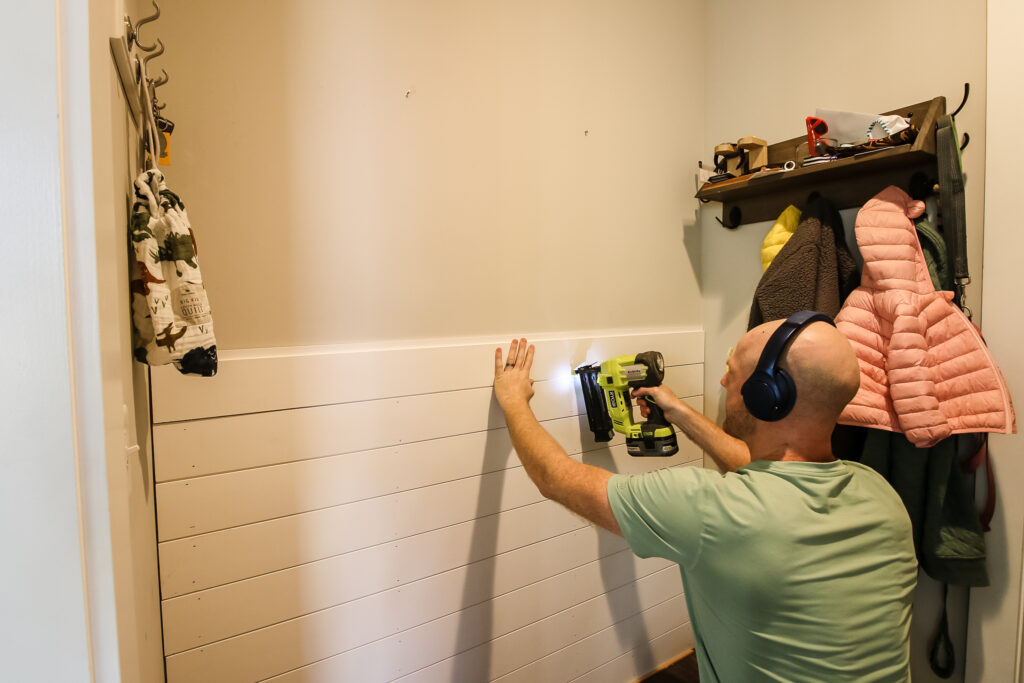
Before you can install shiplap, first remove all crown molding and baseboards that are in the space where your mudroom lockers will go.
We used the Dremel Multi-Max to cut ours to fit exactly where the lockers would fit in.
With the space clear, we cut pieces of shiplap to fit the 65" wide space and nailed them in place.
After filling endless nail holes, we painted all the panels with Behr's NYPD, the same as our fireplace.
Step Four: Install shoe cubbies
After the shiplap was all in place, it was time to start building the entryway lockers in place!
We started by installing the shoe cubbies. These fit flush on the floor and in the space between the wall and where we cut out the base board.
We divided our shoe cubbies into four sections so that each family member would have a spot for shoes. This design gets repeated all the way up!
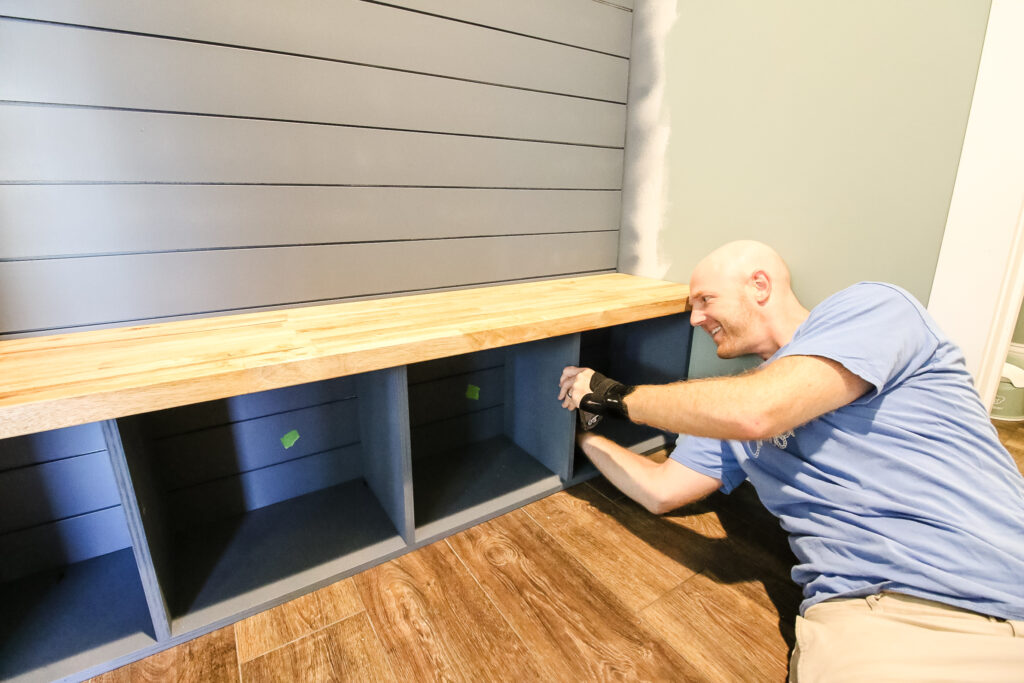
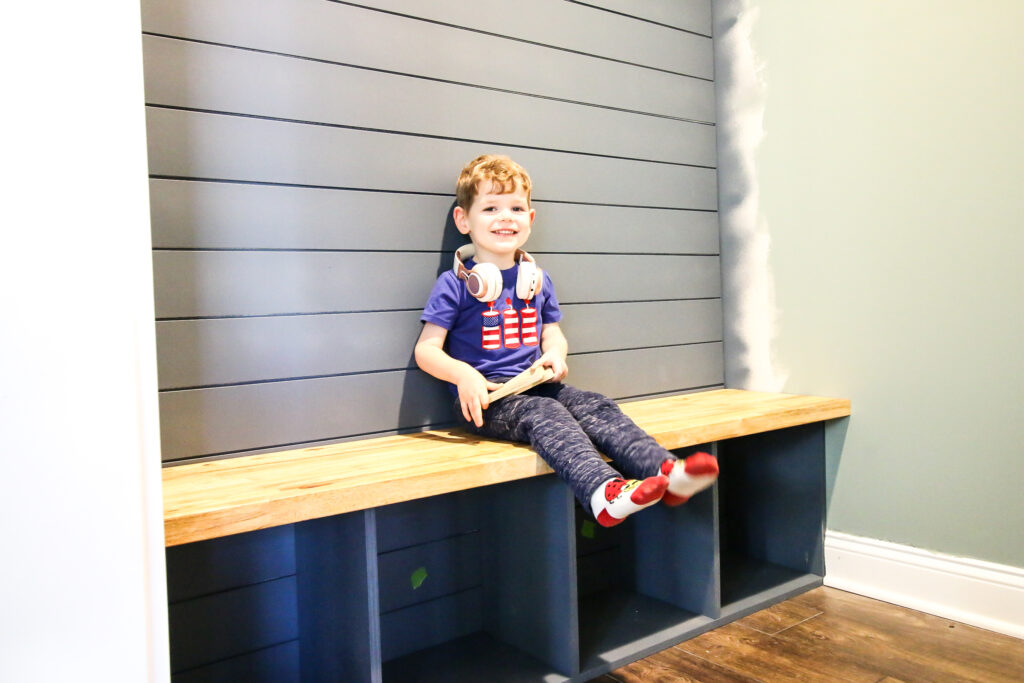
Step Five: Install mudroom bench
Next we installed our DIY mudroom bench. Let's dive back a bit to detail how we made our bench first.
To build a mudroom bench, you could simply use ¾" plywood. With enough support braces underneath, one piece would be fine, but doubling up to two pieces (therefore making the bench 1 ½" thick) would be the most secure.
We chose to use a slab of butcher block for our mudroom bench. We previously used butcher block in our pantry makeover and for our DIY pedestal sink vanity.
We got another slab of butcher block from Floor & Decor near us and cut it to fit the space. Our mudroom bench is about 3" deeper than the shoe cubbies underneath. This gives a little overhang and more space for our people to sit when putting on their shoes.
Your mudroom bench height should be about 18 inches to 20 inches. We made the top of our bench 18" so that our toddlers could just start to be able to climb up to sit.
When it was cut, sanded and oiled, we attached it to the mudroom shoe cubbies with pocket hole screws.
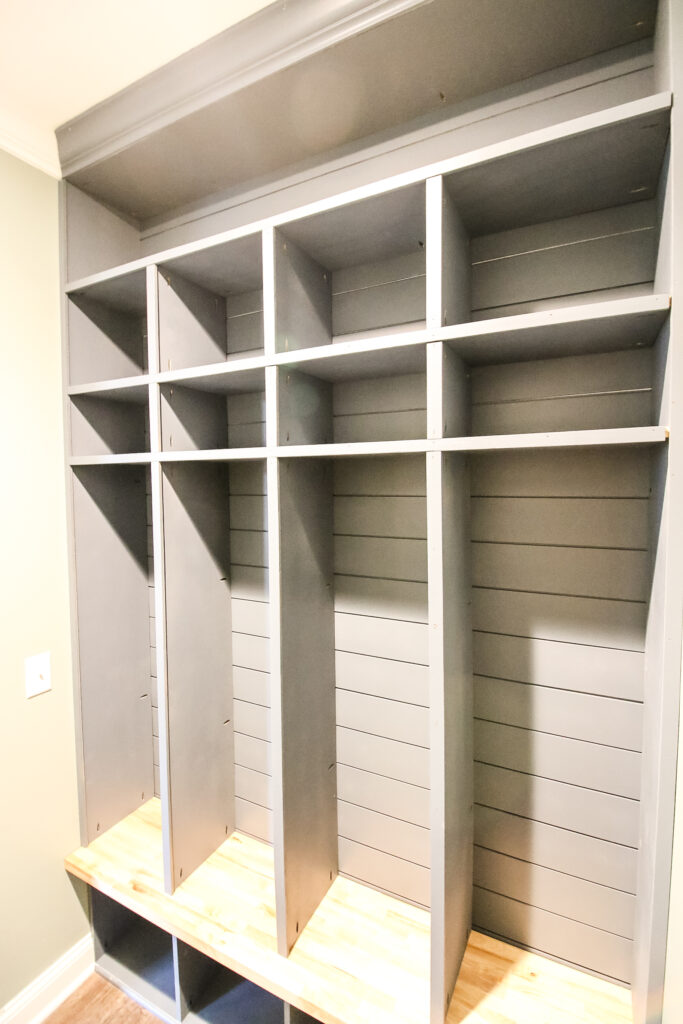
Step Six: Install mudroom locker dividers
Next we installed the locker dividers. For this, we put two boards on each side that went all the way from the bench to the ceiling.
Then, we slid in the dividers that we build earlier. This was the vertical boards that created four spaces and the shelf above.
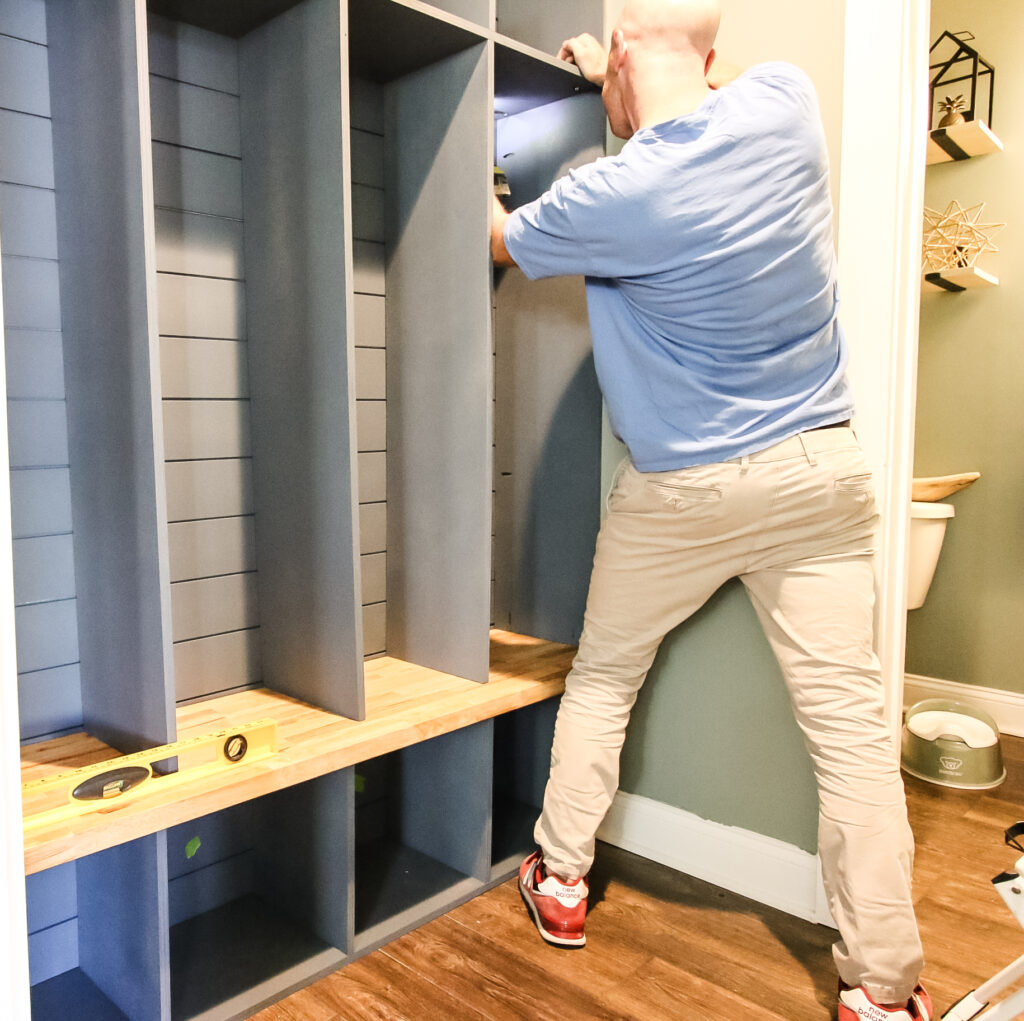
Step Seven: Add top shelves
After installing the lower dividers, we added the next two sets of dividers for upper storage solutions.
Step Eight: Add trim
The mudroom lockers are now in place! Woohoo! But don't stop now. Let's get this thing looking finished.
We added trim to the edges of all the plywood boards. We didn't like the exposed look of the plywood layers and wanted to make it look more chunky.
You could build a face frame that would fit perfectly, but that requires a lot of precision for a project like this.
We opted to just cut trim boards to size and then nail them into place to cover each of the edges.
When building these mudroom lockers as a built-in, you also have to reattach crown molding and base quarter round to finish it all off.
After the trim is added, make sure to fill all the nail holes and seams with wood filler, sand smooth, and touch up the paint.
Step Nine: Add hardware
Now the glam part- hardware! These mudroom lockers wouldn't be a very good drop zone if you couldn't hang anything up.
We turned to National Hardware to grab four of their modern double robe hooks in brass to really give this space some shine.
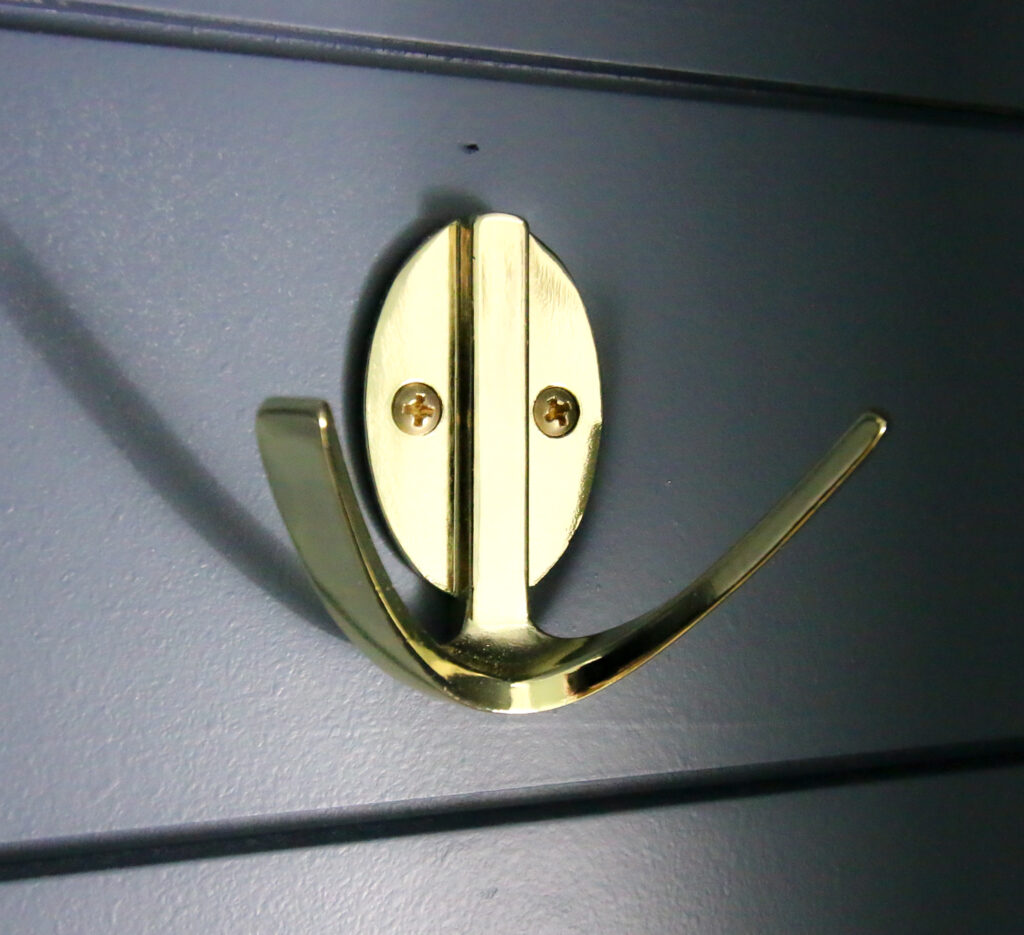
We used the black modern double robe hooks on the original entryway shelf with hooks we built when we first moved in and we loved them so much that we wanted to bring them back. A lot of the hardware and fixtures in our house have been gold and brass so far, so we wanted to carry that look.
The hooks are very easy to install. The most important thing when installing hardware in mud room lockers, especially when they are on display right when you're entering the house, is to make sure they are all lined up and symmetrical.
Add hooks high enough that no coats will be touching the bench, but not too high that you're hitting the underside of the upper shelf when you hand the hook.
National Hardware has tons and tons of hook options for hanging coats in your home and you can definitely find something in your color scheme!
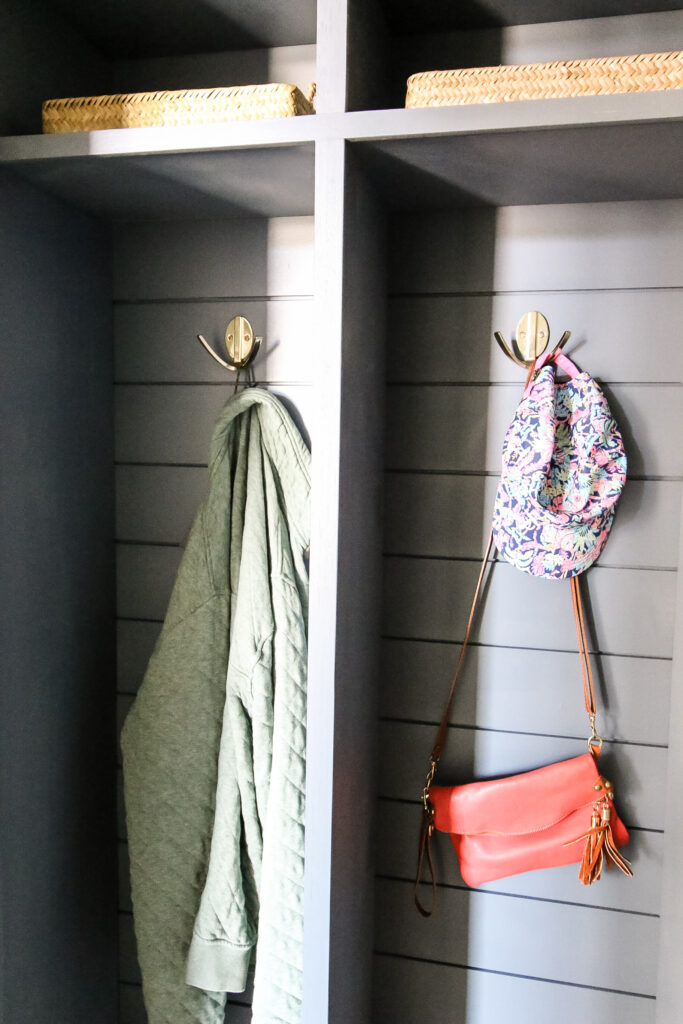
Step Ten: Enjoy organization!
With everything installed, it's time to style and enjoy!
There are so many storage options here and we used baskets to store shoes in the bottom and winter gear in the upper shelves. We'll probably swap that out for something else in the summer!
We also grabbed some trays for our keys and wallets and added some showy decor the top shelf.
And for now, we have coats and bags hanging on the coat rack, but in the summer, that will probably be hats and umbrellas!
DIY mudroom lockers with bench woodworking plans
If you love this look, make sure you grab the plans to build our DIY mudroom lockers!
We built ours in an enclosed specific space, so it's unlikely that your home will have that exact nook. However, you can build this mudroom design as a standalone hall tree that can be build against any wall in your home!
Our woodworking plans include the full material list, cut list, and step-by-step instructions for how to build a set of mudroom lockers for your home. Of course, you can customize any aspect you'd like!
Grab a set of our woodworking plans and get started today!
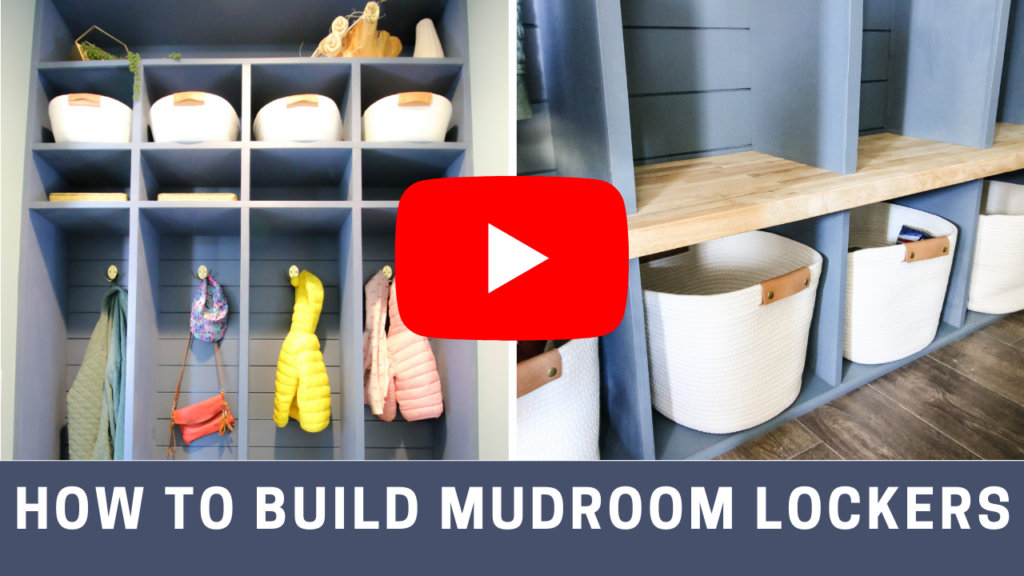
DIY mudroom locker video tutorial
Want a little more than the photos? We've got a full video tutorial on how we built these mudroom lockers for our home for you to enjoy! Click below to jump over to our YouTube video!
Basic woodworking information for every project
Here are some of our most popular woodworking articles!
Shopping for wood:
Woodworking project ideas
- 100+ of the best woodworking project ideas!
- 62 easy beginning woodworking projects
- Woodworking project ideas to make and sell
See all our printable PDF woodworking plans!
Our favorite tools + supplies
- See all our favorite tool reviews
- How to use a Kreg jig
- The ultimate wood stain guide
- The best wood fillers for your project
Remember to also always use safety equipment while woodworking and using tools. Make sure you have proper eye protection, ear protection and a good mask to keep yourself safe.

Looking for something?
We've been doing this since 2012 so we have a LOT of blog posts!
Search stuff like: Ceiling Projects | DIY Plant Stands | Thrift Flips

Hey there, I'm Sean, the woodworking enthusiast and builder behind CharlestonCrafted.com! Since 2012, I've been sharing the magic of turning raw materials into beautiful creations. I love teaching others the art and satisfaction of woodworking and DIY. I try to inspire fellow crafters to make something extraordinary out of nothing at all.


