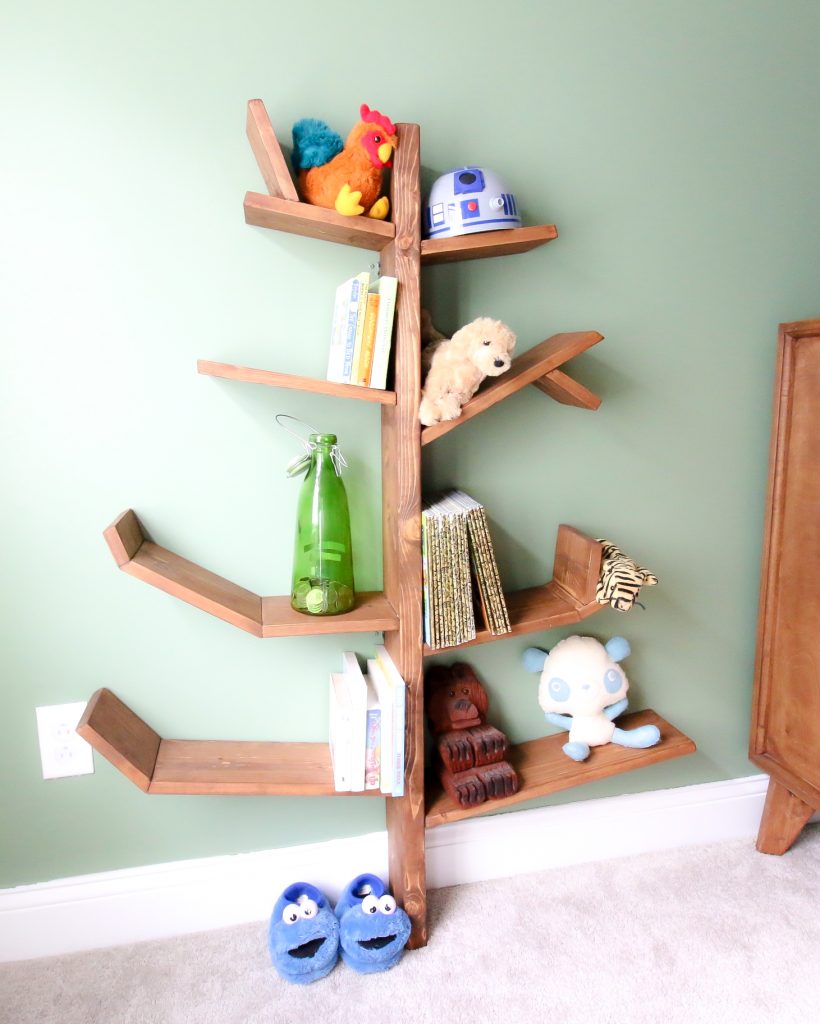
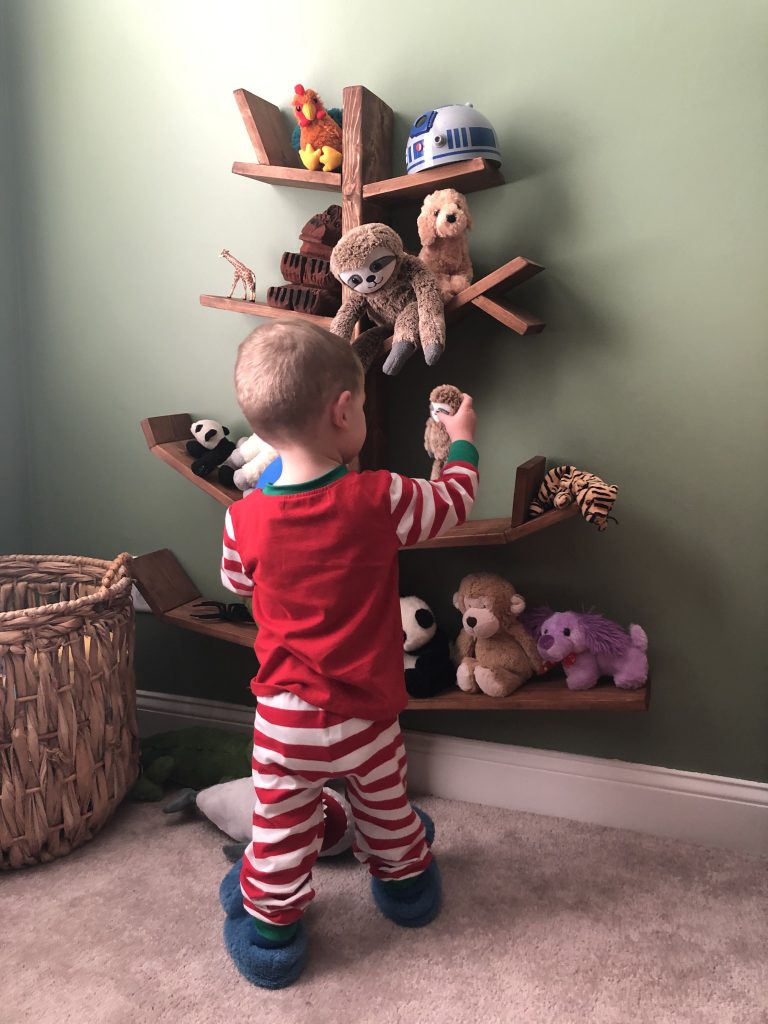
If you want to add a bookshelf shaped like a tree to your home, here is how to build it! We are giving our son a jungle themed bedroom makeover and decided to build him this DIY tree style bookshelf and toy shelf!
This post was sponsored by Kreg Tool, which offers tools perfect for DIYers trying to improve their homes. All opinions are our own and our opinion is that we love Kreg products. Thank you for supporting the brands that make Charleston Crafted possible!
We are excited to begin diving into Luke's bedroom makeover.
Remember his jungle themed nursery in our old home? When we asked him what he wanted in his new bedroom, he said "animals!" The kid has loved animals his whole life.
If you follow us on Instagram, you know that Morgan has been painting a jungle themed mural in his bedroom! I can't wait to share that project when it is done.
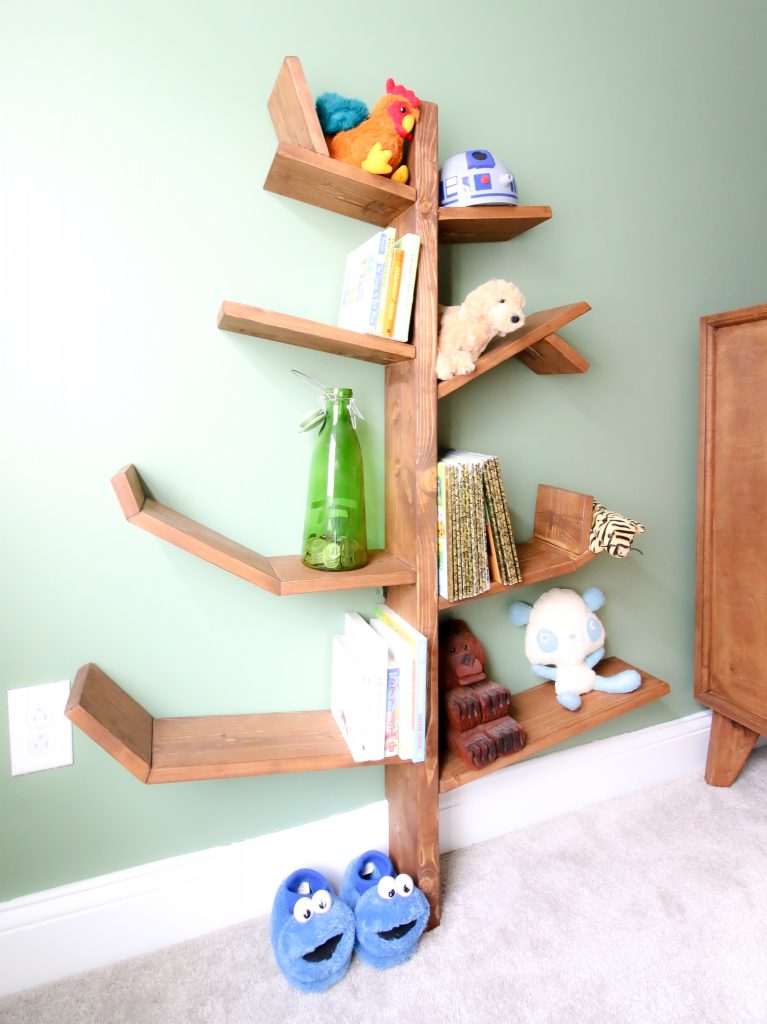
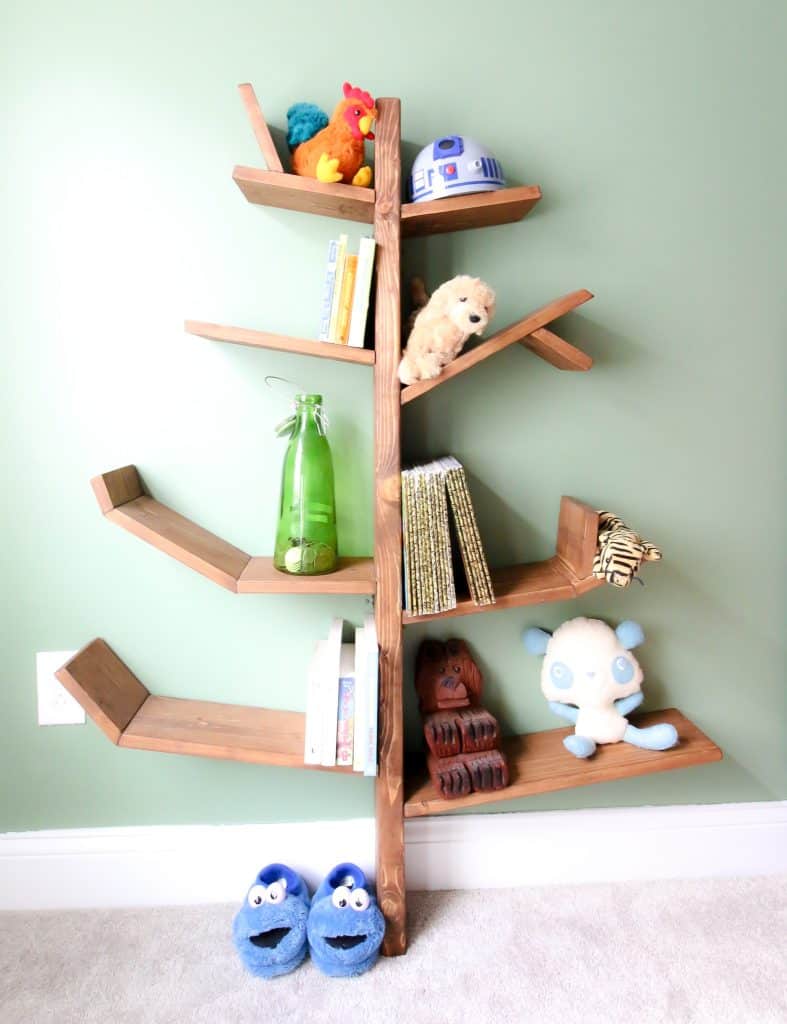
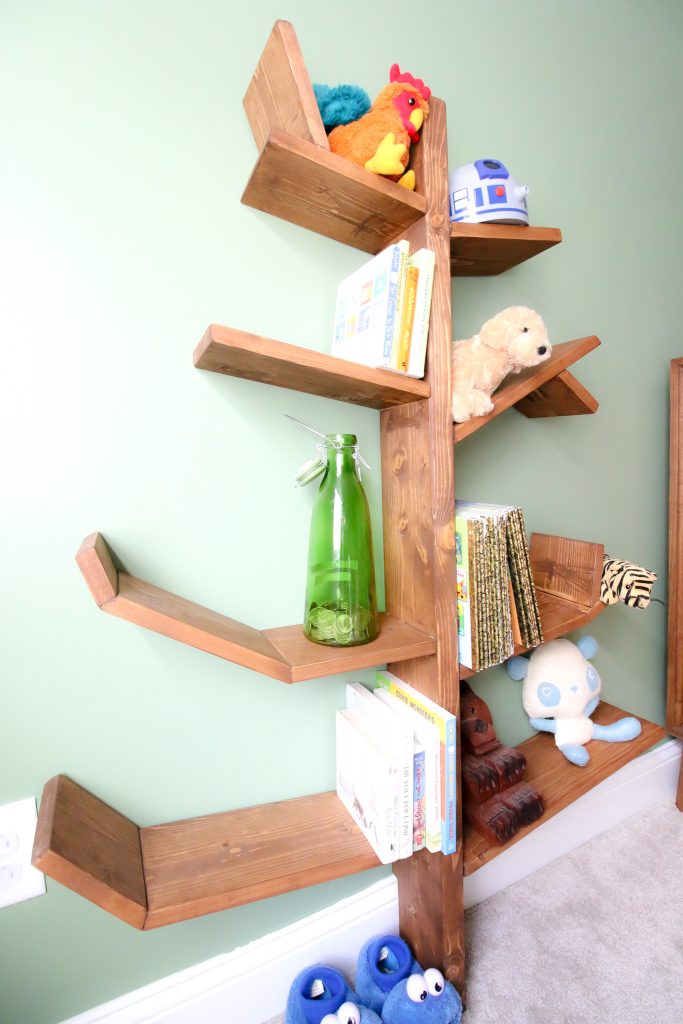
To play on this theme, we wanted to add a tree-shaped bookshelf to his room to hold stuffed animals and books!
DIY Tree Shaped Bookshelf
So, designing him a jungle room theme, we decided to build him a tree shaped bookshelf. He loves to read and has tons of books and we loved this idea.
This is a really fun and interesting way to showcase books and stuffed animals.
Interested in the Kreg Jig? Click here to read our full Kreg Jig review and to see all of our Kreg Jig projects.
New to the Kreg Jig? Here is a step by step guide on how to use a Kreg Jig!
OR grab our FREE Kreg Jig Cheat Sheet here! Download the cheat sheet!
Inspiration
This shelf was inspired by the Babyletto Spruce Tree bookcase.
However, we decided to mimic the feel of that bookshelf but not copy it exactly.
We decided to go for a more simplistic approach and built this shelf out of 1x6 and 2x6 lumber.
Thanks to our Kreg pocket hole jig, it was super easy to connect the branches and make them super strong.
If you need a bigger bookshelf, check out our storage bookcase with attached stuffed animal zoo!
Basic woodworking information for every project
Here are some of our most popular woodworking articles!
Shopping for wood:
Woodworking project ideas
- 100+ of the best woodworking project ideas!
- 62 easy beginning woodworking projects
- Woodworking project ideas to make and sell
See all our printable PDF woodworking plans!
Our favorite tools + supplies
- See all our favorite tool reviews
- How to use a Kreg jig
- The ultimate wood stain guide
- The best wood fillers for your project
Remember to also always use safety equipment while woodworking and using tools. Make sure you have proper eye protection, ear protection and a good mask to keep yourself safe.
How to build a DIY tree bookshelf
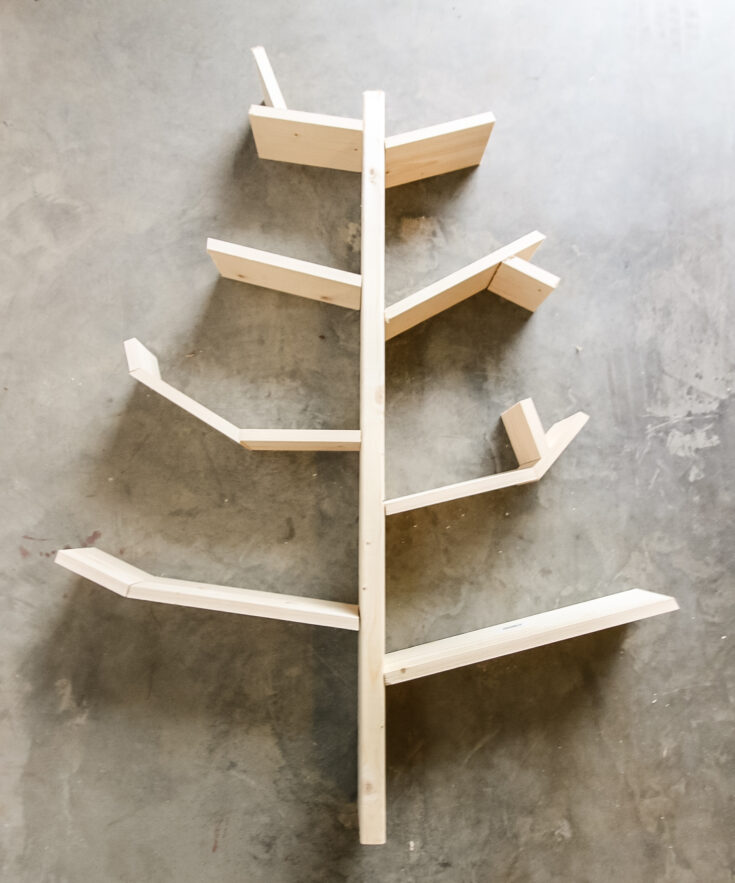
Building a DIY tree bookshelf is about making a custom look of a tree for your space.
You could build this bookshelf just using straight or singular branches off the trunk.
We opted to add interest by adding different angles and additional branches to really mimic the abnormalities of a tree.
Make sure you check out our dollhouse shaped bookshelf too!
Step one: cut trunk
We started by cutting the trunk to the height we wanted and notched the bottom to make room for the baseboard. That's a crucial thing not to forget!
The trunk can be any height you want to fit your child's space, just make sure you make it is a height your child can reach the top.
Step two: cut branches
Then, we cut branches at 10 degree and 30 degree angles so they would come off the trunk.
These can be done at any length overall and you can create any pattern you want.
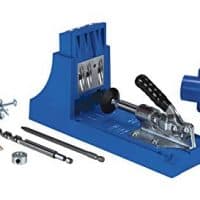
Step three: drill pocket holes
We added pocket holes with our Kreg jig on every branch where it connected to the trunk or another branch.
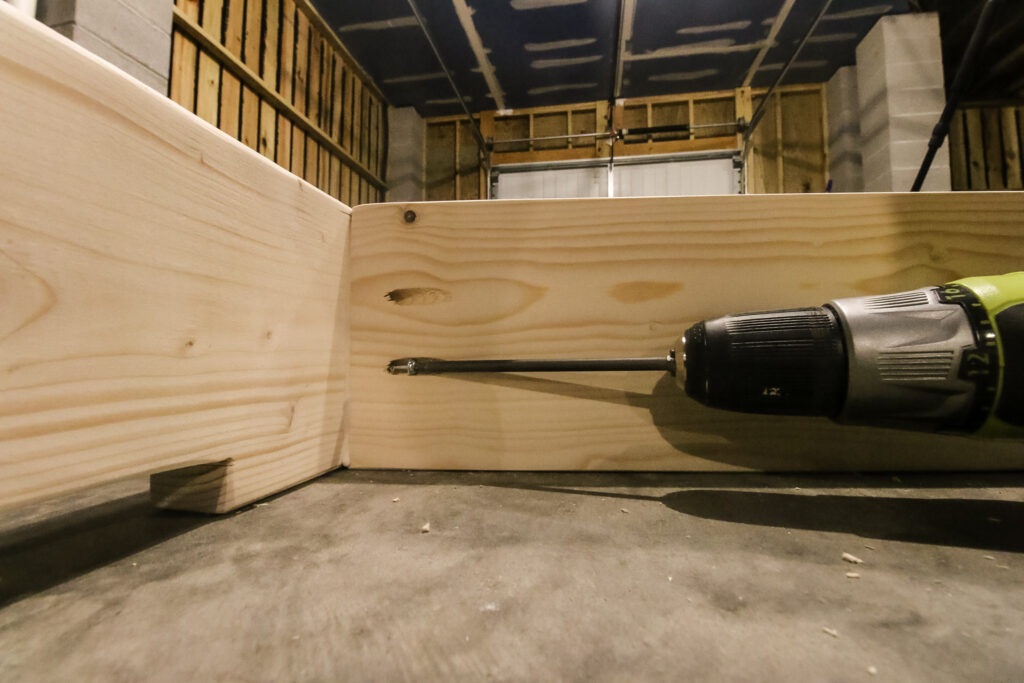
Step four: attach branches
When we had all the branches right where we wanted them, we attached using wood glue and Kreg pocket screws.

Step five: Finishing the shelf
The inspiration bookshelf is actually lacquered. To get that look you would want to paint your shelf with a high gloss paint or paint it and finish with a glossy top coat.
We decided that we wanted a more natural look. So, we stained the tree Early American to match the crib we built for him that are next to each other.
This ties really nicely with the stain on Luke's crib (another great DIY build!) and the brown in the mural.
Step six: mounting the shelf to the wall
To mount the bookshelf to the wall, we used simple corner brackets and drywall anchors. We also painted them to blend with the wood and wall.
We put two brackets on each side of the trunk to stabilize it to the wall. This is important, because this can look like a tempting ladder to a toddler.
We didn't do anything to support the branches other than the wood glue and pocket hole joints. We aren't going to put that much weight on them and they are very solid.
Plans to build this tree bookshelf
You can get the plans to build this bookshelf for free thanks to Kreg Tool. The full cut list and step-by-step instructions are available there.
We have dozens of plans for free on their site to check out!
For an overview, check out our how-to card here.
How to build a DIY tree bookshelf
Here's how to build a super cute DIY bookshelf shaped like a tree! This bookshelf is great for toddlers and kids who love nature. Add books and decor items to the branches and let you child explore all day!
Materials
- - (1) 6' 2x6 board
- - (2) 8' 1x6 boards
- - 1 ¼" pocket screws
- - 4 corner brackets
- - wood glue
- - stain or paint
Tools
- - Kreg K4 pocket hole jig
- - Miter saw
- - Drill
- - Sander
Instructions
- Cut the trunk board.
- Cut branch boards at angles.
- Drill pocket holes in branch boards.
- Attach branches to trunk with wood glue and pocket screws.
- Stain/paint
- Attach to wall.
- Decorate.
Recommended Products
As an Amazon Associate and member of other affiliate programs, I earn from qualifying purchases.

Other bookshelf ideas
Looking for other bookshelf ideas? Here are some tutorials that we have shared:

Looking for something?
We've been doing this since 2012 so we have a LOT of blog posts!
Search stuff like: Ceiling Projects | DIY Plant Stands | Thrift Flips

Hey there, I'm Sean, the woodworking enthusiast and builder behind CharlestonCrafted.com! Since 2012, I've been sharing the magic of turning raw materials into beautiful creations. I love teaching others the art and satisfaction of woodworking and DIY. I try to inspire fellow crafters to make something extraordinary out of nothing at all.

[…] you can build a tree bookshelf for any youngsters room or playroom using the free woodworking plans available at the link. Build it […]