Check out how we built this DIY angled 3 tiered plant stand with space for three potted plants! Makes for a great gift or tabletop decoration!
We love plant stands around here. They are basically a necessity because new plants seem to be popping up all the time through purchase, scavenging the neighborhood swap group, or propagating.
We always have plants of different sizes and shapes around and most of the ones we propagate in our DIY wall-mounted propagation station start off in pretty small pots.
Plants in small pots are great, but they take up a lot of room on a shelf and leave a lot of vertical empty space above them.
So, we wanted to create a tiered plant stand that would go vertical while also allowing each of the pots to get the proper sun and water that they need, which they can't do if they are stacked directly on top of each other.
That in mind, we developed this DIY angled 3 tiered plant stand that would solve those issues!
This is an easy DIY project that can be modified for the pieces of wood you have on hand and can be made for indoor plants or outdoor plants, depending on what you want to use it for!
One of our most popular projects is this DIY angled tabletop plant stand!

Tiered plant stand on an angle
This DIY tiered plant stand is a great project to make for whatever purposes you need it for. It's a great scrap wood plant stand because all of the boards are pretty short and are a great way to use up some pieces of wood.
We recently finished enclosing our garage and had 156 boards that were all about 18" long left over. We've been trying to come up with good ways to use them and this DIY plant stand idea was one of our first!
If you've got a growing plant collection at home, let's show you how to build one of these angled plant stands!
Check out more DIY tiered plant stand ideas here!
How to build a tiered plant stand
The below steps will show you how to build a tiered angled plant stand, but are mostly an overview. You can get the full specific details in our FREE downloadable woodworking plans that will give you the detailed material list, cut list and step-by-step instructions!
Need something that's bigger and rolls? Check out our DIY rolling tiered plant stand!
Materials needed:
- ¾" thick wood (treated if using outdoors, untreated if using indoors)
- 1 ¼" pocket hole screws
- Wood glue
- Saw, sander and drill
- Pocket hole jig
Basic woodworking information for every project
Here are some of our most popular woodworking articles!
Shopping for wood:
Woodworking project ideas
- 100+ of the best woodworking project ideas!
- 62 easy beginning woodworking projects
- Woodworking project ideas to make and sell
See all our printable PDF woodworking plans!
Our favorite tools + supplies
- See all our favorite tool reviews
- How to use a Kreg jig
- The ultimate wood stain guide
- The best wood fillers for your project
Remember to also always use safety equipment while woodworking and using tools. Make sure you have proper eye protection, ear protection and a good mask to keep yourself safe.
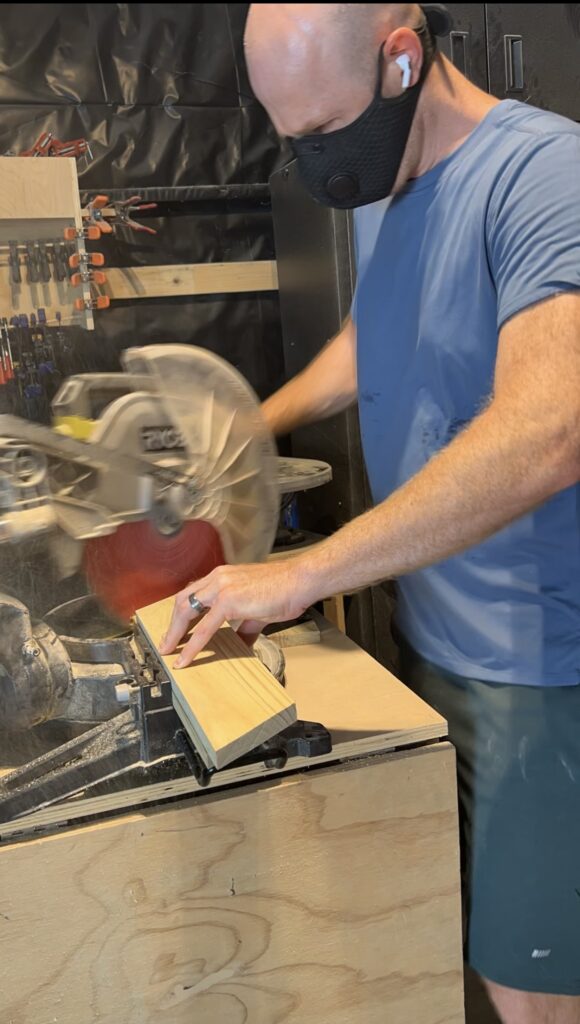
Step one: Prep work
The first part of any project is always the most boring and that's all the cutting, sanding and drilling of holes.
Start by making all the cuts for this wooden plant stand in the cut list of our free woodworking plans and then drill pocket holes into the right places.
We are combining two boards to make a wider base for plant pots, so drill holes to put them together.
After all the pocket holes are drilled, sand everything smooth and we get to move to the fun part!
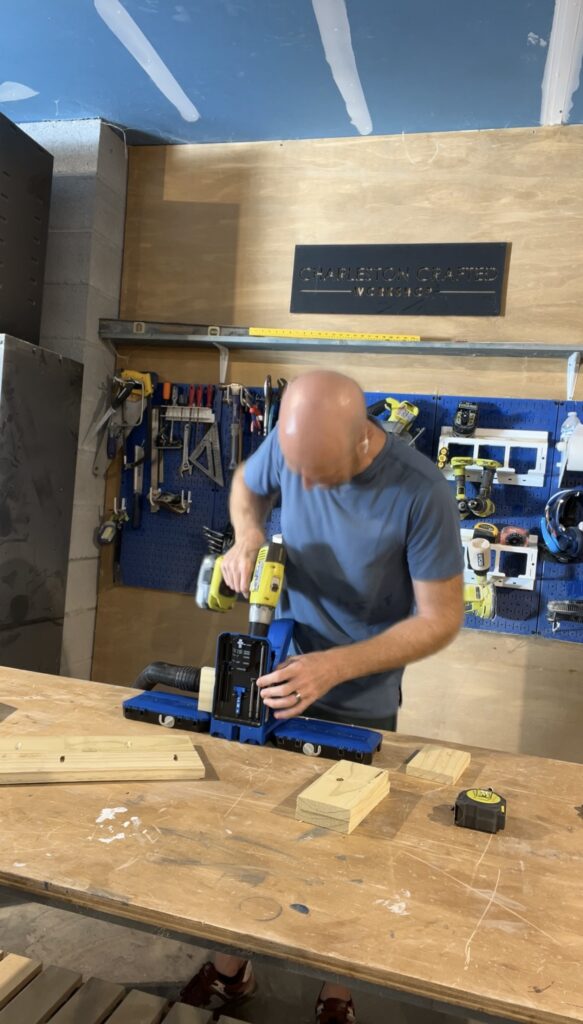
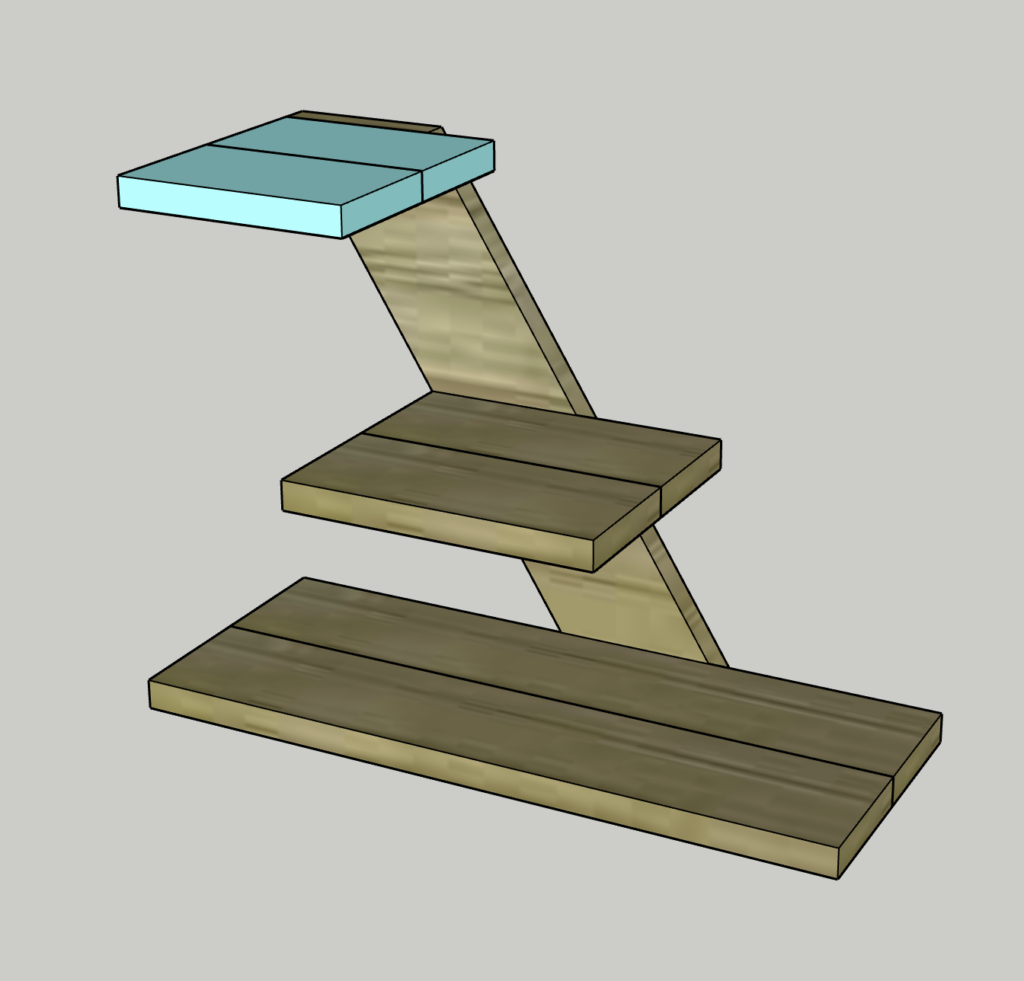
Step two: Create bases
Now we are going to create the three bases for the tiers. Each tier is shorter than the one below it and angled back thanks to the sides.
Using wood glue and screws, we attach two pieces of wood together with pocket hole screws and make sure they are all lined up.
Repeat for the other two bases and get ready to put them together.
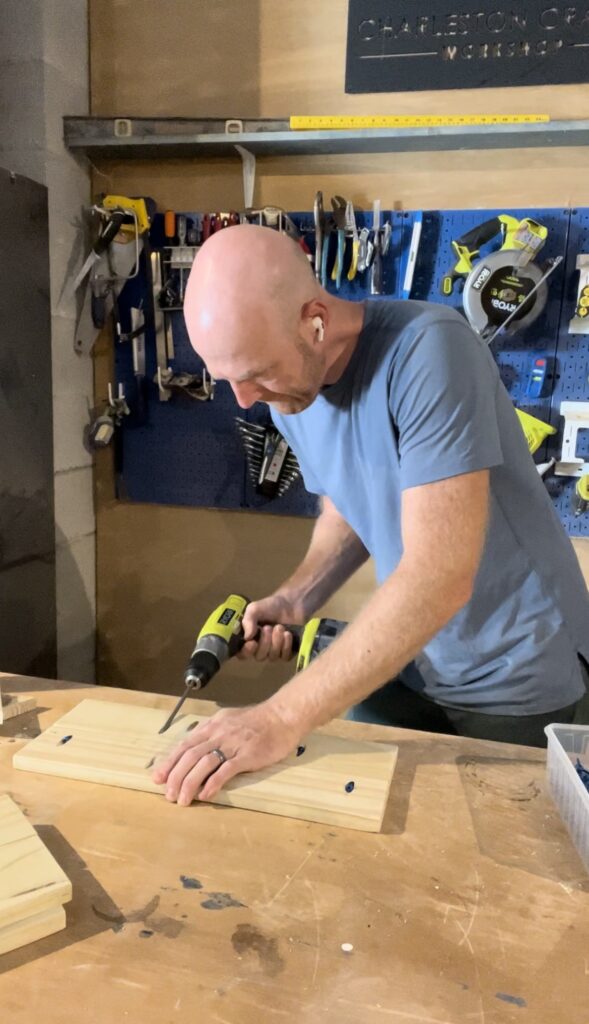
Step three: Attach first angled side
Now, measure out on the bottom base where the angled sides need to go and drill pocket holes on the outside edges of the bottom base to align with where the sides will go. Do that on both sides now so it's easier later.
Now, I have to be honest- I totally forgot to take pictures here. So, I'll include a screenshot of my free woodworking plans to show you how it is done.
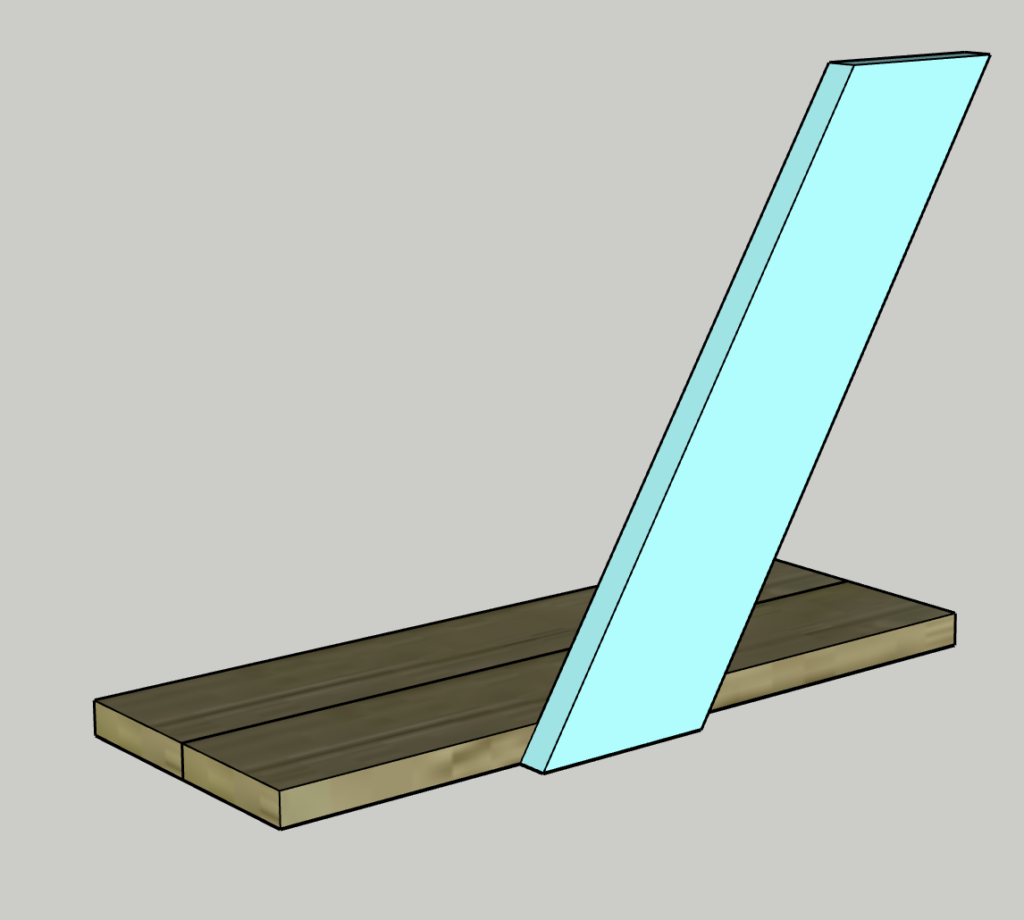
Next, attach the first side to the bottom base using wood glue and screws.
Then you can repeat with the other two bases and connect all three bases to the first side.
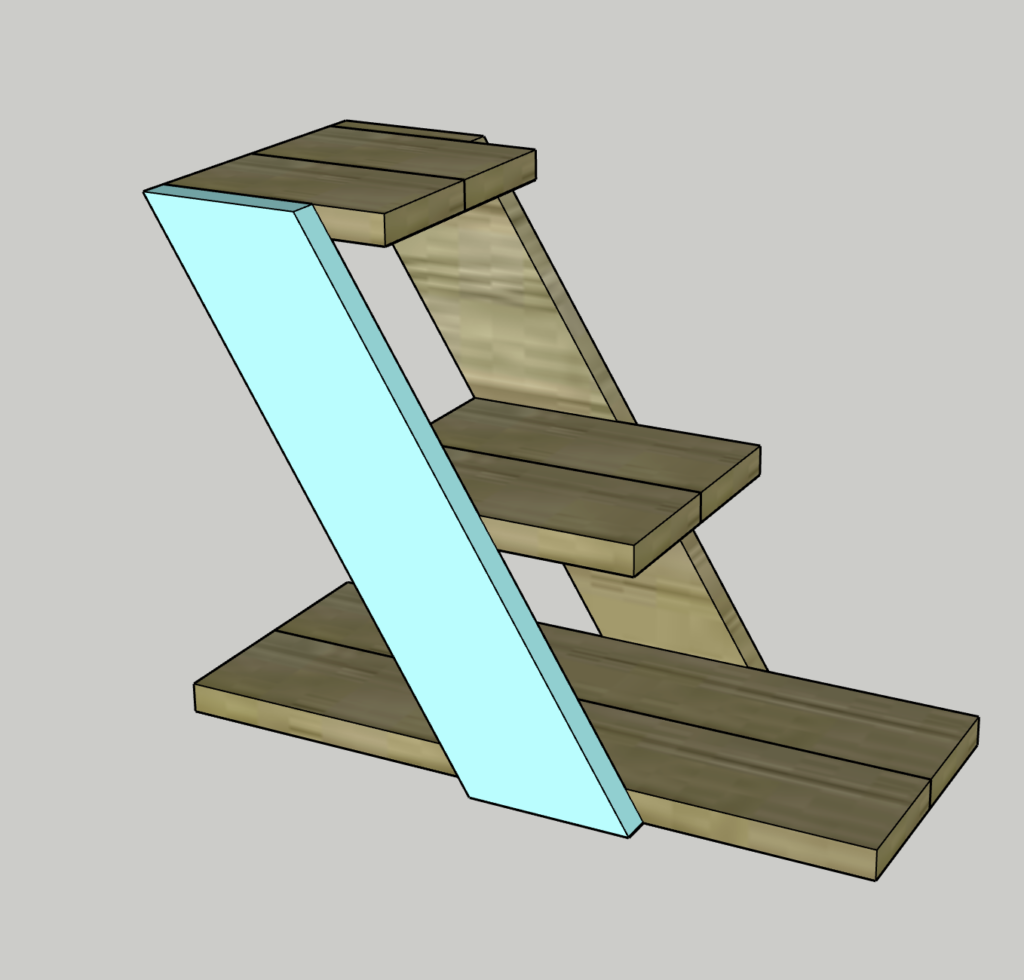
Step four: Attach second angled side
Attaching the second side is easier than the first because you have holes drilled already and can just attach the second side all the way up.
You might have a little bit of trouble getting pocket holes in at these angles because of the opposing side, and we actually used our Kreg 90 degree driver to get in that weird angle and drill them in. It works perfectly!
Again, forgot the photo, so here's a look at the plans image.
Once it's assembled, you can stain or paint it here. If you're using it inside, you can do whatever you want. If you want better outdoor protection, use an outdoor stain!
You could even put this on one of the shelves of our 3-tiered corner plant stand!
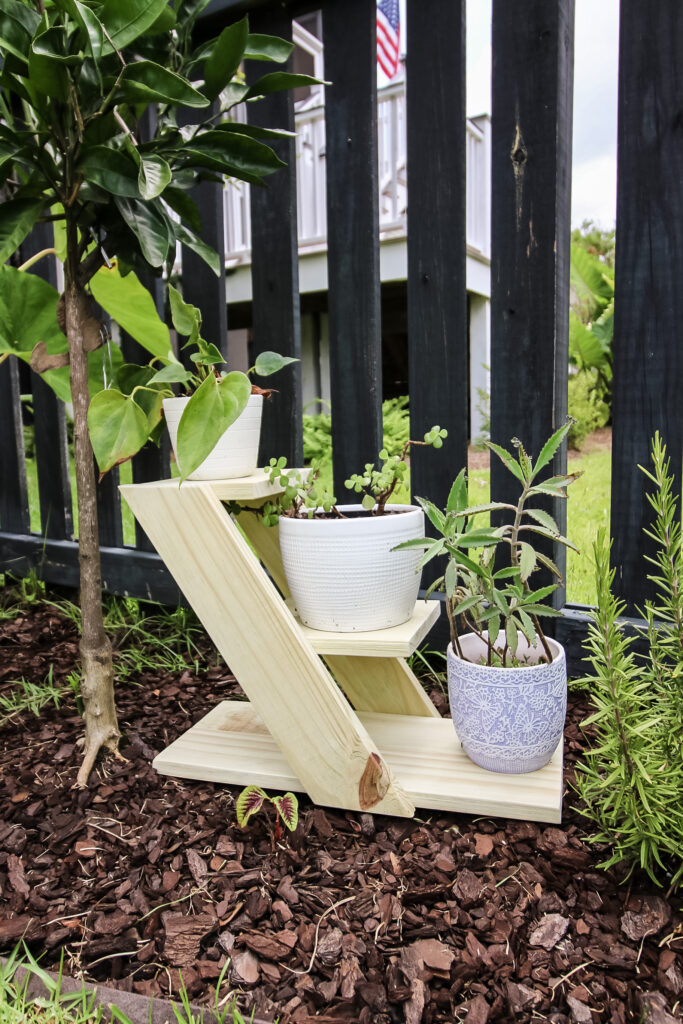
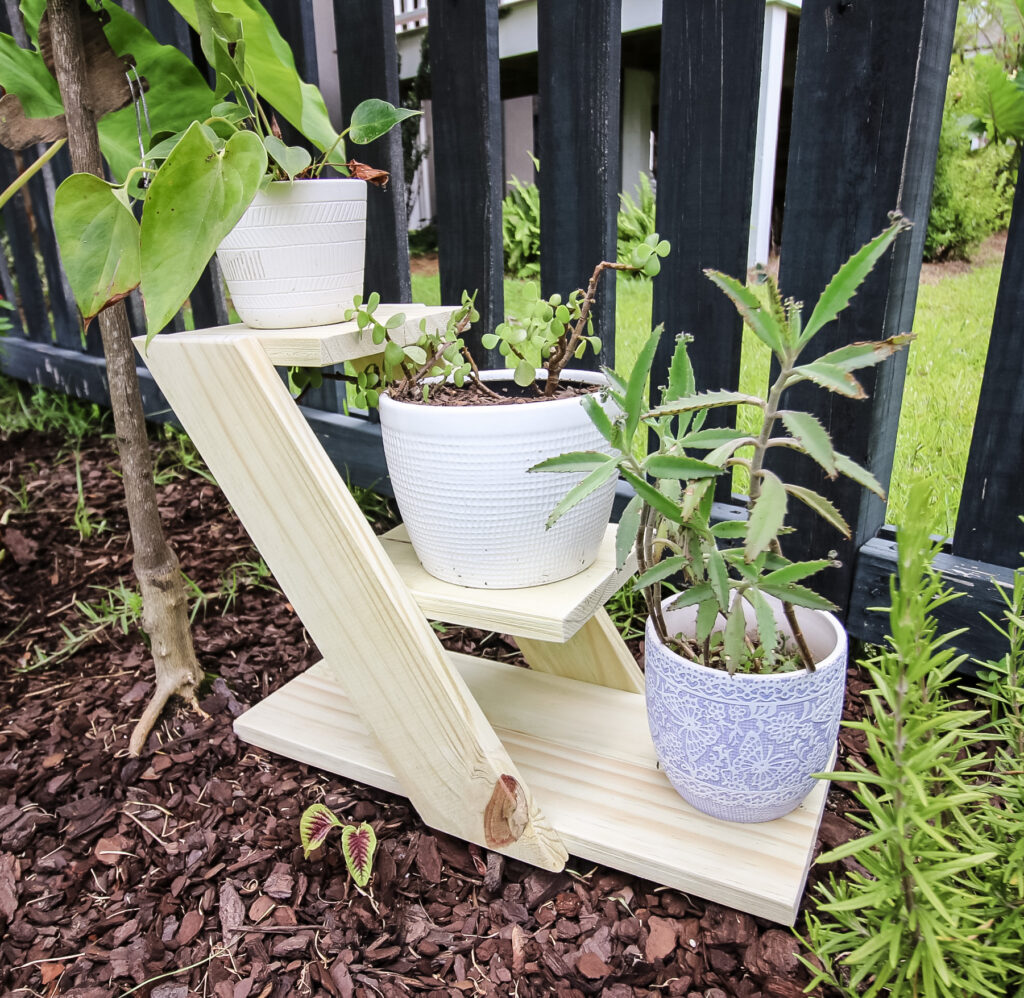
Completed angled plant stand
We love the way this tiered angled plant stand turned out! It is cute and a great used of scrap wood!
The tiered design of our modern plant stand is great for different height potted plants to thrive at once.
This works great on a table, on a mantel or even in the garden!
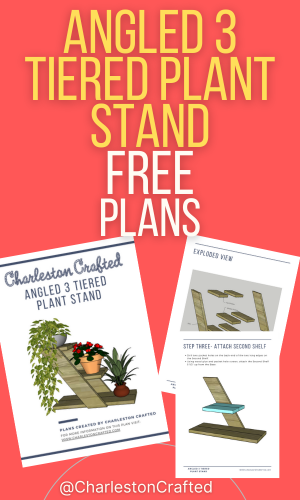
Angled 3 tiered plant stand woodworking plans
If you love this little plant stand, you're in luck, because we've got free woodworking plans for you!
Our woodworking plans come with the full material list, cut list and step-by-step instructions with computer model imagery to help you make one for yourself!
Download the free plans today and make this plant stand as a gift or for your home!

Looking for something?
We've been doing this since 2012 so we have a LOT of blog posts!
Search stuff like: Ceiling Projects | DIY Plant Stands | Thrift Flips

Hey there, I'm Sean, the woodworking enthusiast and builder behind CharlestonCrafted.com! Since 2012, I've been sharing the magic of turning raw materials into beautiful creations. I love teaching others the art and satisfaction of woodworking and DIY. I try to inspire fellow crafters to make something extraordinary out of nothing at all.


