Check out how you can build these large wooden snowflakes that can be used as wall art during the holidays! This DIY project and woodworking plan is easy and can be repeated over and over!
This post is sponsored by Kreg Tool, makers of our favorite pocket hole joinery. All opinions are our own. Thank you for supporting the brands that make Charleston Crafted possible!
It's full on holiday decorating time and we wanted to create a new large piece of holiday decor that we could display in the house.
There isn't ever snow in Charleston, however snow is one of the most recurring symbols of winter. So, we wanted to bring the snowflakes to ourselves by creating some DIY wooden snowflakes that are perfect for hanging on the wall or displaying on a mantel!
Wooden snowflakes are super easy to make and can be customized in lots of different ways (after all, no two snowflakes are the same) but we made these easy to replicate and copy.
We were inspired by this driftwood snowflake from Pottery Barn, but knew there was no way we were paying $200! This is an easy DIY project that you can customize with your own design and size if you want!
These DIY wooden snowflakes are the perfect wall decor for the holidays and we have a full tutorial and FREE woodworking plans for you to make your own right here in this post!
After you hang these, hang a DIY Christmas hanging basket too!

How to make a wooden snowflake
This post is going to show you how you can make some DIY wooden snowflakes for your own home this season.
This is a great scrap wood project, as the longest piece is just 24". Most everything is short, so it's a great way to clean the shop before the holidays!
If you need a better way to store scrap wood, build our rolling scrap wood storage cart!
Check out how we built these snowflakes with a saw, Kreg pocket hole jig and a drill and then get the free plans below!
DIY snowflake tutorial
Here's how to make DIY wooden snowflake wall art for your home!
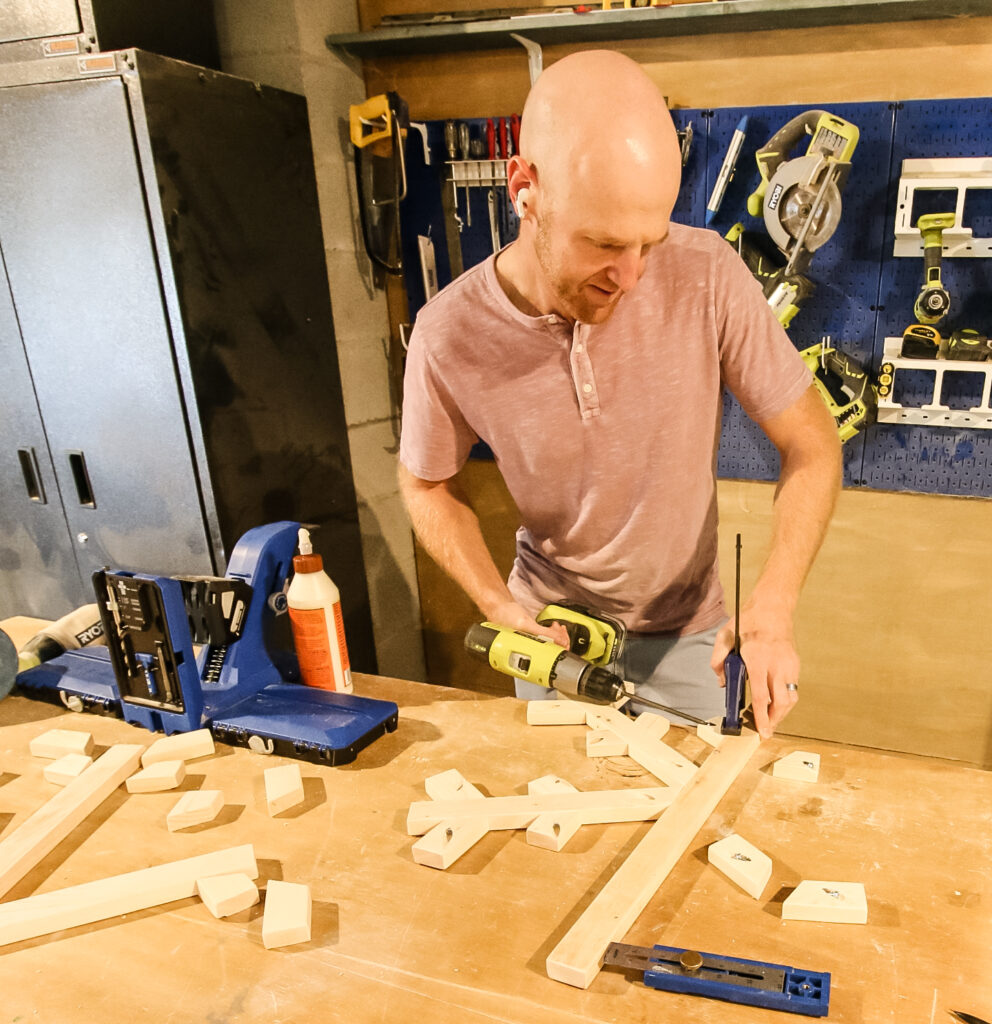
Step one: Cut pieces and drill pocket holes
Start out by grabbing the free woodworking plans for this project on the Kreg Tool Projects and Plans website. You're going to need a Kreg pocket hole jig (we prefer the Kreg 720 Pro) for this project, so grab that while you're there.
Then, make all the cuts. All of the cuts are in the downloadable plans. You're going to be making lots of little pieces of wood, so this is a great way to use scrap wood up.
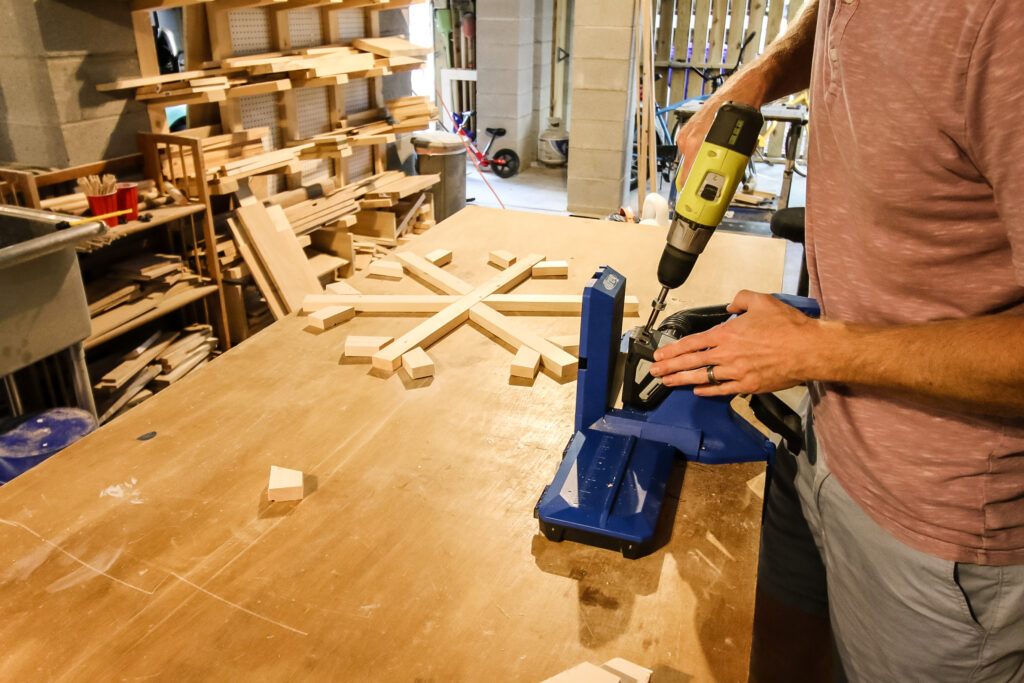
Then, drill a pocket hole in almost every piece you cut. For this, we used our Kreg 720 Pro to drill pocket holes, which works even for angled pieces like are needed here.
The Kreg 720 is great because it automatically clamps the small pieces into place for you, so you don't have to worry about that when drilling the holes.
Once everything is cut and drilled, sand each piece smooth and move to the next step!
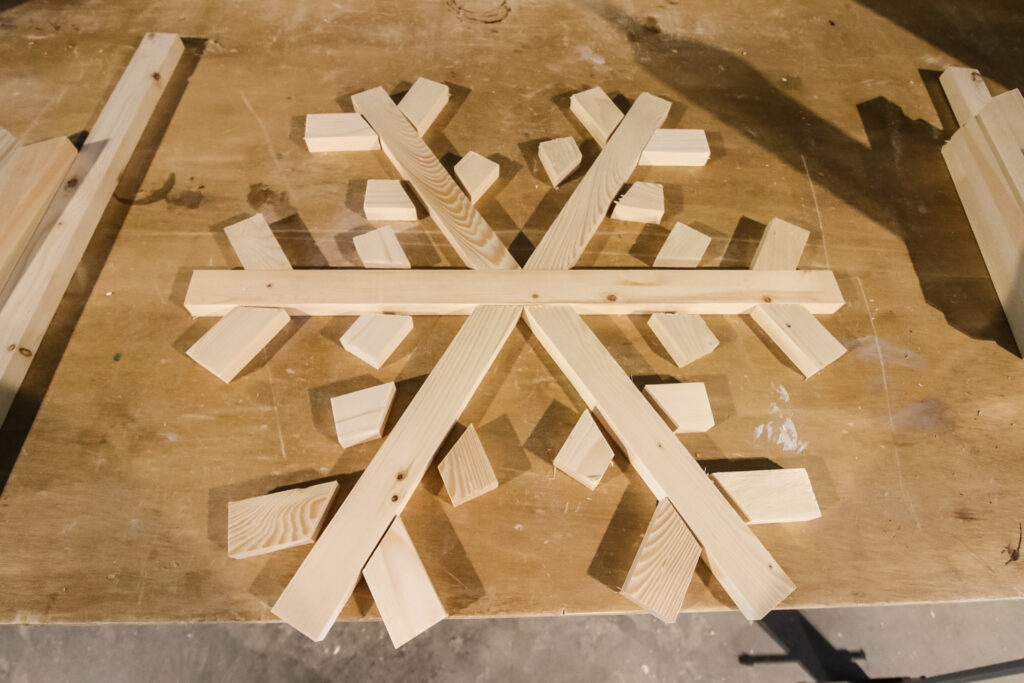
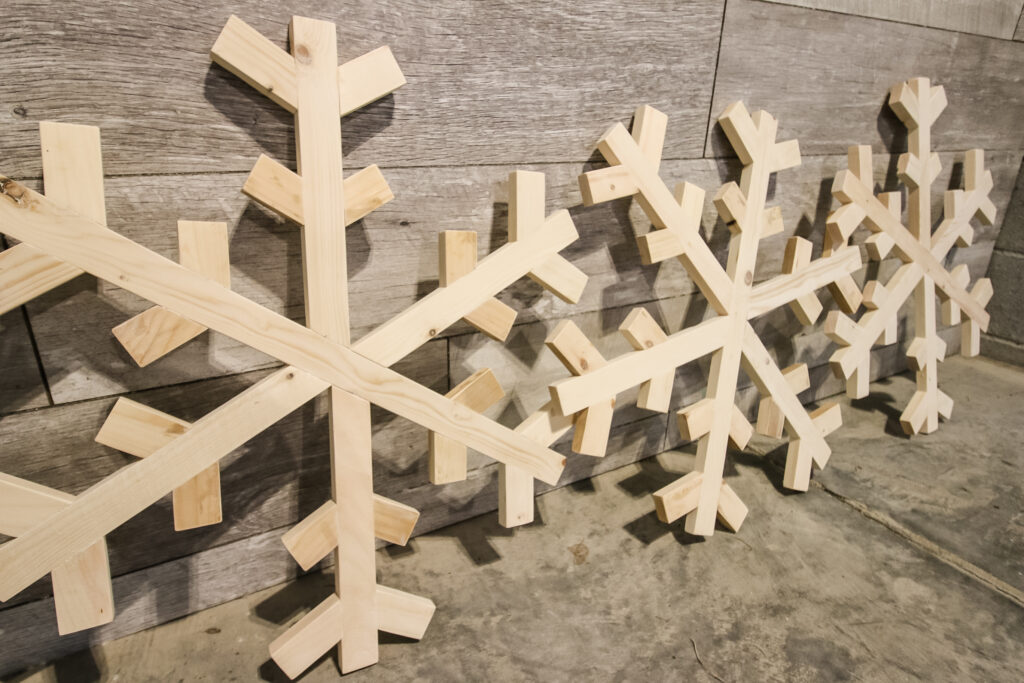
Step two: Assemble snowflake
With everything ready, it's time to assemble the wooden snowflake!
Each snowflake is made from a center board with four long pieces angled out from the center.
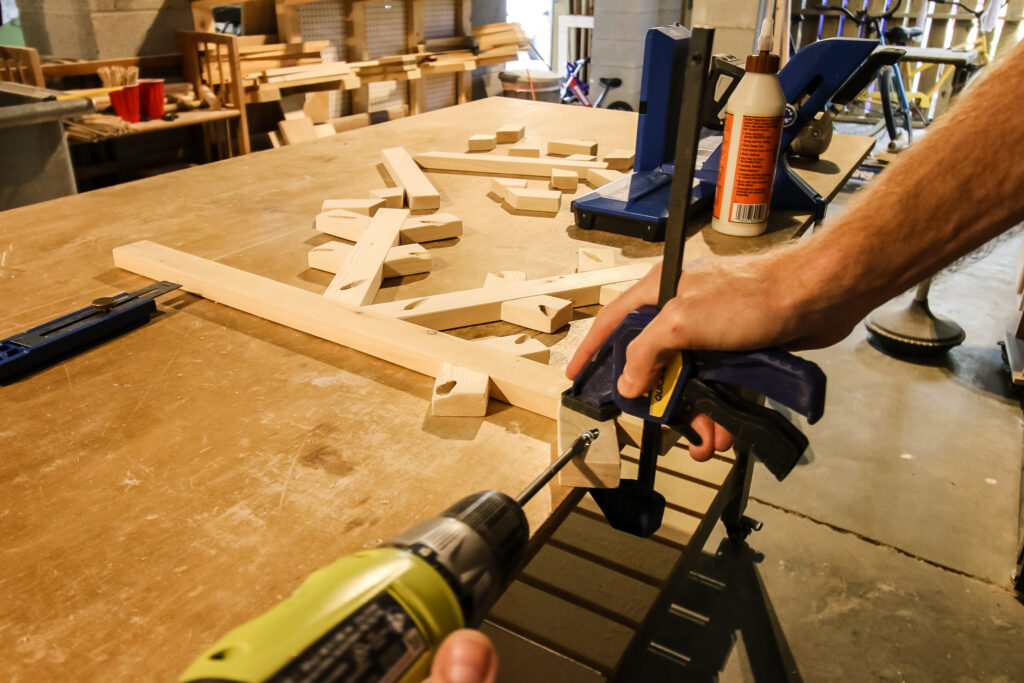
Then, you attach the smaller pieces onto each of the ends. Each piece of the snowflake is attached with wood glue and a pocket hole screw.
We have exact measurements in the woodworking plans for each of the small pieces, but you can also eyeball it to make yours a little unique!
When the entire snowflake is assembled, wait for the glue to dry and then sand the joints smooth!
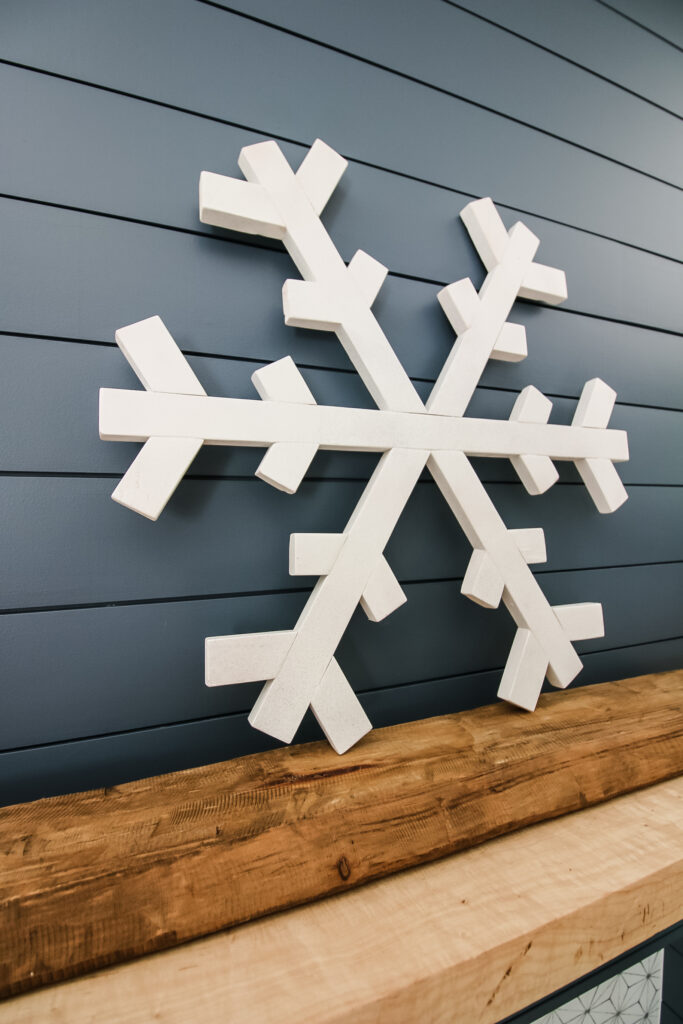
Step three: Add finish
Finally, add some finish to your wooden snowflakes!
We spray painted ours white (snow is white, duh), but then we also added a little bit of silver shimmer to each one by spraying silver spray paint from further back.
The shimmer is barely noticeable, but catches in the light. Finish up with some sealant and you're good to go!

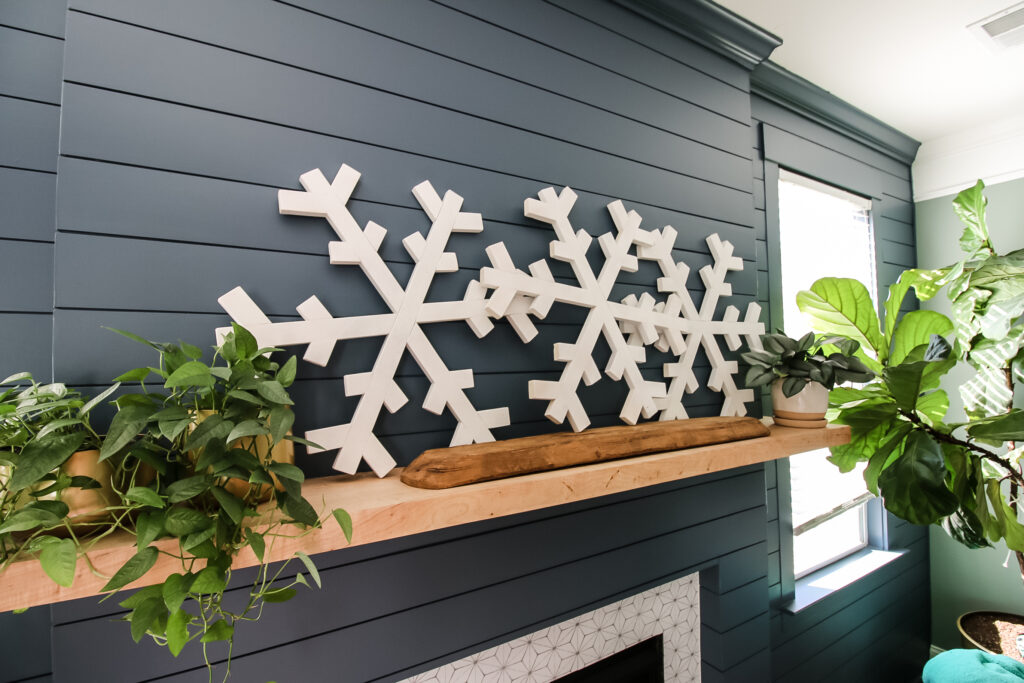
Step four: Display
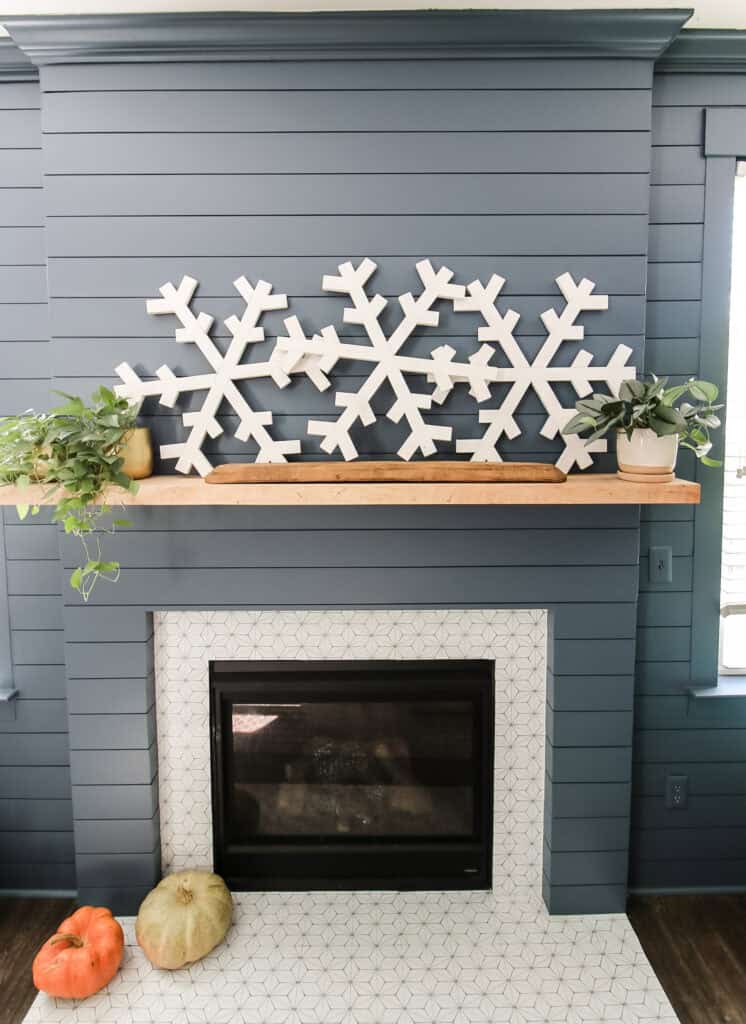
Time to display your DIY wooden snowflakes! The snowflake shape really mimics a real snowflake and looks really cool up on the wall!
We love how these turned out and they look great on top of our mantel. The white really pops off the blue of our shiplap fireplace.
Our DIY wooden snowflakes look awesome and make it look like winter in our home. If only we could get the real thing around here!
DIY wooden snowflake free woodworking plans
If you loved these snowflakes and want to get some up on the wall in your home for the holiday season, we've got great news for you!
There, you can get our full cut list, material list and step-by-step instructions with computer model imagery to easily replicate or adapt these snowflakes for your home!
Kreg's site is filled with lots of great holiday projects (including a few of ours!) so you can get ready for the holidays!
Interested in the Kreg Jig? Click here to read our full Kreg Jig review and to see all of our Kreg Jig projects.
New to the Kreg Jig? Here is a step by step guide on how to use a Kreg Jig!
OR grab our FREE Kreg Jig Cheat Sheet here! Download the cheat sheet!
Basic woodworking information for every project
Here are some of our most popular woodworking articles!
Shopping for wood:
Woodworking project ideas
- 100+ of the best woodworking project ideas!
- 62 easy beginning woodworking projects
- Woodworking project ideas to make and sell
See all our printable PDF woodworking plans!
Our favorite tools + supplies
- See all our favorite tool reviews
- How to use a Kreg jig
- The ultimate wood stain guide
- The best wood fillers for your project
Remember to also always use safety equipment while woodworking and using tools. Make sure you have proper eye protection, ear protection and a good mask to keep yourself safe.

Looking for something?
We've been doing this since 2012 so we have a LOT of blog posts!
Search stuff like: Ceiling Projects | DIY Plant Stands | Thrift Flips

Hey there, I'm Sean, the woodworking enthusiast and builder behind CharlestonCrafted.com! Since 2012, I've been sharing the magic of turning raw materials into beautiful creations. I love teaching others the art and satisfaction of woodworking and DIY. I try to inspire fellow crafters to make something extraordinary out of nothing at all.


