If you're looking to build a simple and modern platform bed, we've got you covered with this post. It's an affordable and approachable project for anyone!
Today, we're showing you the easiest way to build a platform bed with legs! This project is so easy and makes a huge impact.
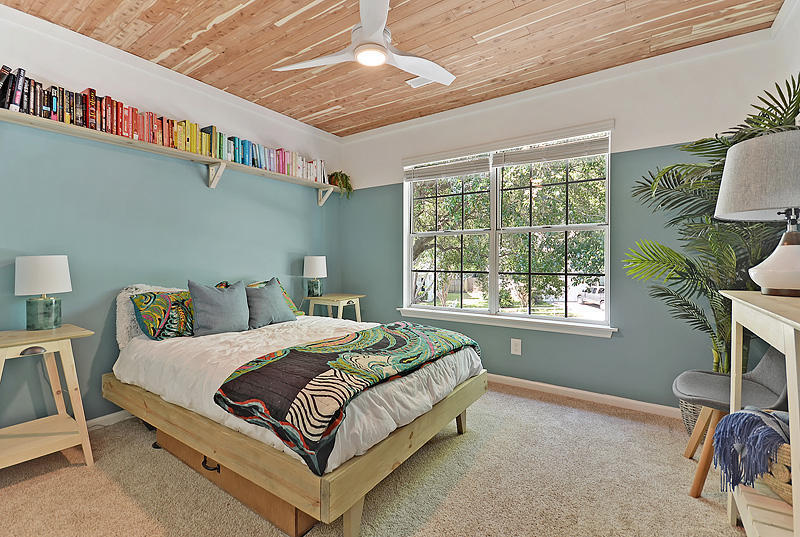
We have been making over our guest bedroom, with furniture builds like midcentury side tables and a console table, and a color block wall.
The old dark wood 80's bed just wasn't going to cut it, so we built a platform bed in one day for less than the cost of Thai food takeout.
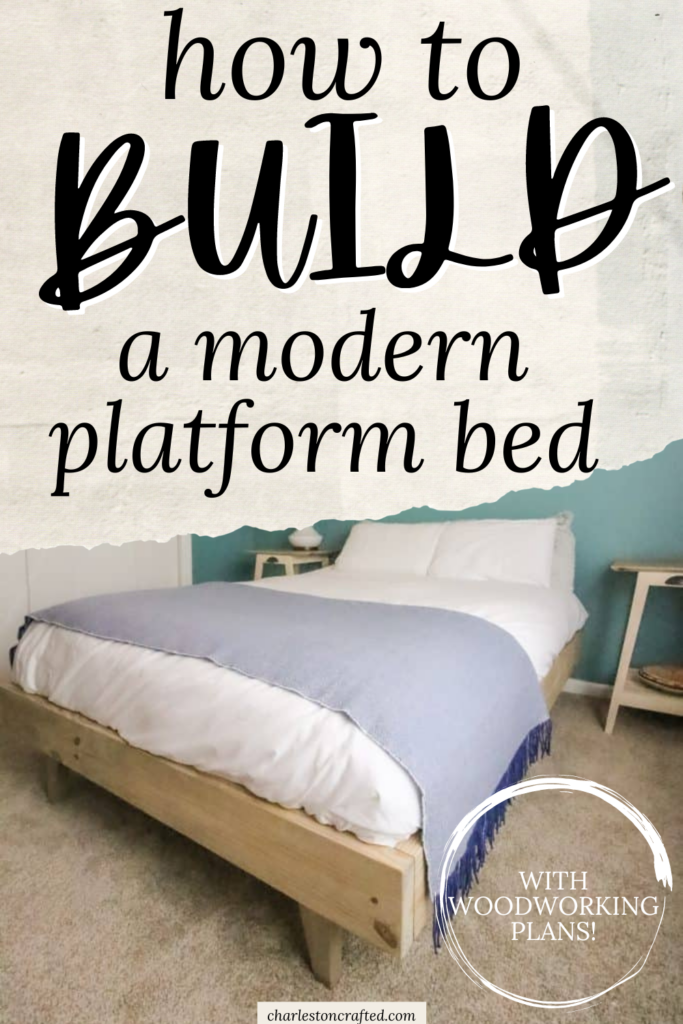
DIY Platform Bed
The main thing to consider with a platform bed is how high you want it to be from the ground.
We chose 9 inches because we have our rolling under-bed storage for wrapping paper underneath.
It was important that our platform bed have legs so that we could take advantage of that precious storage space!
When making your measurements for a platform bed, the inner dimensions of your bed frame need to be the same dimensions as your bed.
We built this for a double/full size bed, and the standard dimensions are 53" x 74".
Click here to get a PDF copy of these plans sent to your inbox.
How much does it cost to build a platform bed?
There are a few factors that will determine how much it costs to build your platform bed. The main one is type of lumber used.
We built this bed for $50 worth of wood. For transparency, that was in 2019. Since then, lumber prices have skyrocketed, but it should still be relatively inexpensive to build this bed, especially compared to purchasing one.
The second factor is what tools or supplies you have on hand or can borrow. We built this double sized bed for just under $50 worth of lumber - we had all of the tools on hand already.
It will cost you more if you don't have stain, screws or a pocket hole jig on hand, but that won't add much to the cost.
Want to make this bed in a different size?
We sell the plans to build a King sized platform bed, a Queen sized platform bed, or a twin sized platform bed! Or, buy them all as a bundle!
How to build a platform bed frame
There are lots of ways to build a platform bed with all sorts of styles. This is a simple box bed with legs and slats. Here's the overview.
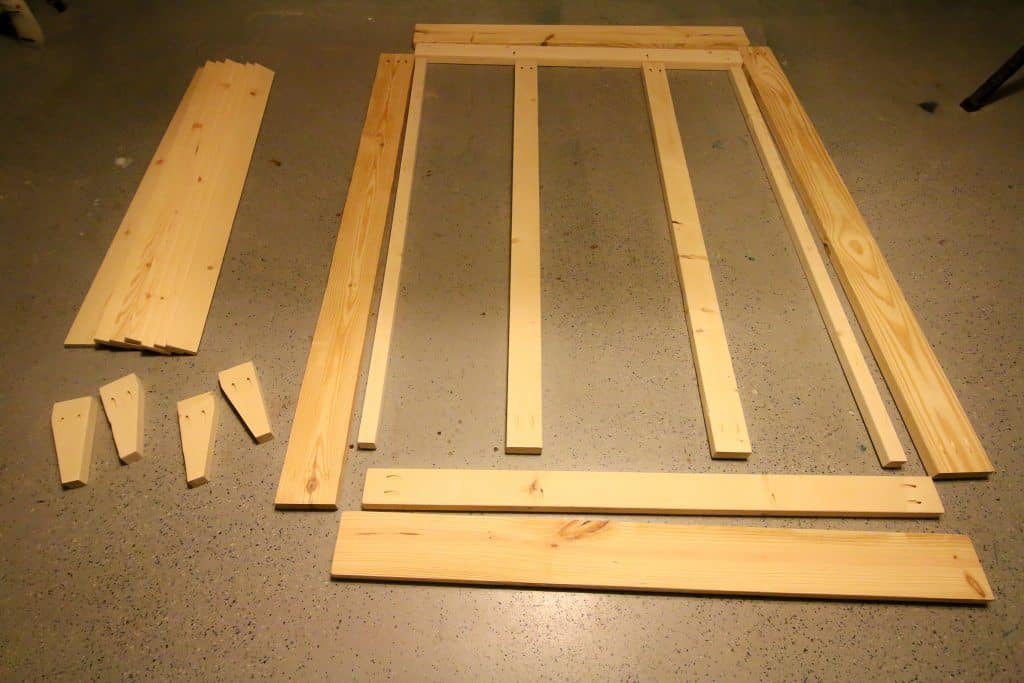
We started by cutting and sanding all our wood to the dimensions needed (see the how-to card below for the full cut list).
Here are a bunch of beds that you can build using a Kreg Jig!
All the pieces in this build are attached using a Kreg Jig.
I usually use the Kreg 720 Pro, but since these are big, long 2x6s, it is a lot easier to clamp on the brand new Kreg 320 directly to the wood.
I absolutely love the 320. It is super user-friendly and great for beginner woodworkers.
The 320 has a thickness gauge which allows you to determine the exact thickness of your wood and then set everything on the 320 to that thickness.
You can set the jig itself and the stop collar on the drill bit to the same dimension to avoid any miscues.
This will also tell you what length screw to use. For the 2x4s and 2x6s used in this project, you need to use 2 ½ inch Kreg screws.
Steps to Build a Platform Bed
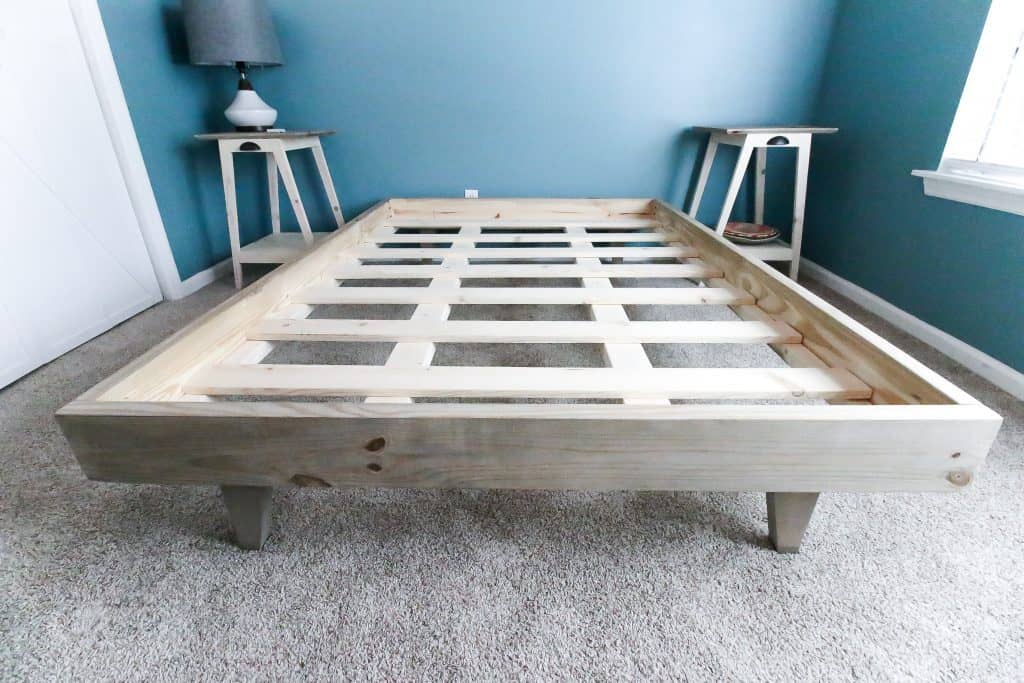
First step was to build the outside box frame by connecting the four sides of the bed.
Next, we attached support railings along the insides of each side of the frame.
Since we were using 2x4s, we subtracted 7 inches from the long sides and 3 inches from the short sides to account for the other pieces.
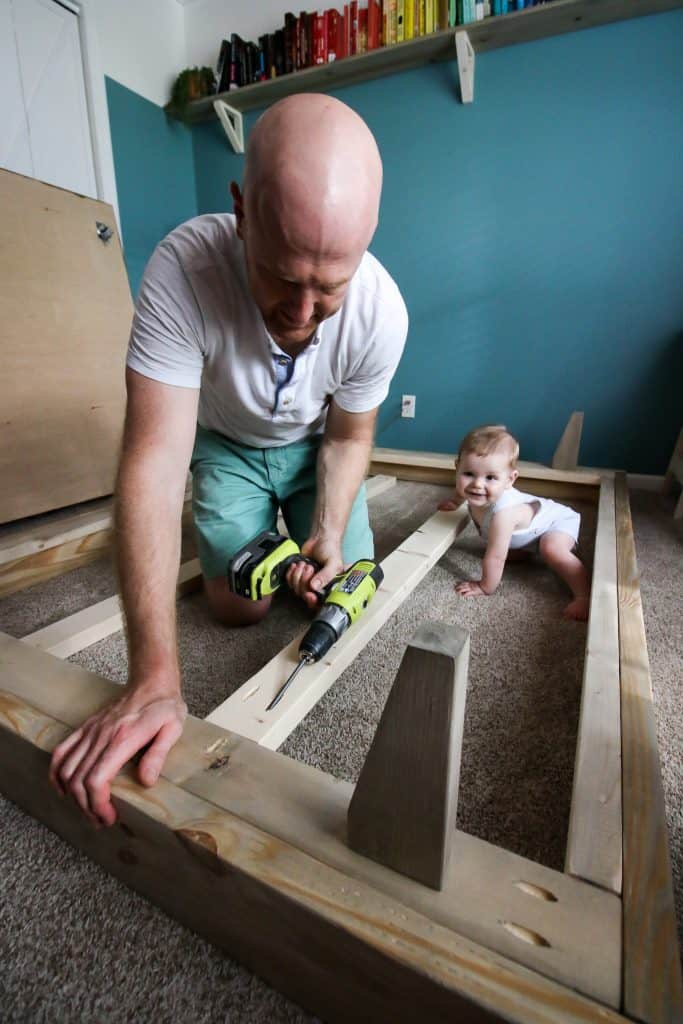
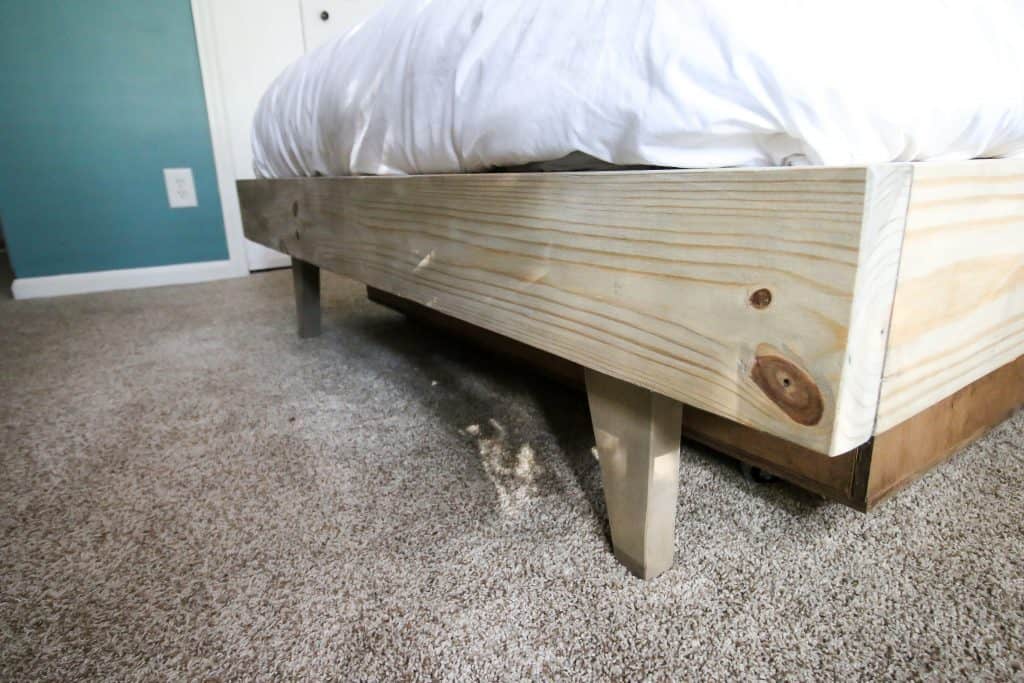
We added legs to the bottom of the 2x4 supports along the front and back.
We cut the same angled legs as we did on our DIY midcentury crib and IKEA Hemnes dresser hack.
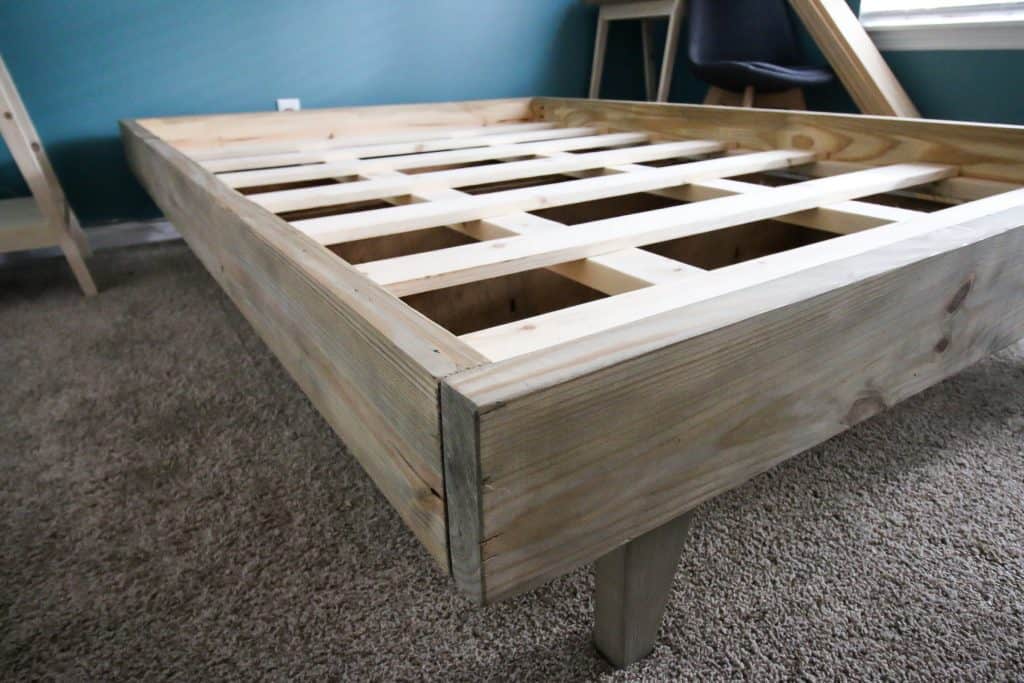
The last step is to add the support for the mattress.
We attached two more 2x4s down the middle length of the bed and then laid 1x4 slats across the width.
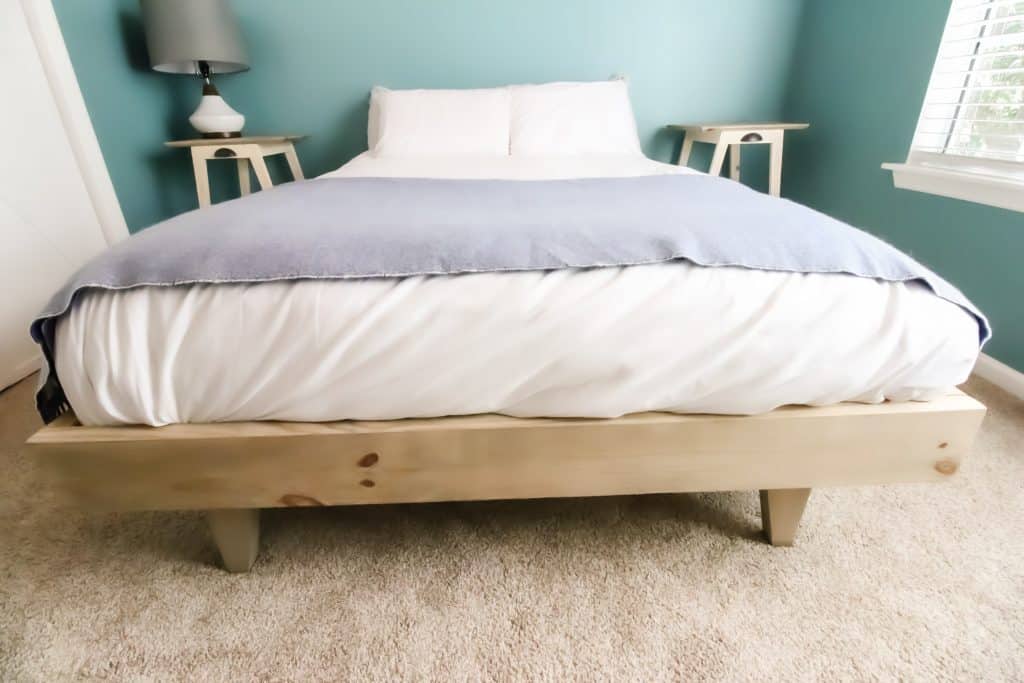
Final Results
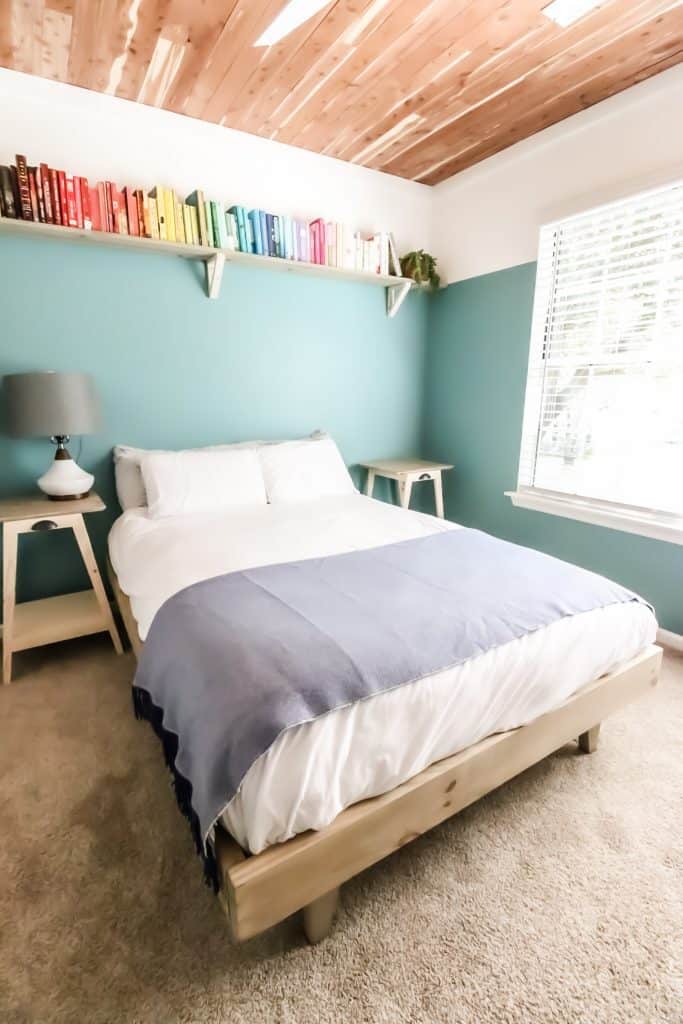
We popped the mattress into the frame and it fit perfectly. We're keeping the comforter and everything tucked down into the frame so that it stays prominent.
We love how this DIY platform bed turned out. It is sleek and modern and takes up much less space than the old bed.
This build might seem like a larger-scale build, but it was extremely simple. It's a box with legs!
This is a great beginner woodworking project to really get you feeling like a pro. It was all made so much easier thanks to the versatility of the Kreg 320 Jig.
What is the best wood to use for a platform bed?
You can use any species of wood to build this platform bed. We chose pine because it is the cheapest wood at the hardware store and we wanted to complete this project on a small budget.
Do I need a special mattress for a platform bed?
No, you can use any mattress on this bed. Just don't use a boxspring, which saves you money! That is the beauty of a platform bed - the mattress sits directly on the wood.

How to Build a Platform Bed for $50
We're showing you how to build a platform bed for only $50 in materials. If you've ever wanted to switch to a platform bed and ditch the box spring and huge headboard/foot board, this is what you need. You can build this platform bed in just a day. Please note, these instructions are for a double/full size bed. If you want to build a platform bed for a twin, queen or king mattress, you can use the same instructions, but you'll need to scale them appropriately.
Materials
- Four 2x6s
- Four 2x4s
- Two 2x2s
- Ten 1x4s
- 2 ½" Kreg pocket screws
- Stain
- Sealant
Tools
- Miter saw
- Kreg 320 Jig
- Drill
Instructions
- Make Cuts:
Front and Back (2)- 56" using 2x6
Sides (2)- 74" using 2x6*
Inner Side Supports (2)- 67" using 2x2
Front and Back Leg Supports (2)- 53" using 2x4*
Long Center Supports (2)- 67" using 2x4*
Slats (7)- 53" using 1x4
Legs (4)- 9" using 2x4
*-indicates to drill two pocket holes on each end - Cut your legs at an angle. Make a mark 1 ½" in on the short side, then make a mark 2 ½" down on one long side. Draw a line between them and cut off that corner. Drill two pocket holes on the top.
- Attach the Sides to the inside edge of the Front and Back.
- Attach the Front and Back Leg Supports flush on the bottom edge of the Front and Back. Add 2-3 additional pocket holes on the long side of the Supports to connect them to the Front and Back.
- Attach the Inner Side Supports to the Sides by drilling through the Supports into the Sides.
- Flip your piece upside down and attach the Legs to the Leg Supports 7" in.
- Attach the Long Center Supports to the Front and Back Leg Supports evenly spaced.
- Lay slats out evenly across the supports.
- Stain and seal to your liking.
- Pop in your bed and enjoy a well-deserved good night's sleep.
Notes
This bed is designed to be taken apart and reassembled. If you want to cut, sand and stain all your pieces in your workshop, you can then construct it in the bedroom entirely or build in the garage, take apart and reassemble.
Recommended Products
As an Amazon Associate and member of other affiliate programs, I earn from qualifying purchases.


Interested in the Kreg Jig? Click here to read our full Kreg Jig review and to see all of our Kreg Jig projects.
New to the Kreg Jig? Here is a step by step guide on how to use a Kreg Jig!
OR grab our FREE Kreg Jig Cheat Sheet here! Download the cheat sheet!
This post is sponsored by Kreg Tool. All opinions are our own and our opinion is that we love Kreg Tool. Thank you for supporting the brands that make Charleston Crafted possible!

Looking for something?
We've been doing this since 2012 so we have a LOT of blog posts!
Search stuff like: Ceiling Projects | DIY Plant Stands | Thrift Flips

Hey there, I'm Sean, the woodworking enthusiast and builder behind CharlestonCrafted.com! Since 2012, I've been sharing the magic of turning raw materials into beautiful creations. I love teaching others the art and satisfaction of woodworking and DIY. I try to inspire fellow crafters to make something extraordinary out of nothing at all.


luiessir says
¡Creo que al sonriente niño que te ayuda le gustara el bricolaje cuando sea mayor!.
Morgan says
¡Yo también lo creo! ¡Gracias por leer!
Kristen says
Any idea how much weight it holds? Thanks!
Sean says
It has had no problems holding two grown adults!
sandy says
Do you have any plans for a kitchen banquette or kitchen nook? Looks like you know what you are doing and a banquette 72 inches by 5 feet does not look like it is that much more difficult need storage in my kitchen/dining room because the galley kitchen is so small. Been looking for someone to come up with something for my dining room corner and it is ridiculous what people what....let alone have someone answer the request.
3-28-20 Thanks in advance...
Sean says
Hey Sandy, We don't have plans for that right now as we don't have that space in our house. I have definitely tried to make some in my mind though for friends. I wish I had more to offer for you!
Alysia Byers says
How did you attach the legs exactly? And what stain did you use? Thanks
Sean says
Legs were attached with wood glue and pocket screws. Stain was Weathered Oak
Catherine says
Hi! What size mattress does this fit? Thanks!
Morgan says
It's a double bed!
Brooke says
hey there! We built this bed and love it, thank you for the plans! The only issue we're having is the legs are pretty wiggly. We have the bed in a room with hardwoods and after sliding the bed over a little the legs became very shaky. Any tips on reinforcing them to make them more stable?
Morgan says
Hey Brooke - glad you are enjoying it. Do you mean wiggly like loose from the base? Did you apply wood glue between the legs + base before screwing them together? That would make the legs not-removable from the base, but would make a very tight bond. -Morgan
Gene says
Nice plans and well laid out, still waiting for a gazebo plan. Thanks for the free plans you provide.
Morgan says
Thanks Gene! I wish we had space for a gazebo in our yard!
Chad Janey says
The plans call for the front boards to be cut at 56" and the supports at 53", but all of the FULL mattress dimensions I see show them to be 54" wide, which would seem to be an inch wider than the resulting opening on this bed... I realize mattresses are not SOLID and will have some give, so is the 1" lacking intentional so that it fits snugger???
Morgan says
Hey Chad, so my mattress is 53". If you look online, it seems to vary between 53" and 54", depending on the brand. I think a soft 54" mattress would fit snug with no problem, but if you wanted to adjust the cuts by 1", you could just adjust the front and back pieces and the slats by 1" each.