• Skip to primary navigation
  • Skip to main content
  • Skip to primary sidebar
Charleston Crafted
  • DIY
  • Woodworking
  • Popular Posts
  • Blog
  • About
  • Shop
menu icon
go to homepage
  • DIY
  • Woodworking
  • Popular Posts
  • Blog
  • About
  • Shop
search icon
Homepage link
  • DIY
  • Woodworking
  • Popular Posts
  • Blog
  • About
  • Shop
×
Home » Building

DIY Built-In U-Shaped Desk

Published: Nov 6, 2019 · Modified: Feb 3, 2020 by Sean · As an Amazon Associate, we earn from qualifying purchases. This site contains affiliate links. ·

We made this DIY built-in U-shaped desk custom for a small nook in our bedroom. The dimensions are 100% unique to this random nook of ours, so we don't have specific step-by-step plans for this build, but hopefully it will give you some inspiration!

We've been busy lately at Charleston Crafted and have been preparing for the holidays. Before we could get to most of those projects, we've been working on a few crucial projects we need around the house, including building a custom desk/vanity for Morgan.

As you know, we recently made over the guest bedroom (check out the color block wall, cedar plank ceiling, modern platform bed, console table, side tables, gallery wall, bi-fold door and bookshelf!) When we did that, we had to take all the old stuff out of there, including our concrete and plywood desk that we did all our computer work on.

We moved that desk into the nook in our bedroom that also had Morgan's vanity. We had to turn the vanity and desk to opposing walls of the nook in order to make them fit. Needless to say, it didn't look good and it was super cramped.

Old desk vanity area

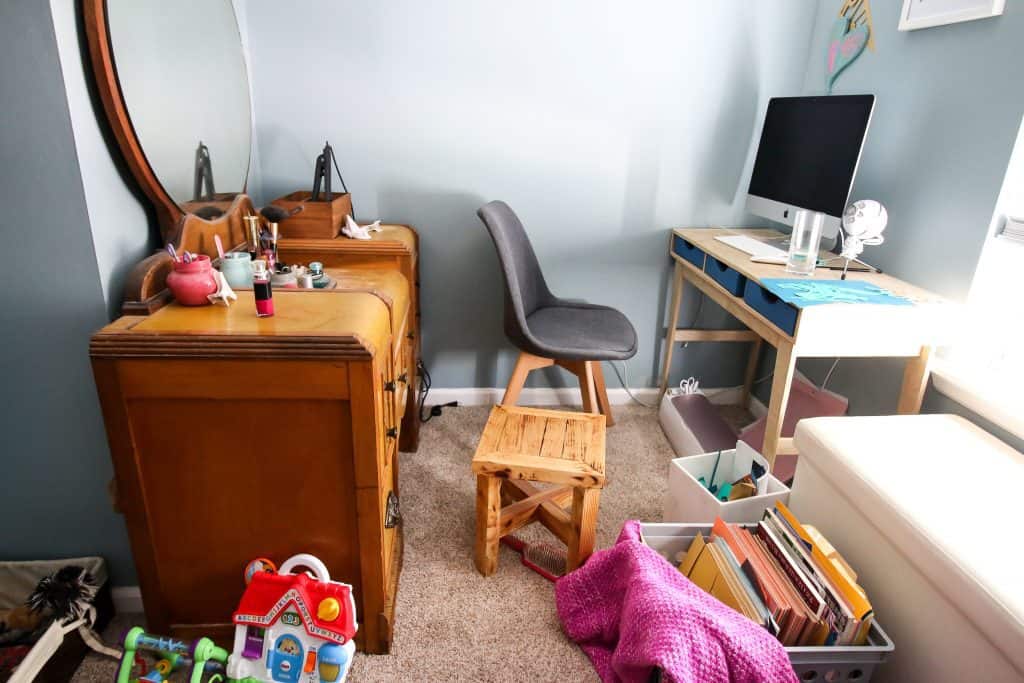
So we decided to build a custom U-shaped desk/vanity that would be built into the nook.

Final DIY Built-In U-Shaped Desk

Building the Desk/Vanity

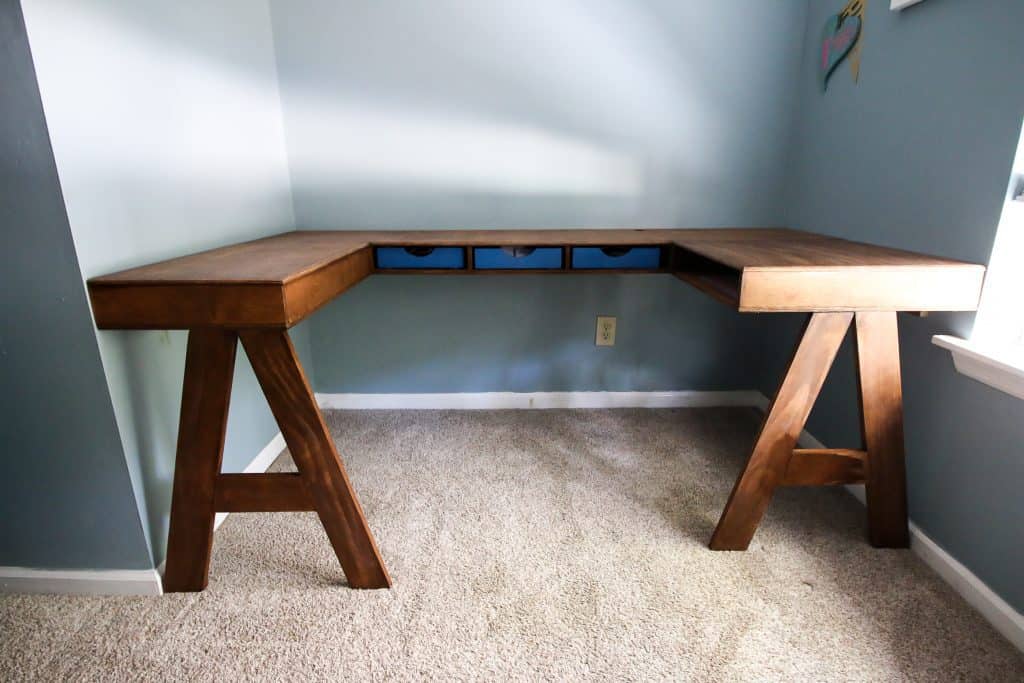
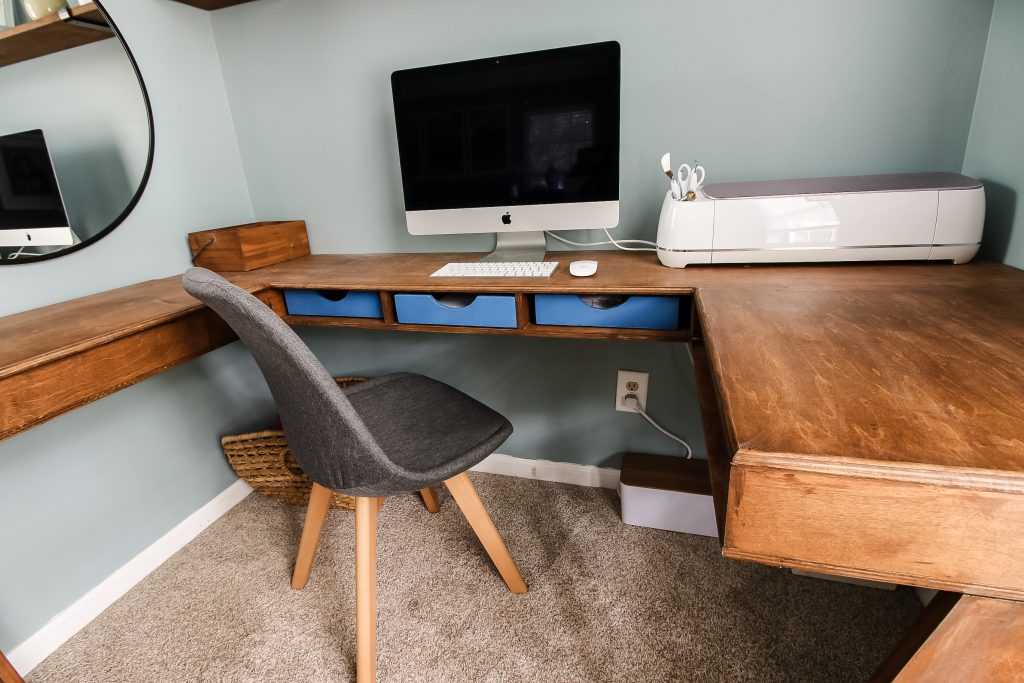
We opted to go for a floating style desk with two supporting legs on the outside. These are completely for show and really don't provide any support, but they make the area look more defined.

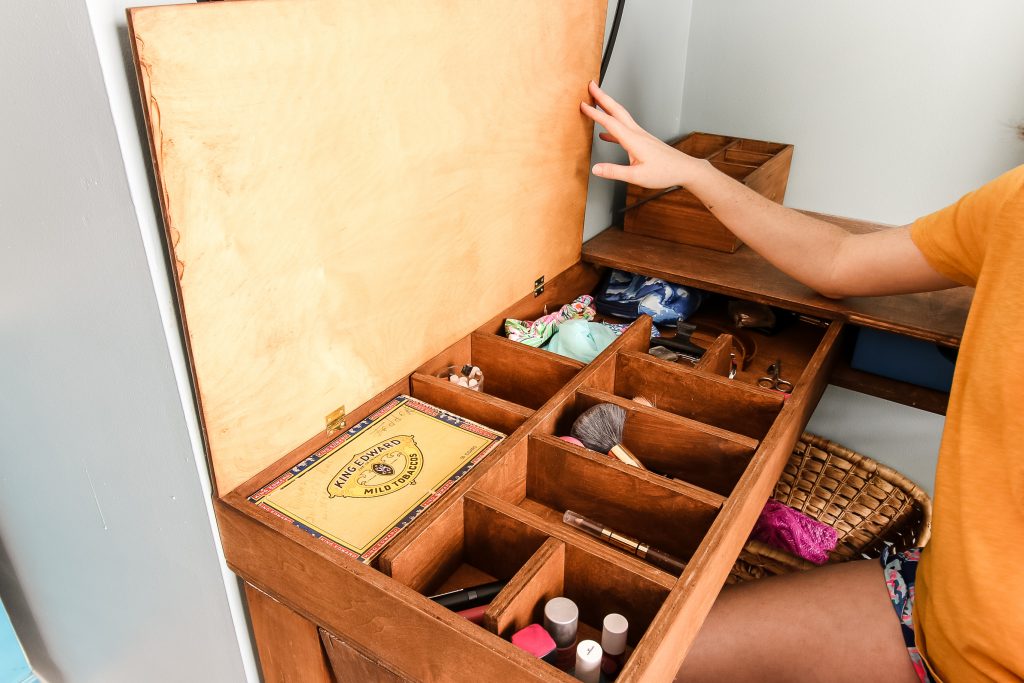
When drawing out the specs for this plan, we worked on three sections- a desk, a vanity and a Cricut cutting station. The desk and Cricut sides would have open cubbies for storage of supplies. The vanity would have a closed front but a hinged lid to store beauty supplies.

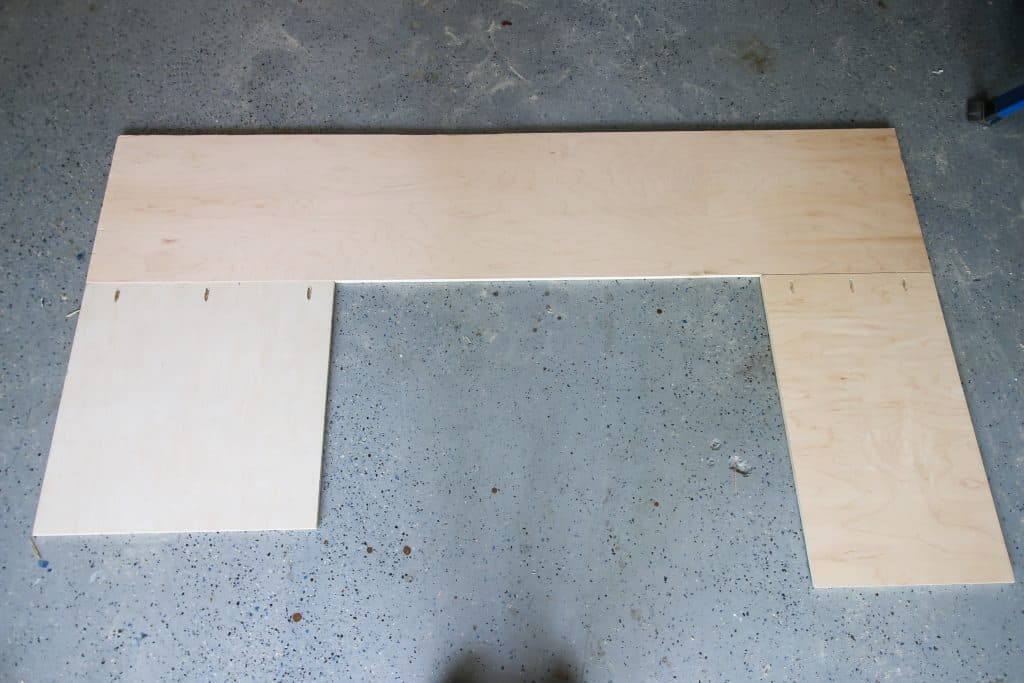
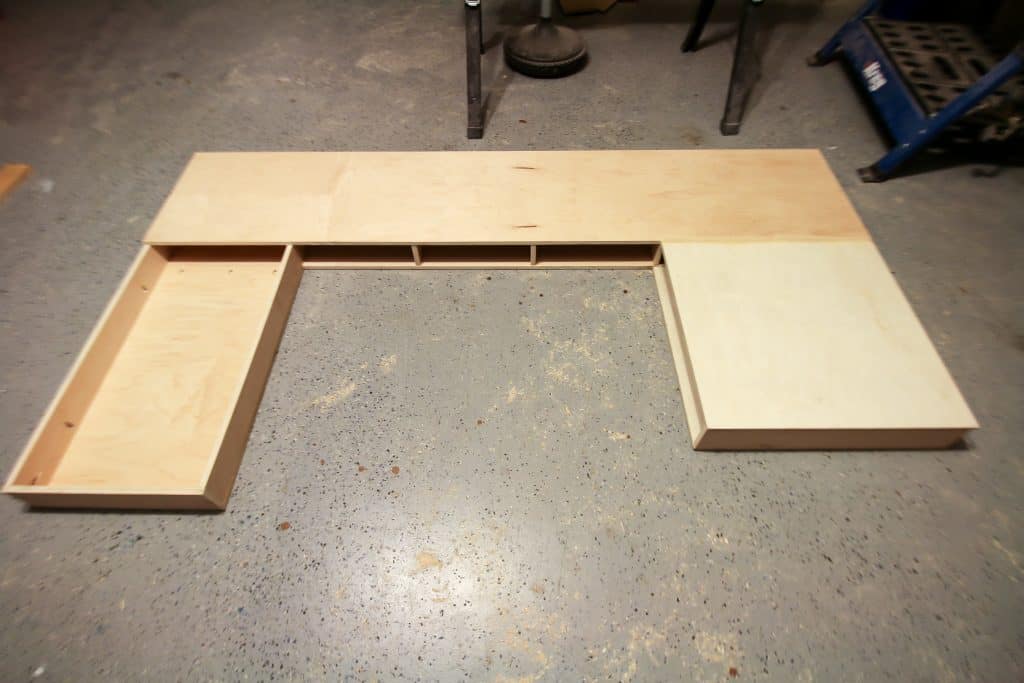
The entire thing is made from ½" plywood and held together with pocket holes. The first step was to cut the top and bottom pieces (three pieces each, joined together). We connected the three bottom pieces together and laid them out.

Bottom of desk constructed

Then, we cut all the dividers, backs and fronts and attached those to the bottoms to create the box.

Dividers added to desk

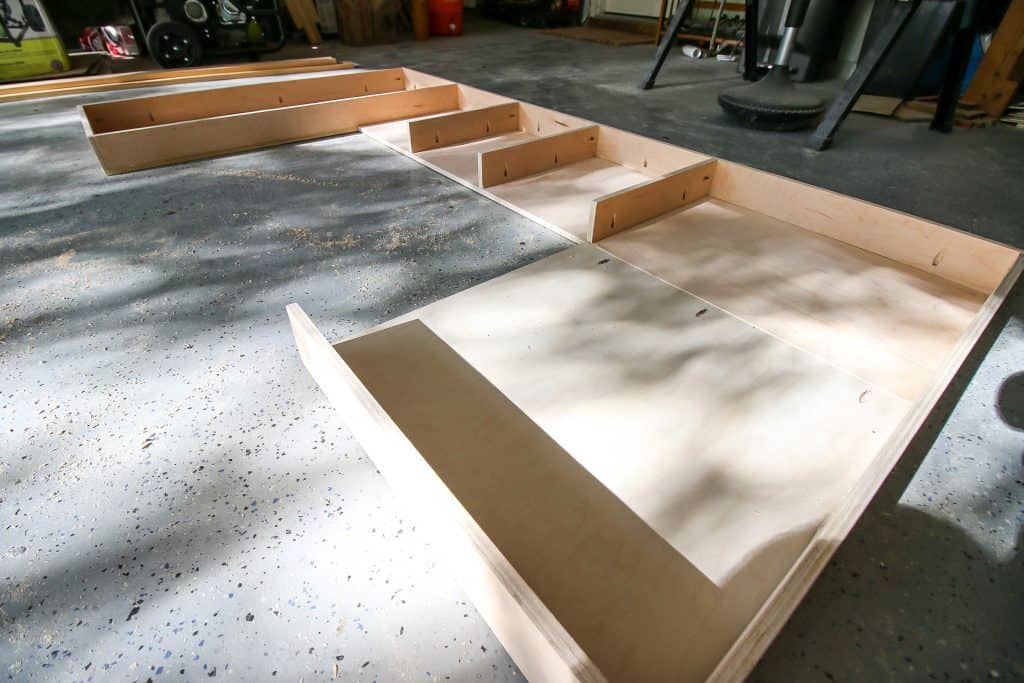
Finally, we connected the desk and Cricut side top pieces and attached those to the rest of the desk.

Top added to built in desk

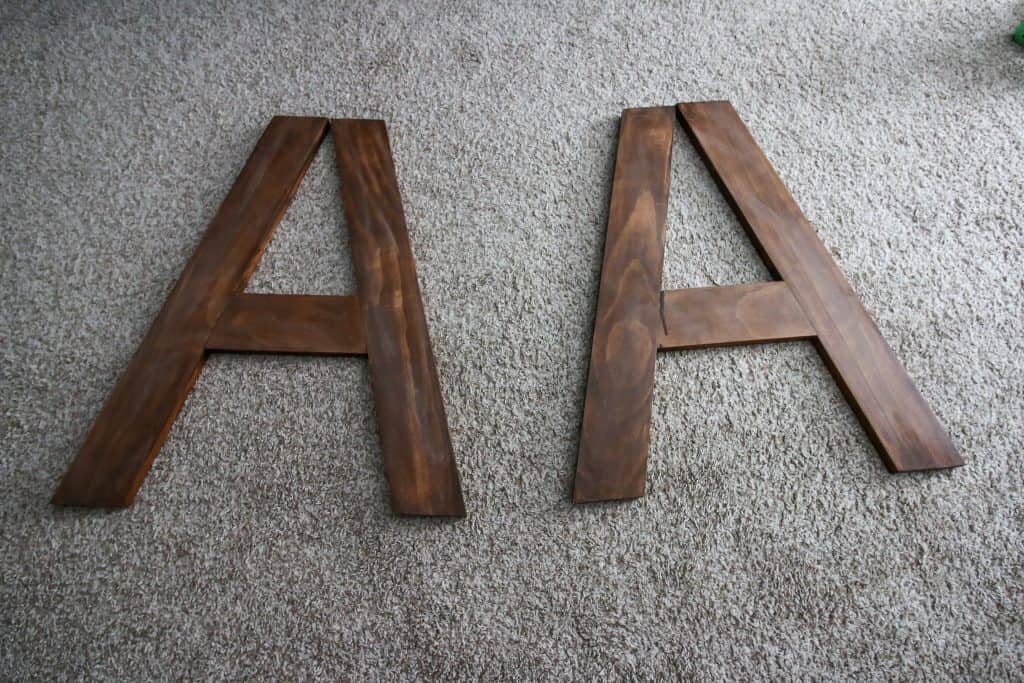
We made two A-frame style legs to go on the outer edges of the desk and then stained all of our pieces.

A-Frame Legs for Built In Desk

Installing the Desk/Vanity

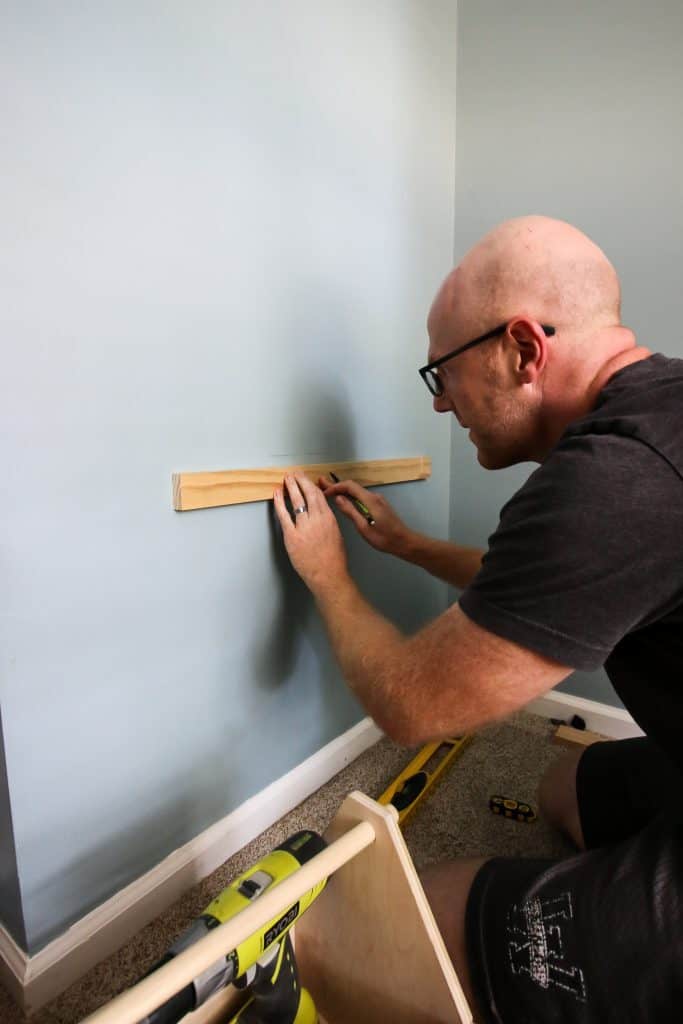
To install the desk/vanity, we measured where the bottom of the desk should be (the height of the legs) on the wall and screwed stabilizing boards into the wall with the top at that line. This way, the desk would rest on top of a board on all three sides of the space.

Adding support braces to wall for built in desk

We carried the entire desk up in one piece (minus the legs) and placed it on top of the supports. Miraculously, it actually fit with no testing. In a house as un-square as ours, this really was a miracle.

Built in desk floating on supports

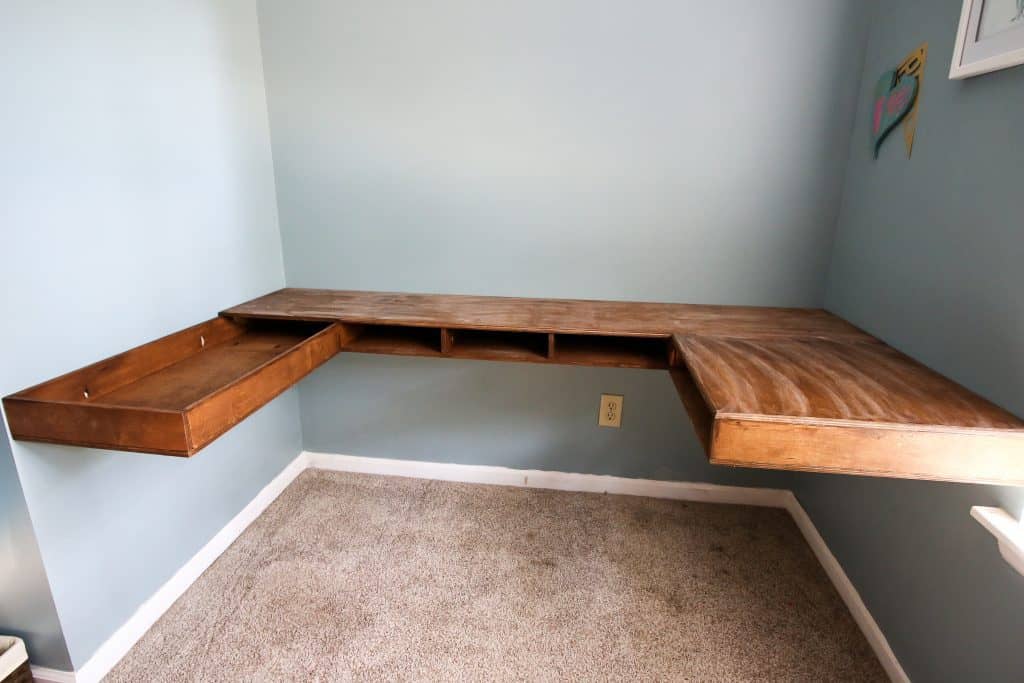
We attached the legs to the underside of the desk, then attached the hinging vanity top to the desk.

Final Constructed Built In Desk Vanity
Desk from right

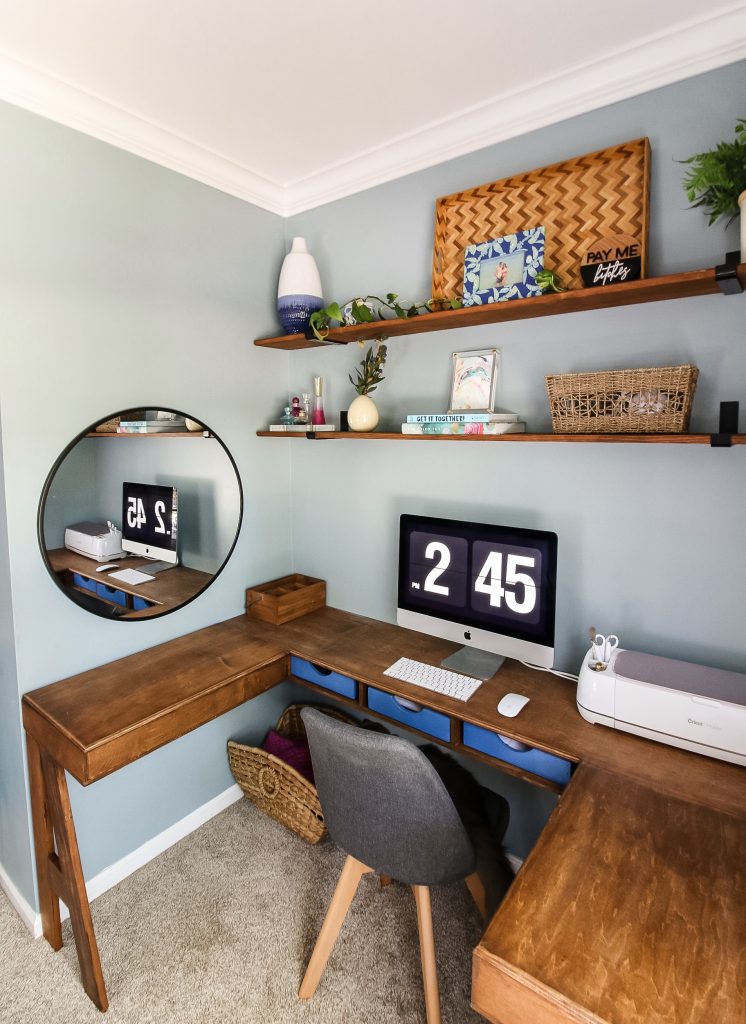
Styling the Office Area

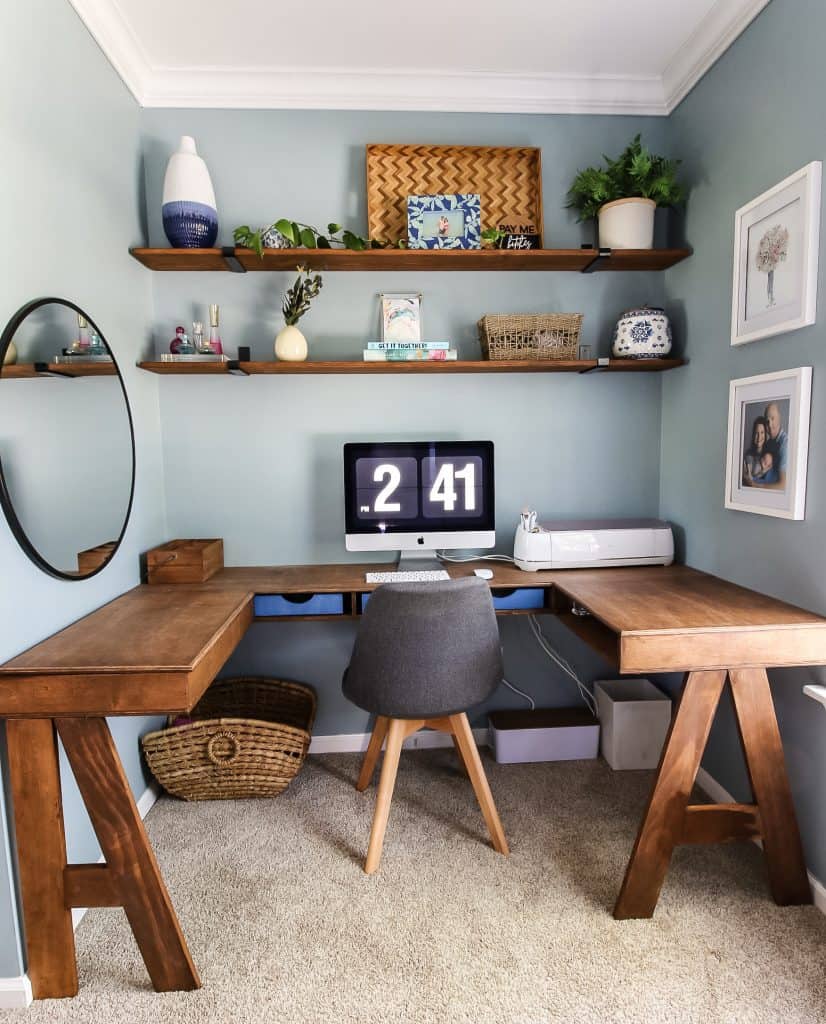
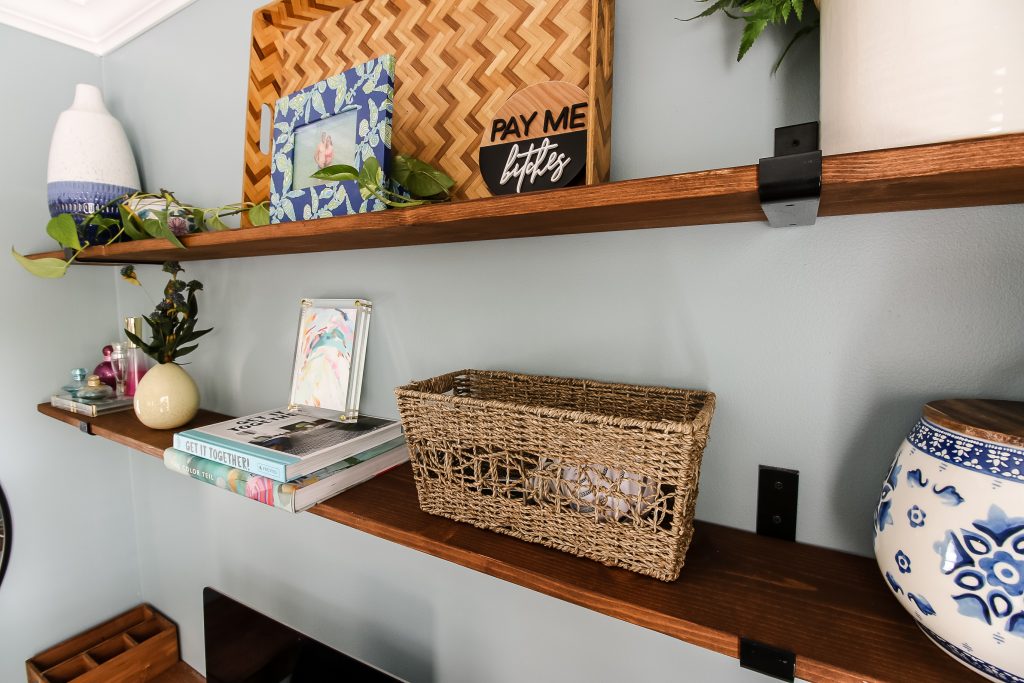
For all intents and purposes, this is now our office space. We added two shelves with cool brackets above the desk. This can be used for styling and practicality.

Shelves above desk
Desk from left

We also added a round mirror above the vanity side for Morgan to do her makeup and built a custom divider for her things inside the flip top.

Vanity
Inside vanity portion of desk

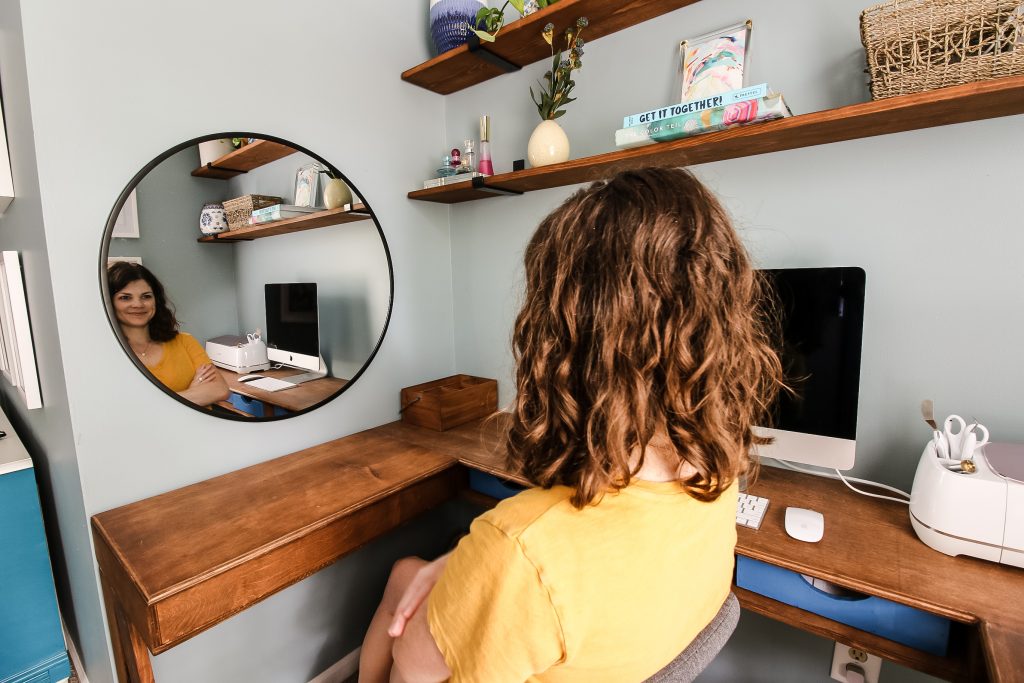
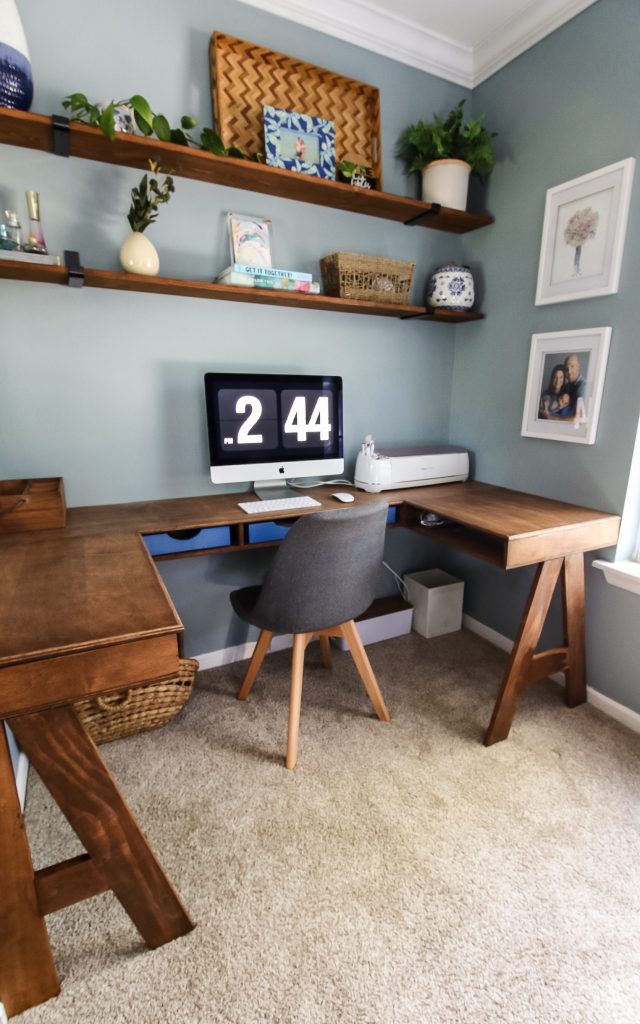
We love this built-in desk/vanity and that it is 100% custom to our space. It is working so much better than our previous setups and we feel professional. It also really brought purpose to this nook of our bedroom. We'd love to see if you make something similar!

Desk part
Charleston Crafted Signature

Follow us on:
Pinterest | Instagram | TikTok | YouTube | Facebook | Amazon Storefront | LTK Shop

Looking for something?

We've been doing this since 2012 so we have a LOT of blog posts!
Search stuff like: Ceiling Projects | DIY Plant Stands | Thrift Flips

Charleston Crafted logo banner
Sean headshot cropped
Sean

Hey there, I'm Sean, the woodworking enthusiast and builder behind CharlestonCrafted.com! Since 2012, I've been sharing the magic of turning raw materials into beautiful creations. I love teaching others the art and satisfaction of woodworking and DIY. I try to inspire fellow crafters to make something extraordinary out of nothing at all.

More Building

  • How to build a DIY gate pergola- Charleston Crafted
    How to build a DIY gate pergola
  • DIY modern rolling storage table - Charleston Crafted
    DIY modern rolling storage table
  • DIY folding desk for walking pad - Charleston Crafted
    DIY folding desk for walking pads
  • DIY cube storage console table - Charleston Crafted
    DIY cube storage console table

Reader Interactions

Comments

  1. carmen says

    April 12, 2020 at 11:11 am

    So impressed with your U shape built in desk.

    • Sean says

      April 13, 2020 at 9:00 am

      Thanks! It was perfect for our space.

  2. Sandra Derry says

    May 25, 2020 at 12:17 pm

    Totally love that

  3. Becky Blanton says

    June 22, 2020 at 11:41 am

    I really love the idea of a hinged top where you can store things for easy access. I'm going to incorporate that into my next build! I love the shelving units too, the brackets are sweet! I'm going with a french cleat wall tho since I'm CONSTANTLY rearranging my office and bringing in different tools etc. But this is a perfect set-up for you guys and you did a great job with it! Well done!

    • Sean says

      June 22, 2020 at 1:18 pm

      Thanks Becky!

  4. Kathy says

    September 29, 2020 at 3:09 pm

    Two questions: how did you secure it to the wall brackets and who did you opt to not edge band the plywood? Thank you.

    • Sean says

      September 30, 2020 at 3:13 pm

      We secured boards to the wall using screws directly through the boards into the studs of the wall. Then the desk sat on top of the boards. We didn't edge band because we wanted to round off the edge since we were using it as a workspace and didn't want the sharp edge poking into our wrists.

      • Kathy says

        September 30, 2020 at 4:46 pm

        Thank you for answering. I understand about the boards screwed to the wall, but how did you secure the desk to the boards that you had screwed to the studs? Thank you.

        • Sean says

          September 30, 2020 at 8:07 pm

          Oh gotcha! Actually we didn’t. The desk was custom built to fit snuggly in the nook. It rested on those boards and the legs on the two ends and it was very secure without needing screws.

          • Kathy says

            September 30, 2020 at 11:12 pm

            Oh, I see. Thank you so much for clarifying that for me. If I haven’t said this already, I LOVE the desk!! What a creative way to use the space.

          • Sean says

            October 01, 2020 at 3:47 pm

            Thank you so much! It was such a weird space so we had to make something super custom.

  5. Kevin says

    October 16, 2020 at 5:57 pm

    Love this project! What Stain did you use on the plywood?

    • Morgan says

      October 17, 2020 at 8:15 pm

      It was Early American - https://amzn.to/31e9ZYP

  6. Dave says

    November 05, 2021 at 12:30 pm

    This is very nice. Do you have designs for breadbox?

    • Morgan says

      November 05, 2021 at 8:42 pm

      Thanks Dave! But sorry, not at this time!

Trackbacks

  1. 10 DIY Desk Ideas + Favorite Desk Chairs and Accessories - Erin Spain says:
    February 11, 2020 at 8:18 pm

    […] DIY built-in U-shaped desk by Charleston Crafted is really cool too! This would be perfect for a homework station or an arts […]

  2. 30 DIY Desk Ideas for Beginners You Can Build Today! - Anika's DIY Life says:
    April 18, 2020 at 11:15 am

    […] Built-in U Shaped Desk from Charleston […]

  3. 12 Desks You Can Make This Weekend - Crafted by the Hunts says:
    April 23, 2020 at 2:51 pm

    […] Desk by Anika’s DIY Life IKEA Hack Desk by PMQ for TwoDIY Farmhouse Desk by Handmade HavenDIY Built-In Desk by Charleston CraftedDIY Desk in a Closet by Houseful of HandmadeDIY Wood Desk by Lazy Guy DIYDIY Workbench Inspired Desk […]

  4. 25 Wooden Desk Ideas - Woodworking24hrs says:
    June 3, 2020 at 7:42 pm

    […] desk was created by Chaleston crafted. They made this DIY built-in U-shaped desk custom for a small nook in our bedroom. The dimensions […]

  5. 10 Best Home Office Ideas - Real Estate News says:
    June 10, 2020 at 1:35 pm

    […] 6.Build A Custom Desk For A Nook In Your Home by Charleston Crafted […]

  6. 8 Small Home Office Ideas | Viktorblogger says:
    November 13, 2020 at 12:08 pm

    […] Check it here. […]

  7. 13 DIY Desks You Can Make This Weekend – Latest Blog 2021 @timeDate says:
    December 8, 2020 at 8:10 am

    […] Hack Desk by PMQ for Two DIY Farmhouse Desk by Handmade Haven DIY Built-In Desk by Charleston Crafted DIY Desk in a Closet by Houseful of Handmade DIY Wood Desk by Lazy Guy DIY DIY Workbench Inspired […]

Primary Sidebar

Charleston Crafted about us image

Hey y'all!

We are Morgan & Sean McBride and we are crafting our home together in Charleston, South Carolina.

More about us

Popular Posts

  • DIY Coffered Ceiling
    DIY Coffered Ceiling
  • How to Make DIY Concrete Pumpkins via Charleston Crafted
    How to Make DIY Concrete Pumpkins
  • How to Make a Cupid's Arrow Valentine's Day Wall Hanging with felt on the Cricut
    How to make a Cupid's Arrow Valentine's Day Wall Hanging
  • Our Tropical Oasis - A backyard Hammock area - Charleston Crafted
    Our Tropical Oasis

Recent Posts

  • fisherman aesthetic home inspiration
    Fisherman Aesthetic Decor for Your Home
  • Senix Tools Review- Charleston Crafted
    Are Senix power tools any good?
  • Your Weekend To-Do List: 15 Things to Do for Summer Home Upkeep
    Your Weekend To-Do List: 15 Things to Do for Summer Home Upkeep
  • How to stain wood with RIT dye - step by step instructions
    How to stain wood with RIT dye

Privacy Policy

Footer

↑ back to top

Navigation

  • Home
  • Blog
  • Contact Us
  • Terms of Use
  • Disclaimer

Newsletter

  • Sign up for emails and updates
  • Follow us on Instagram
  • Work with Us

Browse by Category

  • Woodworking
  • Home Projects
  • Paint Colors
  • Room Reveals

© 2025 The Charleston Crafted Blog LLC DBA “Charleston Crafted” and “CharlestonCrafted” (also known as N/A) / All Rights Reserved.
Official Website: (Charleston Crafted)
Registered in USA (Co. Reg. No.: 565586)
Address: Charleston, USA 29414, South Carolina
Contact Phone: Not applicable — contact is via email: sean@charlestoncrafted.com

DISCLAIMER: The content on this website is provided for general informational purposes only and is not intended as professional advice. The Charleston Crafted Blog LLC and The Charleston Crafted Blog LLC make no representations or warranties—express or implied—regarding the accuracy, completeness, or suitability of the information contained herein. Any reliance you place on this information is strictly at your own risk. In no event shall The Charleston Crafted Blog LLC or The Charleston Crafted Blog LLC be liable for any loss or damage, including without limitation, indirect or consequential loss or damage, arising from the use or inability to use this website. This website is the official website of The Charleston Crafted Blog LLC.

AFFILIATE DISCLOSURE: This website contains affiliate links. If you click through and make a purchase, we may earn a commission at no extra cost to you.

As an Amazon Associate, I earn from qualifying purchases.

Site Editor: Morgan Smith McBride

Copyright © 2025 Charleston Crafted