• Skip to primary navigation
  • Skip to main content
  • Skip to primary sidebar
Charleston Crafted
  • DIY
  • Woodworking
  • Popular Posts
  • Blog
  • About
  • Shop
menu icon
go to homepage
  • DIY
  • Woodworking
  • Popular Posts
  • Blog
  • About
  • Shop
search icon
Homepage link
  • DIY
  • Woodworking
  • Popular Posts
  • Blog
  • About
  • Shop
×
Home » Art Projects

An Easy DIY Wood Grain Painting & 3-D Mounting

Published: Feb 13, 2017 · Modified: Jan 19, 2024 by Morgan · As an Amazon Associate, we earn from qualifying purchases. This site contains affiliate links. ·

This post will show you all about how we took a large sheet of plywood and painted the grain to make a large piece of art to 3D mount on our wall!

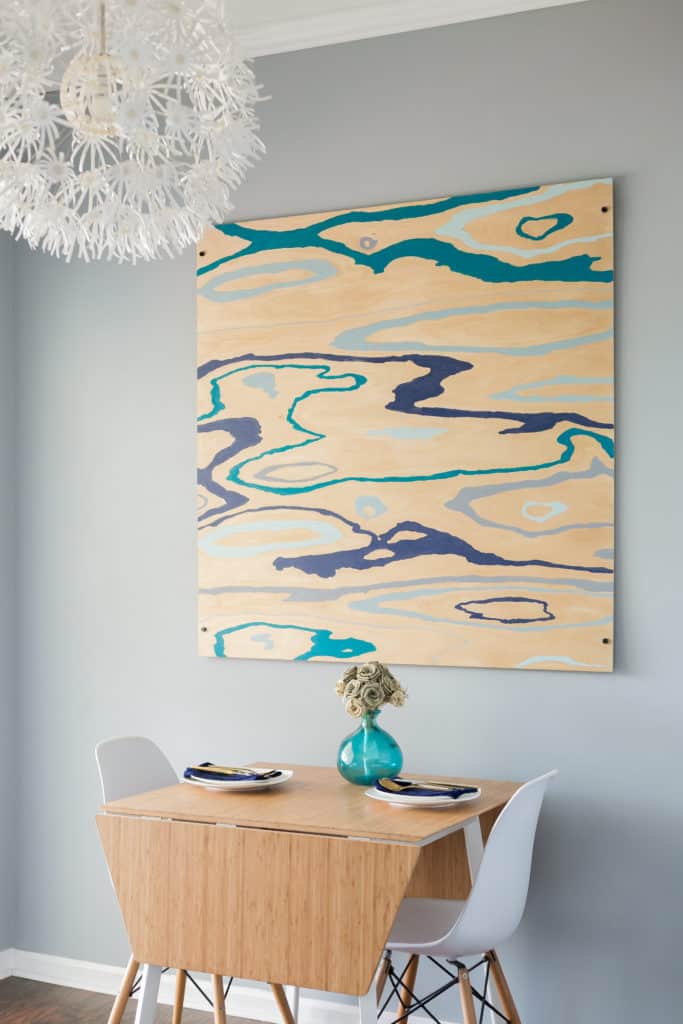
We recently did a wood grain painting for our kitchen and added 3-D mounting. After peeling the wallpaper and painting the walls, the huge wall in our eat in area looked so big and blank.

We didn't want a gallery wall since we already have one on the stairs and one in the sunroom, and so I decided on large scale art.

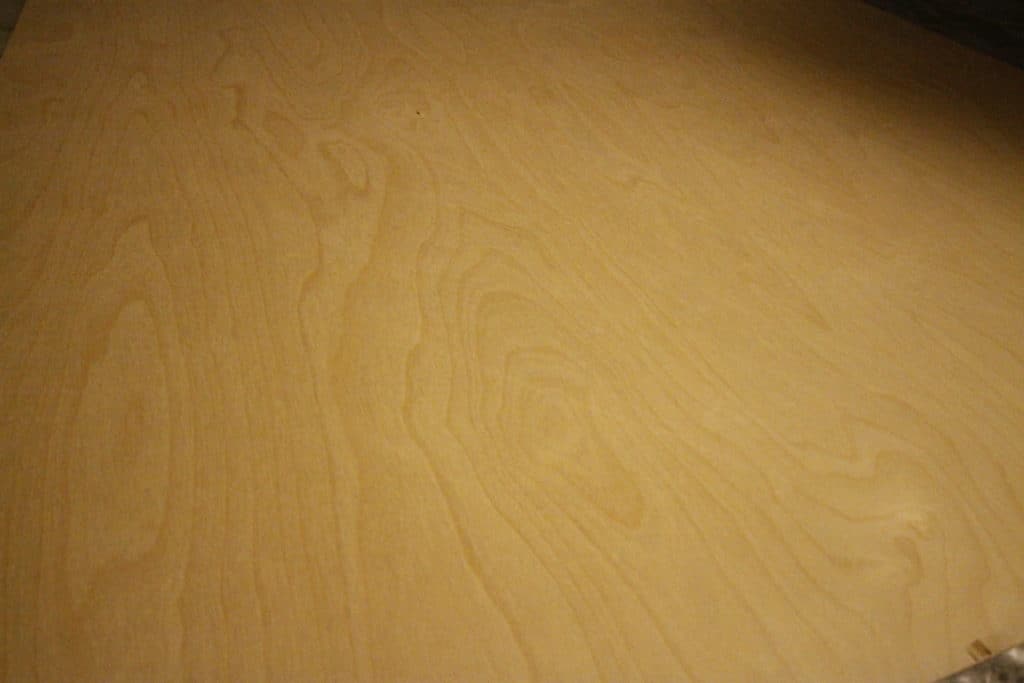
I have been oogling the gorgeous grains of the birch wood sheets at Lowes, so I decided that a 4x4' wood grain painting would be the perfect addition to this space.

Using a sheet of plywood as a canvas has a lot of benefits. First, it's cheaper than a canvas this size. Second, it has a lot of natural beauty that I sought to highlight, not cover up, using paint. Finally, the color of the wood really adds warmth and a natural feel to the space. 

I also came up with a pretty unique way to 3D mount it so it pops off the wall, so keep scrolling if you are interested in that! 

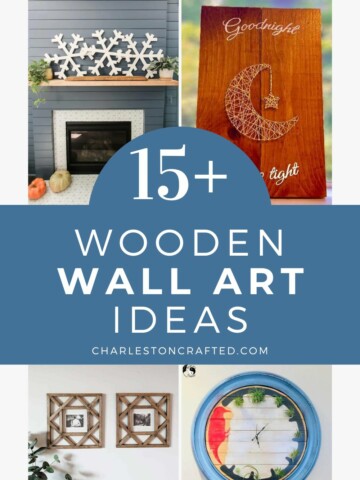
Here are all of my favorite Large DIY Wall Decor Ideas!

Our Kitchen for Charleston Home & Design Magazine - Charleston Crafted

Sign up for our newsletter here full of more DIY and home content! 

Easy DIY Wood Grain Painting & 3-D Mounting

I considered painting different designs or shapes, but I kept coming back to why I loved the wood - the beautiful grain. So, I decided to just wing it.

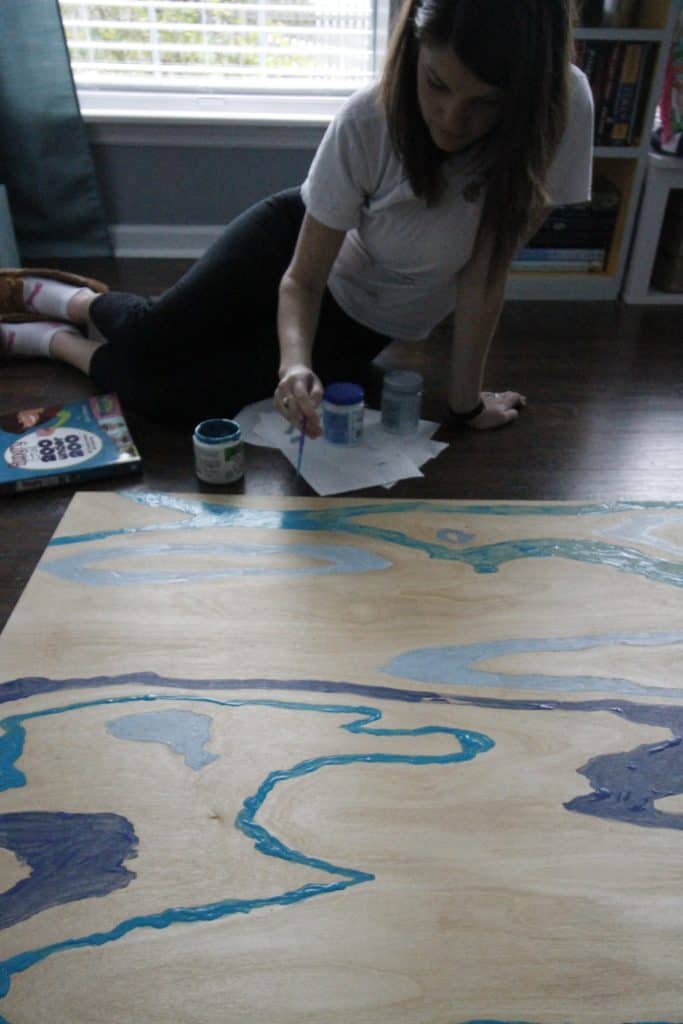
Like I said, the goal of my painting was to emphasize the grain. It almost felt like flowing water to me, especially once I got my blue paints in there. 

An Easy DIY Wood Grain Painting & 3-D Mounting - Charleston Crafted

How to paint a wood grain art painting

Here's what we did to paint this giant piece of art by tracing the wood grains!

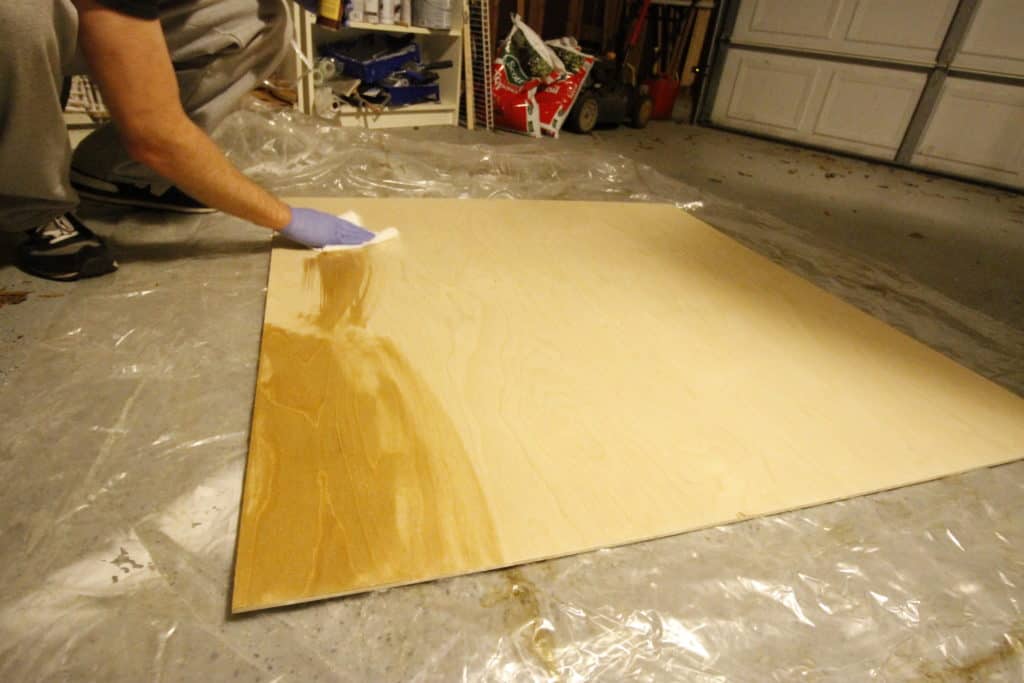
Step one: add a base coat

First, I used our can of Restore a Finish to coat the entire thing. This is much lighter than a stain and just really made the grain pop.

Bonus: we used it on some of the boards for our dining room table, so it brings the two spaces together nicely. You could use any type of oil or stain to get the base color of the plywood where you want it to be. 

An Easy DIY Wood Grain Painting & 3-D Mounting - Charleston Crafted

Like this post? You'll also love our kitchen reveal // DIY triptych from a phone photo // live edge wood shelves

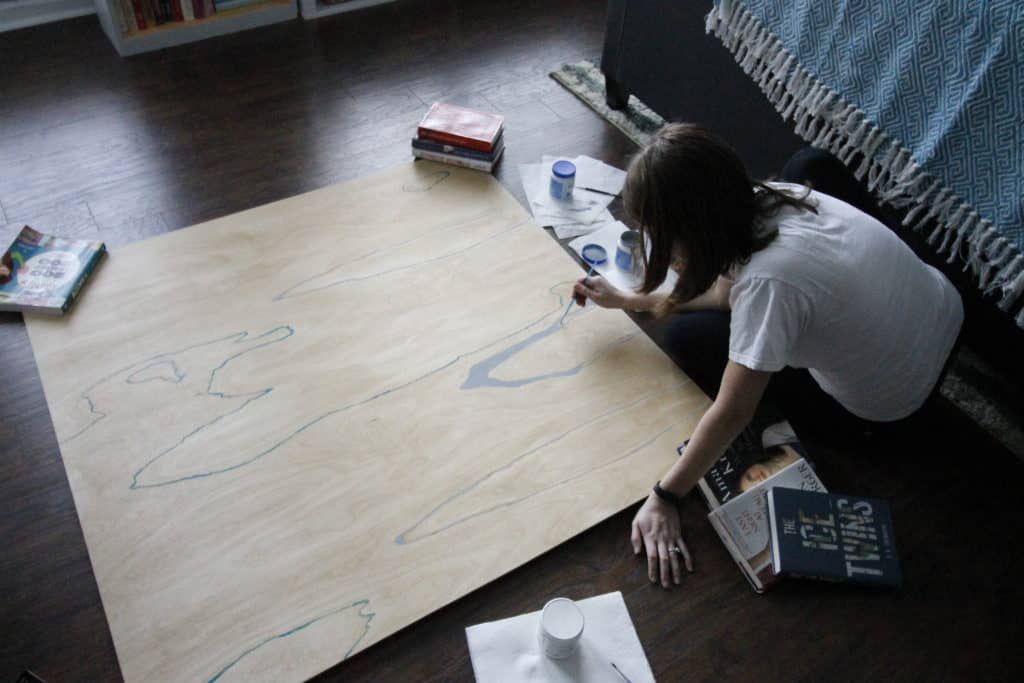
Step two: trace wood grains with paint

Next I grabbed left over paint samples and used a thin paint brush to trace some of the grains, randomly.

I filled some in thicker than others (choosing 2 parallel grains and filling in all of the space between them). Certain sections needed two coats, but it was a really easy process.

Here are my favorite blue gray paint colors!

An Easy DIY Wood Grain Painting & 3-D Mounting - Charleston Crafted

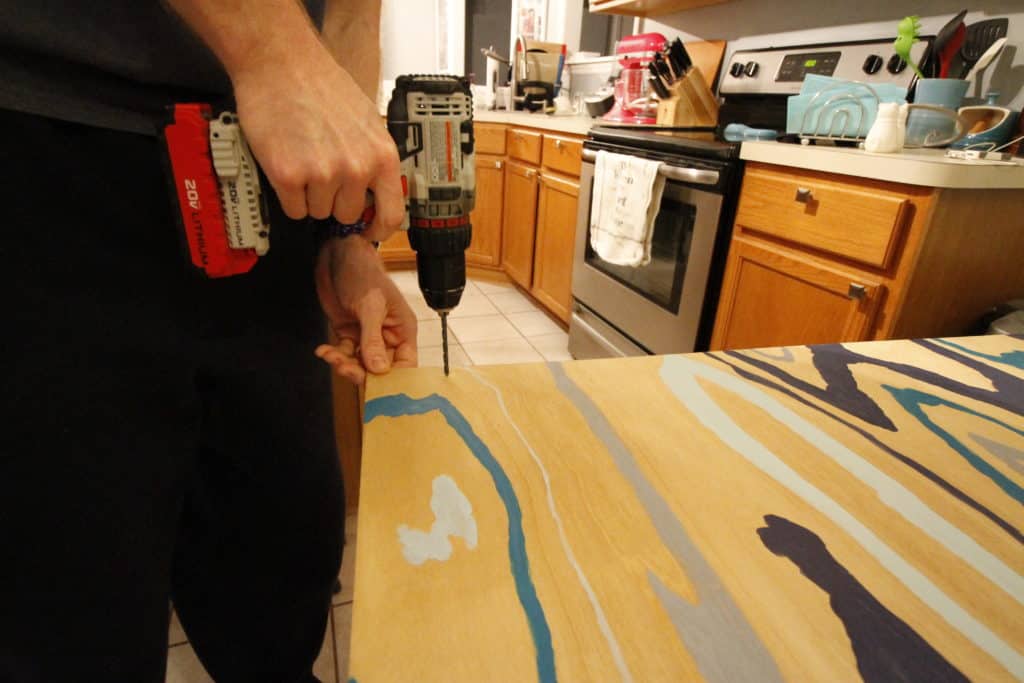
Step three: mount with 3D mounting

Sean mounted the board by drilling four holes in the corners of the board and equally into the wall.

He used leftover chunky black screws that came with the sliding barn door kit as the mounting hardware. He also added some space between the wall and the art in order to give it a three dimensional feel by putting a big hex nut on the screws between the art and the wall.

Then, when they were screwed in, there was about an inch of space between the wall and the art.

An Easy DIY Wood Grain Painting & 3-D Mounting - Charleston Crafted

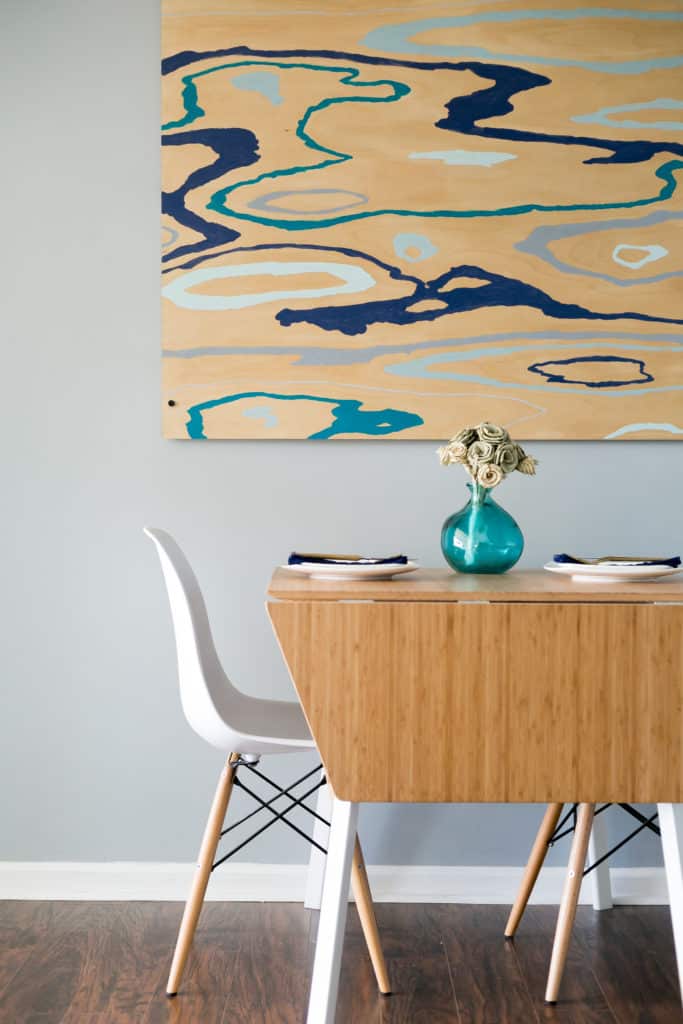
DIY wood grain art painting

The final product looks outstanding! Once the painting was up on the wall, it perfectly tied in the colors of our home to the kitchen.

The wood looks beautiful and light and works with the overall space in our kitchen.

Our Kitchen for Charleston Home & Design Magazine - Charleston Crafted

Click here to pin this project to your Pinterest board!

What have you been putting up lately? Any new art projects?!

Charleston Crafted Signature

Follow us on:
Pinterest | Instagram | TikTok | YouTube | Facebook | Amazon Storefront | LTK Shop

Looking for something?

We've been doing this since 2012 so we have a LOT of blog posts!
Search stuff like: Ceiling Projects | DIY Plant Stands | Thrift Flips

Charleston Crafted logo banner
Morgan headshot cropped
Morgan

Hello, I'm Morgan, half of the creative force behind CharlestonCrafted.com! With a passion for DIY that dates back to 2012, I've transformed three homes and now I'm dedicated to helping others craft their dream spaces. Let's turn your house into a home together!

More Art Projects

  • best Christmas wall art
    15 Christmas Wall Art - Easy DIY Projects
  • 15 creative Wooden Wall Art Ideas
  • 34 DIY large wall decor ideas
    34 Large DIY Wall Decor Ideas
  • How to build a DIY kid's arts and crafts table - Charleston Crafted
    How to build a DIY Kid's Art Table

Reader Interactions

Comments

  1. Corinna - ADesignerAtHome says

    February 13, 2017 at 5:10 pm

    Okay this is really cool! Love the multidimension!

    • Morgan says

      February 14, 2017 at 7:54 am

      Thanks! It was a good way to mix it up compared to the other pieces we already have hanging.

  2. Roxanne says

    February 13, 2017 at 11:33 pm

    I love original decor, good job!

  3. Tee @ Beauteeful Living says

    February 16, 2017 at 9:18 am

    This is so cute and original. I love the colors that you chose. Thanks for sharing.

    • Morgan says

      February 17, 2017 at 11:08 am

      Thanks! they are definitely "my colors" 🙂 Thanks for stopping by!!

  4. Maria Brittis says

    February 16, 2017 at 4:33 pm

    Very creative! I was just in Charleston last weekend doing a video! I live a few hours away!
    I love the wood grain it makes the paint pop!
    Maria

  5. Amanda says

    February 17, 2017 at 8:38 am

    Such a fun idea - I absolutely love the colors you chose!

    • Morgan says

      February 17, 2017 at 11:07 am

      Thanks! it was easy too!

  6. Kati says

    February 23, 2017 at 12:50 pm

    This is such a fun idea! I love wood grain anything.

Trackbacks

  1. 16 Plywood DIY Ideas says:
    June 29, 2017 at 6:20 am

    […] Turn a sheet of plywood into a beautiful piece of art. Tutorial… […]

  2. You CAN DIY The Kitchen Of Your Dreams Too! (Guest Post) - Hungry Hobby says:
    January 31, 2019 at 12:20 pm

    […] the awesome DIY painted wood grain art over our table […]

  3. How to Decorate a Large Wall - The Best Large Wall Decor Ideas - Twelve On Main says:
    August 12, 2021 at 11:05 am

    […] This has to be the coolest DIY wall art idea.  This wood grain wall art by Charleston Crafted is amazing. […]

Primary Sidebar

Charleston Crafted about us image

Hey y'all!

We are Morgan & Sean McBride and we are crafting our home together in Charleston, South Carolina.

More about us

Popular Posts

  • DIY Coffered Ceiling
    DIY Coffered Ceiling
  • How to Make DIY Concrete Pumpkins via Charleston Crafted
    How to Make DIY Concrete Pumpkins
  • How to Make a Cupid's Arrow Valentine's Day Wall Hanging with felt on the Cricut
    How to make a Cupid's Arrow Valentine's Day Wall Hanging
  • Our Tropical Oasis - A backyard Hammock area - Charleston Crafted
    Our Tropical Oasis

Recent Posts

  • fisherman aesthetic home inspiration
    Fisherman Aesthetic Decor for Your Home
  • Senix Tools Review- Charleston Crafted
    Are Senix power tools any good?
  • Your Weekend To-Do List: 15 Things to Do for Summer Home Upkeep
    Your Weekend To-Do List: 15 Things to Do for Summer Home Upkeep
  • How to build a DIY gate pergola- Charleston Crafted
    How to build a DIY gate pergola

Privacy Policy

Footer

↑ back to top

Navigation

  • Home
  • Blog
  • Contact Us
  • Terms of Use
  • Disclaimer

Newsletter

  • Sign up for emails and updates
  • Follow us on Instagram
  • Work with Us

Browse by Category

  • Woodworking
  • Home Projects
  • Paint Colors
  • Room Reveals

© 2025 The Charleston Crafted Blog LLC DBA “Charleston Crafted” and “CharlestonCrafted” (also known as N/A) / All Rights Reserved.
Official Website: (Charleston Crafted)
Registered in USA (Co. Reg. No.: 565586)
Address: Charleston, USA 29414, South Carolina
Contact Phone: Not applicable — contact is via email: sean@charlestoncrafted.com

DISCLAIMER: The content on this website is provided for general informational purposes only and is not intended as professional advice. The Charleston Crafted Blog LLC and The Charleston Crafted Blog LLC make no representations or warranties—express or implied—regarding the accuracy, completeness, or suitability of the information contained herein. Any reliance you place on this information is strictly at your own risk. In no event shall The Charleston Crafted Blog LLC or The Charleston Crafted Blog LLC be liable for any loss or damage, including without limitation, indirect or consequential loss or damage, arising from the use or inability to use this website. This website is the official website of The Charleston Crafted Blog LLC.

AFFILIATE DISCLOSURE: This website contains affiliate links. If you click through and make a purchase, we may earn a commission at no extra cost to you.

As an Amazon Associate, I earn from qualifying purchases.

Site Editor: Morgan Smith McBride

Copyright © 2025 Charleston Crafted