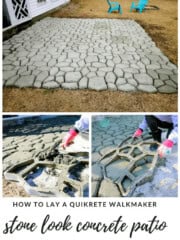
Want to make a concrete patio yourself, on an affordable budget? Here's our step by step tutorial on how we made a Quikrete WalkMaker Patio!
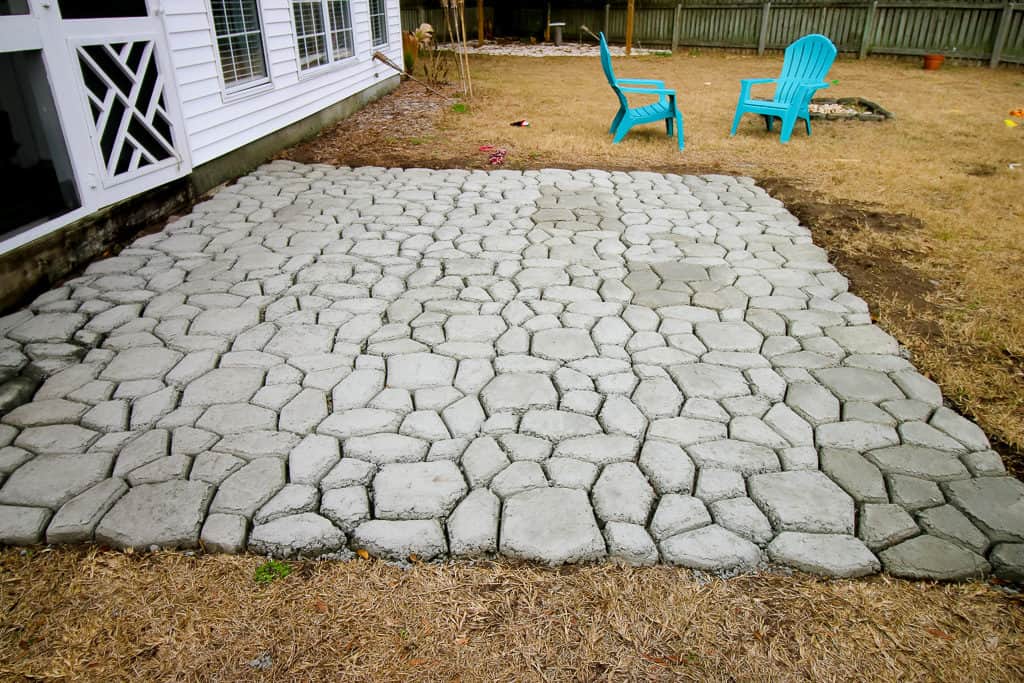
Y'all, we laid a gorgeous patio a few weeks ago and we are loving how it has turned out. If you're looking for how to make a QUIKRETE WalkMaker patio, you've found your final spot.
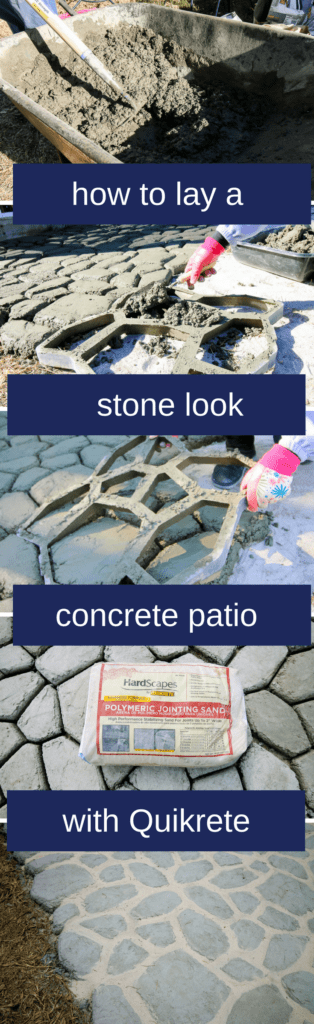
Last week we told you about how we were removing our old patio, so the next step was to lay the new one, using QUIKRETE 5000 and their WalkMaker forms in the Country Stone pattern.
The Country Stone WalkMaker has an awesome look that gives our backyard a rustic feel with the simplicity of pouring concrete.
Once we laid the concrete and it fully dried, we added polymeric sand to fill in the grooves.
Here is how we did the final step of this project, adding polymeric jointing sand.
Click here to download this project tutorial in a free printable PDF
How to make a QUIKRETE Walkmaker patio
The QUIKRETE WalkMaker is a super simple product to use.
The WalkMaker comes in a number of different patterns to elevate your basic concrete patio or path into something really special.
Click here for basic Quikrete Walk Maker Instructions.
Each WalkMaker form is designed to take one 80 pound bag of QUIKRETE, but we ended up needing a little less.
For us, it was about two bags for three forms.
The process is simple.
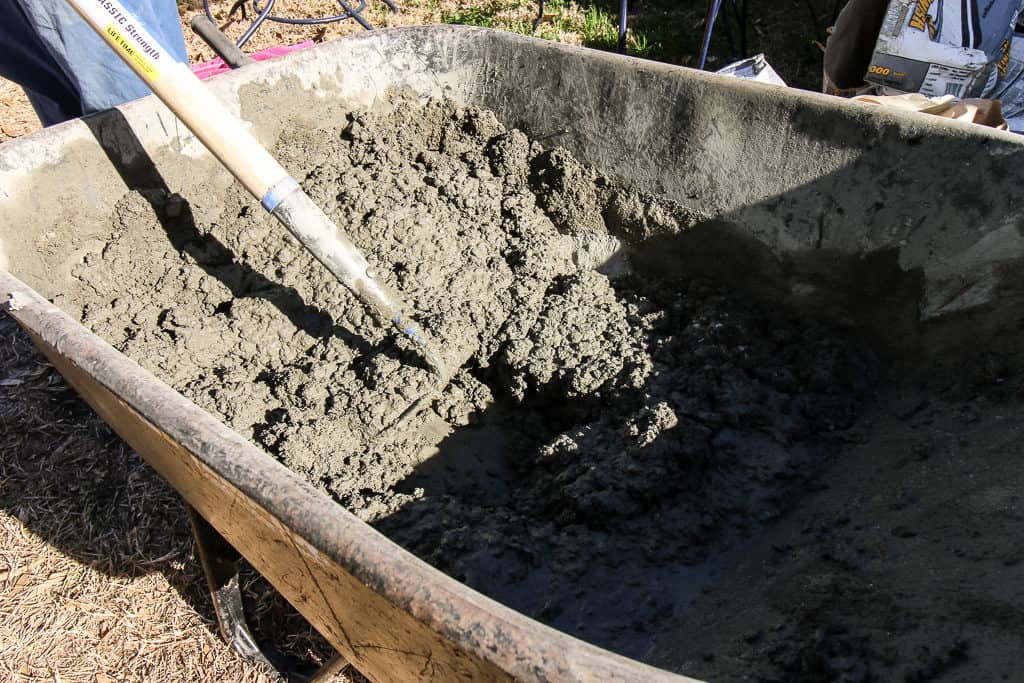
First mix a bag of QUIKRETE in a wheelbarrow or plastic tub according to the instructions on the bag.
It should end up the consistency of wet peanut butter.
Properly mixed concrete will hold it's form immediately, which is essential for using the WalkMaker forms.
Make sure your concrete isn't too wet or dry or it will crumble or mush apart when you remove the WalkMaker.
You want the consistency to be that of wet peanut butter.
Add water bit by bit until you get that consistency.
If you are doing a lot of molds (for a patio or large path), be sure to track the amount of water that you use the first time to make subsequent bags go faster.

Lay your WalkMaker in the first place you want your form.
If you're making a patio like us, we recommend starting along the house in a corner if possible. This way you can work from a straight spot.

With your WalkMaker in place, start scooping your mixed concrete into the form.
Start by pushing the concrete into the corners and along the edges of each stone in the pattern.
If you don't get the concrete all the way into the gaps, the mold won't look right. You will have air bubbles.
Shake the mold a bit to really get it down into all of the gaps.
It takes a lot more concrete than you think that it will! Continue to add concrete, pushing it down around all the edges and filling in the middle.
Pack it down well and then smooth the top as best you can.
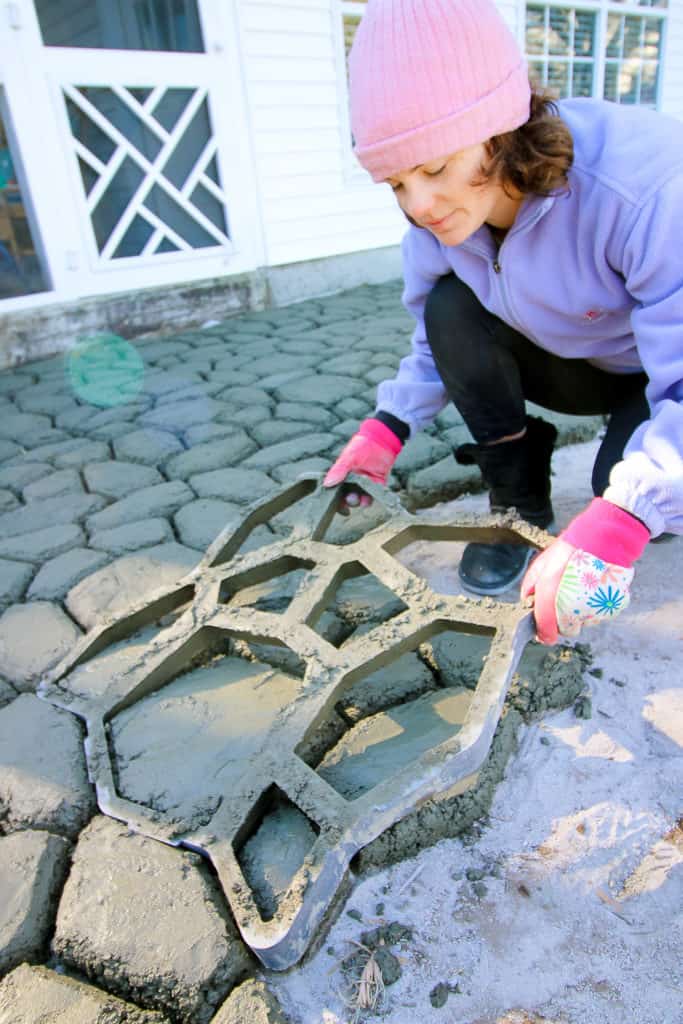
Now is time to remove the WalkMaker form. There are little tabs on each side that make it easy to pull up.
Remember, if your concrete was properly mixed, there shouldn't be any problem here.
Simply pull the form straight up and it should easily come loose from your stones and the concrete should hold it's shape.
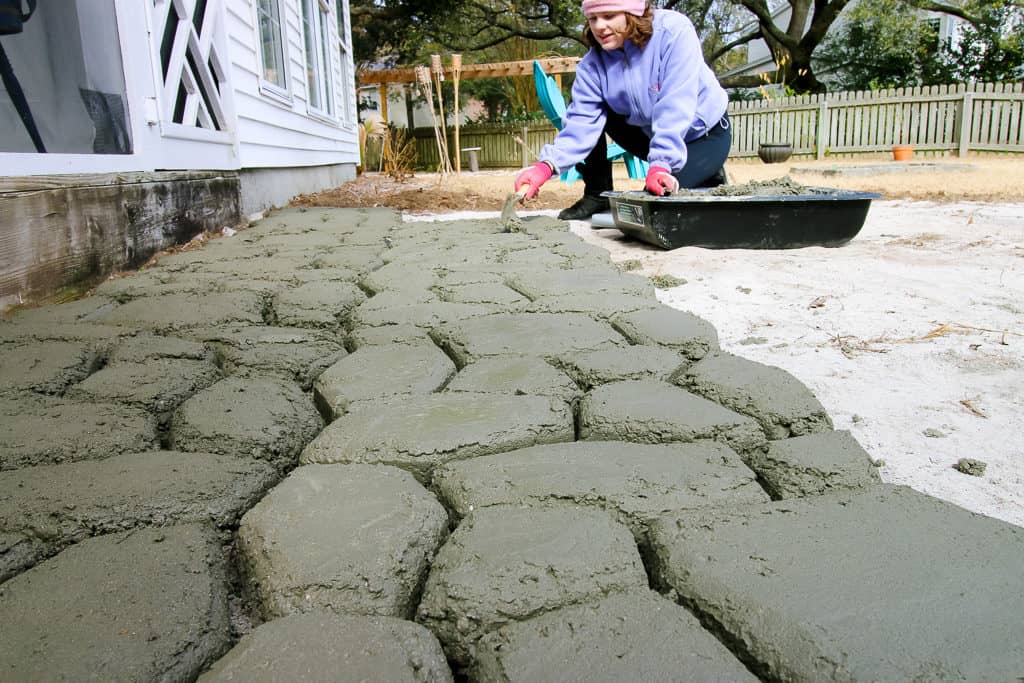
The next thing that you want to do is smooth out the tops and edges of your stones again. Use your hand shovel to do this.
Here you can simply level them off or even bevel the edges a little bit to give them a more natural stone look. Don't forget this step!

The final step is to rotate the WalkMaker form a quarter turn. Then, set it down right up against the stones you just made. Continue to do this as you do each form.
Rotating the pattern makes it harder to tell that your patio or path is a repeating pattern of the same mold. You don't want it to look like a grid!
QUIKRETE 5000 is a great concrete mix for this project because it solidifies pretty quickly.
It's walkable within 10 hours and holds its form very well. The concrete was easy to mix and formed well in the WalkMaker forms.
There ended up being 48 forms and it took about 7 hours.
It took us one day to lay our Walkmaker patio. The beauty of these forms is that you can do a few in an evening if you don't have a long period of time.
Or, you could do an entire patio in one day.
We loved using both of these products and think they would work great for anyone else doing the same thing.
Click here to download this project tutorial in a free printable PDF
How many bags of concrete do I need for a WalkMaker?
The WalkMaker mold is designed to use 1 bag of concrete per mold. So, when you design your patio, count out the squares needed and that's how many bags of concrete you need.
How much does a Walkmaker patio cost to make?
Calculate how big your patio will be. Once you know how many molds you need to use, multiply that times the current cost of bags of concrete. Add in the cost of at least one mold, a shovel, a wheel barrel if you don't have it.
Check out all of our favorite ways to upgrade your backyard on a budget!
So that was how to make a QUIKRETE WalkMaker patio.
If you like this project you might also enjoy:
Hardscape benches and fire pit

Looking for something?
We've been doing this since 2012 so we have a LOT of blog posts!
Search stuff like: Ceiling Projects | DIY Plant Stands | Thrift Flips

Hey there, I'm Sean, the woodworking enthusiast and builder behind CharlestonCrafted.com! Since 2012, I've been sharing the magic of turning raw materials into beautiful creations. I love teaching others the art and satisfaction of woodworking and DIY. I try to inspire fellow crafters to make something extraordinary out of nothing at all.


Madeline says
Hi! The patio looks great! What steps did you take to prepare the area before laying the concrete with the walkmaker?
Morgan says
we basically just cleared and leveled the space. the concrete is self-leveling so it doesn't have to be perfect!
Morgan says
here's a post about it: https://www.charlestoncrafted.com/2018/02/05/removing-our-old-patio/
Sara says
Can I ask what your budget was for this project?? We LOVE the result. It looks so good!
Sean says
Thanks Sara! So the cost is going to really depend on the size of your space. We had a 12x14 patio, meaning we needed six molds across and seven the other way, so around 85 bags. Bags of concrete cost about $5. Then we ended up needed about six bags of the polymeric jointing sand, which cost about $20 each. The molds cost about $25 and we used two so that we could be doing two areas simultaneously. So it was around $600. But it will vary based on your plan, space and costs in your area.
Trish says
Your patio looks beautiful, but I am a little confused on the amount of concrete you used. At the beginning of the post, you said you used two bags for three forms, and at the end you state you used 48 forms. Based on your previous statement, I would think you used 32 bags of concrete, but then in the comments you state you used 85 bags. How did you use 85 bags if you only made 48 forms and made three forms out of two bags? Did you mean to state that it took three bags to make two forms? Thank you!
Judy says
I've a spot that I've been looking to do something similar with. Adding to my list of alternatives!
Morgan says
Thanks Judy! If you make your own, please share with us!
Wendy says
I love it! I would love to do this as a decorative option for a small drive way. What are your thoughts? We live in Eastern Idaho. How well would it hold up? I really want to try it out. The current drive is asphalt.
I want to place over it.
Thank you, Wendy
Sean says
Should work great! Just get it done before you get your snow for the season!
Josh says
How did you pour the concrete near the foundation?
Sean says
Hey Josh, we lined up our molds along the edge of the foundation and then filled that gap later with the jointing sand.
Mal says
How has it held up? Any regrets?
Morgan says
It has held up amazing. Zero regrets. No cracks, no weeds. It is the exact same as day one and we love it.
Courtney Q says
How much did the whole project cost you?! A simple breakdown would be so helpful 🙂 Love it, thanks for sharing!
Sean says
The bags of concrete are about $5 each in our area, the jointing sand is about $20, and the molds are about $25. We used 32 bags of concrete and 6 bags of sand. And 2 molds. So just under $400.
Ashley says
How large was your patio you created?
Morgan says
14x16 foot ish
De Crews says
What did you lay down (gravel) before starting this project?
Morgan says
No, we did not lay gravel! It can go right in the dirt.
Donna O says
Looks great!
Would it be easier to plop the concrete down first in a flat layer, then push the form into it to get the shapes?
Sean says
I think the main problem you would run into would be being able to keep the concrete in shape. Plus you wouldn't be able to pour more than one row down at a time anyways because you'd have to be able to access it to put the mold down. Plus plus, you'd have to pour A LOT of concrete first before doing the molds. I'd recommend the recommended method.
Barbara says
NOPE...does NOT work to do that.
Sean says
Does not work to do what?
TigerKim says
Awesome job. I had one of these molds about 20 years ago and never used it. Now I live across the country and I love seeing the results you've gotten. This might actually be a great solution for me now. Thanks for the inspiration.
Alyssa says
Did you have to prepare the ground in any way before starting the concrete process?
Morgan says
We just leveled it!
Ginger says
I want to do a breezeway between the house and garage. Can I just level it as any other patio?
Morgan says
I don't see why not.
Krystal says
I love this idea! I want to build a fire pit for my husband for Father’s Day next year. How many bags did you use for your space roughly? They look about the same size. I know it’s a ways away but I will have to budget this project, and secretly save. I try to purchase all materials using cash and have my parent and his parent deliver them as soon as he leaves for work in hopes the project is done when he gets home! Thanks in advance!
Sean says
Hi, I'd be happy to help, but I don't know how you would use the WalkMaker forms to make a fire pit. Can you please clarify what you're looking for and to do?
Qween says
About how much did your patio cost in concrete. Is it cheaper than buying pavers?
Morgan says
The price is going to differ in your area, but yes it should be cheaper than pavers. One mold = one bag of concrete = one square foot so you can measure that way, plus the cost of the mold and the polymeric sand.
Aly L says
Did you do sand for your mortar?
Morgan says
Yes we used polymeric sand!
Ariel says
Hi
Great job! This is one of the better tutorials out there!
Quick question, how does the polymeric sand feel when barefoot? Is it sandy or does it actually harden up hard like grout? I’ve never used it and I’ve not been able to find answers.
I’d like to eventually try this but need to know how barefoot friendly/sandy it could be. Thanks!
Morgan says
Hey Ariel, it doesn't feel like sand and isn't grainy. It has a semi-hard, semi-spongey feel to it. It solidifies, holds really well to the concrete and worked great.