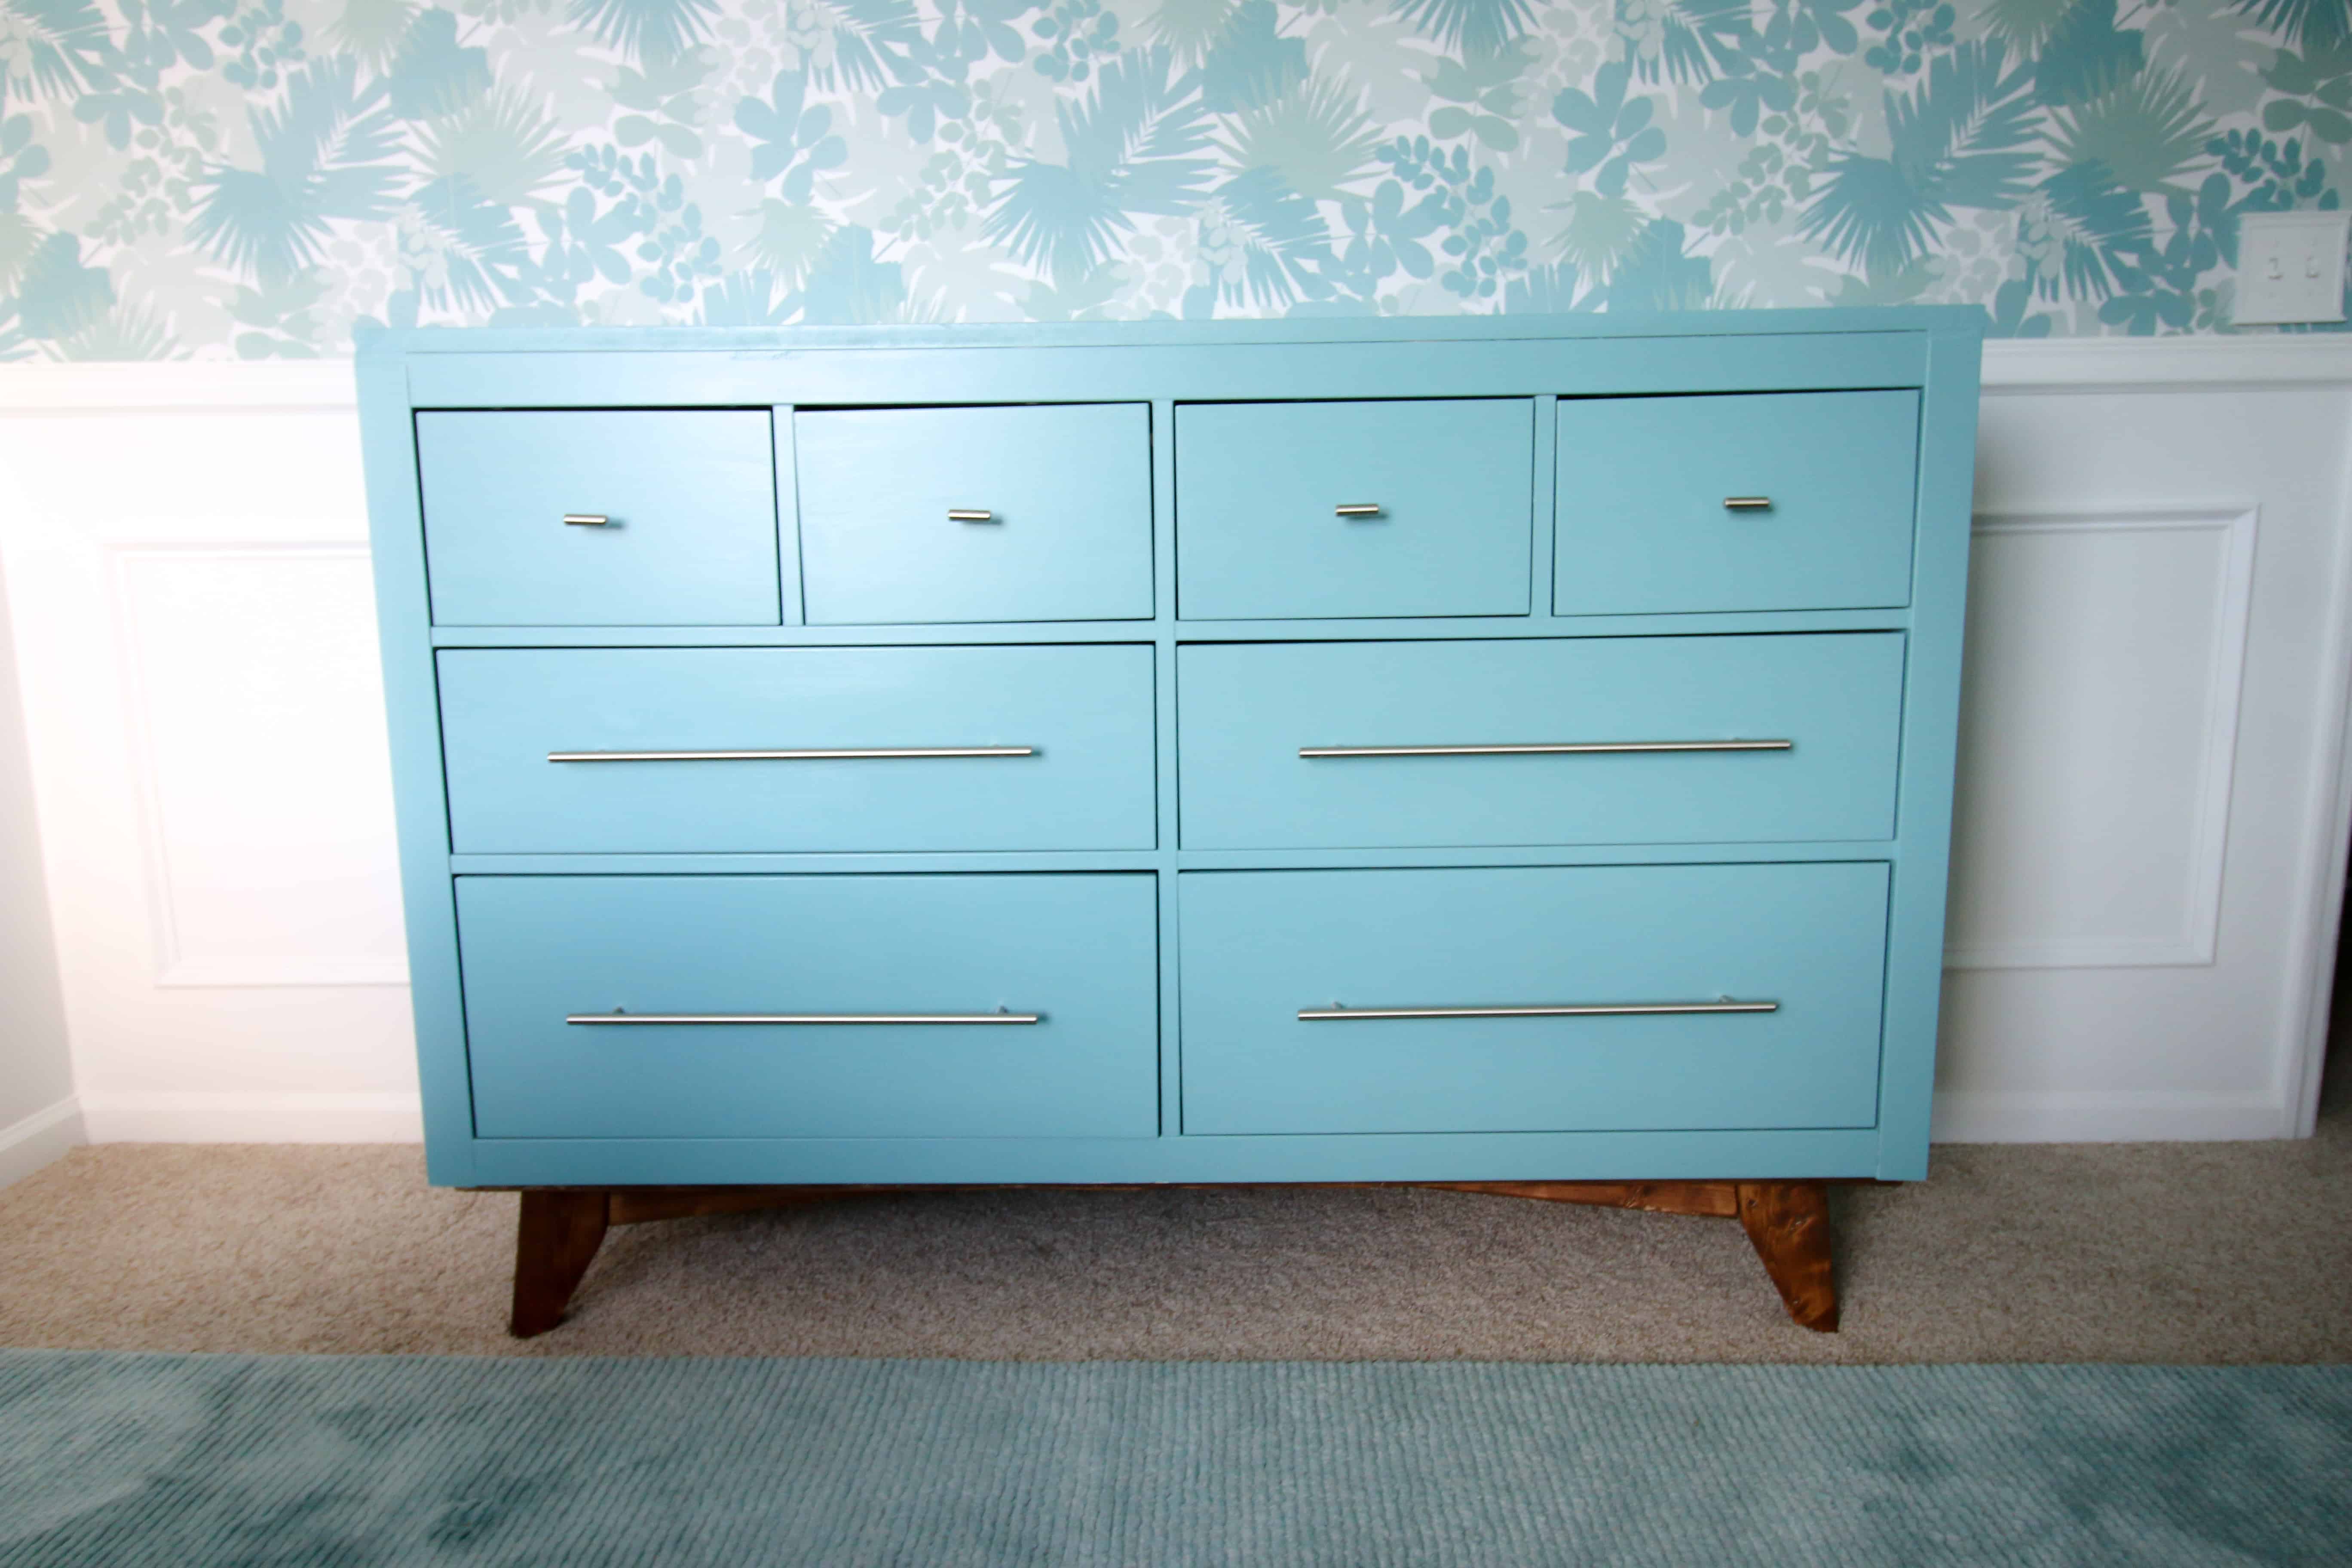
We bought a used IKEA Hemnes dresser on Facebook Marketplace that was perfect to transform into our baby's dresser and changing table. We have several pieces of the IKEA Hemnes line in our home, so it would be ok as is. But, we decided to give it a mid century modern twist.
Peep all the details of our tropical nursery here!
Morgan has been going crazy buying baby clothes (surprises surprise) and this dresser has really big and deep drawers, which are perfect for tons of onesie storage.
Something worth noting is that this makes for a really tall dresser.
If you are short and looking for a changing table, this might not be the best fit for you.
Also, we got the 6 drawer version of this dresser.
There is actually no Ikea in the state of South Carolina (I know, I know) and we bought this used on Facebook Marketplace for $30.
Click here to pin this project to your Pinterest board!
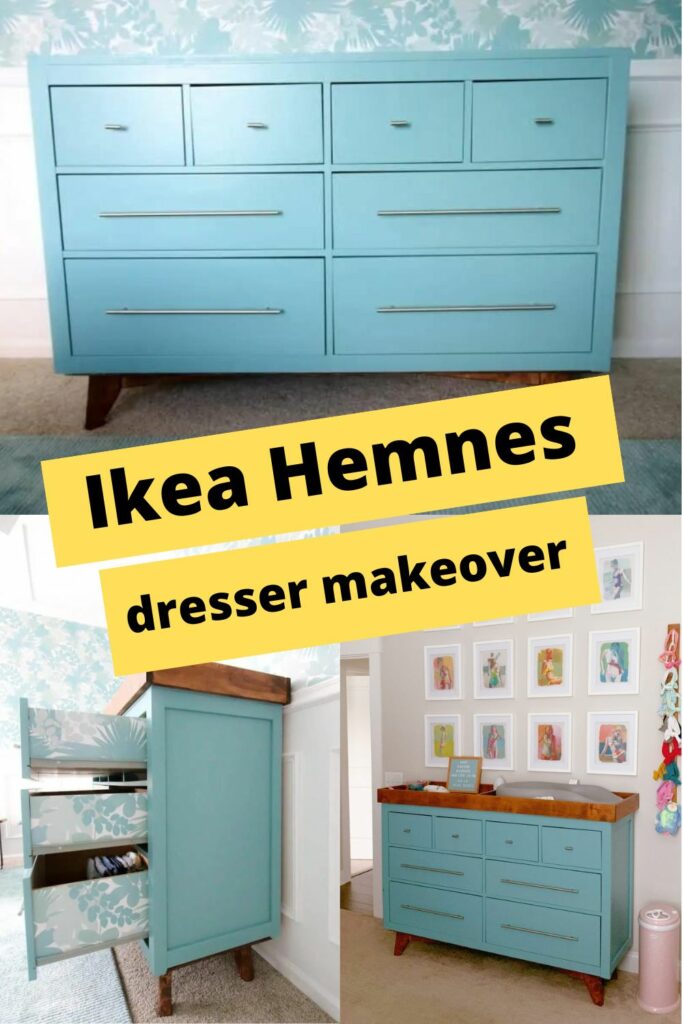
So, here's our IKEA Hemnes dresser mid century modern hack!
IKEA Hemnes Dresser Mid Century Modern Hack
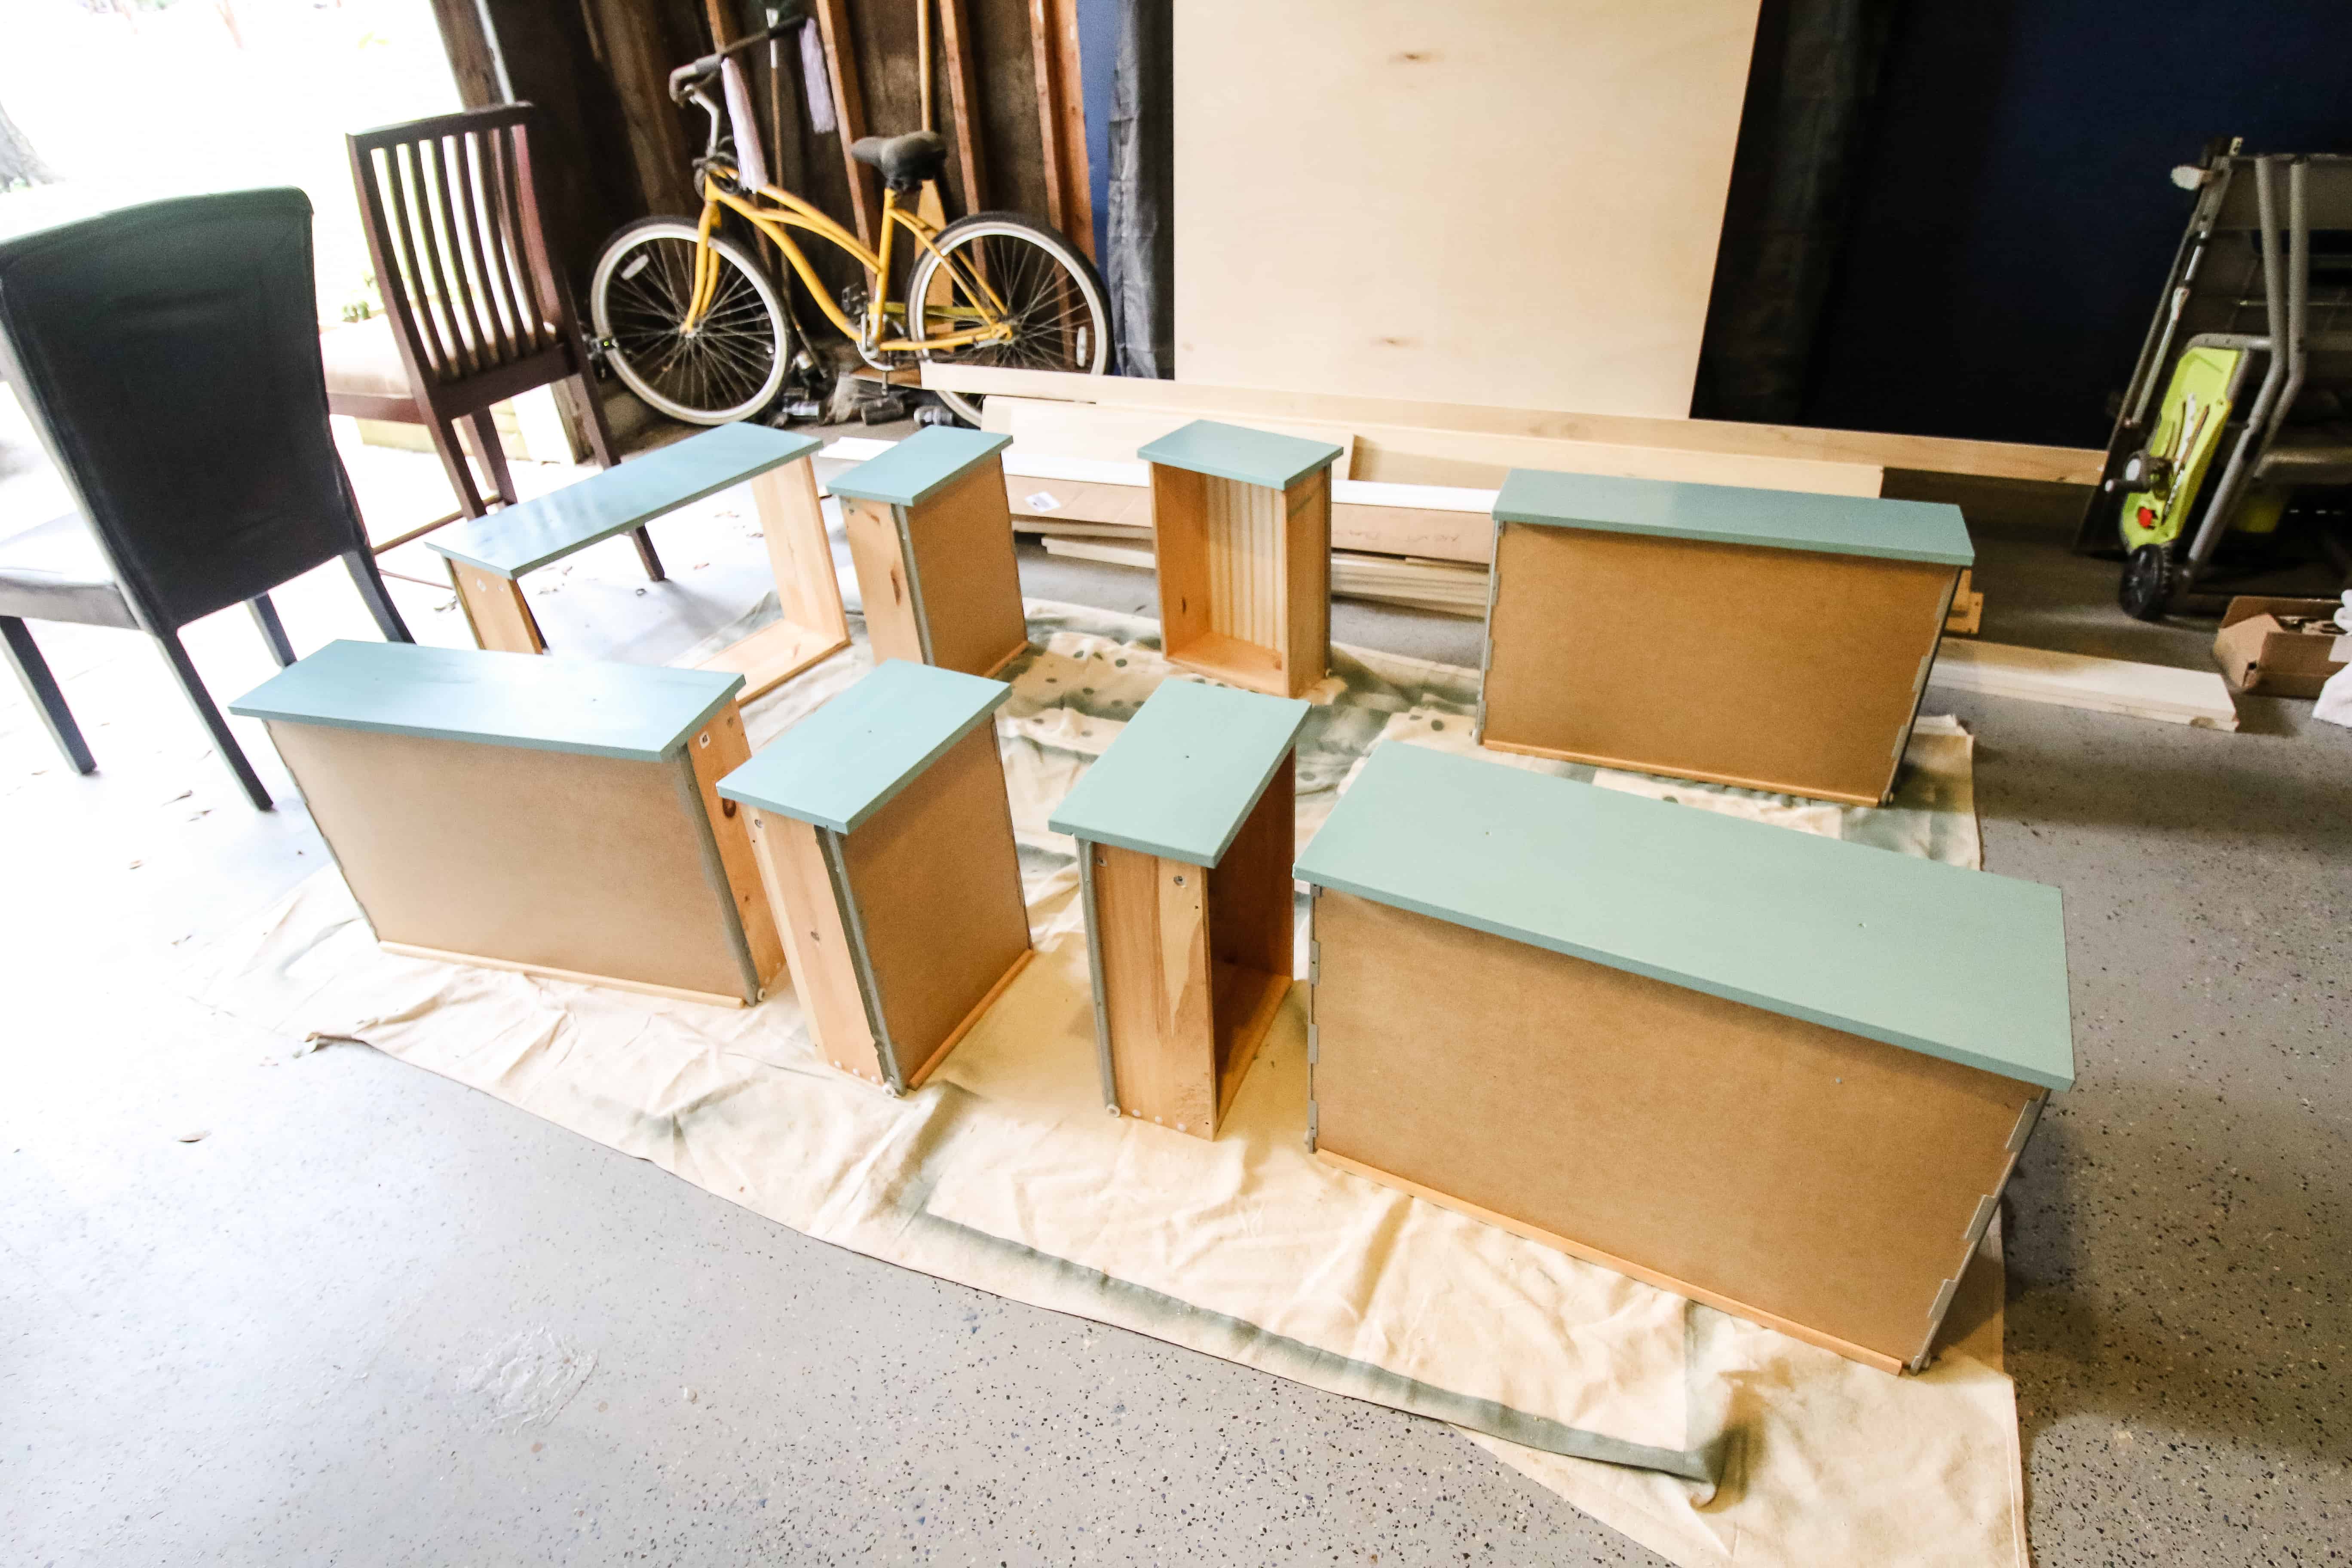
Deconstruct the Dresser
The first step of our IKEA Hemnes dresser mid century modern hack was to make a new shell of the dresser.
We started by trimming off the overhanging edges from the top.
Then, we sawed off the vertical legs on the bottom. This left us with a plain square shell.
Refinishing the Dresser
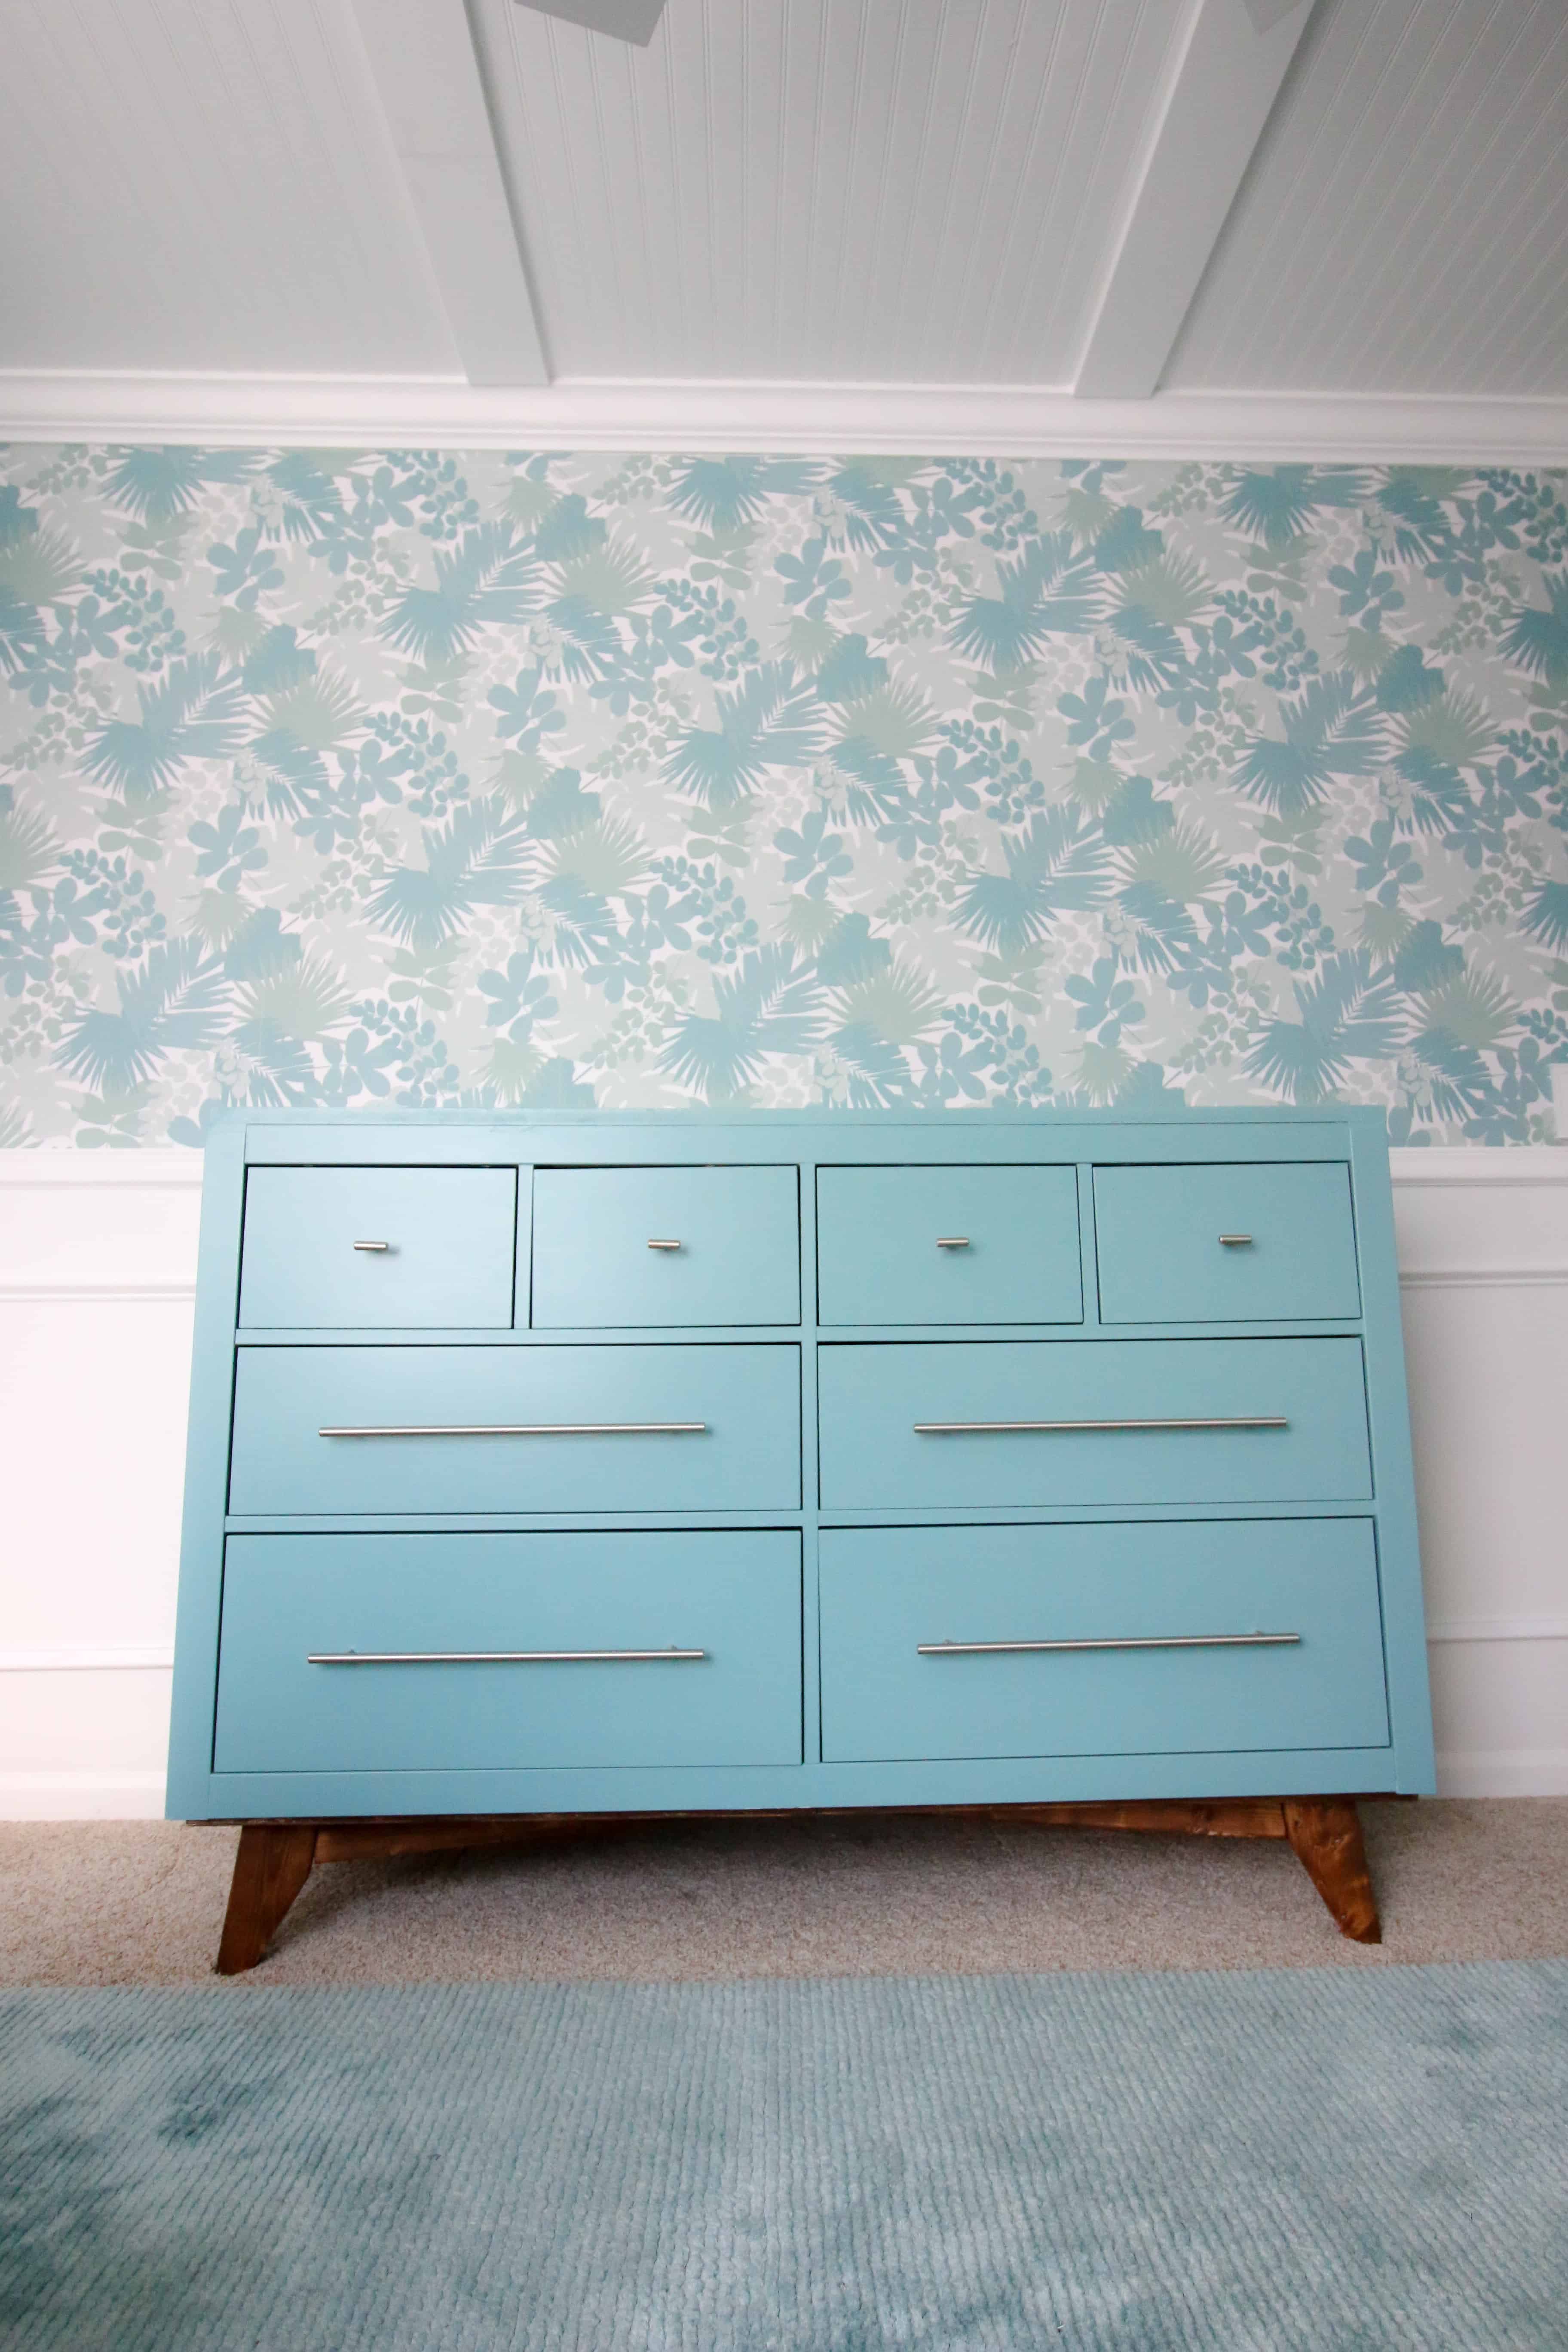
We painted the dresser and the drawers with Behr Marquee Tower Bridge.
This plays off the nursery's wallpaper and the inside of the closet.
We styled the drawers by adding strips of scrap wallpaper and adding new hardware.
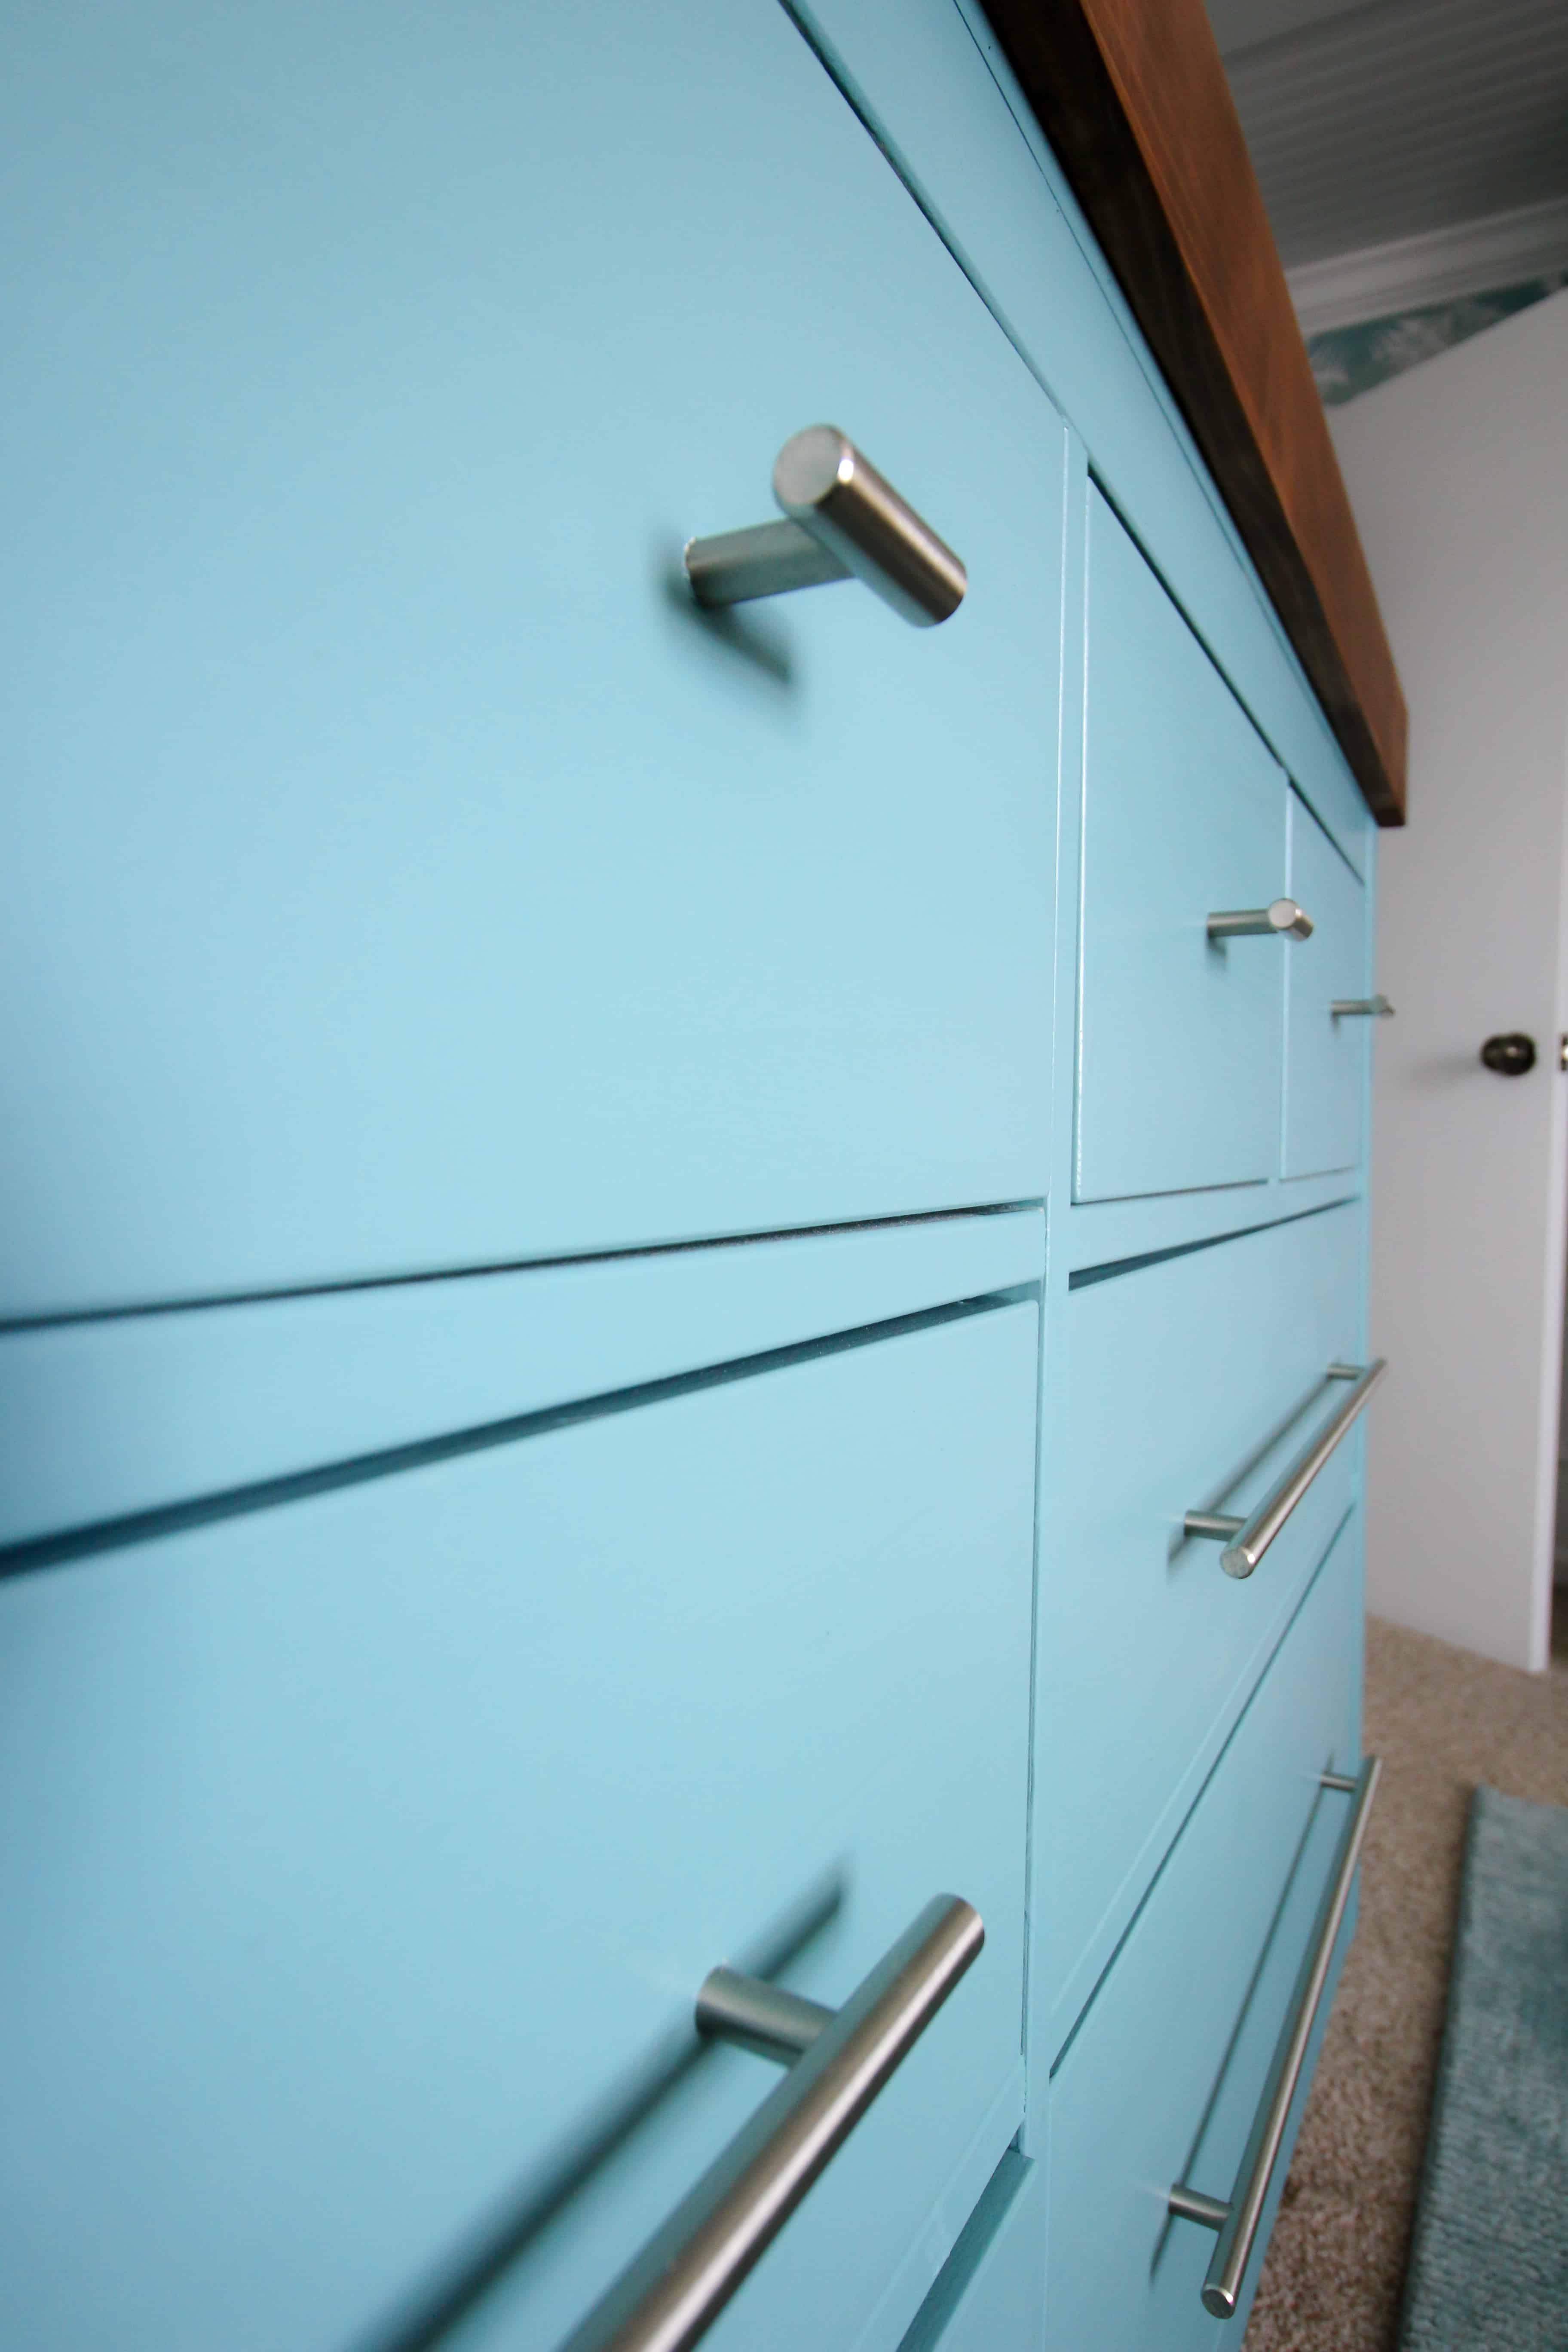
Thanks to Liberty Hardware for sending us their steel bar knob pulls and steel bar drawer handle pulls.
We used these pulls on the bi-fold closet doors as well, so they tie in nicely. These pulls are much more modern, but give a mid century look as well.
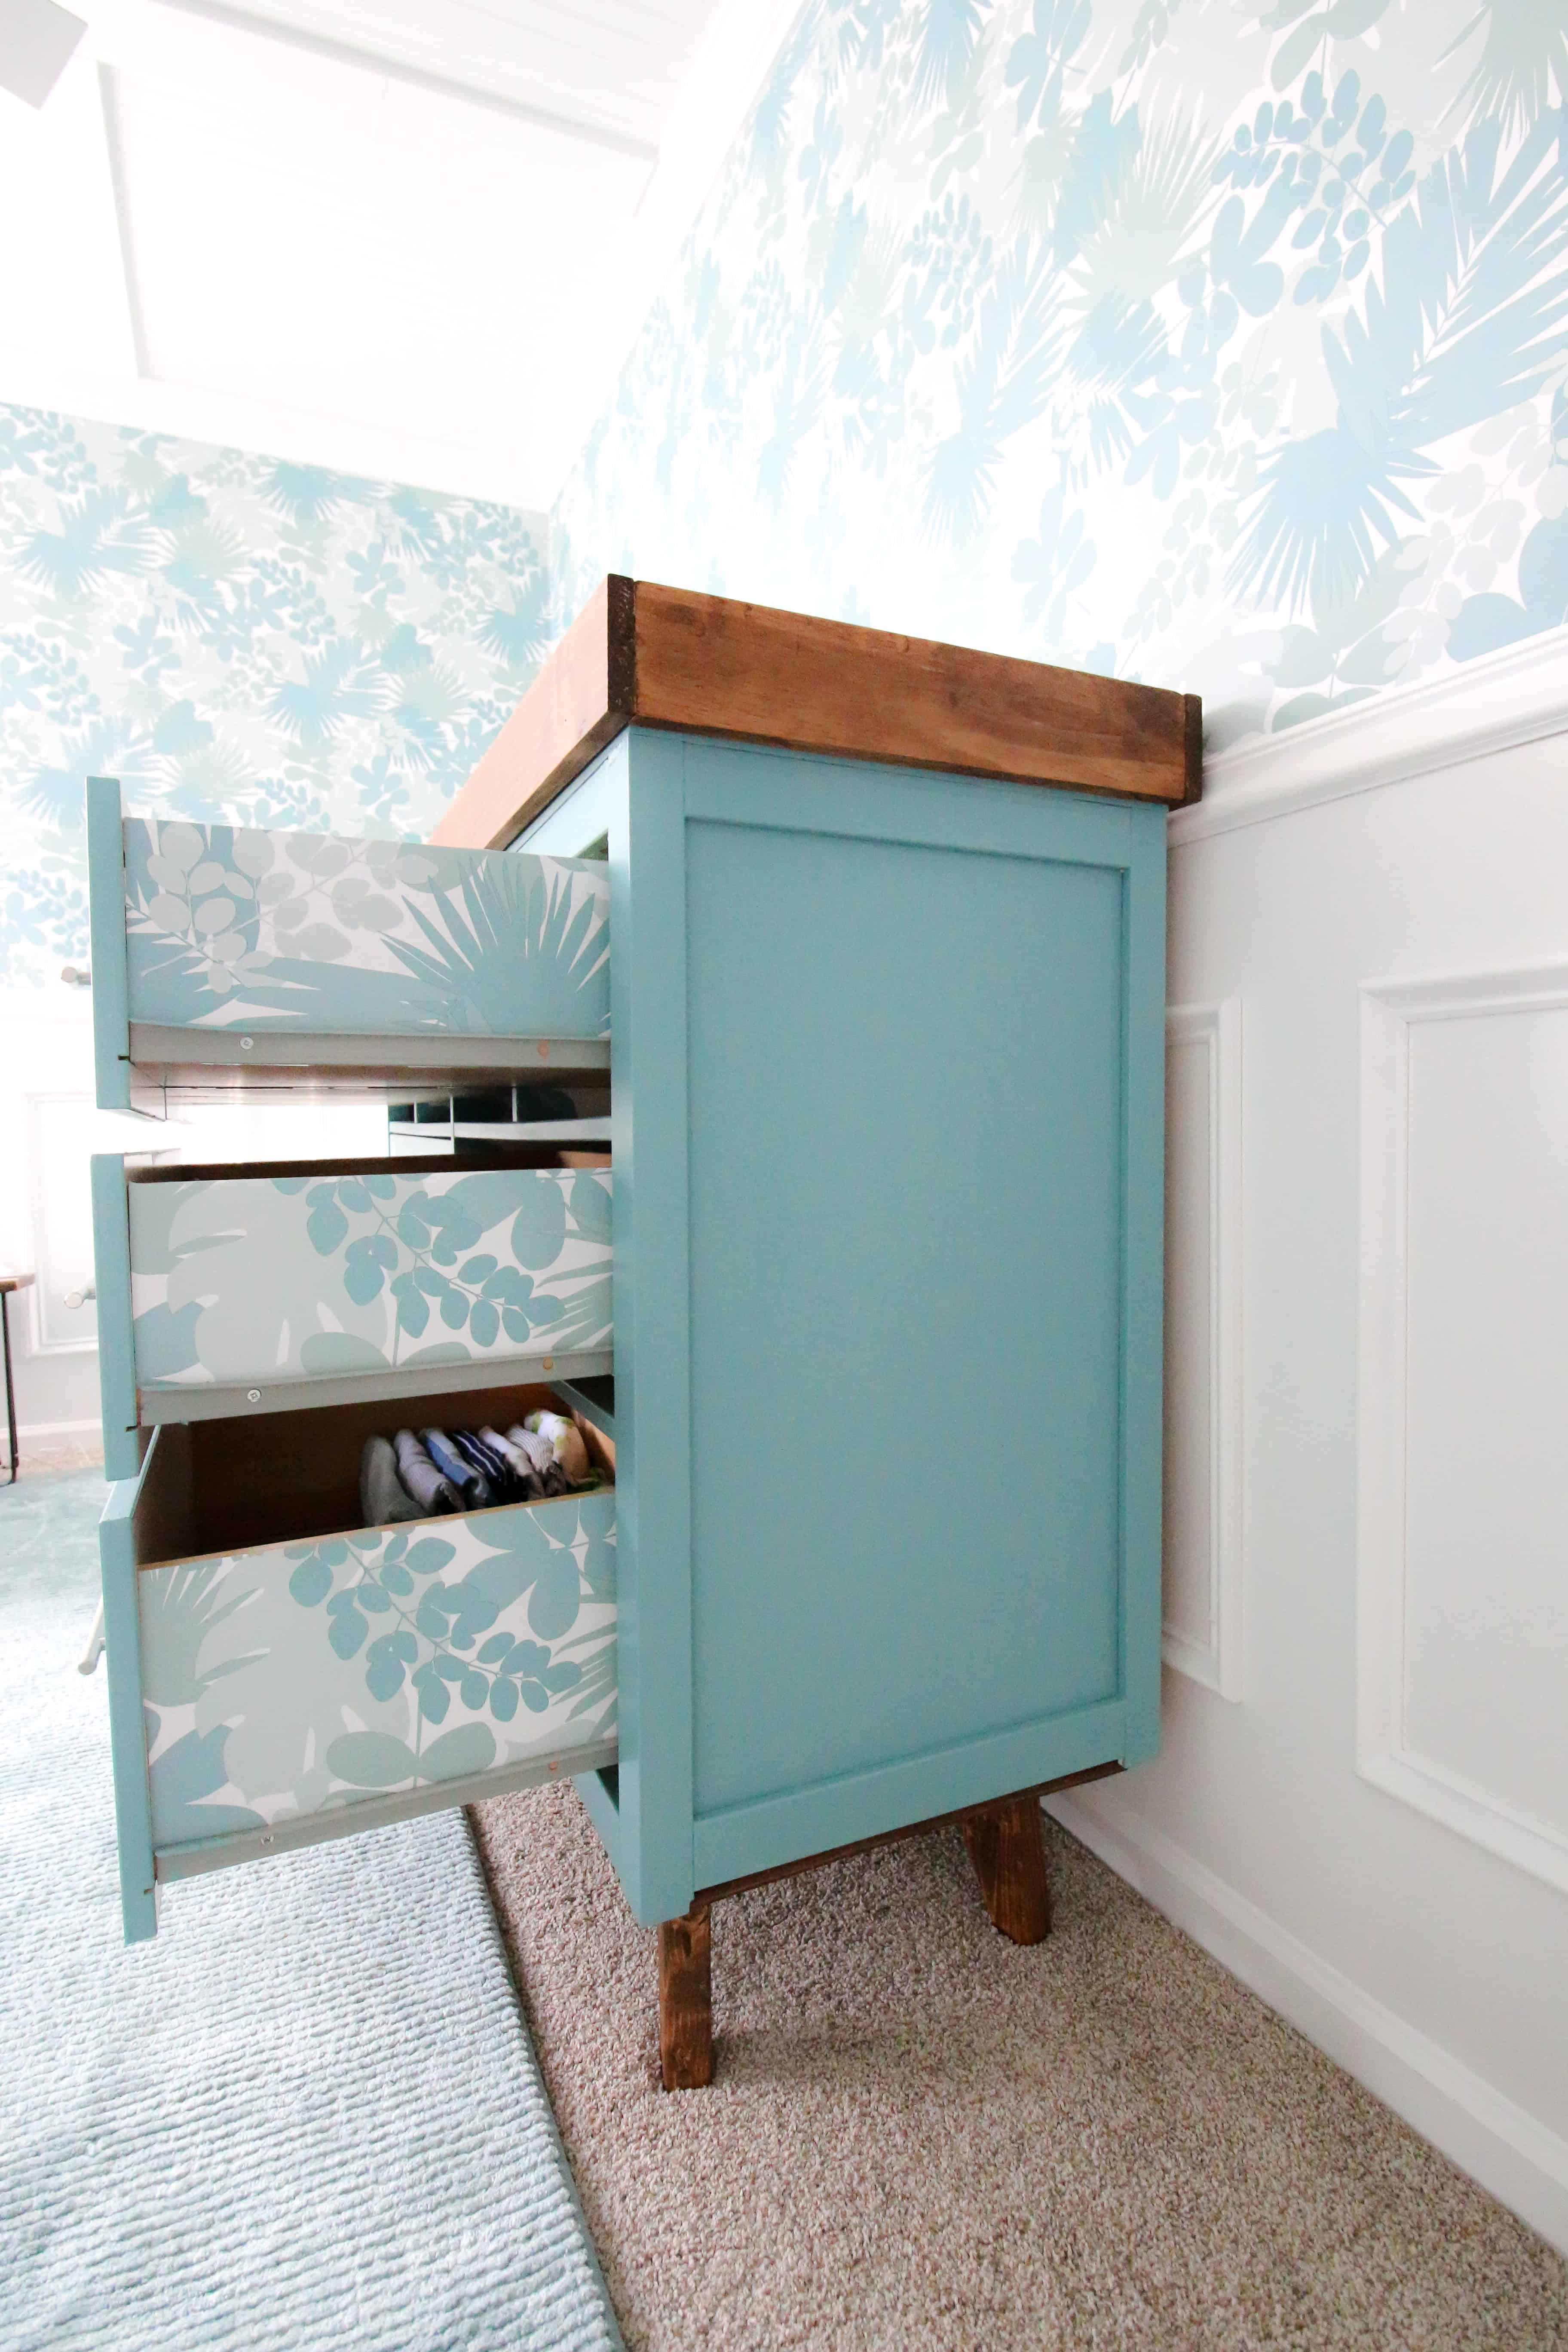
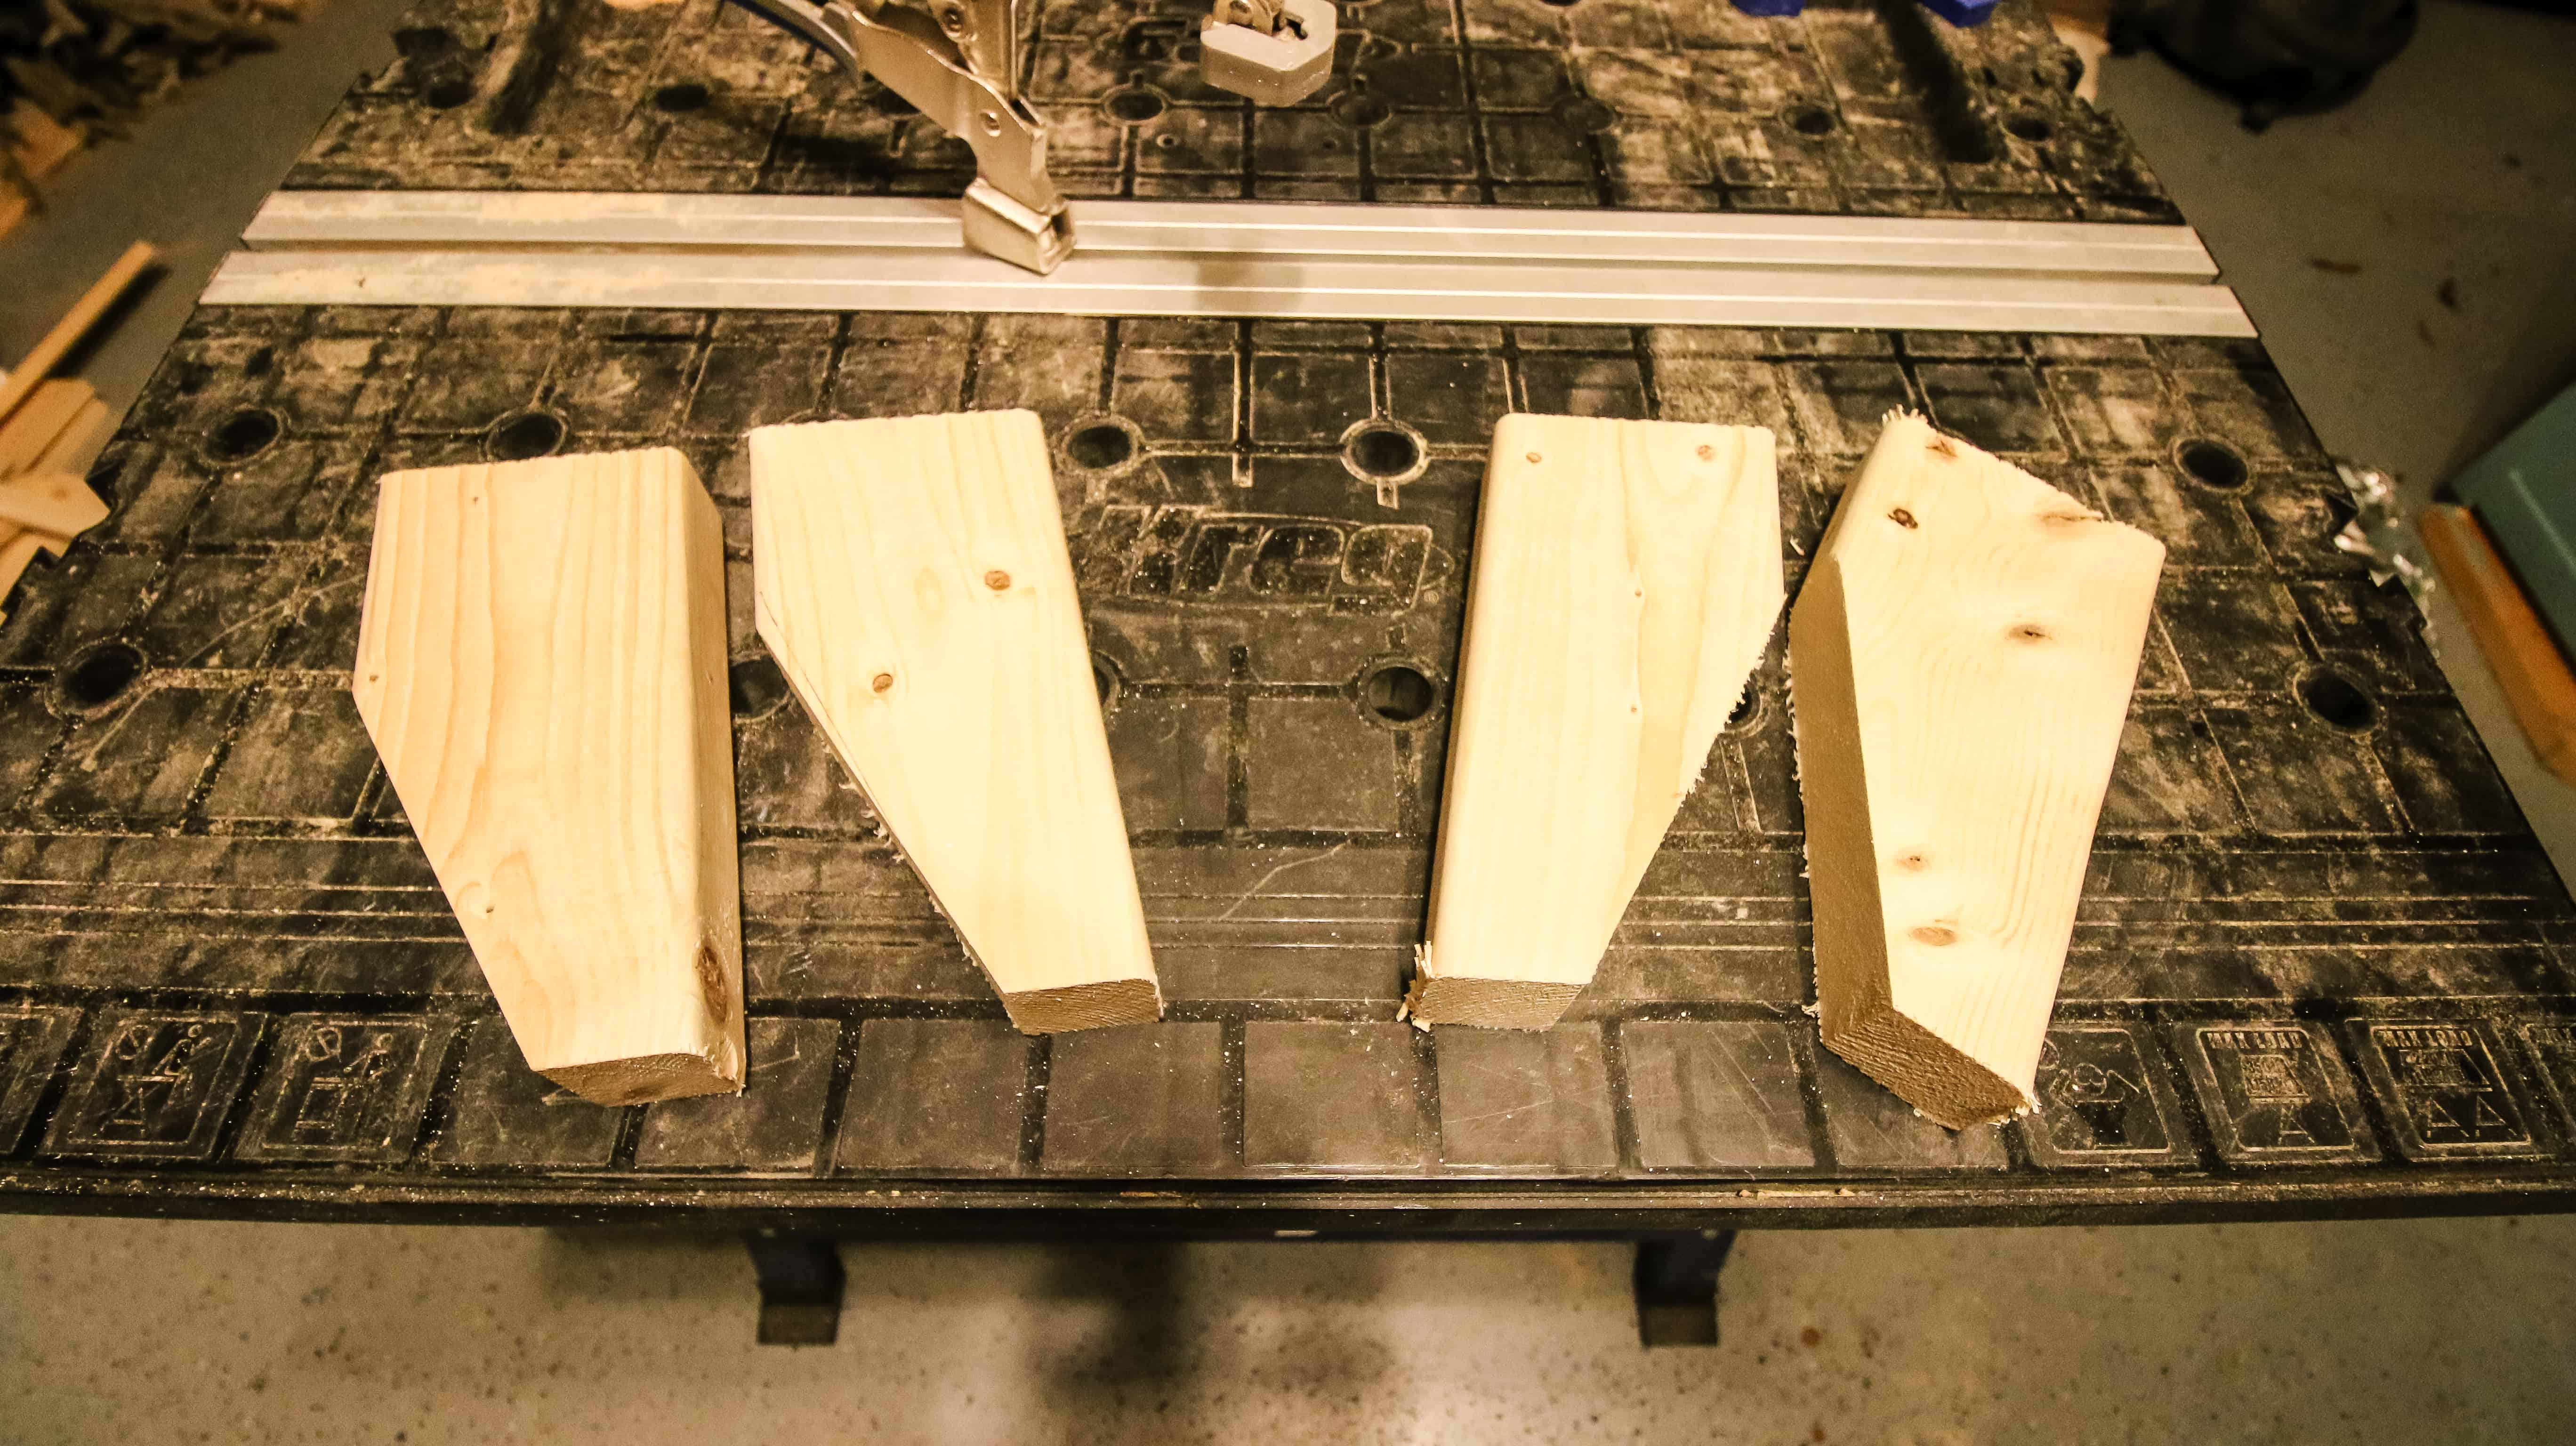
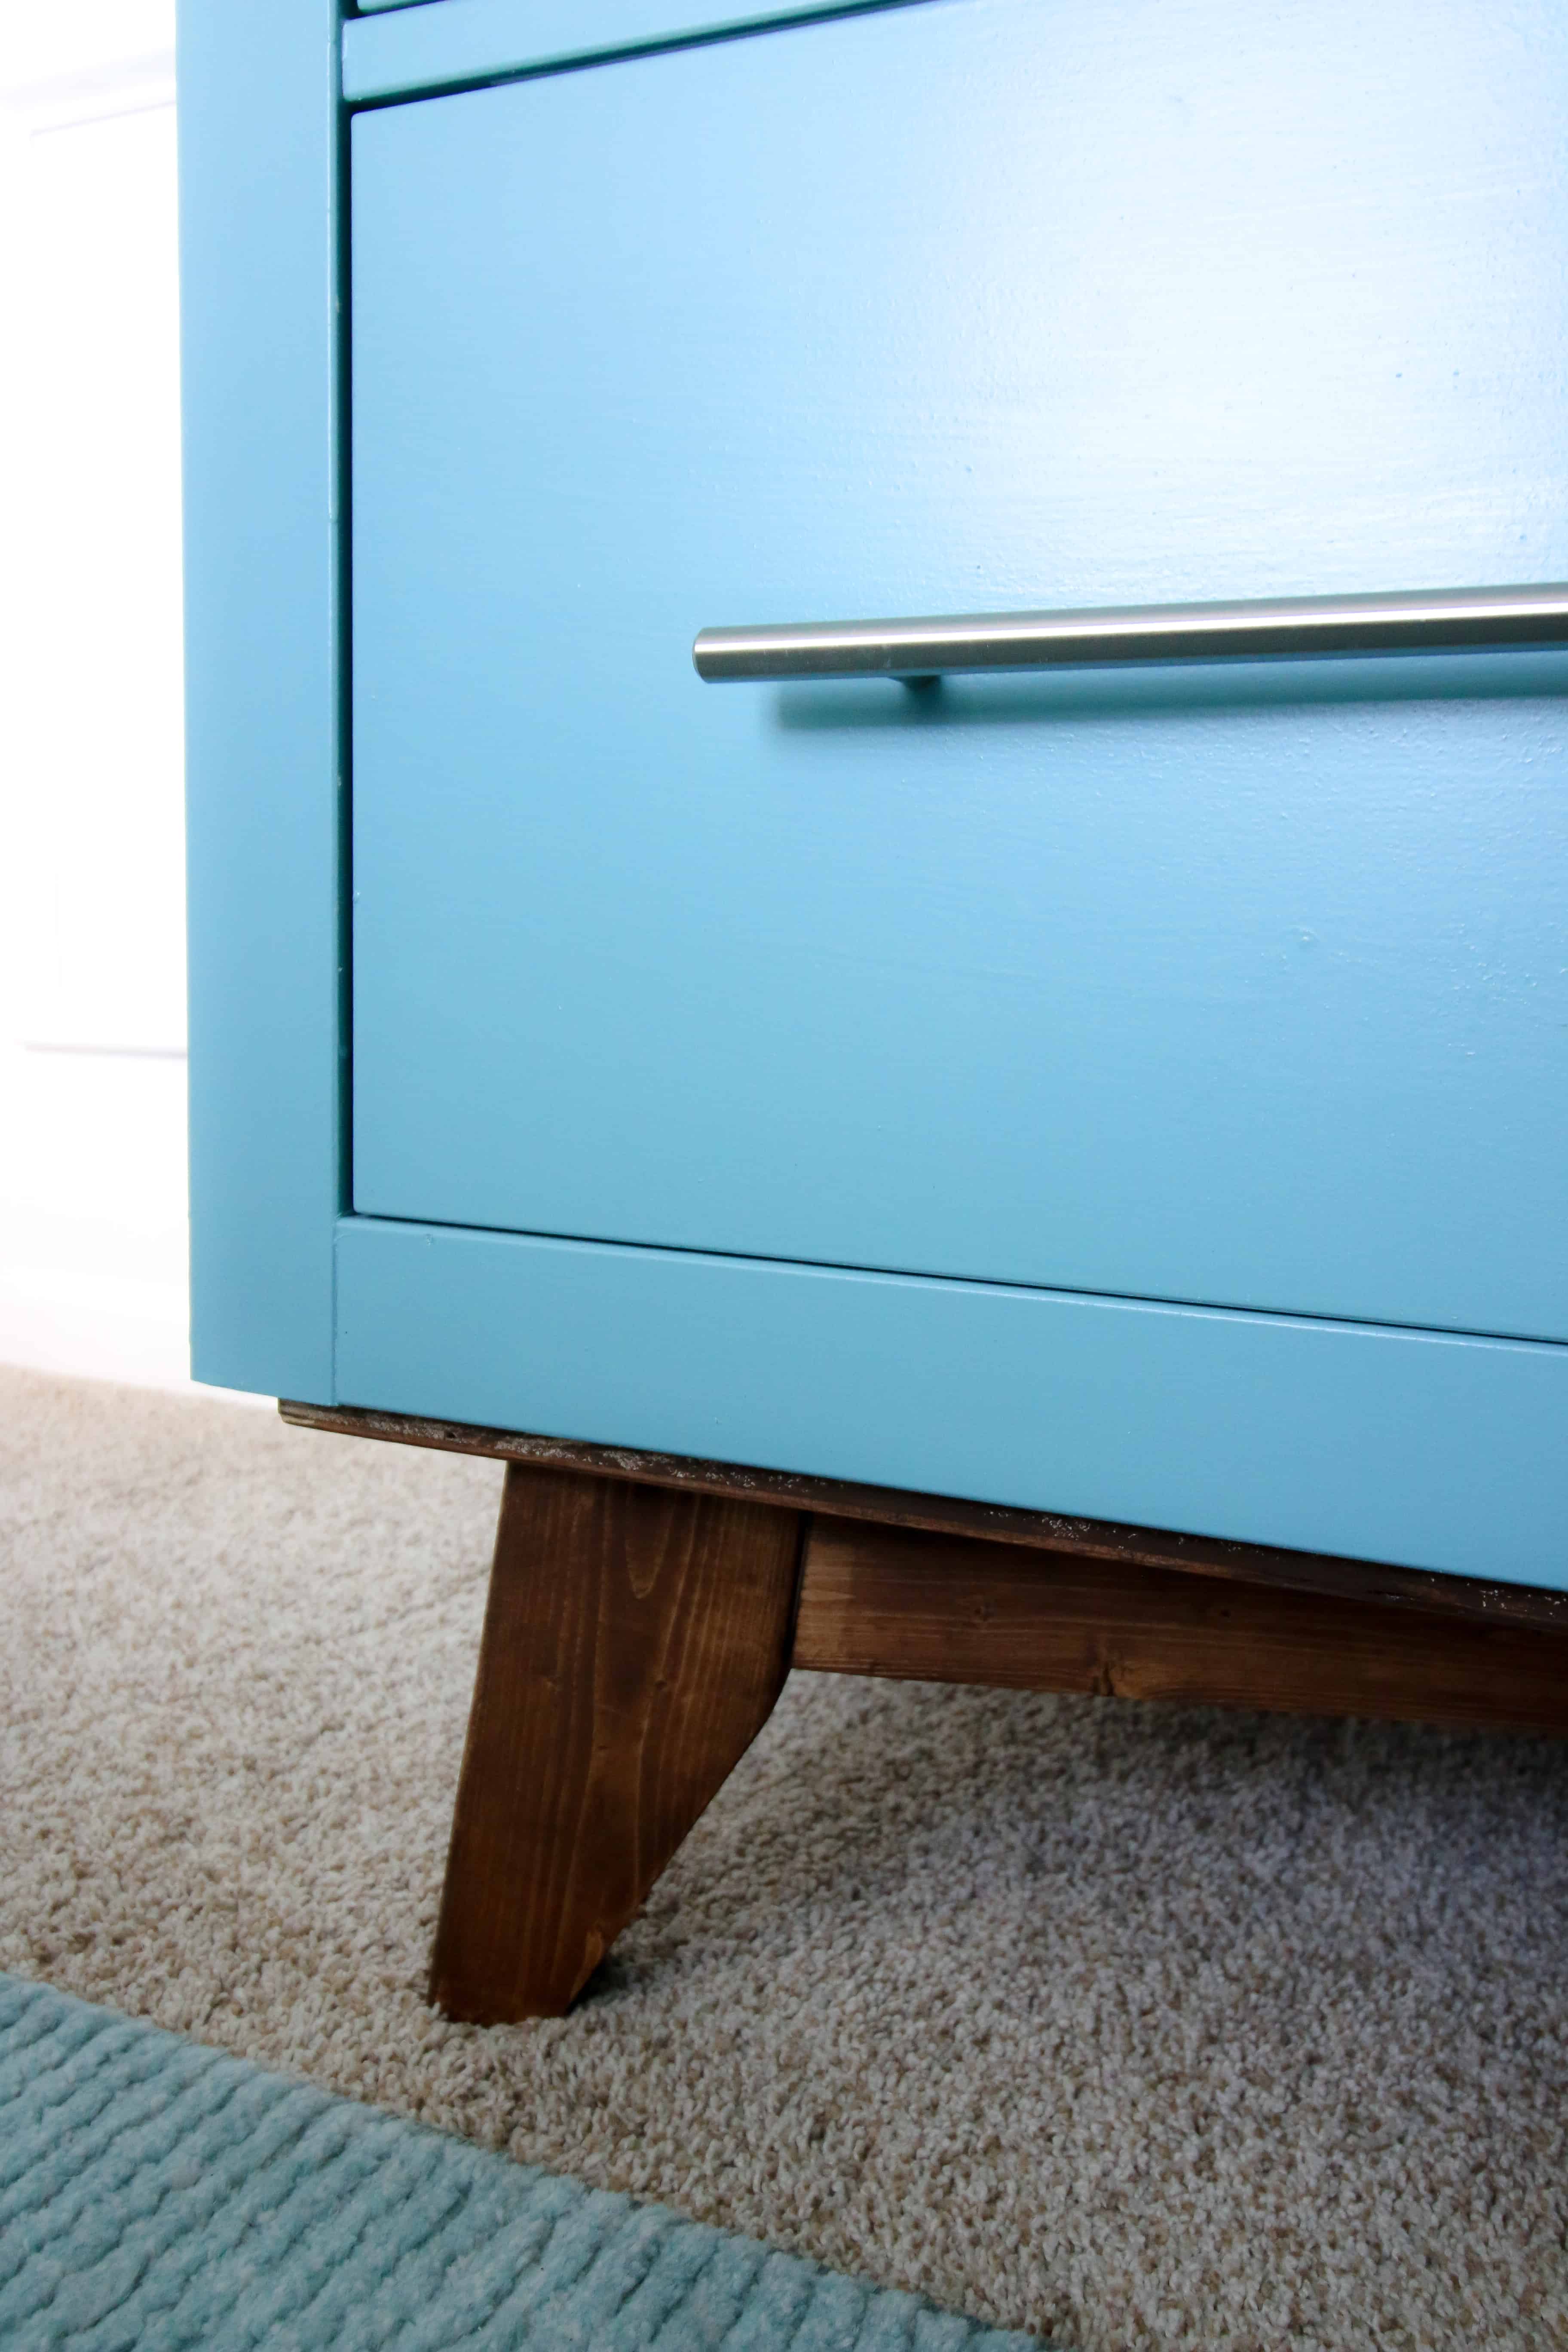
Making Mid Century Modern Legs
The biggest part of this project was creating new legs that look MCM. No - not man crush Monday - mid century modern!
We wanted to have angled legs with a sturdy base. Here's the steps to make this leg base entirely from 2x4s:
- Cut four 8 inch long pieces with a 7 degree parallel miter on each end
- Mark about 2 ½ inches down one side and 1 to 1 ½ inches in from the bottom. Draw a line between the two points and cut that off.

- Cut two 2x4 pieces the length of the diagonal you want from corner to corner. For me, it was 49 inches each. Trim them down to only be 2 ½ inches wide and with non-parallel 7 degree miters on each end.
- Use a Kreg Jig to connect two legs to each board.
- Line one of the leg sets up on top of the other to form an X-shaped base. Cut out a gap on one of the boards and attach the two new boards to the board that is still whole using a Kreg Jig.

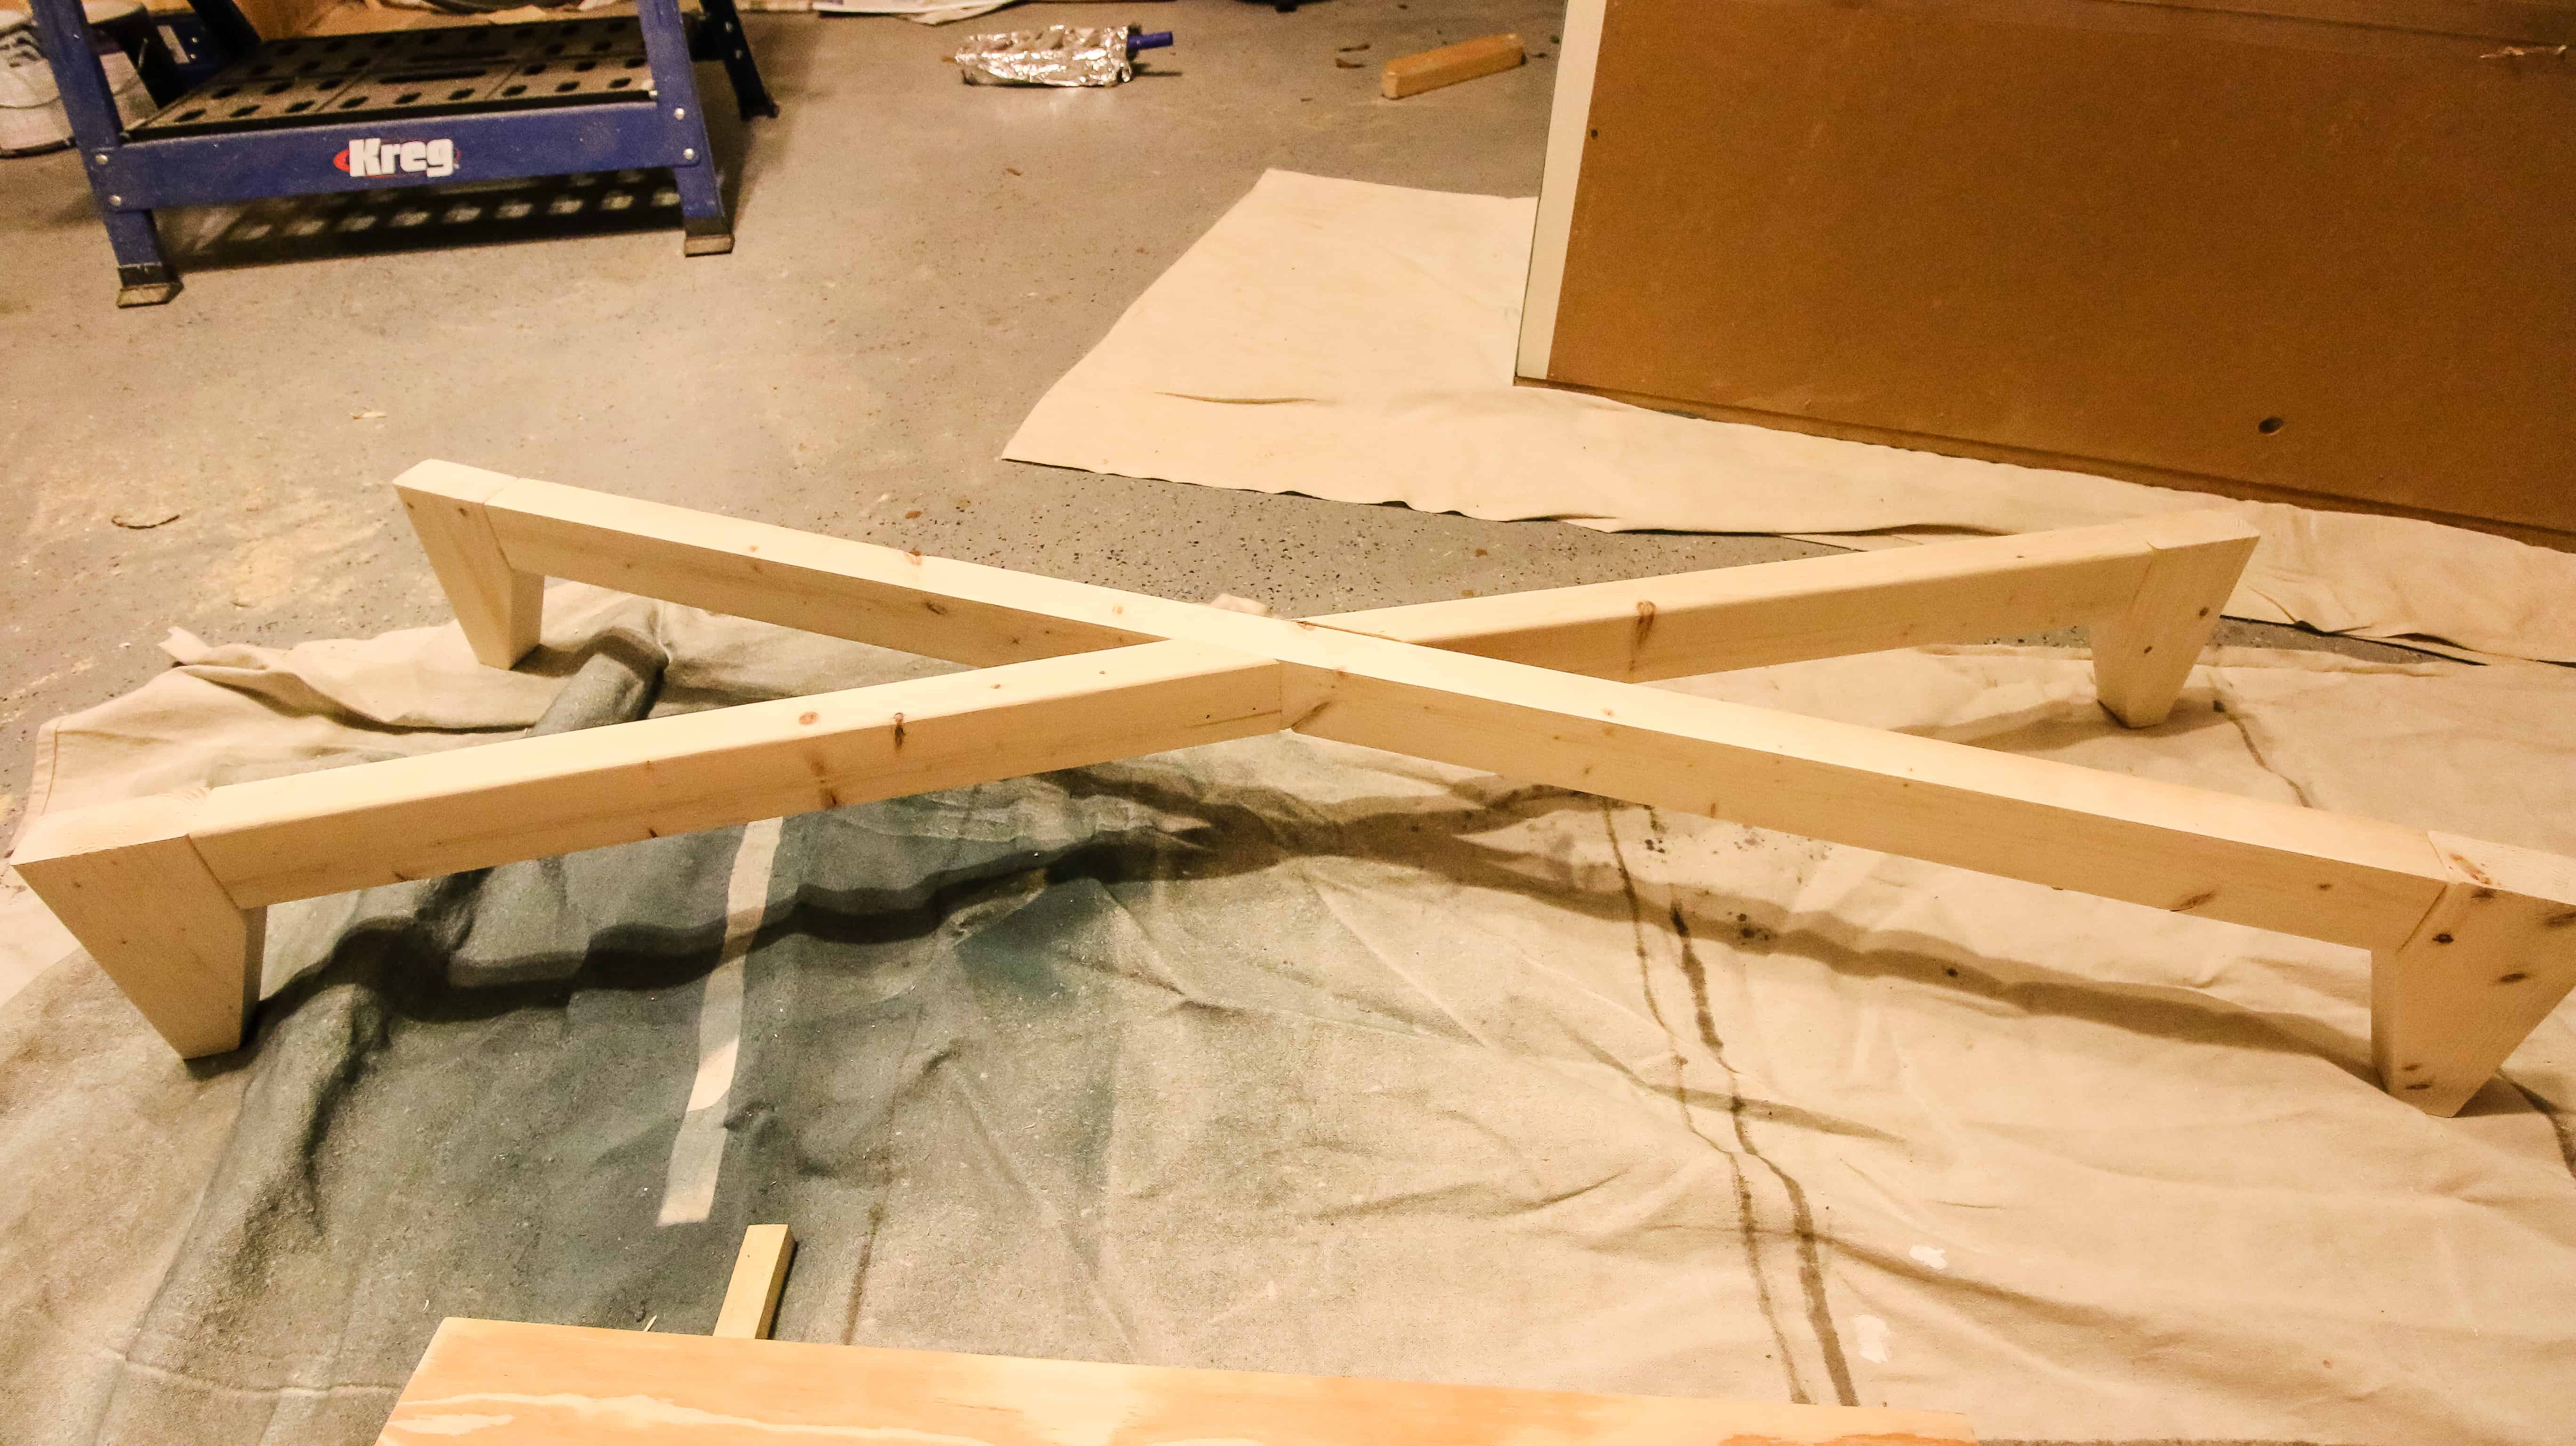
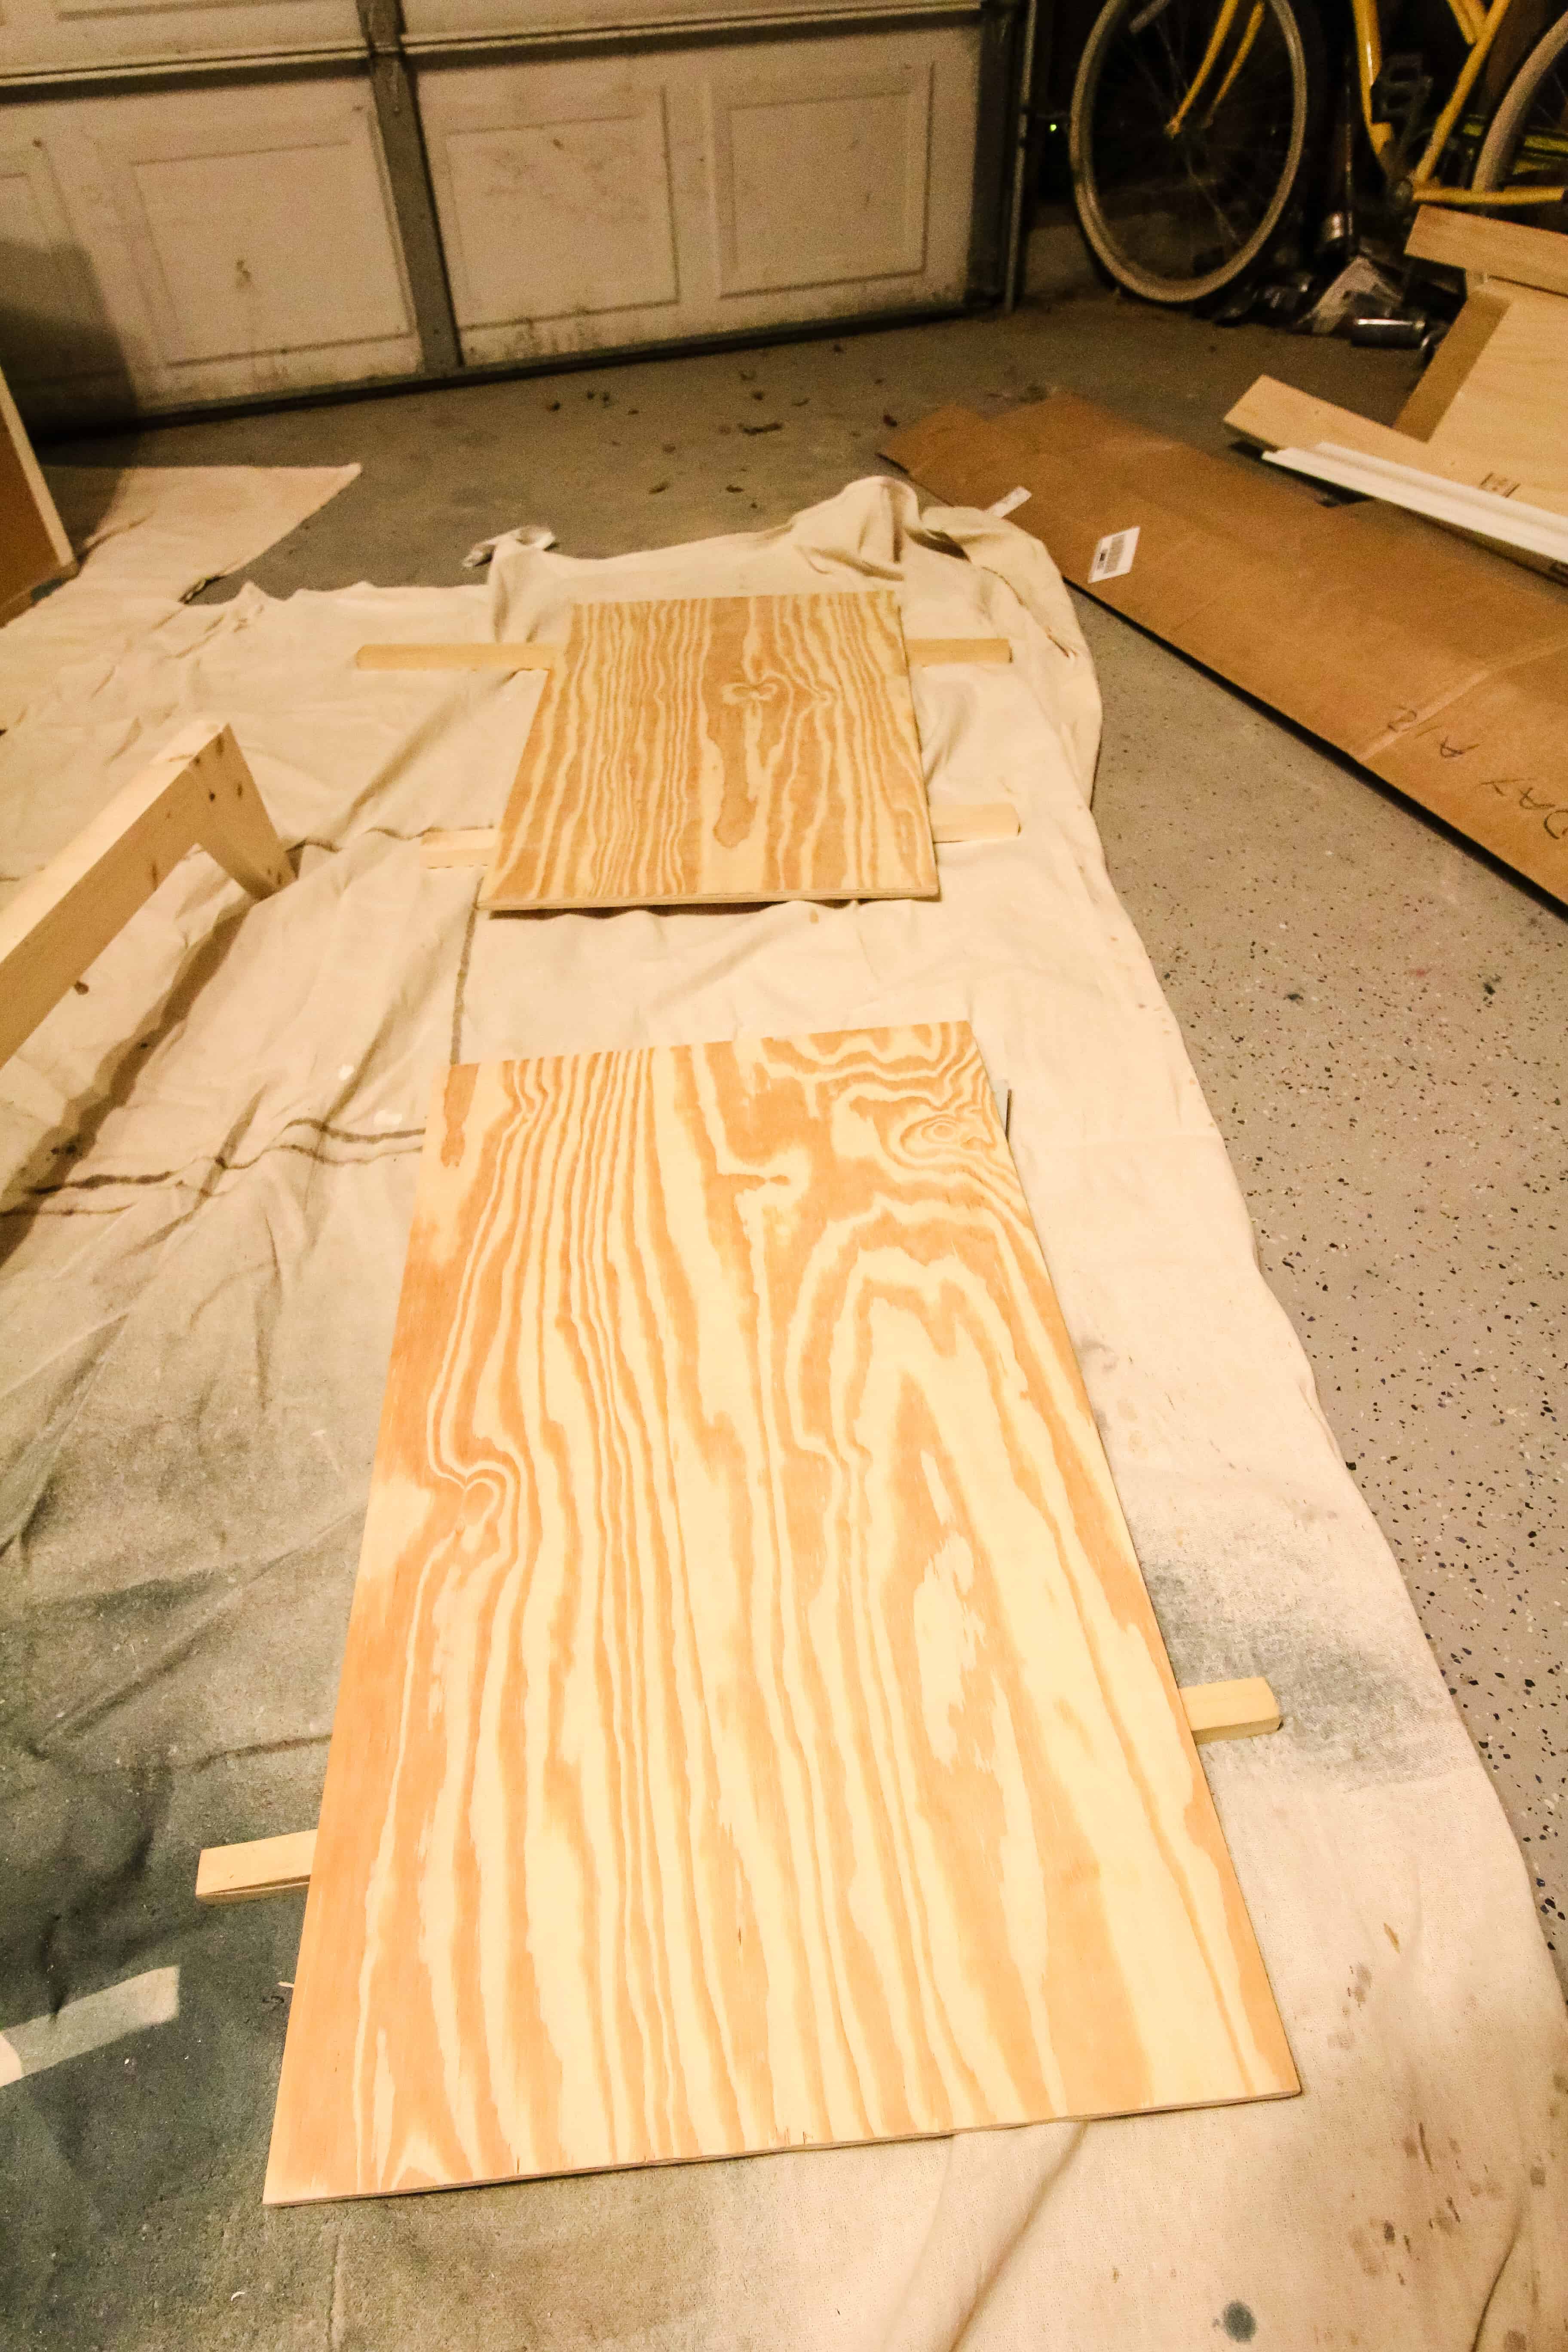
Since this IKEA Hemnes dresser actually doesn't have a solid base, you also have to cut plywood out to connect to the bottom of the dresser so that the new legs you made have somewhere to support.
Final Steps
Stain the plywood base and legs a color of your choice.
Attach the legs to the base and the base to the bottom of the dresser using a combination of wood glue and screws.
IKEA Hemnes Dresser Mid Century Modern Hack
This IKEA Hemnes dresser mid century modern hack is a great way to bring new live to an old piece of furniture.
We love the look of the base of the dresser and the more streamlined body of the dresser.
Paired with the refreshed color and hardware, we're swooning.
If you want to attempt an IKEA Hemnes dresser mid century modern hack, remember that paint is very delicate on the IKEA pieces until it is cured and sealed.
Any cuts will temporarily leave the dresser a little less solid until you recreate a new base as well, so always be careful.
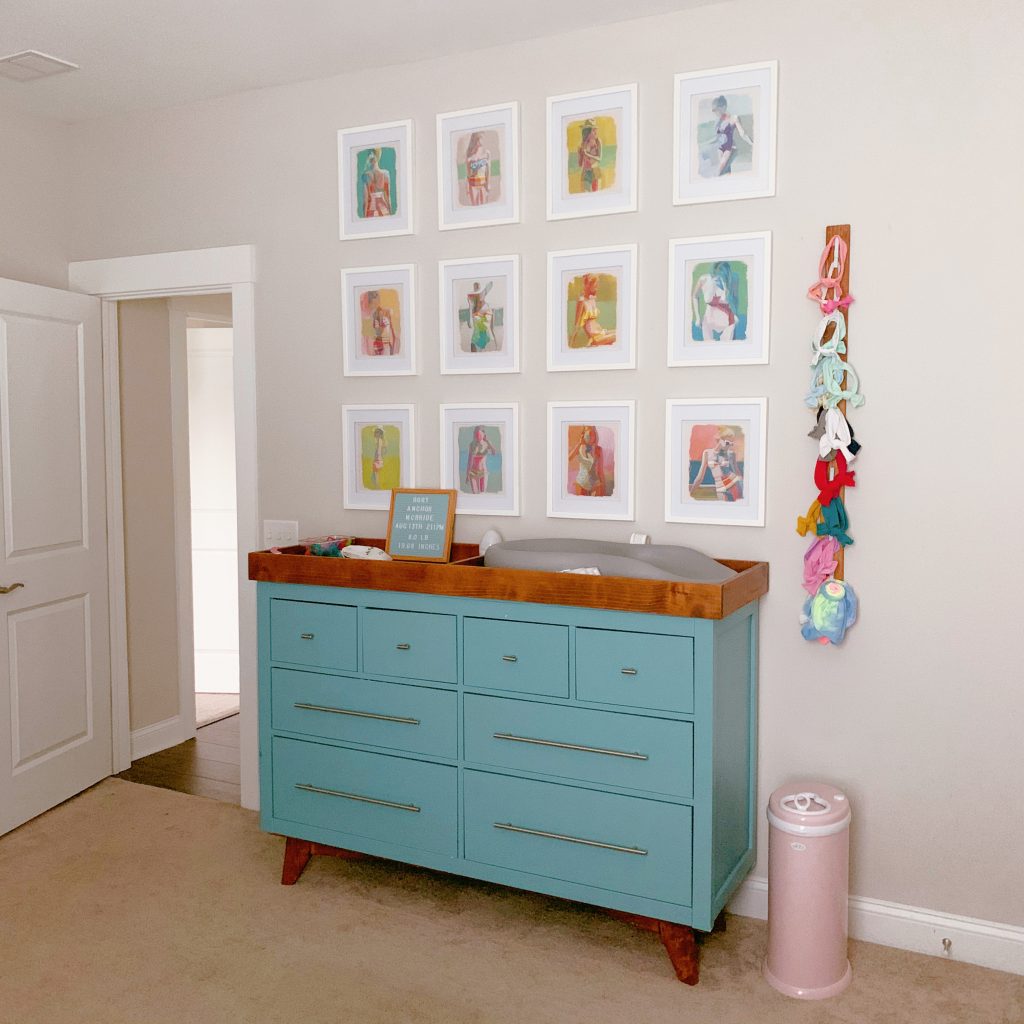
I love how this dresser looks in our tropical nursery and love the Tower Bridge color with our wallpaper. Swoon!
I am digging the mid century modern feel and am excited to bring that vibe in with very similar legs on the crib!
Click here to pin this project to your Pinterest board!
Here is the tutorial for the DIY wooden changing table topper.
Click here to see more details on that gallery wall and check out how we made over the bifold closet doors!
Be sure to click over and check out our Jungle Theme Nursery Reveal!

Click here to grab our Home Renovation Planner and FINALLY get your next big DIY project organized!
Share with us your creations!
Interested in the Kreg Jig? Click here to read our full Kreg Jig review and to see all of our Kreg Jig projects.
New to the Kreg Jig? Here is a step by step guide on how to use a Kreg Jig!
OR grab our FREE Kreg Jig Cheat Sheet here! Download the cheat sheet!

Looking for something?
We've been doing this since 2012 so we have a LOT of blog posts!
Search stuff like: Ceiling Projects | DIY Plant Stands | Thrift Flips

Hey there, I'm Sean, the woodworking enthusiast and builder behind CharlestonCrafted.com! Since 2012, I've been sharing the magic of turning raw materials into beautiful creations. I love teaching others the art and satisfaction of woodworking and DIY. I try to inspire fellow crafters to make something extraordinary out of nothing at all.


Holly Wright says
Did you find that the drawer pull on the bottom drawers fit the knob holes already? I’m not sure the distance between the two knobs since I have this dresser in storage currently and can’t measure but would like to remodel it.
Sean says
No - we had to drill new holes. I couldn't find anything that fit the existing holes!
Nori says
Hey,
I love this idea. I have a question. How much inches off the ikea dresser did you cut off from each side?
Sean says
Hey Nori! Thanks for clicking over. If you're referring to the lip on the top of the dresser, I'm not sure the exact dimension, but it was approximately an inch. I just cut it completely flush with the dresser.
Rose says
How did you prep the dresser before you painted? Sanding? Or did you just apply paint?
Sean says
Hi Rose! We did sand it with our electric sander, just enough to rough up the surface a bit. I hope that helps!
Serena says
Do you remember how far apart the holes were for the dresser?
Morgan says
Hey Serena! Happy to help but not sure exactly which holes you’re referring to. If you mean on the dresser drawers, they were originally 14 1/4” apart and the new holes were roughly 15” apart. Please let me know if that’s not what you meant!
Serena says
Thanks! I love the look of the long handles. Unfortunately living in an apartment building makes these projects very difficult. I was hopping just switching the handles would be possible.
Morgan says
I unfortunately couldn't find anything 14.25" which is why I had to go with the 15"! 🙁
Kelly says
Hello. I am looking to try something similar. Since you had to drill new holes for the long handles on the bottom 4 drawers, how did you fill the old holes so they are not visible?
Sean says
Hi Kelly! We drilled new hole with our drill. Then we added wood filler to the old holes. Gently sand and then wipe clean before painting! We actually did this after painting because we didn't realize the new handles didn't quite line up 😀 so we just touched up that area of paint. The great news is, the old holes fall just inside the new holes so they are really well hidden by the new hardware!! good luck and please share your project (tag us on social media if you share the results!!)
Jennifer says
this project is so great! how did you saw off the "lip" overhang on the top of the dresser without damaging the rest of the dresser? I was actually hoping to keep the dresser black as it is, but it seems like we may need to paint it either way to do the hardware and after sawing off the top edges.
Our new place will be very small - do you have any suggestions on furniture colors for a very small bedroom? Is black too dark?
Sean says
Hey Jennifer! We sawed off the lip by being very very careful (insert Elmer Fudd voice there). We traced a line exactly along the lip so that it would be flush, making sure to account for the width of the saw blade. Then we used a circular saw and followed the line flush and it turned out great.
As for your color, black isn't bad, but it depends on what you have going on in the room. Matching the color of the dresser to complement the wall color or other pieces in the room will make it seem smaller by blending in a bit. Going extremely bold compared to the rest of the room will make it stand out more and will make it feel bigger. Let us know if you have any other questions and please send us a picture when you're done or tag us on Instagram so we can see how it turns out!!
Jennifer Murphy says
Hi! We just started the first steps on this DIY and my husband was actually about to take the entire top of the dresser off to saw the edges off! If you remove the drawers you can see the ikea screws that hold the top on, thought I’d share for any one else about to do this because it might be easier than trying to saw it with the dresser intact!
Morgan says
That is a GREAT tip thank you so much for sharing!
Becca says
Did you have to drill new holes for the 15 1/8 in pulls?
Sean says
Hi Becca, thanks for stopping by! Yes, we did have to drill new holes because of this particular rod we got. It wasn't a problem though. We filled the old holes with spackle and painted over them when we painted the whole thing. I imagine you could certainly find different pulls that were spaced the same.
Michael says
Hi! Thanks so much for posting these plans. Do you mind describing step 5 a little more? When you line up one of the leg sets on top of the other to form an X and then cut a gap into one, what do you mean by gap? Is there an angled cut? Did you just place the leg set on top of the other, rotate it until you got the depth you wanted from one leg across to the other? Thanks again, I really appreciate it!
Sean says
Hey Michael, happy to clarify. So I made two leg sets. I took placed one down and put another one on top of it and put it at the angle I needed. Then, I marked lines on the bottom beam on either side of the beam on top of it. Then, I cut out that gap at the angles I had drawn. So now the bottom beam had become two parts. I then attached those to the whole beam with pocket hole screws. Summed up, I made two identical leg sets, then cut a section out of the middle of one, creating two pieces, then attached that to the whole beam. It is actually spelled out more clearly in our crib build post and there is a really good picture there of the base when stained that shows exactly what I'm talking about. https://www.charlestoncrafted.com/2018/11/12/diy-mid-century-crib/
Michael says
Thank you!
Lindsey says
Hi there, this looks great! I have a Hemnes dresser that I love for my son's things, but we're painting his room navy and the dresser is also blue - would love to be able to keep it and update it! Did you sand your dresser down before painting it?
Sean says
Hey Lindsey! Yes, we did a light sanding job to try to help the paint adhere. That's the thing with IKEA furniture is that since it's not real wood, paint has to have a longer time to set. So we roughed it up a bit, but the bigger thing is to just make sure to let it cure a lot longer than with real wood. Thanks for stopping by!
Alexandra says
Hi! This came out beautiful. Good job! Im looking to buy this same drawer but don't want to paint it...so, don't want to have to drill any extra holes for the long rod/pull. What measurement should i look for when buying door pulls? I see the ones you used are 15-1/8 in. (384mm)..(followed your amazon link). Thank you!!!!
Sean says
The original holes were 14 1/4” apart. We couldn’t find any that fit that distance perfectly. We thought IKEA probably created special pulls that no one else makes.
Amanda says
This looks amazing and was exactly what I was imagining doing with mine. I'm going to try to blend the leg color with the body so I want to take the wood lighter-- I'm wondering if you sanded before painting? I hope you and your baby are enjoying it!
Sean says
Yes, we sanded the dresser. The material that it is made of is really slick, so sanding roughs it up to help paint stick. Please share a picture if you make a version!!
Audrey says
This turned out great! A couple of questions--what is the new width of the dresser with the edges sawed off? The stock 63" width is just a little too big for our space, but I'm wondering if we do as you did, if it might fit.
Also, I see you commented earlier that it is not "real wood." I know on the website it is listed as pine (all but the white color)--which color dresser did you start with? I was wondering if one got the white stain color, could it be sanded down to bare and stained, or if paint is the only option for this particular line. Thank you for sharing!
Morgan says
Cutting off the edges takes about an inch off of the length and width if I remember correctly. It wasn't a huge amount of lip. It was a painted white dresser and I don't think that it was real wood at all.
Nicole says
I'm looking for bar pulls to put on my hemnes. Were these the exact right fit for the pre drilled holes? I have the white hemnes and I want to keep it that way, so I can drill my own holes and fill the old.
Thanks
Morgan says
Unfortunately, we couldn't find any that were the exact right size. I think IKEA must have made them a non-standard size. We had to drill holes just to the outside of the original holes and then fill the original ones in and paint.
Molly says
This looks amazing!! Want to do somehting smiilar with my Hemnes dresser. Question about the bar pulls: You linked the 15-1/8 bars here- did those fit withthe existing screw holes or did you have to drill new holes and cover the orginial ones up? I'm trying to avoid those extra steps but I LOVE the bar look!!
Sean says
Thanks Molly. I trolled all of the internet (this was in 2018 to be fair) and was unable to find any bar pulls that fit the existing holes. So, I had to drill new holes - it was especially annoying because they ALMOST fit - it's less than an inch off total. But I also loved the look! Sorry for the bad news but know that drilling/filling the old holes wasn't bad at all. The old holes are closer together than the holes that I drilled, so they are hidden behind the bar pulls, too!
Katja says
I absolutely love this!!! Thank you so, so much for sharing how you made the new legs. I just started hacking Ikea furniture so don't have much experience but a friend of mine was able to help me recreate the legs. I'm so excited! What I'm now wondering is how did you cut off the legs? What kind of saw did you use? Thank you so much!
Morgan says
Hey Katja - I am glad you like the project! You could use a circular saw or a reciprocating saw to cut off the legs easily! I honestly can't remember which we used.
Ellie says
hi Sean and Morgan!
would you say the drawer holes are 14.25 center to center? or 13 7/8 as someone else mentioned? i don’t have the luxury of being able to sand down for a paint job + create new holes and am hoping to have better pull bar options years after you did this 🙂
when companies list the size, is it standard to refer to it as center to center?
Morgan says
I'm not sure exactly how you are measuring but the pull bars did NOT fit the existing holes. The bars that we used are just over 18" long, so the 15 1/8" refers to the distance between the holes. These landed on the OUTSIDE of the holes so the holes on the hemnes are closer together than this. I filled & sanded ours so I can't give you a good measurement between them, sorry!
Lena says
Hi Sean! I saw you had drilled the holes after painting so if you were to do it again, would you drill the new holes before or after wood filling the old hole? Example: I’m not painting and just adding new handle bars. Deciding if it’s best to cover the old hole first or not. It’s intimidating to me since they lightly overlap! Thanks for much got your help and this post!
Sean says
Hey Lena - I don't think it matters. If you won't paint, then just fill it, wipe around the filling with a damp paper towel to remove any overage, and then drill the new holes! If they overlap, You probably want to fill it first so you aren't trying to fill one hole and not get it into the new holes, if that makes sense!
Medina Hadzic says
Hey! I have a smaller piece of the hemnes collection, the 3 drawer chest. I’m dying to know how you cut the overhang and if it’ll split the wood or not. I hate the overhang and it just takes up even more room in my already small space.
Sean says
Hey Medina - we just used the circular saw and cut it off. It didn't split the wood - but it exposed the composite wood underneath, which is not as smooth as the outer wood. You will have to sand and apply some type of wood filler to get a smooth finish!
c99 says
Hi, I'm here for the base tutorial. How tall did the total piece end up with your new legs What is the measurement from the floor to the top of the plywood?
Morgan says
Hi, we actually just got rid of this piece last week, so I can't measure exactly, but it's 8" legs and 1/2" plywood, so about 8 1/2" for the base.