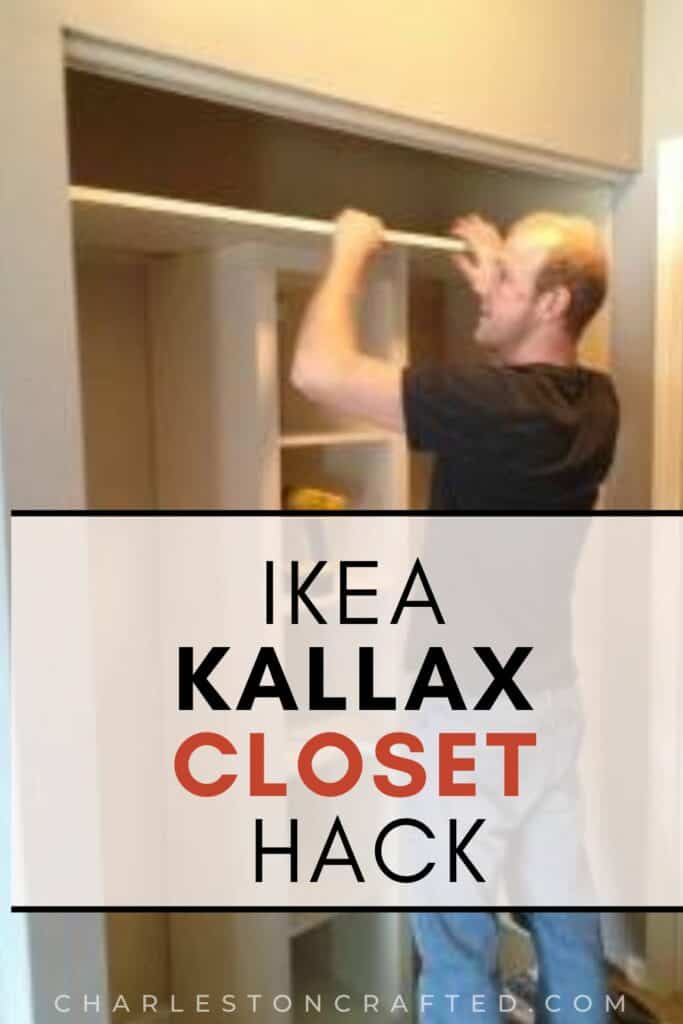
Want to install a simple closet system? Check out our ikea kallax closet hack and step by step guide on adding smart organization to my small reach in closets!
Closet organizations projects are some of the most satisfying projects!
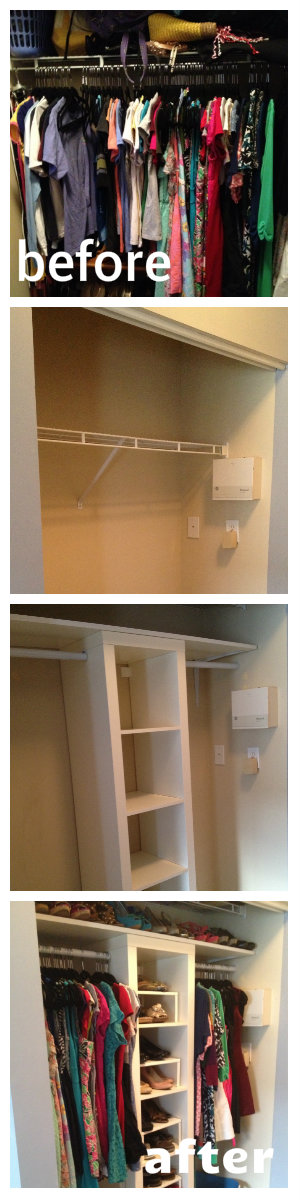
I mean, like a lot of you, I have a lot of clothes. Skirts, blouses, dresses, shorts- I’ve just accumulated a lot over the past few years.
As I’ve said before, one of the greatest things about our condo is the ample storage room, including the double closets in the master bedroom.
However, they were stocked with builder-grade wire rack & rod combos. One of the closets had double shelves and the other had one higher shelf.
Though I dug the concept, I knew that I could design something prettier and more space efficient.
So, here is how we used Ikea pieces to hack the perfect closet organizer!
Planning a budget-friendly closet makeover
My original plan was to purchase a closet kit. After doing some online research, I settled on closet kits from the Martha Stewart collection at Home Depot.
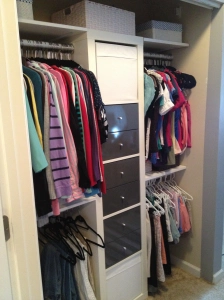
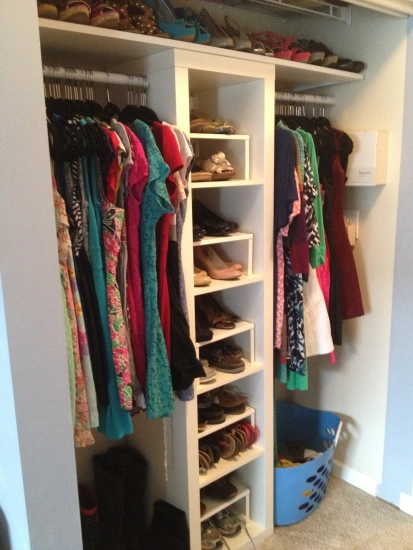
I designed one closet to have double rods for tops & bottoms. I designed the second closet to be an accessories closet with drawers & shoe cubbies, as well as one rod for camisoles or t-shirts.
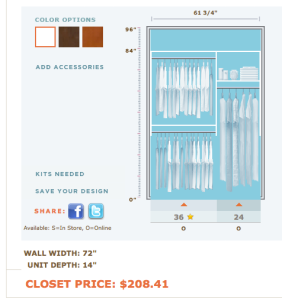
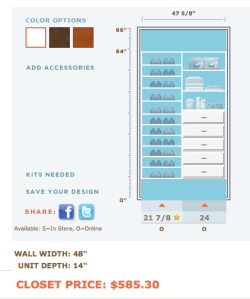
Unfortunately, though the Martha Stewart collected is called “cheap” by many reviewers on Amazon (as in price, not quality), my designs rang in at $208 and $585, respectively.
Ouch. Much more than I hoped to spend and way over my budget.
So, I had to go back to the drawing board. I decided to research other DIY closet system ideas.
I was pinspired to try some IKEA hacks. You know I love IKEA and I have seen a lot of hacks of the Expedit system and decided to start from there.
NOTE:
Ikea discontinued the Expedit system in 2014 and re-released it as the Kallax system - which is designed to be the same design but more sustainable.
I have updated this article to include the corresponding Kallax pieces which are available to purchase now!
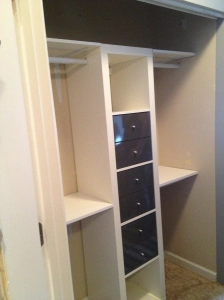
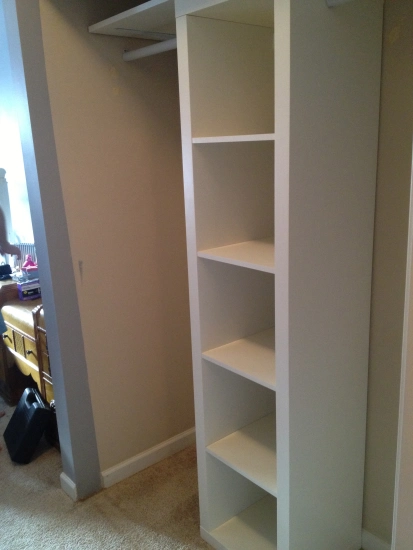
I decided that I could center an Expedit in each closet and have rods going out either way.
One closet would get drawers for small clothing items (I don’t have a dresser!) and the other would house shoes & handbags.
In case you were wondering, each closet is 60” wide, 18” deep, and has a doorway 7’ high (though the ceiling inside the closet is 9’, like the rest of the ceilings in the condo.)
Ikea Kallax closet hack
These shelves are easy to set up with items from Ikea and a few additional items from the hardware store.
Ikea shopping list:
- 2x Expedit 5x1 shelves @ $59
- 3x Expedit drawers @ $25
- 2x white fabric bins @ $5
- 5x Rationell Variera pop up shelves @ $8
Here is the Kallax version of that list:
Walmart also sells this 5x1 storage shelf which is most similar to the shelves that we used!
Other supplies used
Once we got back to Charleston a few days later, we also went to Lowe's where I purchased:
- ¾" x 16" x 96" Board @ $18
- ⅝" x 16" x 48" Board @ $12
- 6x rods @ $6.50
- Dry Wall Screws @ $5
- ½ inch screws @ $11
- 10x 13 ¾” L brackets @ $1.74
So, a total spending of less than $350, including some leftover items like screws that I will use on future projects.
It seems like a lot, but compared to over $800 for the closet kit, I was feeling pretty good.
Steps to add an Ikea closet system to your closet
Here are the steps to install your Ikea closet system. If it feels overwhelming, break it up so that you do a few steps at a time!
STEP 1: empty the closets
The first step was to empty the closets. This is a great time to purge and get rid of unwanted clothing.

STEP 2: demolition.
We removed the existing wire shelving. This turned out to be, like many steps in this project, harder than it looked.
You will want to unscrew any screws and use pliers to pull the hardware out of the wall.
STEP 3: Repairs
After removing all of the hardware, sand the wall and patch with spackle. Let dry, and sand smooth again.

STEP 4: Paint
This is the point where we should have painted.
I wish I could say that we didn’t think of it, or that we didn’t have any appropriate left over paint or supplies sitting around, but that would be untrue.
We were just lazy and excited to get on with the project.
Looking back, I definitely wish we had painted and not left the splotchy patched walls. Don't be lazy - paint!
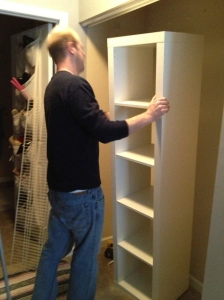
STEP 5: Assemble
Next, Sean assembled the Ikea shelving. It was pretty simple to assemble straight from the instructions.
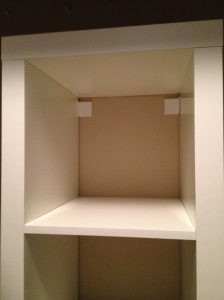
We slid the tower shelf into the center of the closet. Sean then secured it to the wall using the included brackets.
Cut your shelf wood to be the width of your closet and place it on top of the shelf, spanning the width of the closet.

STEP 6: Add shelves and rods
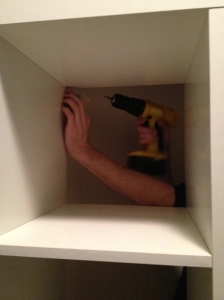
Next came the closet rods. Sean did the shelves first on one side and the rods first on the other side and found that either way, whatever you did second was more difficult due to your space being blocked by the first thing you screwed in.
He drilled holes & added anchors & screwed ½ inch screws straight into the Expedit to hang the rods.
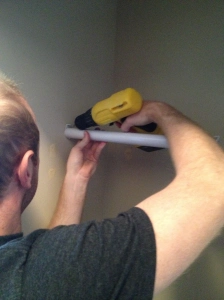
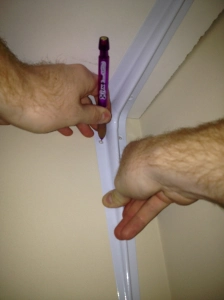
He secured the shelves with L brackets.
The shelves were 15 ¾” deep and the L brackets were 13 ¾” long.
He held them up and used a pencil to mark where to drill holes in the wall. He then used the ½” screws to screw the shelves to the brackets.
We installed double rods & shelves on one closet. This meant 4 rods, 4 short shelves, & 8 brackets.
This would allow for hanging tops & bottoms & maximize every vertical inch.
On the other closet, we installed just one long shelf (& 2 brackets) above the Exepdit.
These rods were for dresses, with room for boots & my hamper underneath.

We also installed one of the prior wire shelves above the top solid shelf for additional storage.
STEP 7: Add organization & your clothes!
Finally, I got to fill these babies! I managed to fit in everything that was in there before.
And, while the Expedits do take up a chunk of the rod hanging space, they allow for so much organization & vertical storage that it is totally worth it!
I am so happy with these and am so thankful that Sean spent his last free day in Charleston building them! I cannot thank him enough!

Though they are gorgeous, there are still some things I’d like to fix.
First of all, I plan to hang curtains in front of each closet.
Also, I wish it was painted- we will see what I do about that in the future.
Finally, I hope to grab a couple of baskets or clear tupperwares to store small items on the upper shelves. Right now I have them stored in tote bags.
But, overall, I am IN LOVE and OBSESSED with my new closets! They are definitely my favorite part of my condo right now!
Want more closet makeovers?
Be sure to check out our total closet makeover in our first house and our giant built in dresser in our second house!

Looking for something?
We've been doing this since 2012 so we have a LOT of blog posts!
Search stuff like: Ceiling Projects | DIY Plant Stands | Thrift Flips


BarbS says
It looks great! You truely have a talent Morgan! Want to tackle our closets?
charlestoncrafted says
Haha thanks mom. Your closets a lot better than these were!
Melissa says
You need some of the Thirty-One cubes or rectangles...you should check them out for sure...would look so pretty in this closet.... http://www.mythirtyone.com/288414
Julie says
Your wardrobe looks amazing, well done.
Patty McKee says
I too have double closets with wire shelving and have been researching how to get a custom closet at an affordable price. This just might work for me!! Thanks for posting!
Morgan says
please share if you do!
samantha says
can you provide detail on how you attached the rods to the Expedit shelves? We are tackling this project this week and I'm looking for help with that!
Sean says
Hey Samantha! Glad to hear you're going to try this project! Good luck! Hanging the rods to the shelves was actually pretty easy. I just bought the extendable/collapsible closet rods and treated the Expedit shelves just like a wall. I drilled into the shelf and then screwed it in. The rods have specific instructions about how you need to hang the wall parts first and then get the rod on. The biggest thing to be careful about is making sure you don't accidentally push the drill bit all the way through the side of the shelf. Just make sure to use a shorter drill bit so you don't end up with a hole on the inside of the shelf. Good luck and please send us a picture when you're done!
Trina says
My husband and I are doing this now, I was interested in the brown drawers with silver knobs on the second closet. Did you divide each section into two shelves? Could you tell me where you got them? Thanks!
CharlestonCrafted says
They are the grey ikea expedit drawer inserts. They divide each shelf into two drawers and are removable. Ikea doesn't sell expedit anymore but they have several similar kits. Good luck!
Megan says
How are the drawers space wise? Can you fit shirts in them, or are they big enough for only socks and underwear?
Morgan says
You could definitely fit folded shirts width and depth wise- but they are not very tall. You could fit maybe 5 folded t shirt, max. They are best for socks, underwear, tights, sports bras, etc.
Morgan says
The new system is called the Kallax and here's the link to the inserts. Good luck! http://www.ikea.com/us/en/catalog/products/90286649/
Christina says
The closet looks wonderful- good job!
Morgan says
Thanks! I love it still to this day. Thanks for stopping by.
Juliana Joseph says
Hi. I plan on doing this during the summer and I just wanted to know where did you get the dividers inside the shelf where your shoes are sitting. I've been looking all over but can't find one.
Morgan says
They were sold at Ikea. They might not have the exact product anymore but they should have something similar in stores!
Yina says
It looks great! What racks did you use to divide the shelves and put shoes?
Morgan says
They were from Ikea and went with the Expedit, which they no longer make. They might have something similar, I just don't see anything online. Goodluck.
Ahmad says
Love this idea..
The board you purchased from Lowe’s, how big was it? Was it precut in 16 in depth? What exactly do you call it?
Sean says
Hey Ahmad, yes, the board was precut to 16" deep. It's a laminated shelving board, specifically sold in the shelving section. We didn't have any real saws back then, so I didn't make any cuts myself. If you liked this closet makeover, you might be able to draw some inspiration from our most recent closet makeovers in our new bedroom and our nursery. These are better written and better designed.
Master- https://www.charlestoncrafted.com/2017/04/26/orc-build-custom-wooden-closet-system/
Nursery- https://www.charlestoncrafted.com/2018/09/24/nursery-closet-system/