Your dartboard deserves a beautiful home. This post will show you how to build a DIY dartboard cabinet and get free woodworking plans to do it!
This post was sponsored by Kreg Tool, makers of the pocket hole joinery we used on this project. All opinions are our own and our opinion is we love Kreg Tool. Thank you for supporting the brands that make Charleston Crafted possible!
One of the great bar pastimes (at least before Covid) was throwing darts with a drink in your hand. While I haven't been to a bar in several years now, we thought we'd bring that game into our home.
Darts is something that is always fun to play because it doesn't require much and can even be done alone.
However, a dartboard on the wall isn't really the nicest thing to look at, even if it's in a game room.
So, we decided to build a simple dartboard cabinet that looks beautiful and like a piece of the home.
This is a great project for you or to make as a gift for someone that likes playing darts.
Read on to see how we built this DIY dartboard cabinet and get our free plans to make one for yourself!
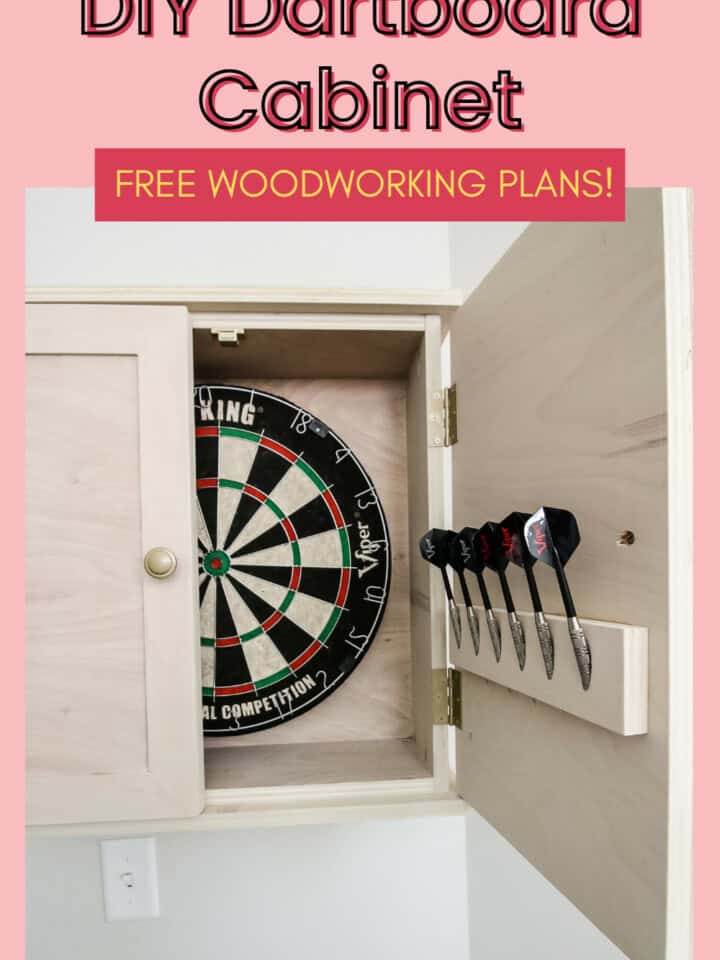
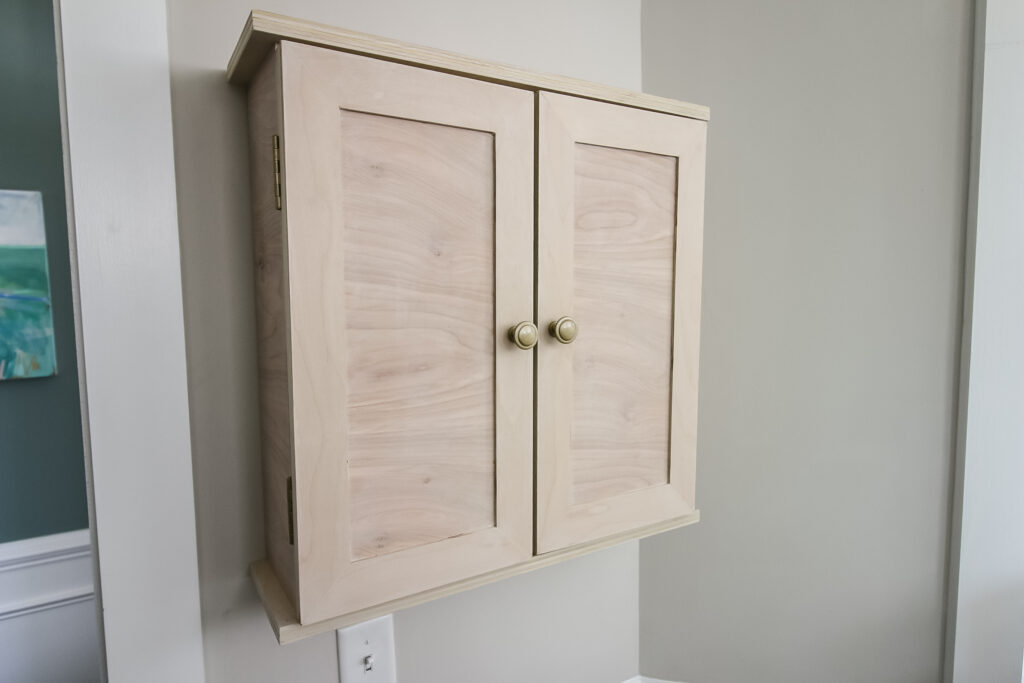
DIY dartboard cabinet
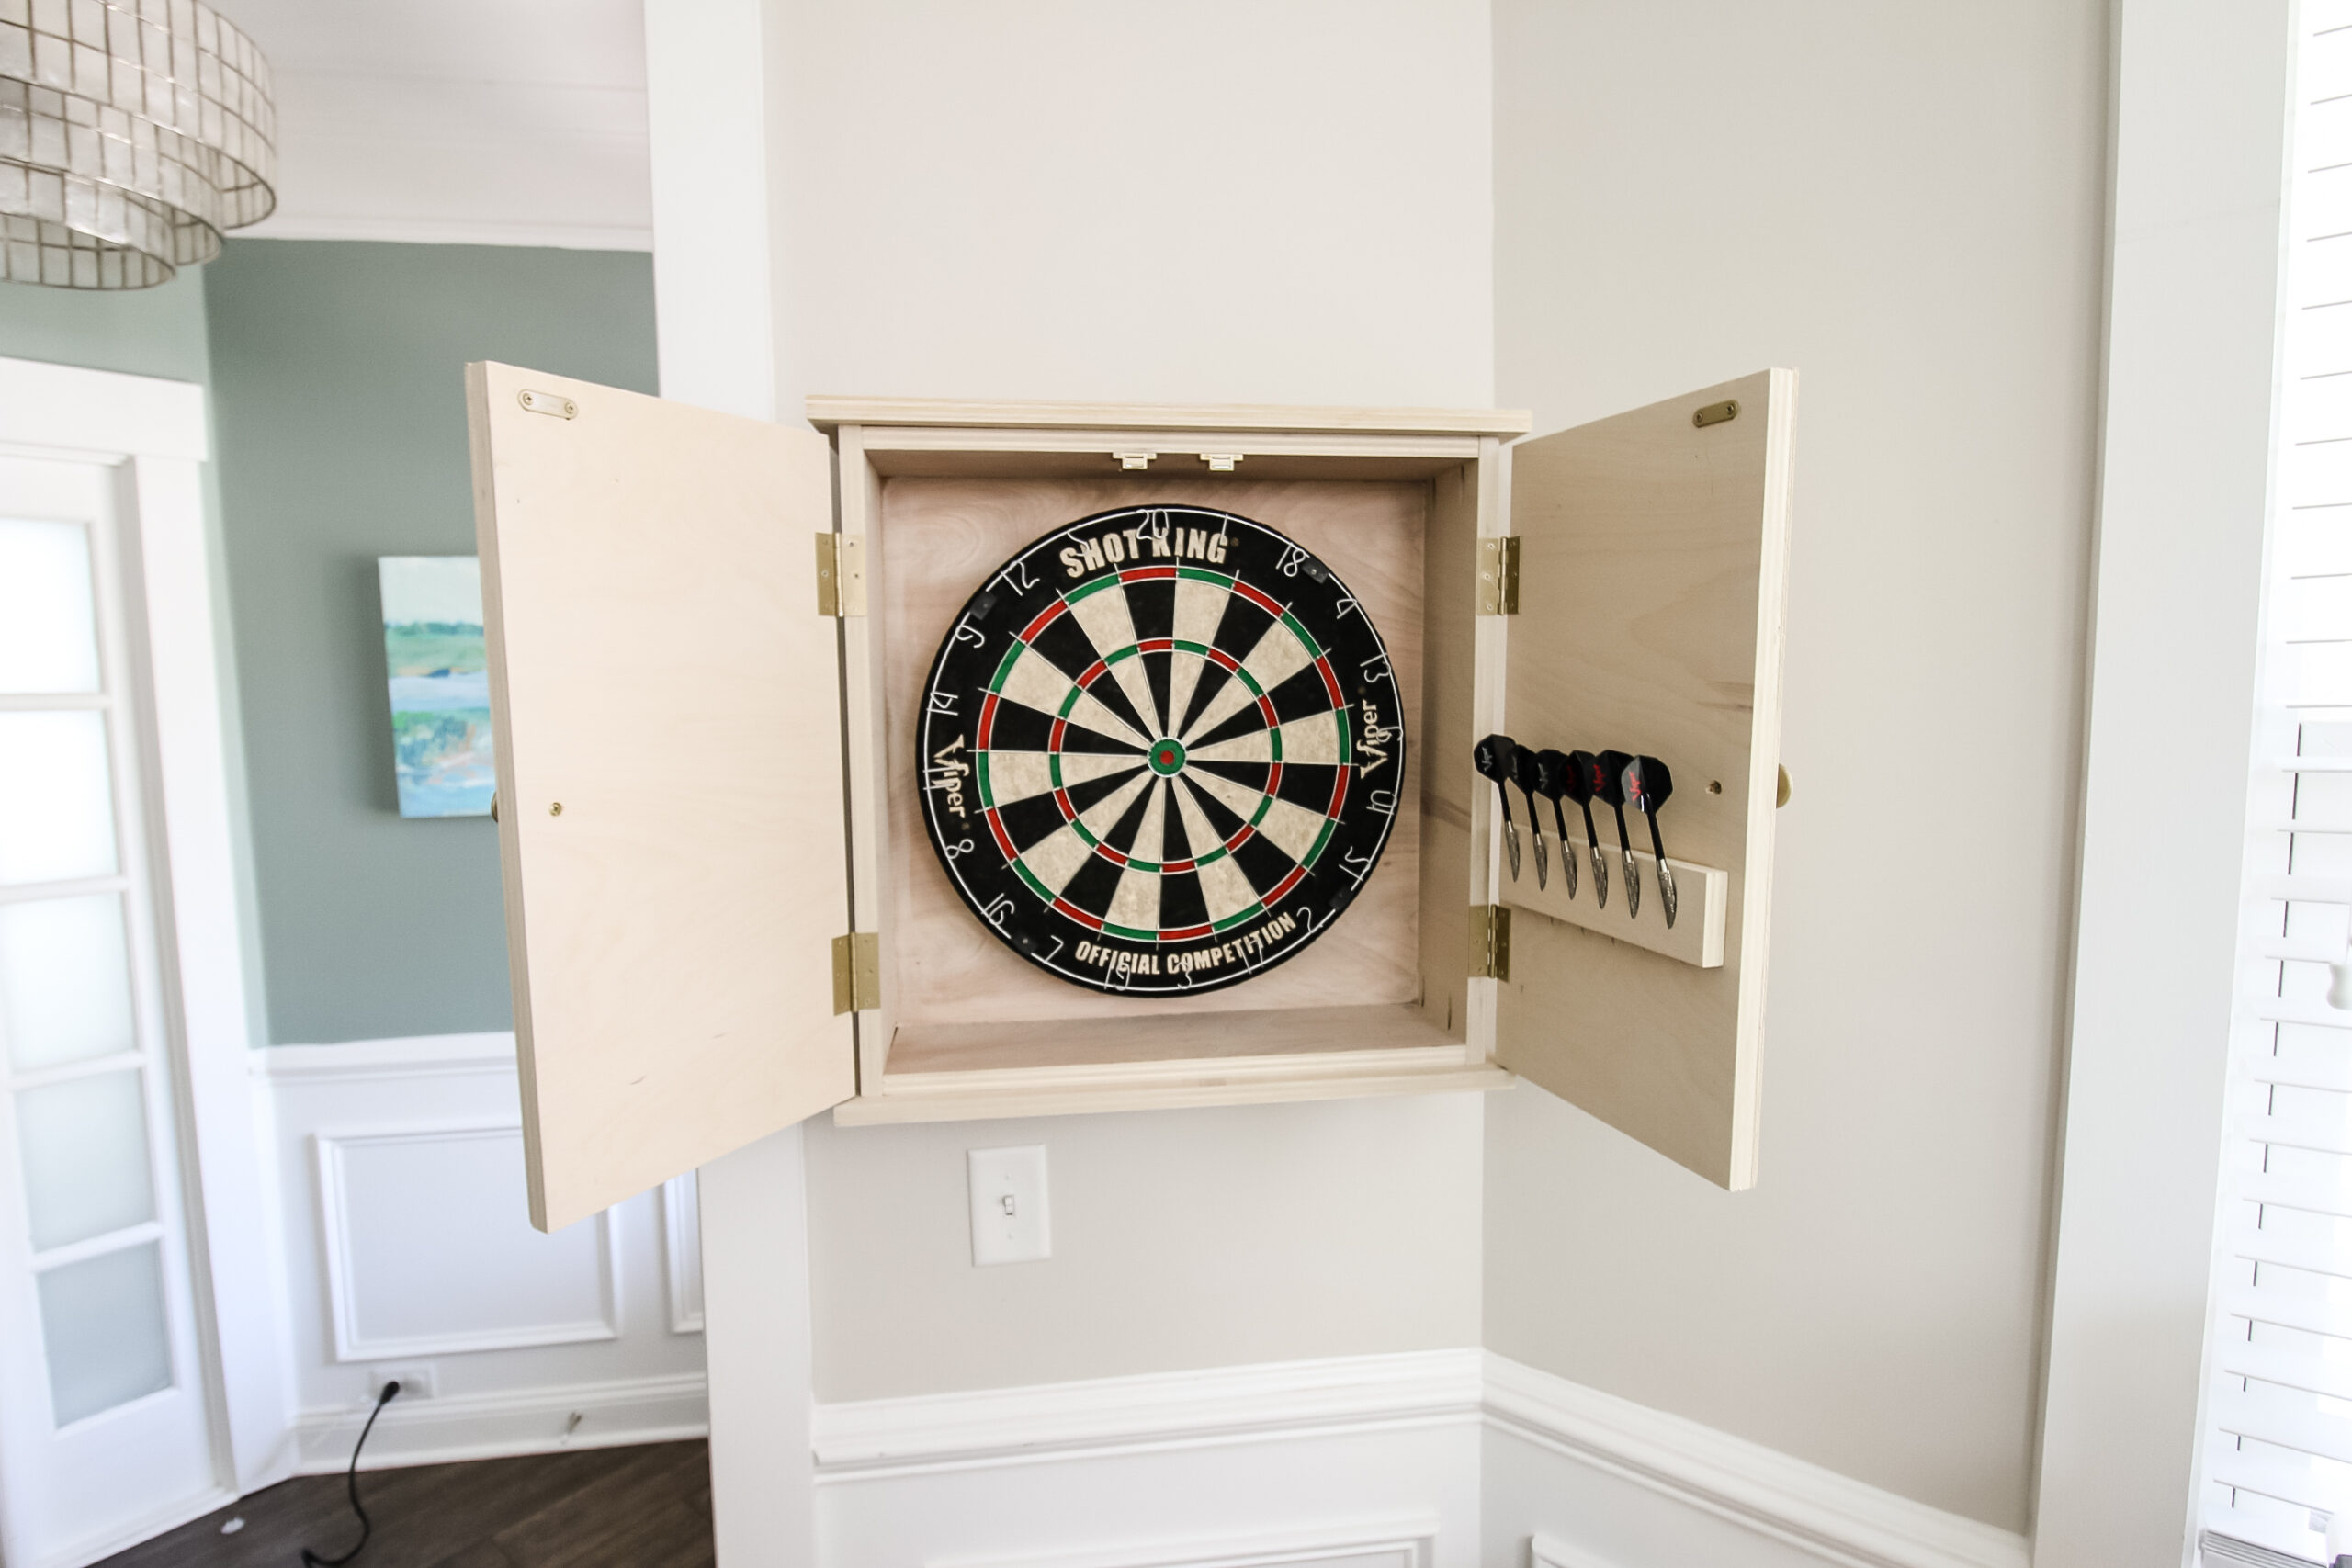
This is a simple DIY dartboard cabinet that looks really nice on the wall and can be customized with stain color and hardware choices.
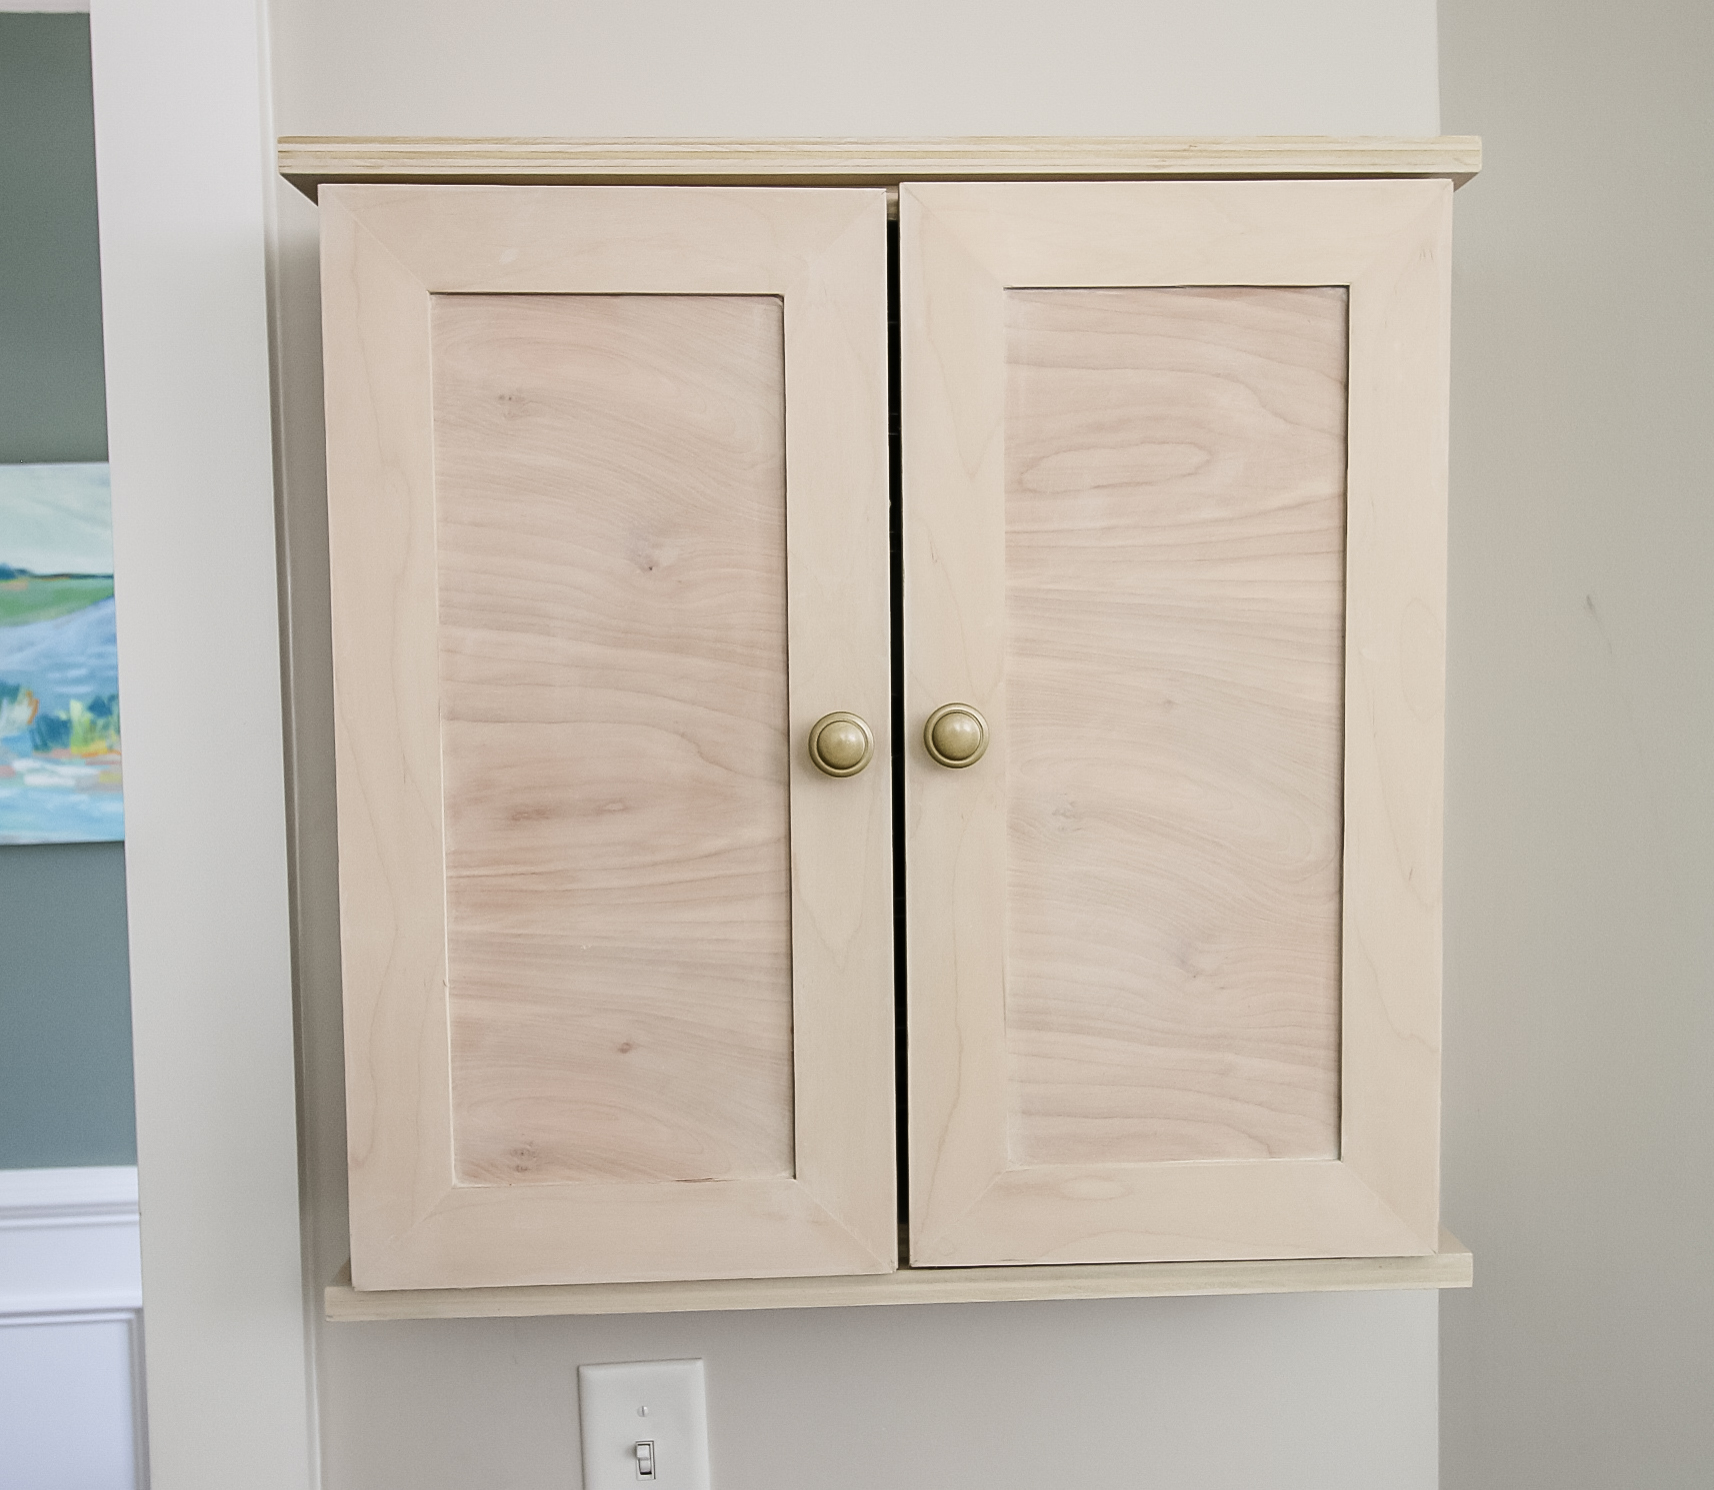
It's a good idea to make your cabinet fit with the existing decor in the room it will be in so that it flows with the space and no one would even know there was a dartboard in there.
Let's dive into how to make this project and then get the full DIY dartboard cabinet plans to make your own!
How to make a dartboard cabinet
Here's what you need and how to build a dartboard cabinet with about half a sheet of plywood.
Supplies needed to build a dartboard cabinet
- ¾" plywood
- Kreg pocket hole jig (we prefer the Kreg 720 Pro)
- Kreg pocket hole screws
- Standard size dartboard
- Stain and hardware of choice
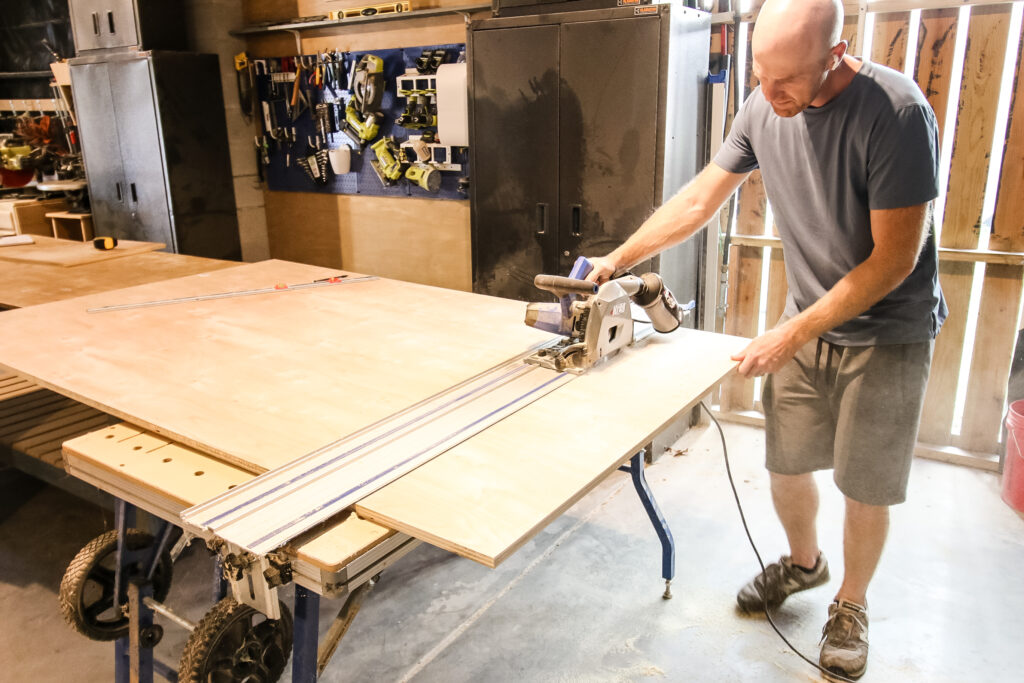
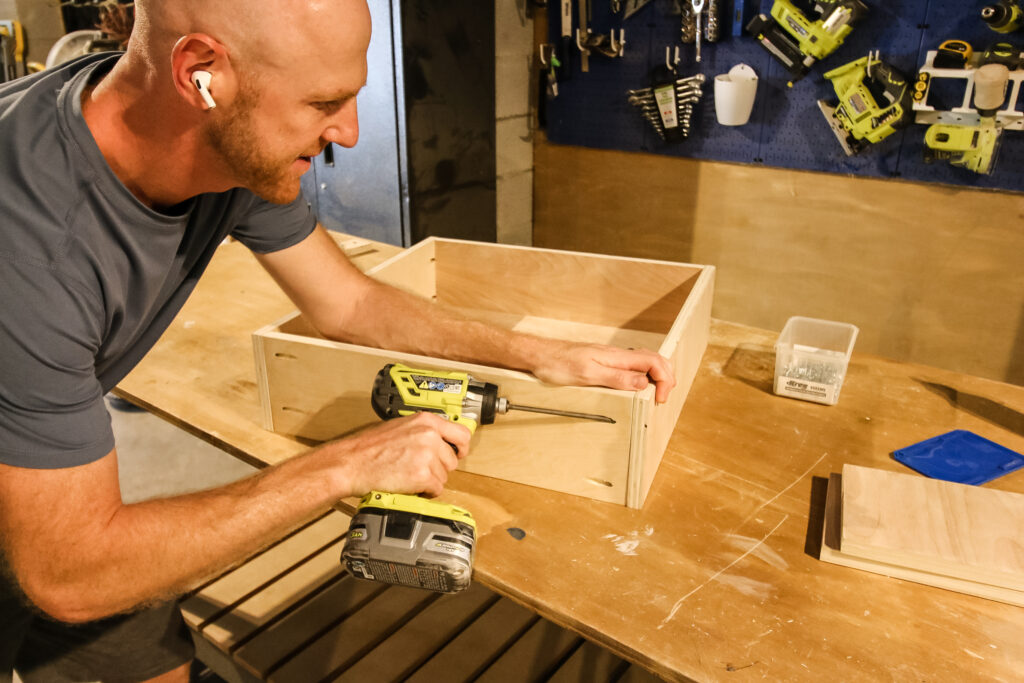
Step one: Make cuts and drill pocket holes
Once you've downloaded our free woodworking plans, you'll have the full cut list for this project. The easiest thing to do is to start by making all the cuts at once. It's a fairly straightforward build, so with all the cuts done, you can get to building!
After everything is cut, then do all of your pocket holes at once. The pocket hole placement on this project is easy and can all be done at once.
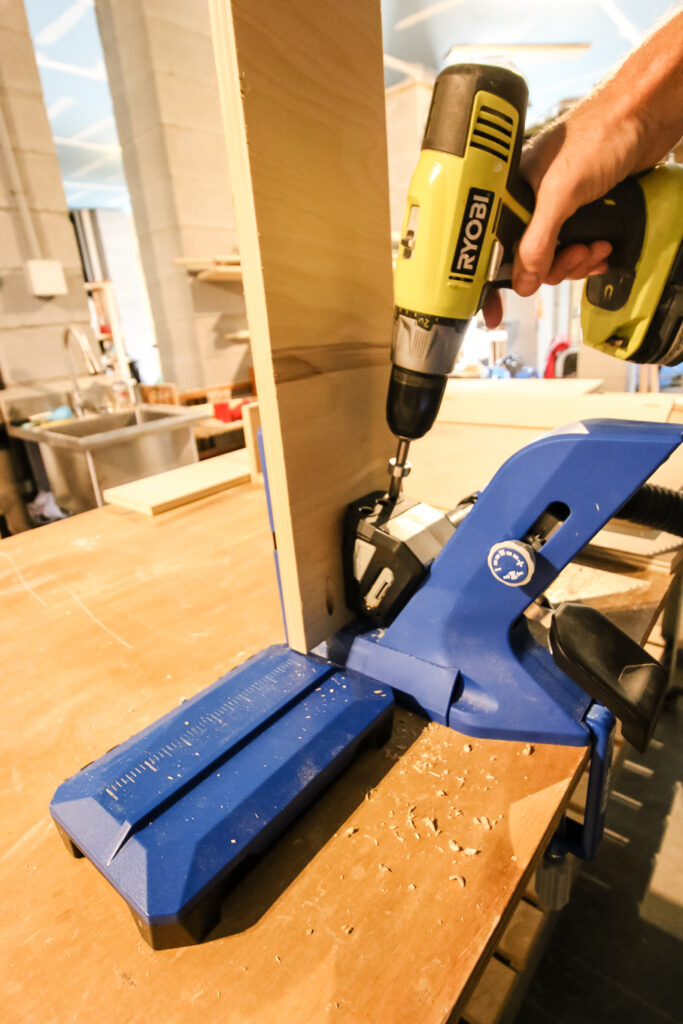
As usual, we used our Kreg Pocket Hole Jig 720 Pro for this project to drill all of our pocket holes. We love how easy it is to use the 720 Pro because the base is nice and wide and the AutoMAXX clamping system makes it easy to do repetitive holes.
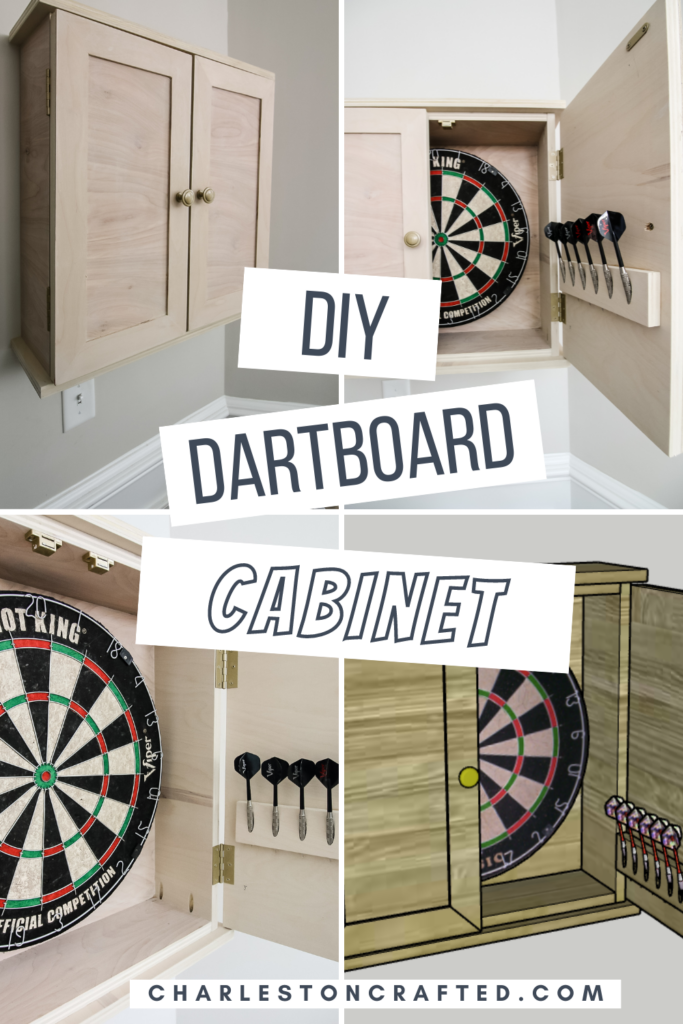
Pocket hole placement goes in the ends of the side boards and each side of the back, but the cool thing is how we used pocket holes for dart storage.
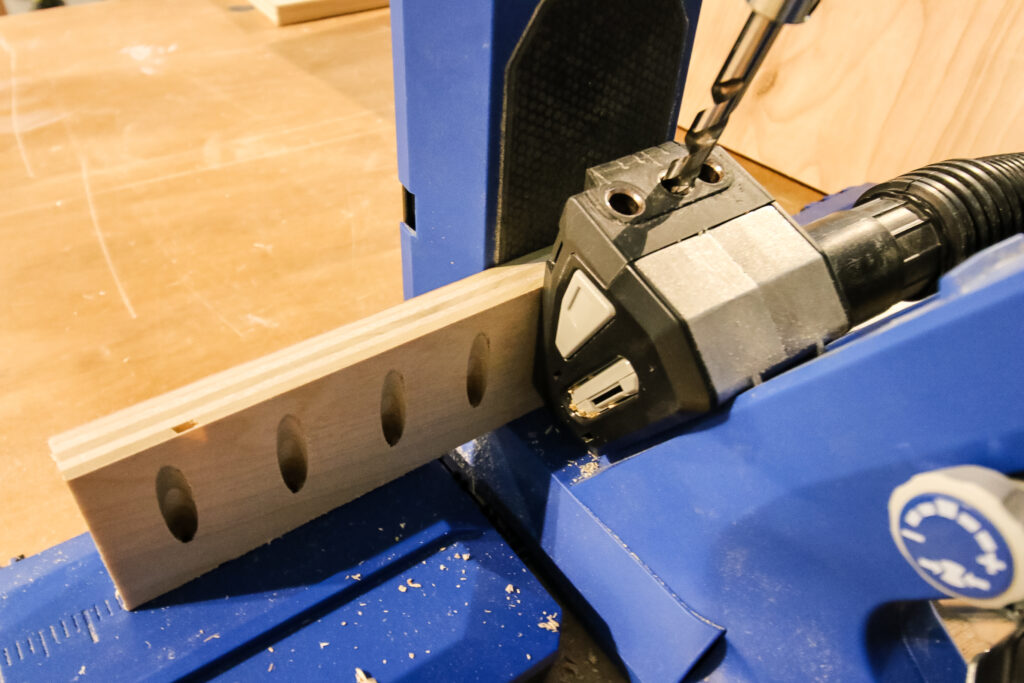
We drilled six pocket holes in a short piece of wood to attach to the door to hold all of the darts. The dart tips fit nicely through the pocket holes and hold the dart safely in place.
Step two: Build box and add back
The first part of assembling the dartboard cabinet is to attach the sides to the top and bottom of the box and then add the back.
The frame of the box holds together and the back can be slide in for easily attaching with pocket hole screws.
Step three: Attach trim boards
With the box assembled, you can add trim boards to the top and bottom to give the piece a nicer, more finished look.
These are attached with wood glue and pocket hole screws from the side boards.
We also added trim board to the doors. For this, we used ¼" plywood cut into strips with 45 degree mitered angles.
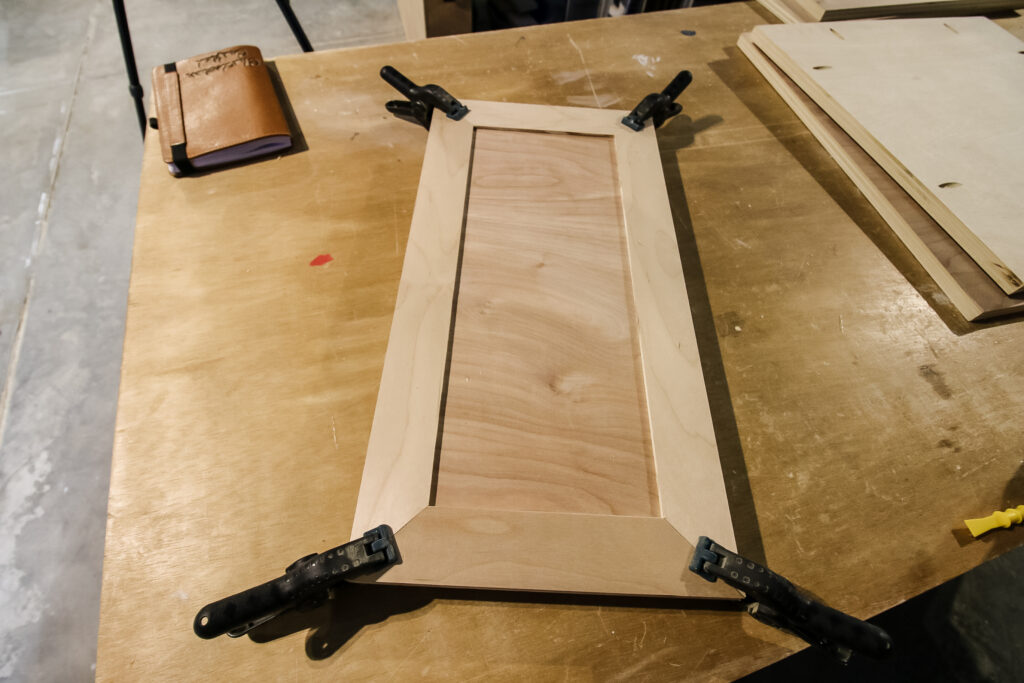
The trim boards on the doors are clamped on with wood glue, then filled in the joints with wood filler.
We also attached the dart holder board to the inside of one of the doors with wood glue so that there wouldn't be any exposed screws.
Step four: Add hardware
With all the woodworking done, it's time to add final hardware!
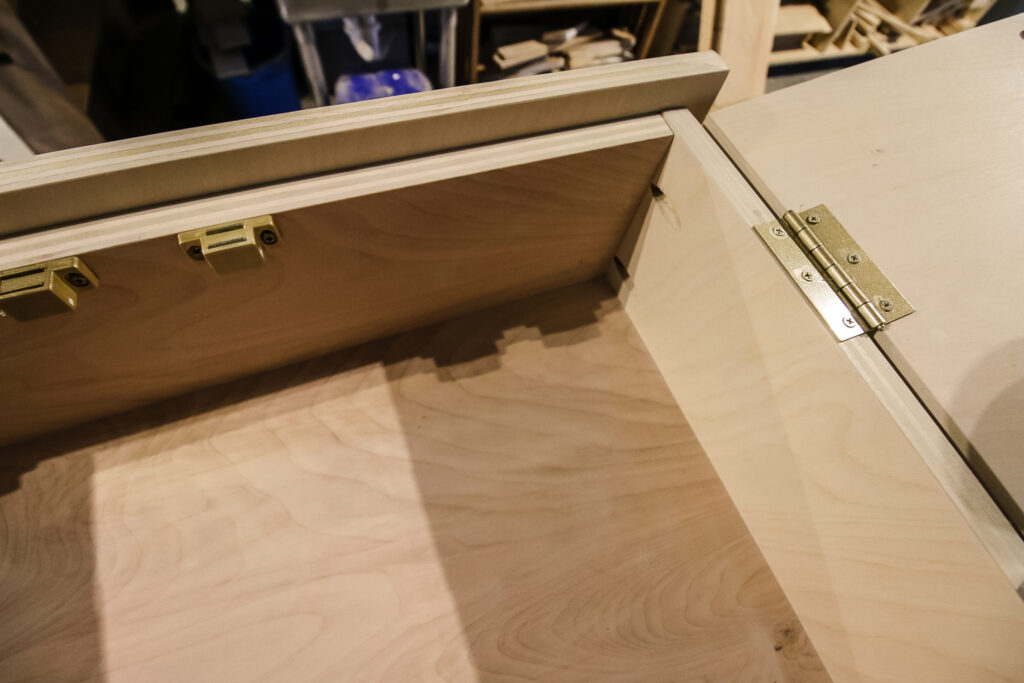
You'll need to add two hinges to each door, a knob to each door and a magnet catch to keep each door closed.
We spray painted all of ours to be a matching gold color.
Step five: Insert dartboard and darts
Finally it was time to add the dartboard! Follow the instructions for the mounting hardware that come with your dartboard to attach it to the inside of the board.
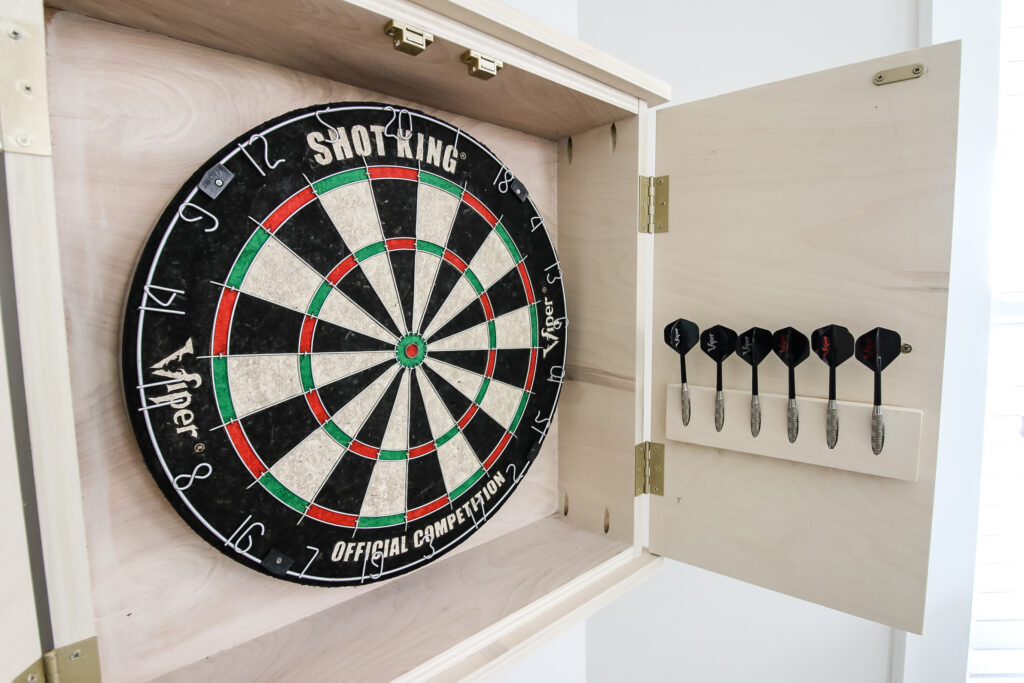
What a great dart holder those Kreg pocket holes make for the steel tip darts!
You could also add chalkboard paint to the inside of the other door if you wanted to keep score that way!
Step six: Hang on the wall
The final step is to hang your dartboard on the wall. Apparently there is a very precise spot to hang your board one the wall using a measuring tape, so make sure you get that right.
To actually hang it, we used two keyhole hangers on the back and lined them up.
This was the second time that we have used these keyhole hangers, the other being our modern wall-mounted floating side tables that we installed in our guest bedroom and they work really well.

Now you can play darts and really enjoy the game!
When you're finished, simply close the doors and your DIY dartboard cabinet will look like a piece of the home up on the wall!
What are the dimensions for a dartboard cabinet?
The dimensions for a dartboard cabinet can be adjusted depending on the style of cabinet you want. However, our DIY dartboard cabinet ends up being 23"x23"x7" at its biggest points.
DIY dartboard cabinet free plans!
Love this project and want to make one for yourself! Well, we've got DIY dartboard cabinet woodworking plans for you for free!
Thanks to our friends at Kreg Tool, you can click over and get our plans for free on their site. These plans feature our full material list, cut list and step-by-step instructions with computer model imagery to make it very simple for you!
Use this post as a guide and grab our specific free plans to build your own today!
Interested in the Kreg Jig? Click here to read our full Kreg Jig review and to see all of our Kreg Jig projects.
New to the Kreg Jig? Here is a step by step guide on how to use a Kreg Jig!
OR grab our FREE Kreg Jig Cheat Sheet here! Download the cheat sheet!

Looking for something?
We've been doing this since 2012 so we have a LOT of blog posts!
Search stuff like: Ceiling Projects | DIY Plant Stands | Thrift Flips

Hey there, I'm Sean, the woodworking enthusiast and builder behind CharlestonCrafted.com! Since 2012, I've been sharing the magic of turning raw materials into beautiful creations. I love teaching others the art and satisfaction of woodworking and DIY. I try to inspire fellow crafters to make something extraordinary out of nothing at all.