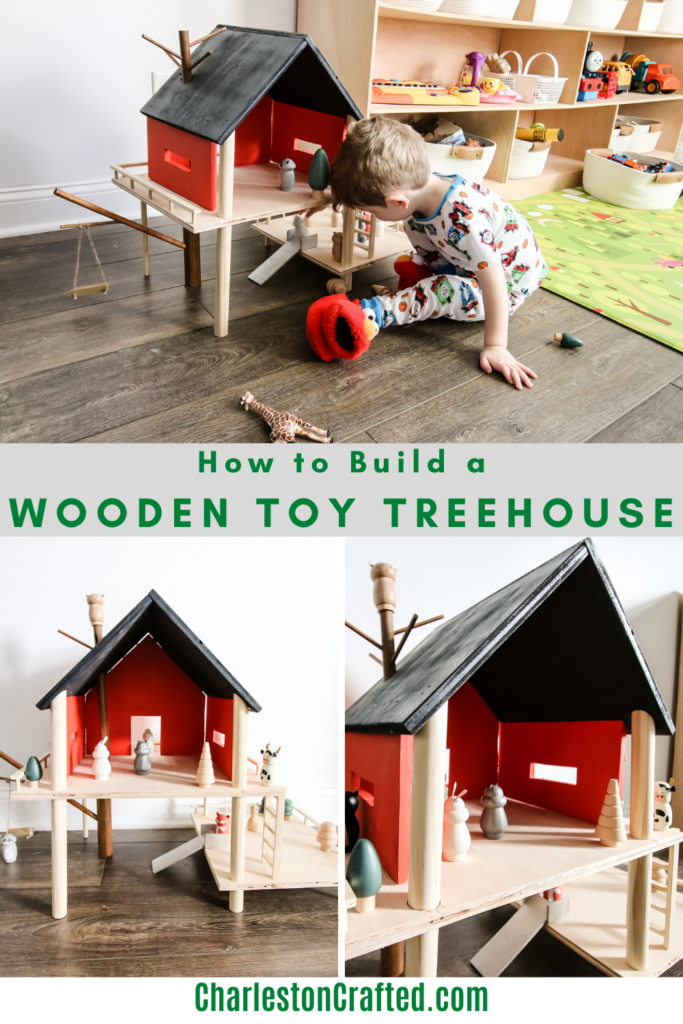
Here's how to make a DIY wooden toy treehouse for small peg dolls. This version is similar to the Hearth and Hand with Magnolia wooden toy treehouse at Target and can be made at a fraction of the cost. Here's how.
Whether they want to or not, many children these days are into wooden Montessori toys instead of loud, flashing plastic toys.
In our house, we do our best to encourage imaginative play through Montessori activities and wooden or simple toys. We have plenty of plastic toys, too - but we try to find a level of balance.
We first bought a set of peg doll animals at our old house and built a simple DIY wooden toy barn to house them in.
With more space in our new house, we were eyeing the Hearth and Hand wooden toy treehouse at Target, but didn't want to spend $120. We also liked the Magic Wood toy treehouse at $139.
So, for Christmas, we decided to design our own version of a DIY wooden toy treehouse and built it for the kids.
With our plans and a little imagination, you can build one for your family as well!
DIY wooden toy treehouse
When we took a trip to the mountains of North Carolina last summer, we went to a garden that had a special fairy house trail that our son became obsessed with.
He really enjoyed opening the fairy doors and looking at the gnomes and fairies climbing on the treehouses.
This was a fun build to bring lots of imaginative play into the future!
Check out our tutorial + woodworking plans for how to build a kids learning tower!
Wooden treehouse toy inspiration
We had several different bits of inspiration when designing our peg doll treehouse.
As mentioned, we loved the looks of the Hearth and Hand with Magnolia wooden toy treehouse and the Crate & Kids wooden treehouse dollhouse. We based our idea off of different elements of each of these.
We liked the idea of multiple levels for different play zones, and also with realistic elements of an outdoor play set, like a swing and slide.
The other choice was to determine if it would be more natural wood or plywood. Many of the wooden toy tree houses you see are made from live edge wood and actual branches, but we wanted ours to mimic other elements of the playroom, specifically our Montessori toy shelf that we plan to store this toy on top of. So, we chose a plywood base.
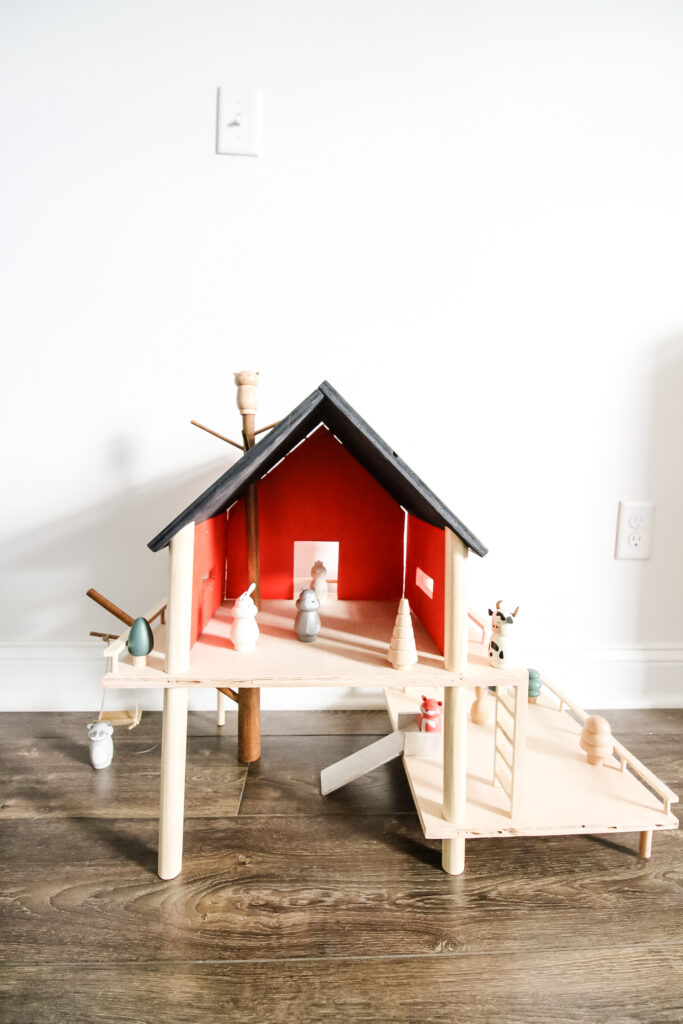
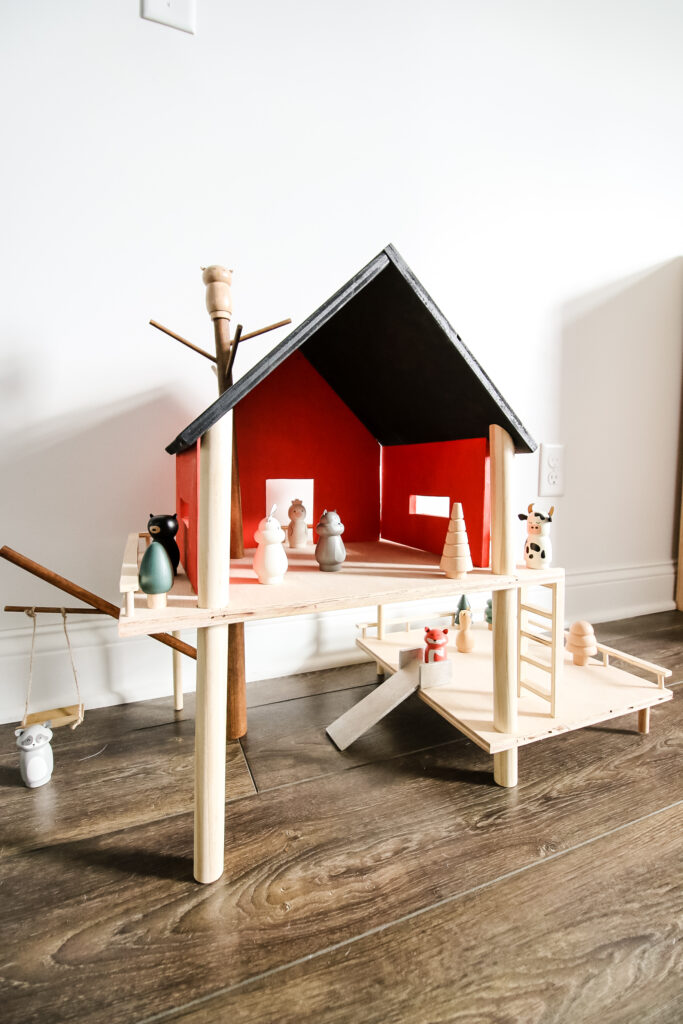
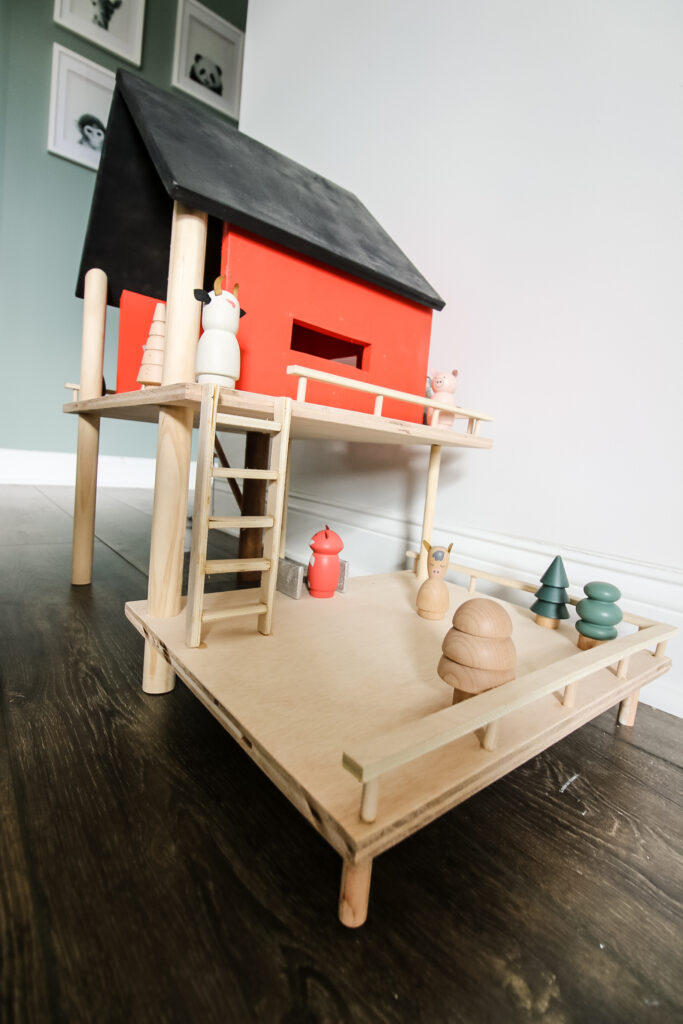
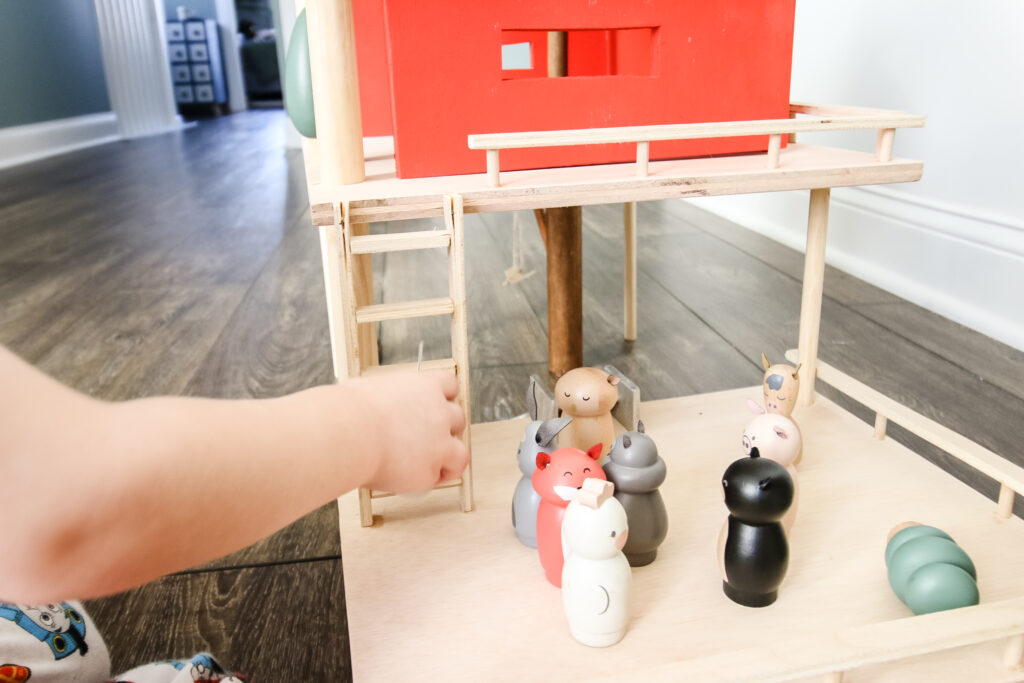
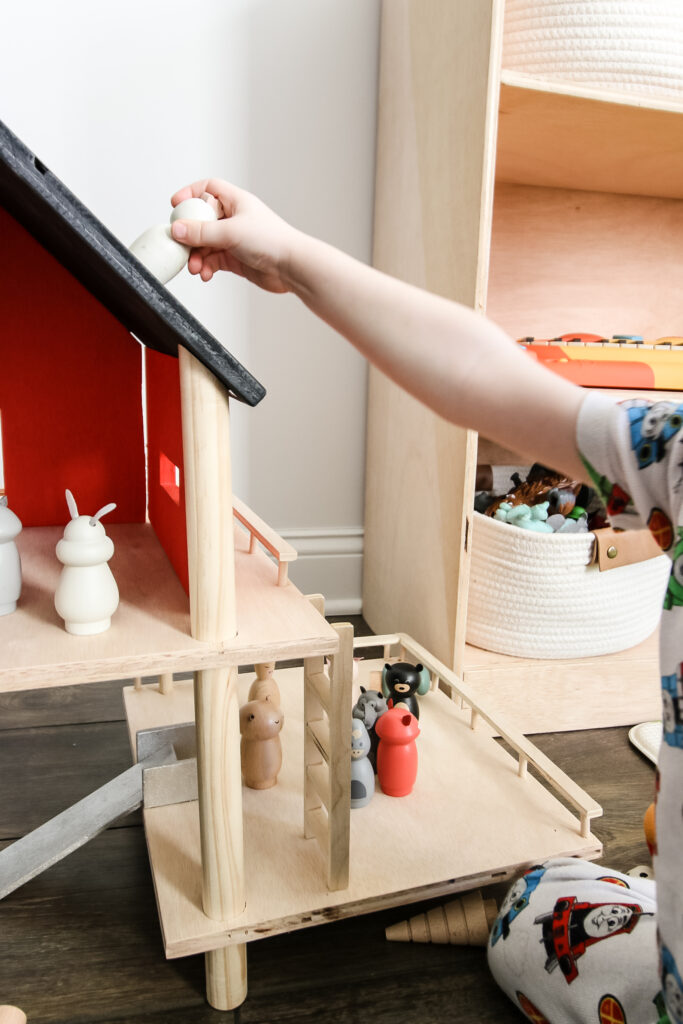
Our design includes space around the main frame of the house to fit peg dolls and other small world toys so that the kids could actually move their guys around the treehouse.
Finally, for us, we tried to make the house itself look like our actual house, so we painted it red and black, using leftover paint from the jungle mural in our son's room.
How to make a toy treehouse
Here's how to make a DIY wooden tree house toy for your kids.
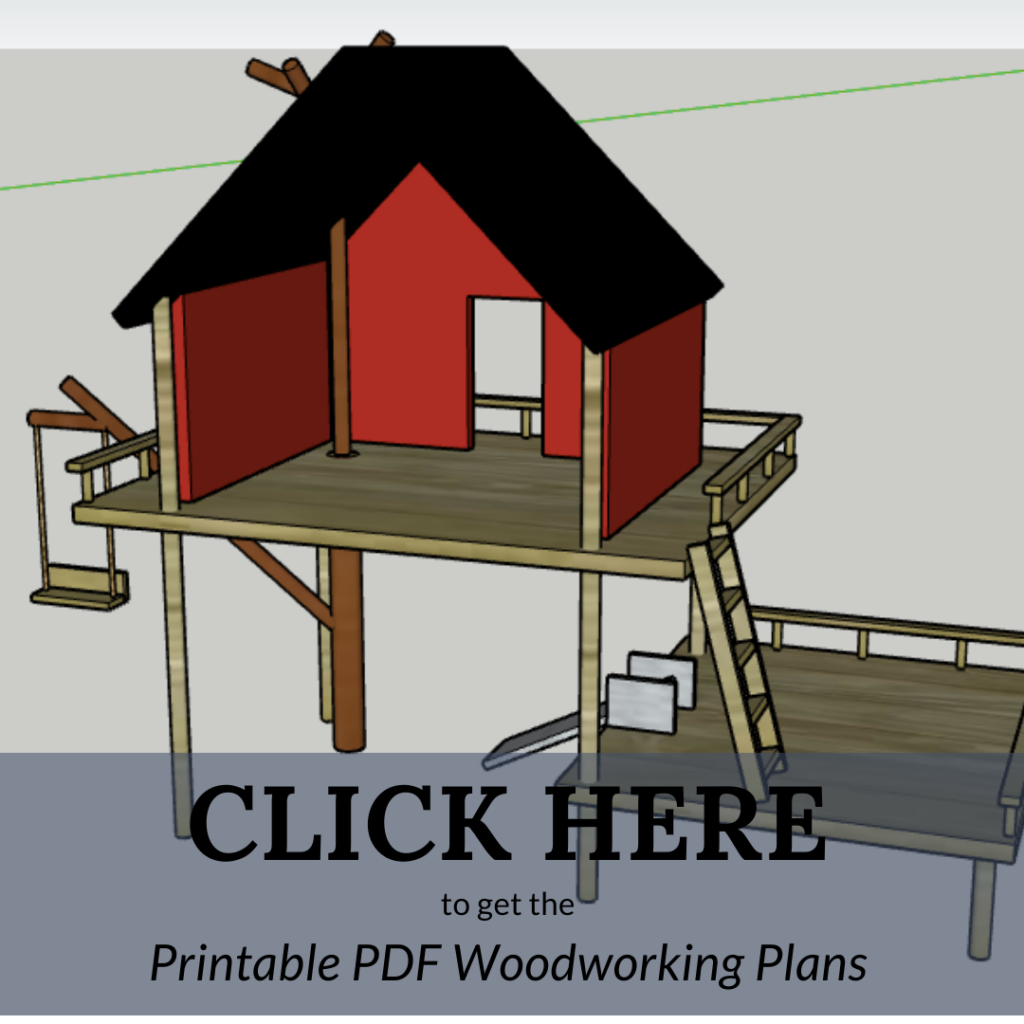
This post and the steps below will give you a general overview on how we created our small world tree house. You can use this post as a guide to create your own, or click over to the woodworking plans for a more complete step-by-step guide and cut list.
Tools needed to make a fairy tree house
- Table saw
- Miter saw
- Cordless drill
- Clamps
- Brad nailer
Materials needed to make a doll tree house
- Plywood
- Dowels
- Wood glue
- Brad nails
- Spray paint or stain
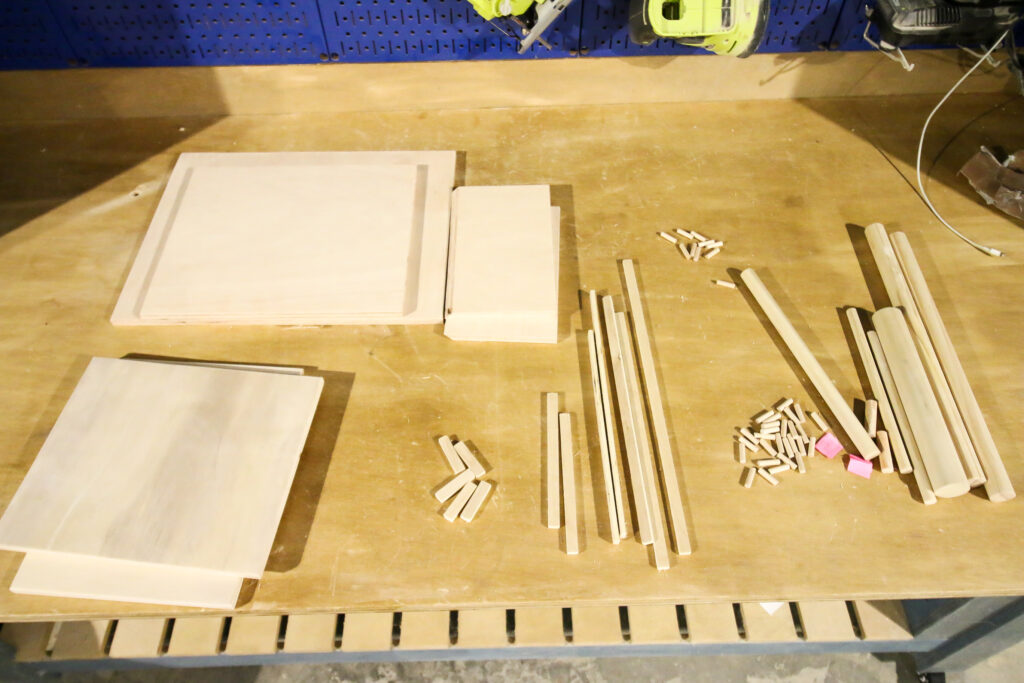
How to make a doll treehouse
Follow these steps to help make your wooden toy treehouse. Remember to grab the treehouse woodworking plans to get the full details.
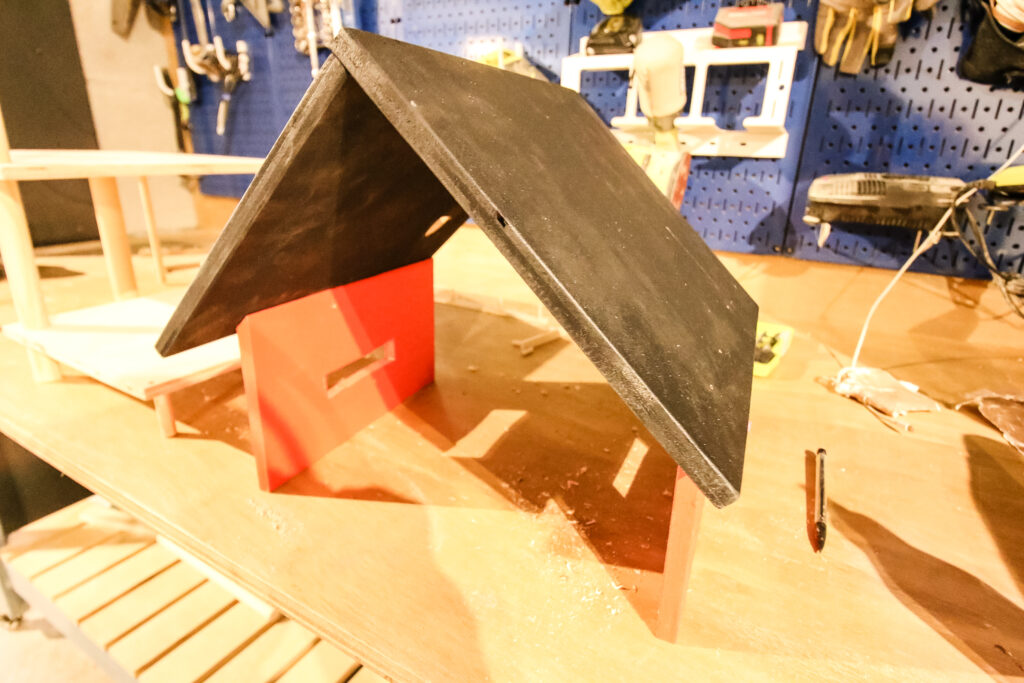
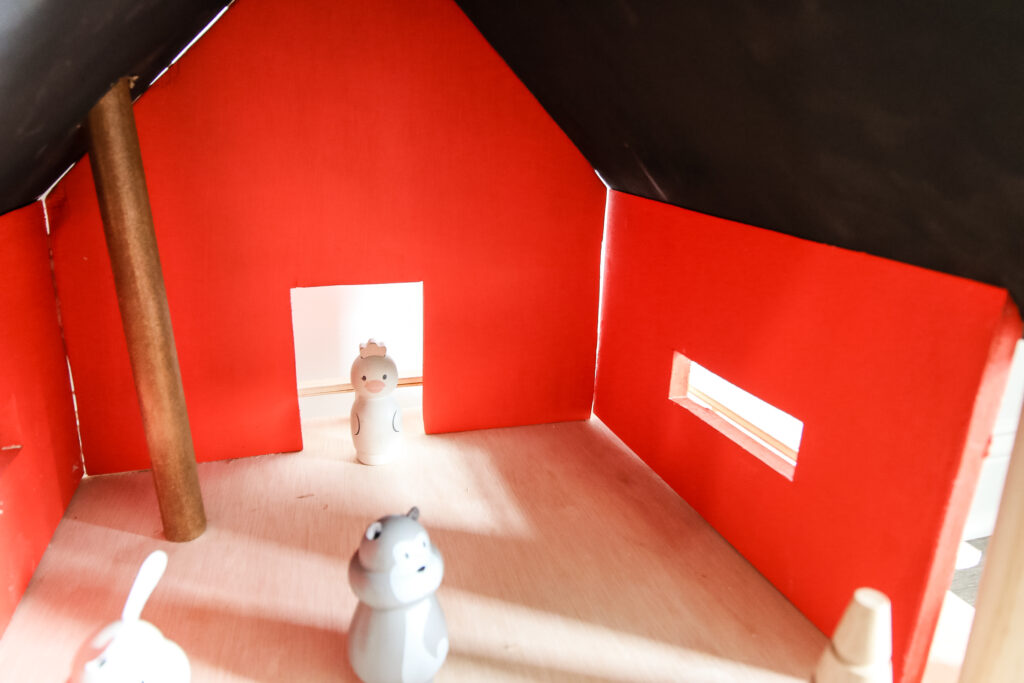
STEP 1: Assemble house
To assemble the house itself, we cut two side pieces with 45 degree angles on the top edge and two roof pieces that would align with those.
We also cut a back wall, but left the front open for ease of play.
On the back wall, we cut a door with a jig saw and did the same with windows on the two side panels.
We wanted this treehouse to look like our actual house, so we spray painted the sides and back red and the roof black. This would be a great opportunity to go whatever direction you wanted.
We connected everything together with wood glue and brad nails.
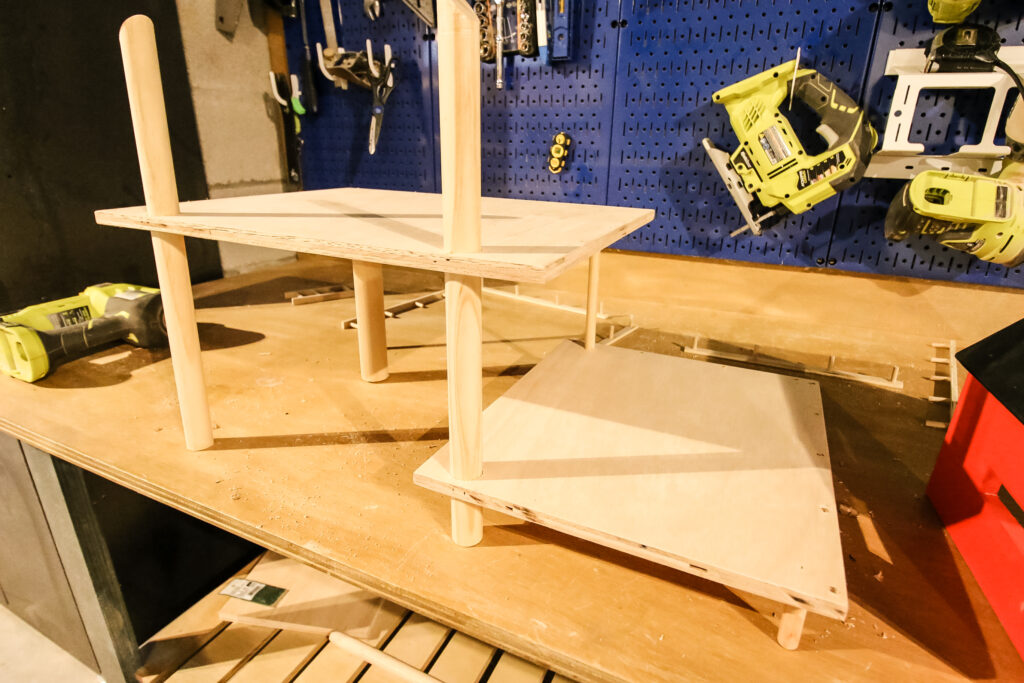
STEP 2: Build platforms
This step is where things were a little tricky. The two platforms are both connected and supported by various lengths of dowel rods to give it that stilts look.
We opted for two large dowels in the front to serve as supports for the upper platform, but also look like columns on the front of the house.
We also used longer, skinnier dowels on the back, and shorter dowels around the bottom of the lower platform.
The exact lengths of these are in the woodworking plans, but it can depend how much spacing you want.
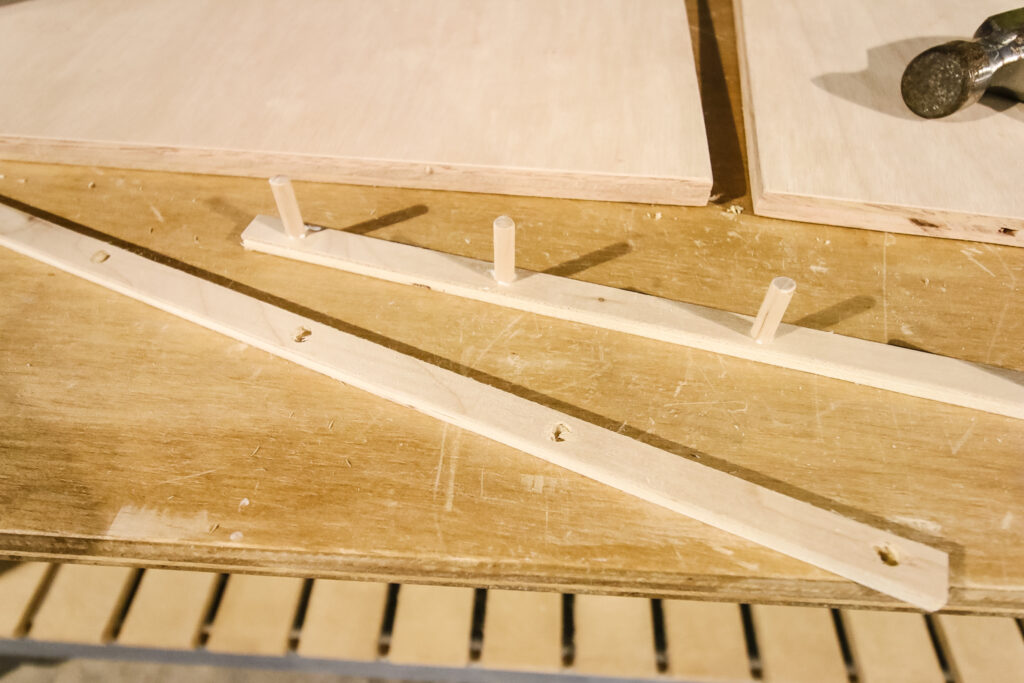
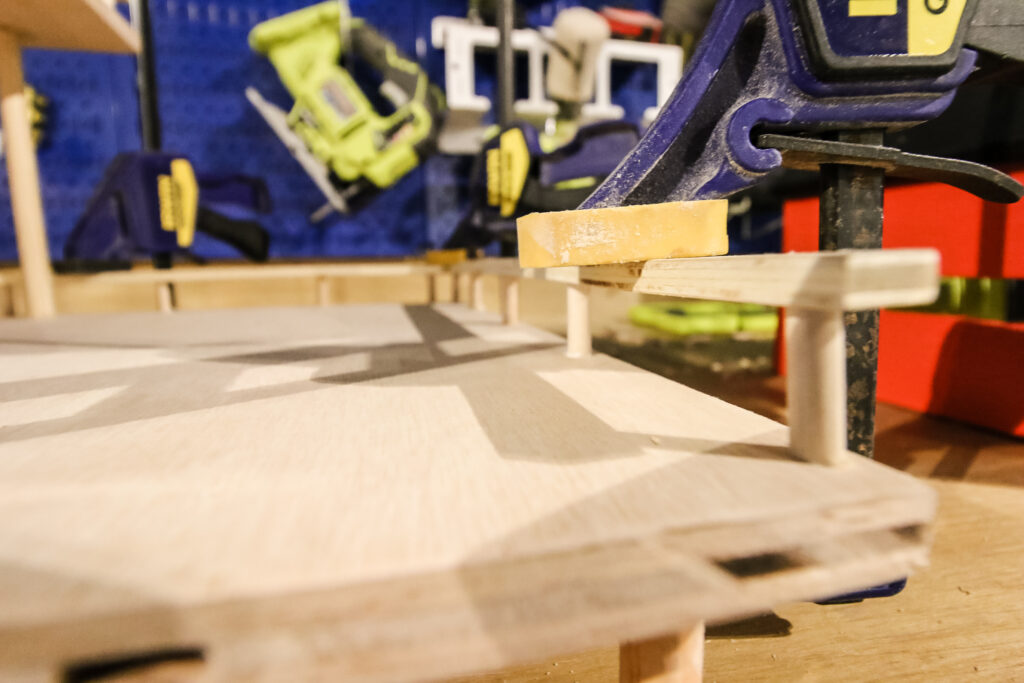
STEP 3: Attach railings
With the platforms assembled and in place, we attached railings around the edge of both.
This involved cutting very short lengths of thin dowel and gluing them onto strips of plywood before gluing and clamping to the edges of the platforms.
To make this easier, we first drilled very shallow holes in the railings and glued the dowels in there. Then, we marked those locations in place on the platforms and drilled shallow holes there as well to help hold them in place.
Turned out to work really nicely.
STEP 4: Create tree
You can't have a treehouse without a tree! Many of the versions we have seen people make include live edge wood for their doll house treehouses to go around.
To match with the aesthetic of the dowels that were supporting the railings and platforms, we made our tree out of dowel pieces.
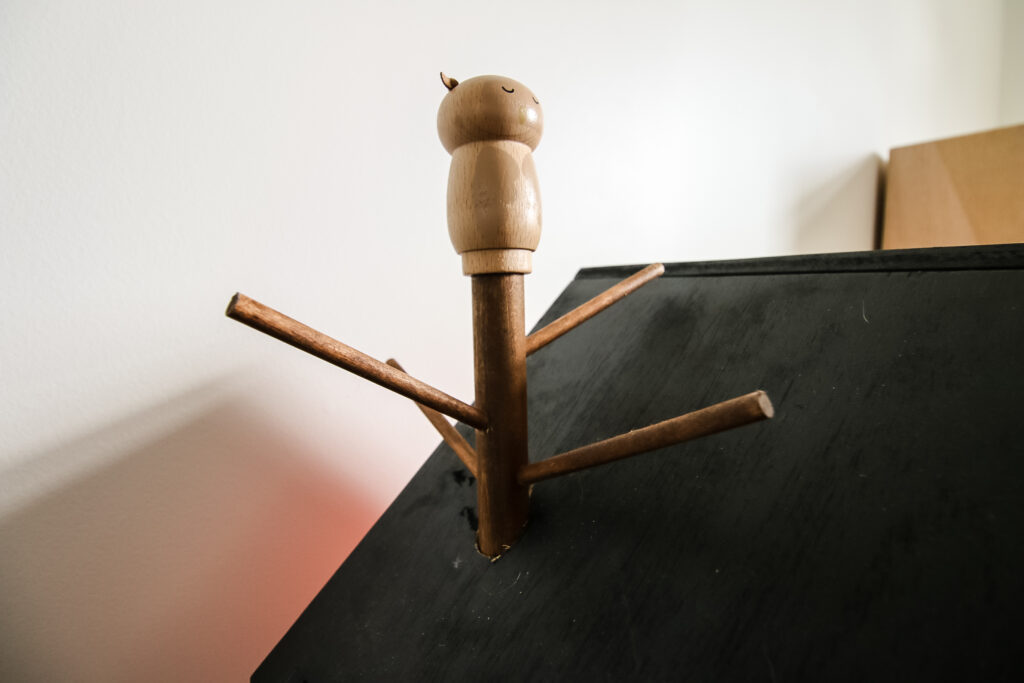
We used a thicker dowel underneath the tall platform and a slightly thinner dowel on the upper platform. Then, we drilled a hole straight through the roof of the house where we wanted it to line up so that it would slide straight down.
We also drilled angled holes into the top of the dowel to allow for small dowel scrap cutoffs to be inserted to look like branches. Kind of like this dowel Christmas tree!
On the lower "trunk" of the tree, we drilled an angled hole and inserted a longer dowel that would stick out past the platform for our swing.
You could add tree stumps or small trees on other parts of the treehouse to give yours a jungle vibe!
STEP 5: Assemble treehouse
With everything cut and the individual pieces assembled, it was time to put it all together.
The platforms are already in place with the railings, so now it's mostly time to add the house. We used wood glue along the bottom and lined it up with the angled dowels in the front so that the roof would rest there, where we also added small nails.
Then we slid the upper part of the tree through the hole and glued that in place as well.
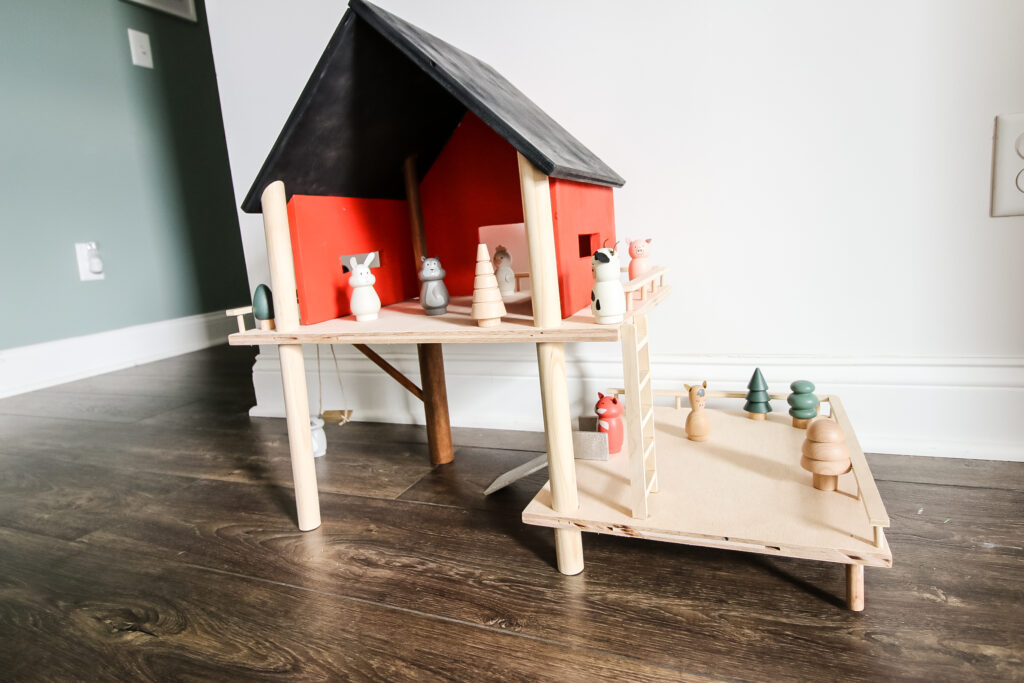
STEP 6: Add accessories
Our wooden treehouse set features a slide, ladder and swing for the wooden peg doll animal toy set we bought to play with.
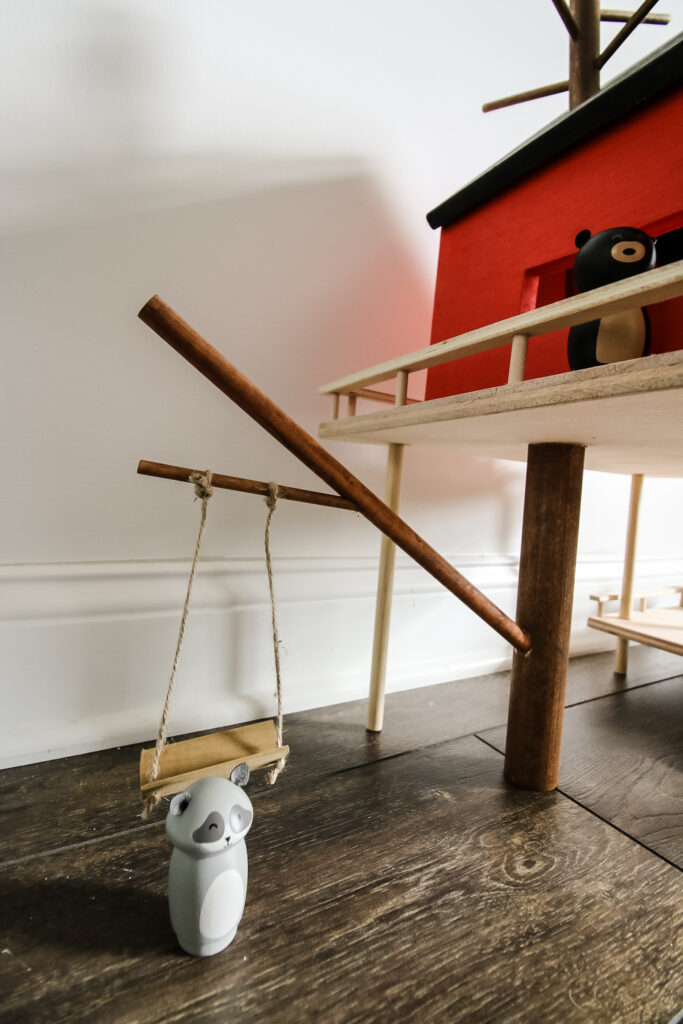
The swing is two small strips of wood glued together and hung from the tree branch.
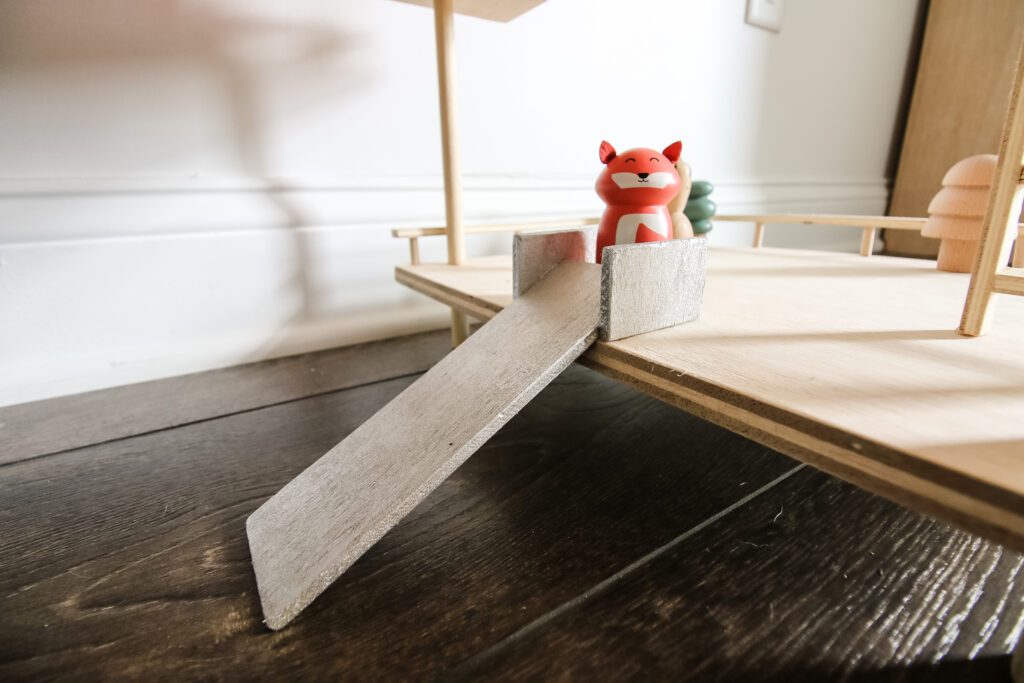
Our slide is ¼" thick plywood cut to angle down from the first platform to the ground.
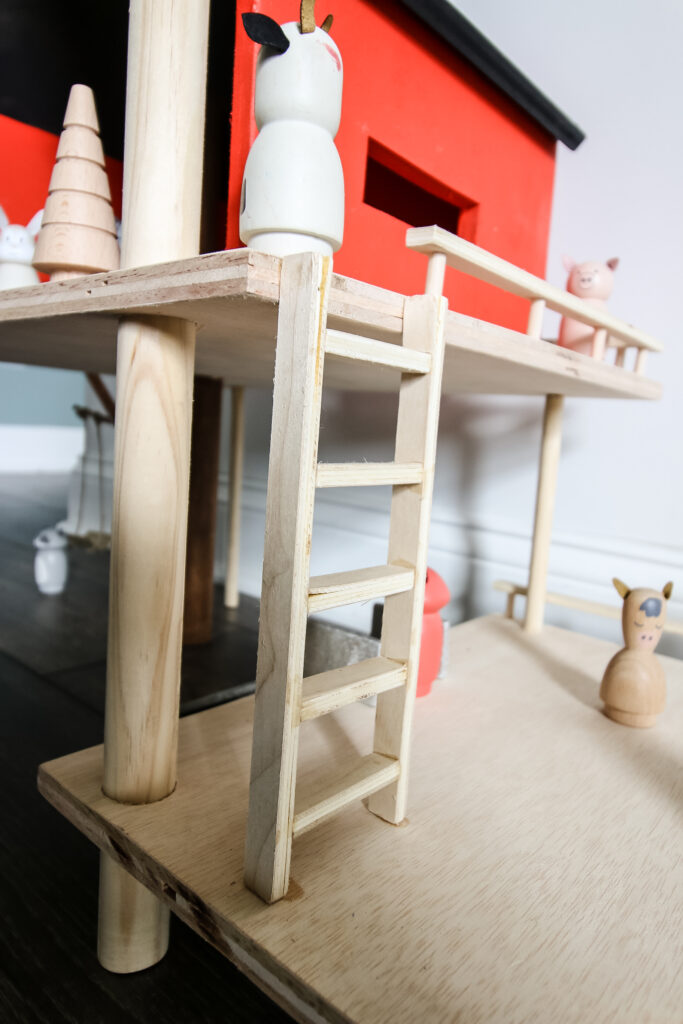
Of course, you have to have a ladder to get between the two platforms! We used ¼" plywood and glued two long strips to the sides of smaller "steps" to create a ladder to attach between them.
STEP 7: Have fun!
Our children have loved using their imagination to play with our DIY wooden toy treehouse!
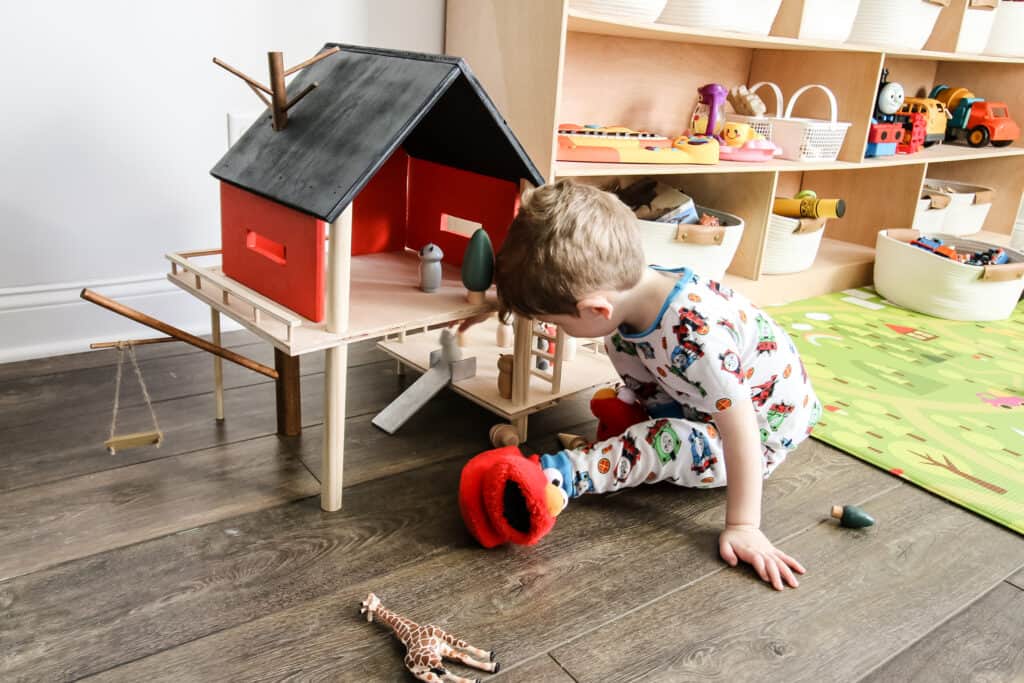
Of course, they don't always use each part the way it's intended or how we thought they would, but that's the fun of imagination.
The peg dolls are easy to move around the platforms or slide down the slide and it's fun to see this small world play happening between two age groups.
The most important thing is to let them have fun!
DIY wooden toy treehouse woodworking plans
Want a better look at how we built our DIY fairy tree house? Click on over and get the woodworking plans!
Our plans will give you a full material list and cut list, as well as step-by-step instructions with computer model images.
Pair the plans with this post and your imagination and your children will have hours of fun with their wooden toy treehouse! Add in your own wooden peg dolls or wooden fairy garden accessories and have a blast!

Looking for something?
We've been doing this since 2012 so we have a LOT of blog posts!
Search stuff like: Ceiling Projects | DIY Plant Stands | Thrift Flips

Hey there, I'm Sean, the woodworking enthusiast and builder behind CharlestonCrafted.com! Since 2012, I've been sharing the magic of turning raw materials into beautiful creations. I love teaching others the art and satisfaction of woodworking and DIY. I try to inspire fellow crafters to make something extraordinary out of nothing at all.