Want to cover your popcorn ceilings? You'll love this simple tutorial on how to cover popcorn ceiling with beadboard!
Do you have popcorn ceilings in your home?
This texture was super popular decades ago for covering imperfections in the drywall and making finishing work go more quickly.
But, it is a look that feels very dated and can get dirty and dusty easily.
We've tried scraping our popcorn ceilings in our master bedroom and two bathrooms and it was a difficult and messy process.
Then we had a contractor cover the ceilings downstairs with drywall when they took down two walls. That was great - but cost us about $1,000 per room!
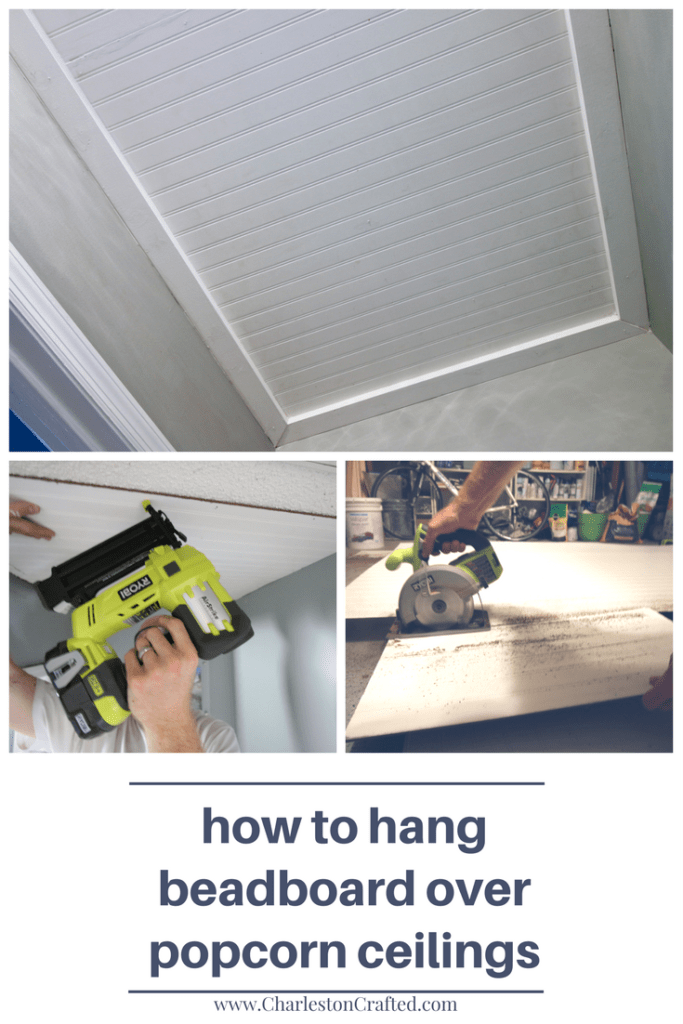
We decided to try to cover the ceilings at the top of our stairway ourselves - but with beadboard instead of drywall.
Today we are going to share a full step by step tutorial on how to cover popcorn ceilings (or any ceilings!) with beadboard paneling.
Reminder, we're working on the stairwell and upstairs hallway for the $100 room challenge.
Why use beadboard on your ceilings?
You can cover your popcorn ceilings with either drywall or beadboard. In general, beadboard is a cheaper and more DIY-friendly ceiling cover option compared to drywall.
Covering popcorn ceiling with drywall will give you more of a smooth finish, while beadboard ceilings have a textured look that plays well for historical or beachy-style homes.
The cost of beadboard is also typically less than the cost of drywall, and it requires less finishing work. There is no mudding or drywall work required when hanging a beadboard ceiling, since the seams are covered with molding.
Here's how we covered our popcorn ceilings with a coffered ceiling!
How to cover popcorn ceiling with beadboard
Covering your ceiling with beadboard panels is a very doable DIY project, though it is easiest if you have two people to help with holding the panels.
Supplies needed:
- beadboard panels
- construction adhesive
- 1x3 trim boards - or trim of choice
- crown molding - or preferred molding
- ladder or working platform
- circular saw
- nail gun
- trim paint + brush or roller or paint sprayer
- caulk
We needed to get enough beadboard to cover that area, which was three 4'x8' sections of beadboard.
We also needed trim for the edges and chose 1"x3" pine boards to cover the rough edges.
As for equipment, we borrowed a friend's ladder that was extendable on both sides.
This allowed us to adjust it to the point that we could set it up on angled stairs and reach the highest point in the stairwell, which was 17 feet.
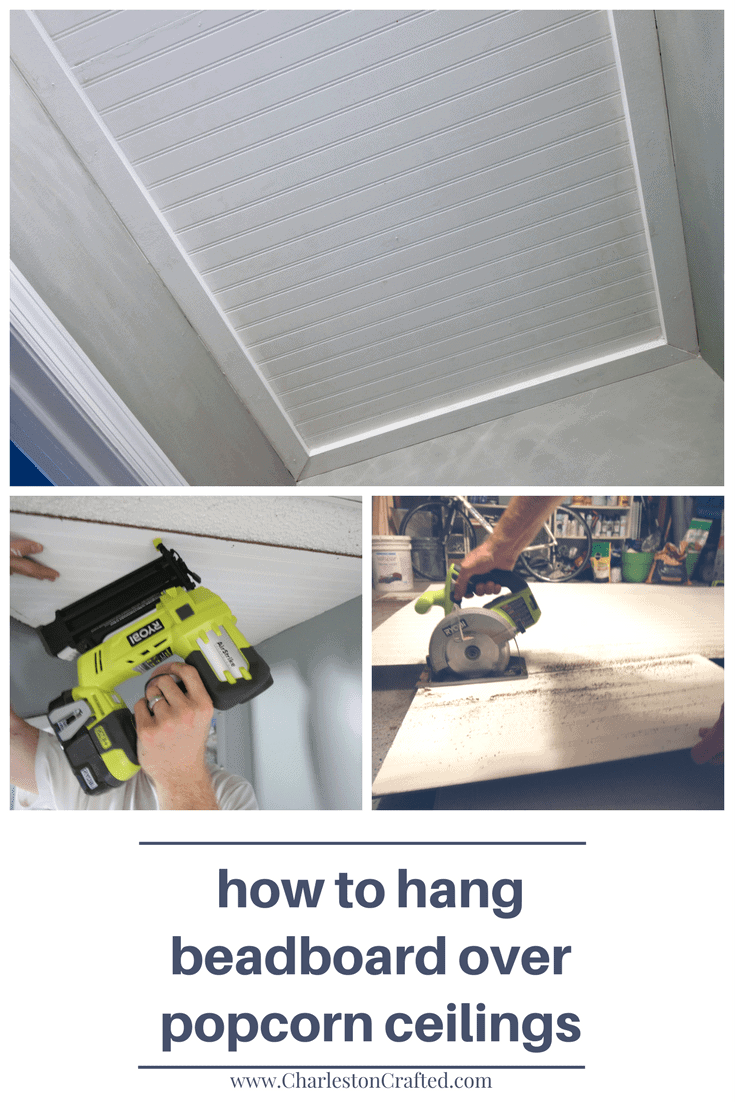
We also could not have done this project without our RYOBI Cordless Circular Saw and RYOBI AirStrike 18 Gauge Cordless Nailer.
I was a little skeptical at first about the thought of using a nailer with no air compressor, thinking it wouldn't have enough power to drive the nails.
I was seriously wrong. This bad boy drove the nails right through the boards into the ceiling with no problems and was so much more convenient than lugging around an air compressor and hose.
Steps to hang a beadboard ceiling
Here is a step by step guide to hanging a beadboard ceiling in your home.
STEP 1: plan
To start the project, we drew out a diagram with measurements of the whole ceiling.
Take your time to diagram the whole space and layout how you can make as few cuts in the panels as possible.
Don't forget that you want all of the lines in the beadboard going the same way and lines up with each other!
Step 2: cut your beadboard
Use a circular saw to cut your beadboard panels according to your plan and diagram.

Step 3: Cut your border molding
Measure the total length of border molding that you need. This will cover each seam between the beadboard and the vertical walls they bump into.
Cut your lengths of molding and sand the cut edges.
Step 4: Cut your seam molding
We chose to use 1x3s to cover the seams in our molding on the ceiling. You can alternatively just caulk these seams, but if you want molding, cut it now.

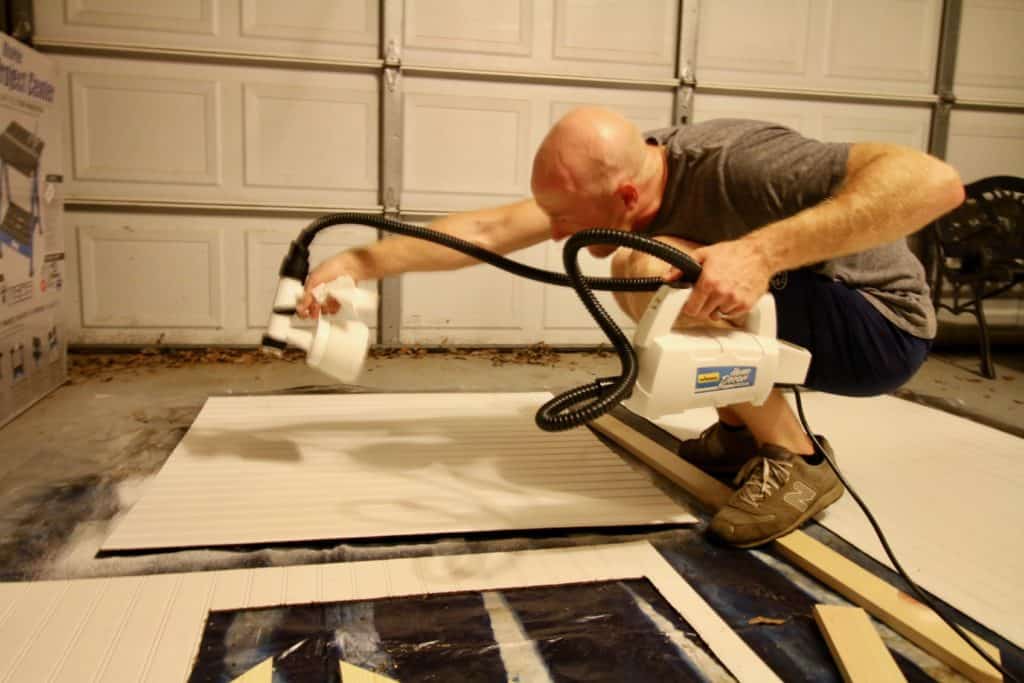
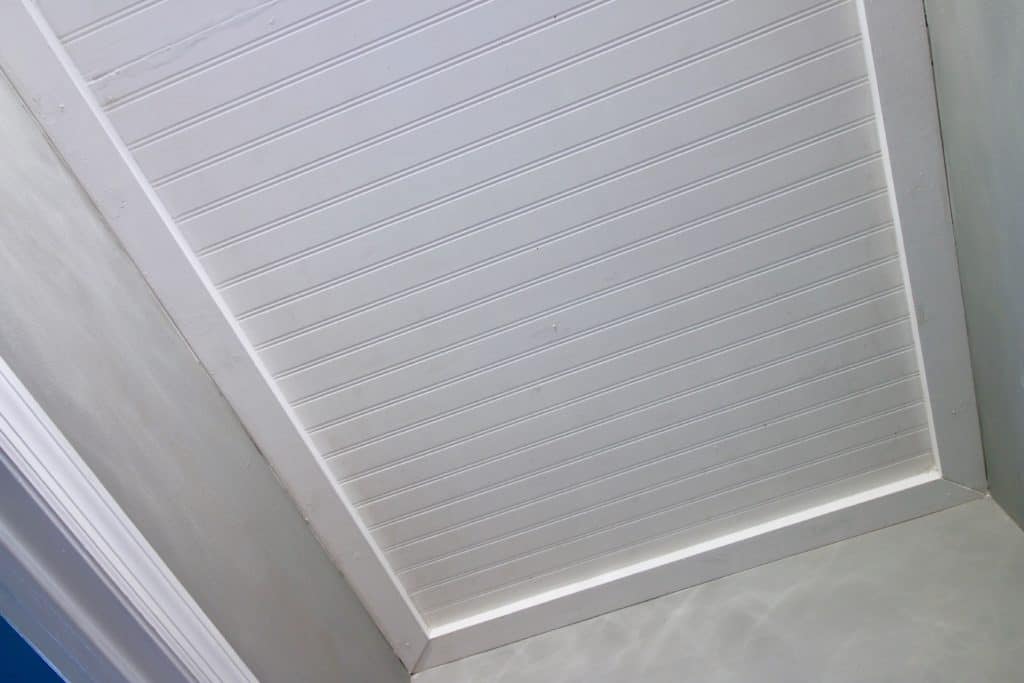
Step 5: paint everything
Use a mini foam roller or paint sprayer to paint all of your beadboard and trim with trim paint.
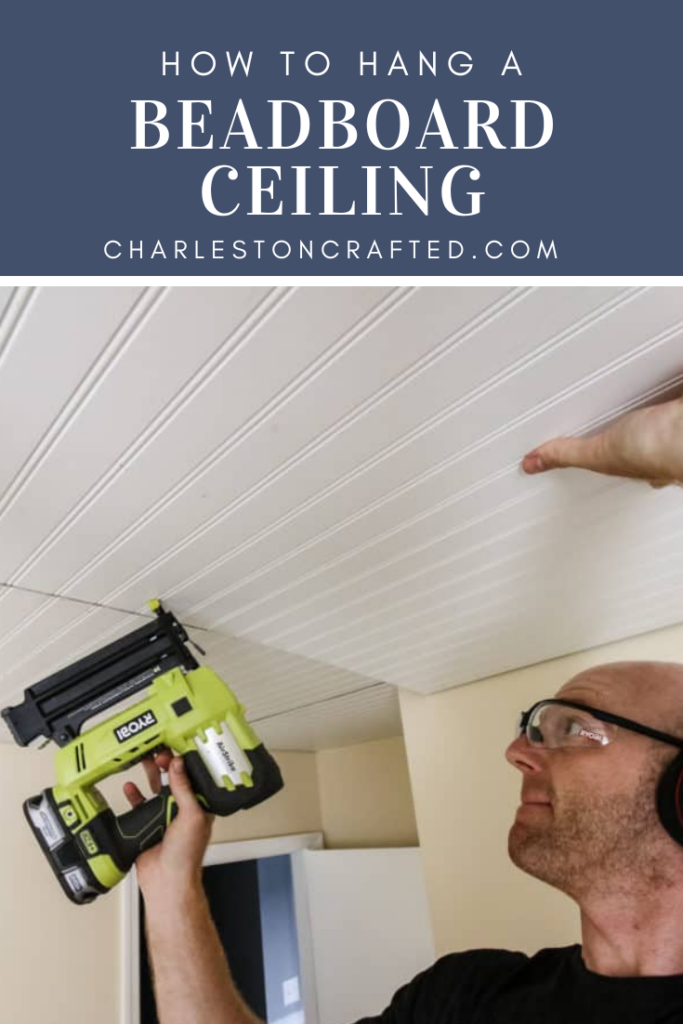
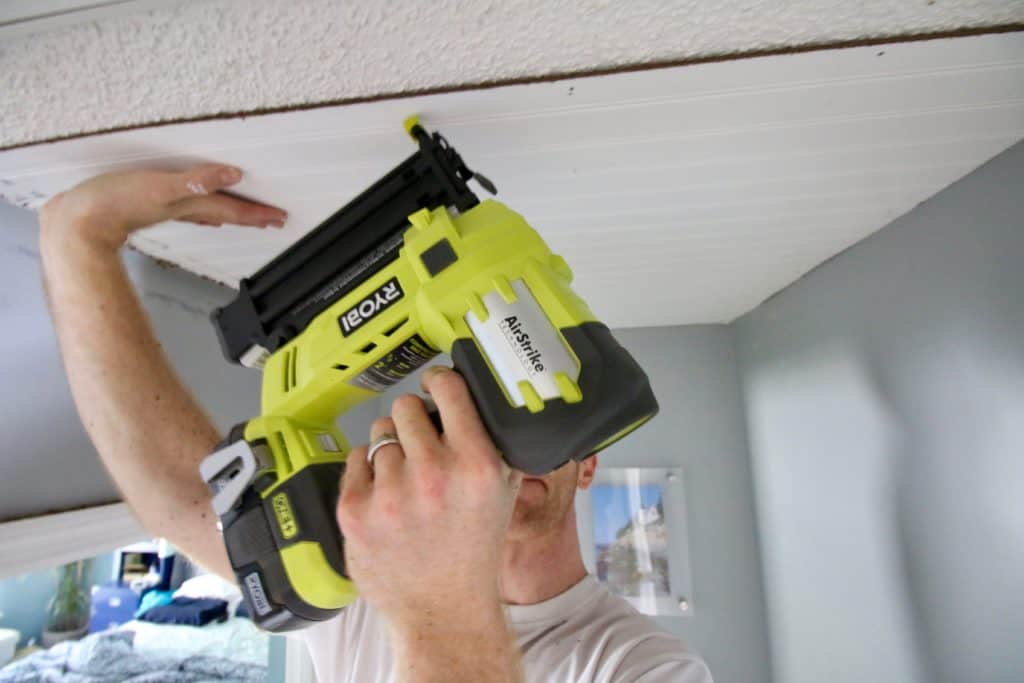
Step 5: Nail up beadboard
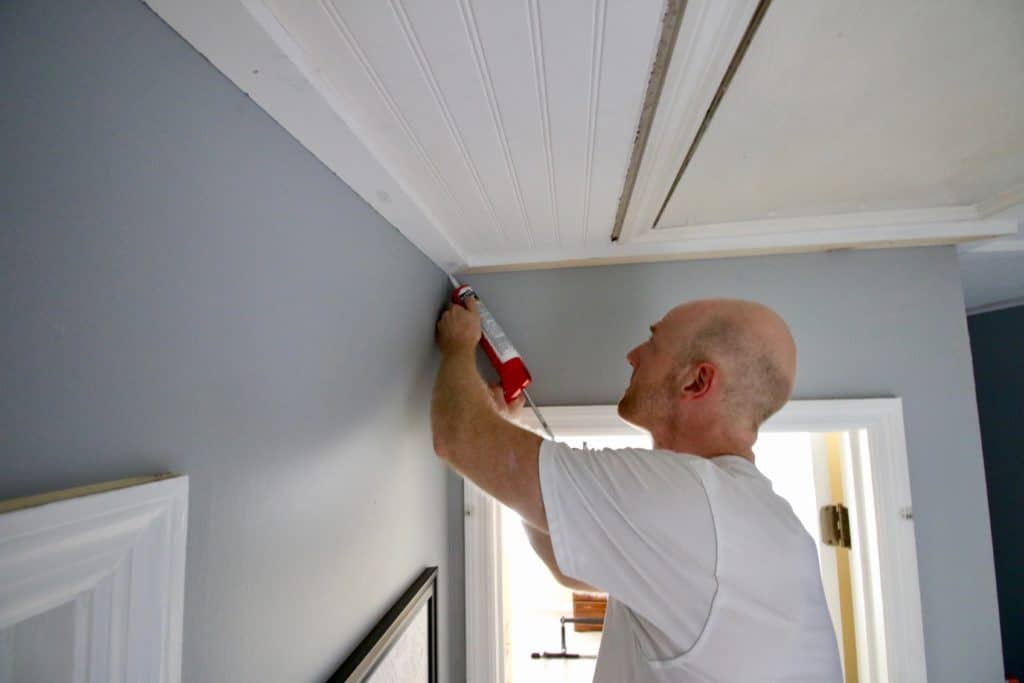
On construction day one, we started in the stairwell and set up the ladder, making sure it was secure and sturdy before setting foot on it.
Then, we added construction adhesive to the beadboard and nailed it up to the ceiling.
It worked perfectly. The nailer was quick and it took mere seconds to get it secured to the ceiling.
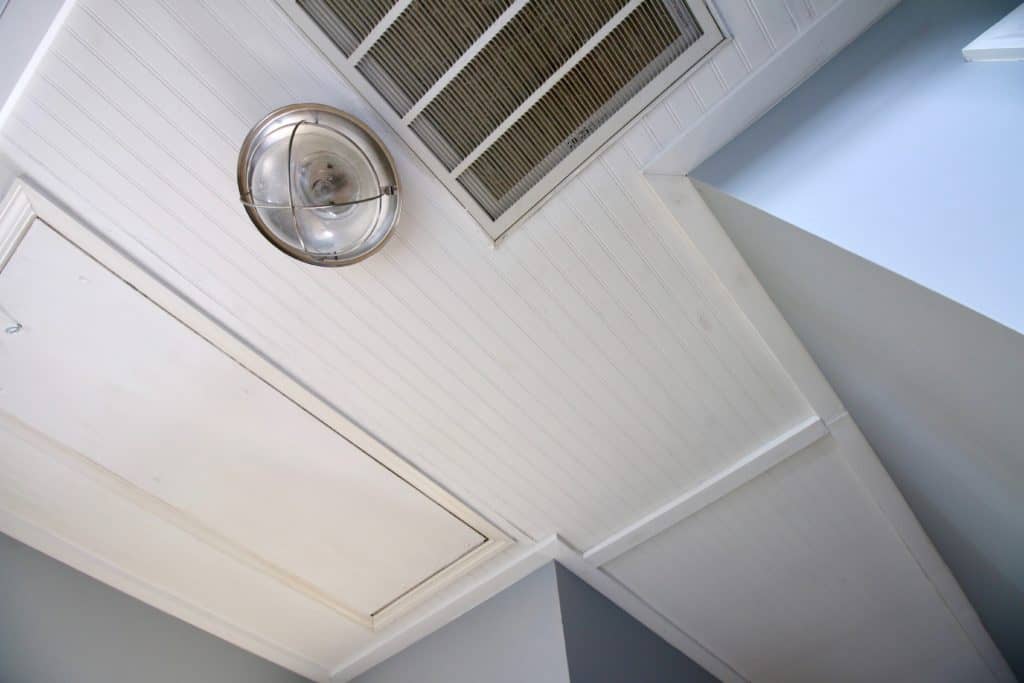
We continued on with the rest of the beadboard panels in the same fashion. These were a little more difficult because we had to make some refinements to the cuts since they were fitting around the air filter, light fixture and attic ladder.
This made it take a little more time, but no big deal otherwise.
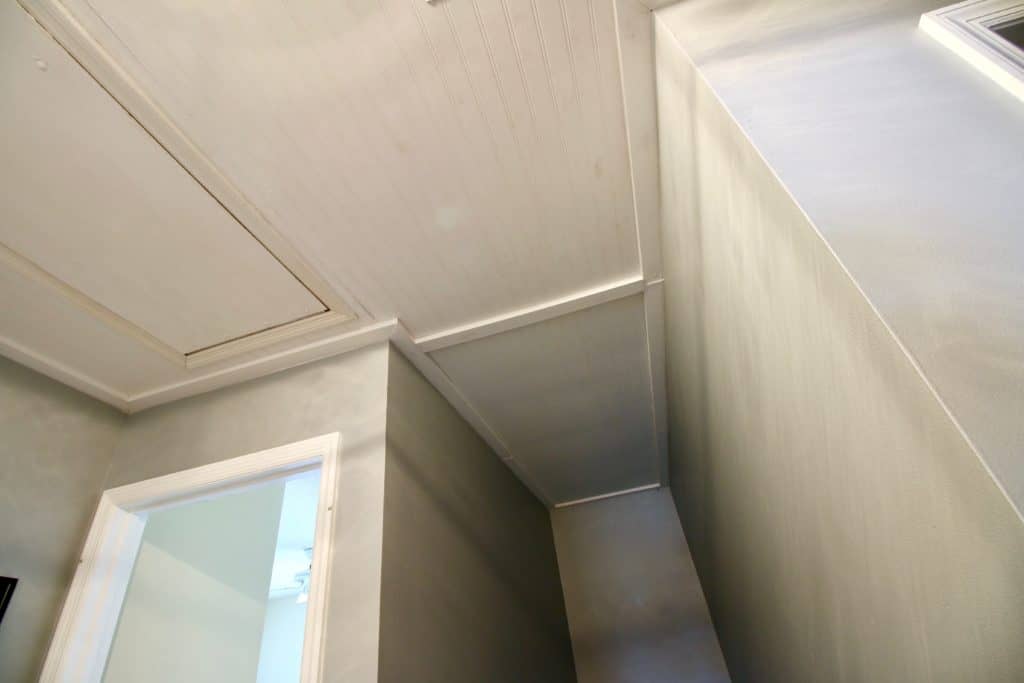
Step 6: Add edge molding
After all the board was up, we added the 1"x3" pine board edges.
Again, we just popped them up with the RYOBI AirStrike and they were in place quick and easy.

Step 7: finishing touches
The part that took the longest span of time was caulking and painting.
We needed to go around and caulk all the seams of the boards to the wall and the ceiling to cover any holes.
We also didn't do edging around things like the air vent and the attic door, so we had to go in and fill gaps with caulk. After it was all dry, we painted any necessary touchups.
In the end, it looks really good.
Our analysis of trying to cover popcorn ceilings with beadboard is that it is more difficult than scraping, but easier.
That sounds dumb, but what I mean is that it is a little more difficult to work with big materials and we had to prep the cuts ahead of time, but it was much easier and neater than dealing with scraping, sanding, mudding and painting.
Those steps take so much more time and are so disgusting that I don't really ever want to scrape again. The beadboard also looks a lot more finished.
The material costs are higher than scraping, but it's worth it.
Of course, nothing is as easy as paying someone to drywall over it for you.
That's my favorite method, but my wallet prefers the beadboard. Speaking of, here's what it cost us.
Budget Breakdown:
- 3 sheets of beadboard: $19.95 each
- Five 1"x3" pine boards: $3.95 each
- Caulk: on hand
- Ceiling Paint: on hand
- Ladder: borrowed
- RYOBI AirStrike: on hand
- Total Cost: $79.60
As you can see, that's 80% of our $100 makeover budget.
We were planning on doing a DIY chandelier in here, but I forgot to budget in the 1x3s for this project which ended up being about $20 ($3.95 x 5) and so I kind of think that I won't have the money left to do it.
Whomp, whomp. I have some clear balls on hand already from Christmas crafts, but I don't think that it is enough. After this + the balusters (that I already bought all the supplies for) I think that we will have $4...
Check out our final $100 Room Challenge hallway makeover reveal!
How to cover popcorn ceiling with beadboard
Hate your popcorn ceiling? You can scrape it (we have a tutorial for that!) or, you can cover it. Beadboard is an easy way to DIY cover popcorn ceilings. Here's how we did it.
Materials
- Beadboard
- Trim
- Paint
- Caulk
- Wood filler
Tools
- Circular saw
- Brad nailer
- Paint sprayer
Instructions
- Measure your ceiling and determine how much beadboard you need. Remember - you need all the stripes to go the same way.
- Determine where you would like trim lines to go to cover any gaps between boards.
- Cut your beadboard to size.
- Hold beadboard in place. Brad nail into the ceiling. If you can identify the ceiling joists (by knocking) be sure to pop some nails in there, too.
- Repeat until all the ceiling is covered.
- Add trim. Use trim to cover the seams and create a clean border around the edge.
- Caulk all seams and nail holes. If an edge is flat, you might want to use wood filler for a smooth finish.
- Sand if needed.
- Paint. We prefer to use our paint sprayer.
Notes
We have covered popcorn ceilings a lot of ways:
Recommended Products
As an Amazon Associate and member of other affiliate programs, I earn from qualifying purchases.


Looking for something?
We've been doing this since 2012 so we have a LOT of blog posts!
Search stuff like: Ceiling Projects | DIY Plant Stands | Thrift Flips

Hey there, I'm Sean, the woodworking enthusiast and builder behind CharlestonCrafted.com! Since 2012, I've been sharing the magic of turning raw materials into beautiful creations. I love teaching others the art and satisfaction of woodworking and DIY. I try to inspire fellow crafters to make something extraordinary out of nothing at all.


Debrashoppeno5 says
The ceiling looks fabulous. It is certainly a 2 person job so I don't know if I will be doing it but I do love the look.
Gabby says
You guys kicked butt on transforming this space. I love the beadboard. Bye bye popcorn ceilings 😉
Keri says
I have been waiting to see how this would turn out. I can only imagine how much cleaner it feels now!
Erin- Lemons, Lavender, & Laundry says
Such a great idea to use the beadboard to cover those popcorn ceilings!
Rebecca says
This is such a great idea!! I have never seen that done before!!
Natalie @nelidesign says
That's a great idea and it looks so much better!
Meredith @ The Palette Muse says
Love this solution to popcorn ceilings! It looks so clean and fresh. And I know you'll figure it something creative for your light!
Melissa ~ Brown Dog Vintage says
What a great solution! We had popcorn ceilings in our last house and I would've loved to have covered them with beadboard. Your space looks amazing!
Deneen says
That looks great, will remember this the next time I buy a house with popcorn ceilings, which I suspect will be soon.