Do you need to apply wood filler to a piece of furniture or wood project? Here is a tutorial on how to stain wood filler for a professional-quality finish.
Whether you are repairing an old piece of wooden furniture or building something from scratch, wood filler can be a godsend for fixing cracks, holes, or other damage in the wood surface.
One of the biggest benefits of using wood filler to repair your wood is that wood filler is often stainable. And yes, wood filler is actually stainable!
Stainable wood filler does work and can have a great finish – if you take the time to do it the right way.
Today we want to talk about the importance of properly staining wood filler for a seamless blend with the surrounding wood and share tips for achieving professional looking would repairs.

Understanding Stainable Wood Filler
There are many types of wood filler, but two that you might see at the store are regular wood filler and stainable wood filler.
Stainable wood filler is specially formulated with wood fibers or sawdust to mimic the absorption properties of natural wood, allowing it to accept stain and blend with the wood's color.
Solvent-based wood fillers are often made with epoxy and are usually not absorbent of stain - they will instead repel it and it will wipe right off or bead up on the surface. This is NOT stainable wood filler.
So, if wood filler is marked as stainable - it is stainable.
But, let's be clear. That doesn't mean it's going to be pretty!
Even if wood fillers are formulated to absorb stain, it doesn't mean that it will absorb the stain in the same way that the surrounding wood does.
It takes work and patience to blend large wood-filled spaces with the rest of the wood.
Choosing the Right Stainable Wood Filler
It is important to select a high-quality stainable wood filler to achieve your desired staining results. Cheaper wood fillers don't absorb stain as evenly.
It's always best to read product labels and reviews to identify suitable options for the specific wood type and project requirements.
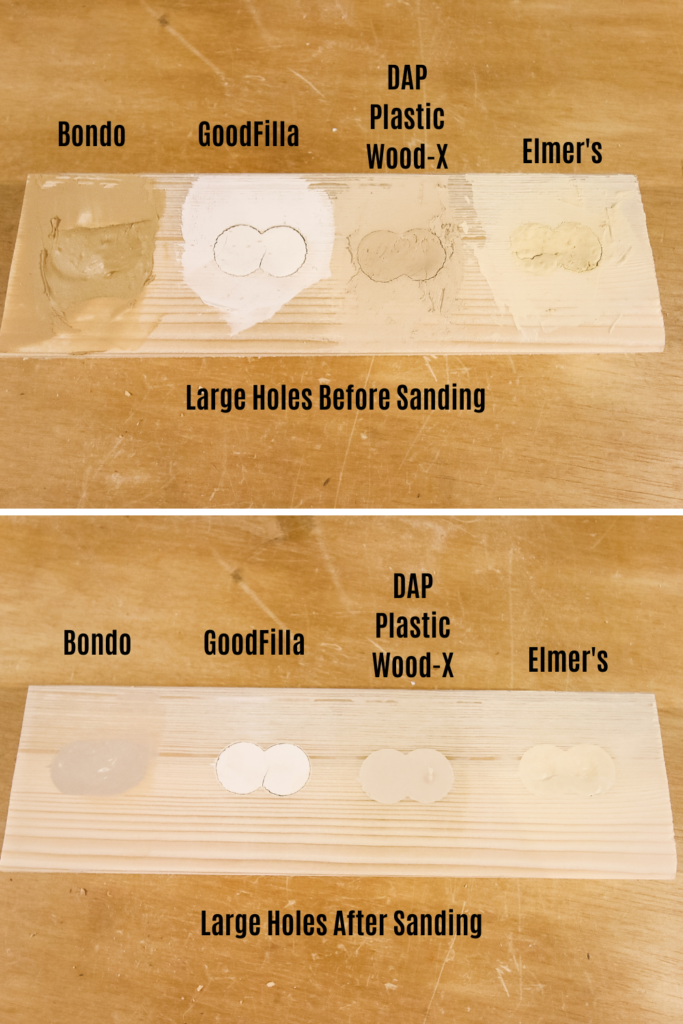
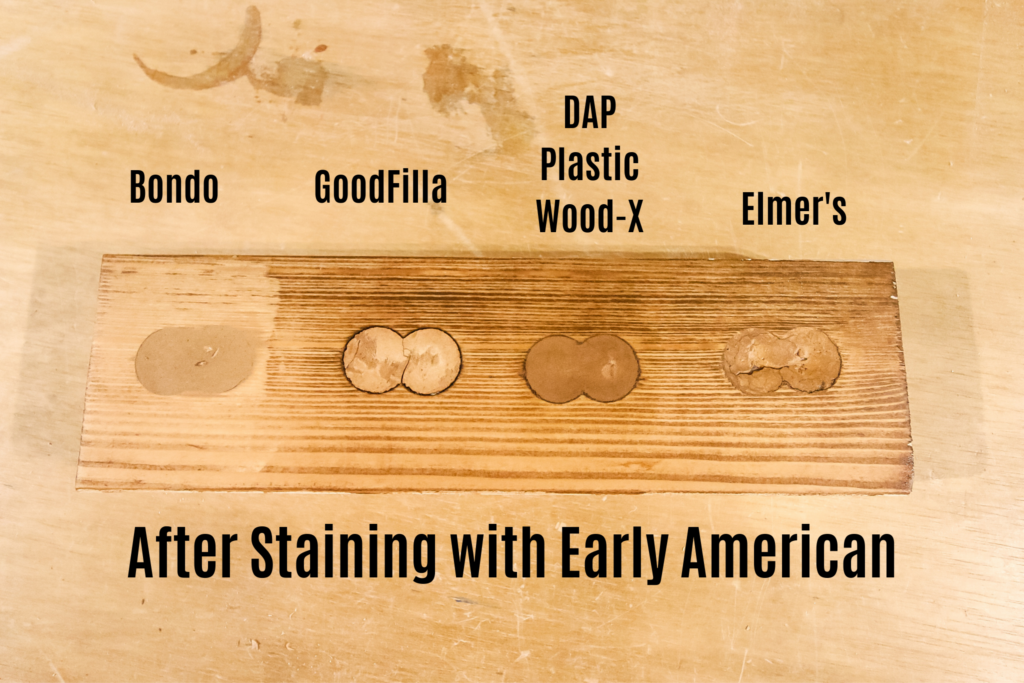
You can see our comparison of the 4 top wood fillers & how they take stain here!
Here are some things to keep in mind when choosing wood stain for a project with wood filler on it.
Consider opacity
Wood stains come in both semi transparent and opaque finished. Opaque wood stains are going to give much better coverage compared to a more see-through semi-transparent option.
Color matters
It's true - darker color stains cover wood filler spots much better than light stain colors. Similarly to the opacity, it's just about getting fuller coverage.
Layering helps
If you want to use a lighter wood stain, you can layer over the wood filler to help get better coverage.
If you are having a hard time color matching to the surrounding wood, it's better to go with a shade that is slightly too light and do multiple coats than go with a shade that is slightly too dark and will stand out.

Skip the filler
If you really don't want spots from wood filler on your project, consider skipping the wood filler altogether.
Of course, if your wood is heavily damaged, this won't work.
But if you are just worried about small nail holes or tiny cracks, it might be better to lean into the rustic imperfections of the piece instead of trying to patch it up like an old pair of jeans.
Paint instead
Of course, your final option is to skip the stain entirely, and just paint your project.
If you were working on a project with wood filler that is not stainable, this is your only option anyway.
But the good thing about painting is that all you need to do is worry about getting the wood filler patch perfectly smooth and level with no visible seams and then it should paint right over no problem.
This is generally the path of least resistance.
How to stain wood filler
Here are the steps to follow to stain wood filled surfaces.
Step 1: Preparing the Wood Surface
It is super important to prepare the wood surface before applying stain to the wood filler. If it is bumpy or dirty, stain will stick that to it forever!
Sand the wood filler area and surrounding wood to create a smooth and even surface for the stain application. I prefer using a 220 grit sandpaper in the direction of the wood grain.
Once you are done, wipe the surface clean.
Step 2: Applying the Stain
I always suggest testing your stain on a small piece of wood/filler to be sure you like the color on your wood project before committing to it.
Use a lint-free cloth or brush to brush the stain on in the direction of the wood grain. Let sit about 15 minutes and then use a clean cloth to wipe off any excess that didn't absorb.
You can apply additional coats - follow the instructions on your wood stain for dry time between coats.
Beware that if you get stain on top of already-stained wood right around the wood filler, it can create a dark ring where it is essentially double stained.
You can either be very careful to avoid this wood (use a tiny brush) or sand the wood a bit to get some stain off and lighten it up, before staining it, too.
Achieving the Desired Stain Color
You have a few options when getting your stain color on your wood filler just right.
Of course if you recently stained the entire project or are currently staying in the entire project, it is easy to just use the exact same stain color.
If you are, however, trying to color match some thing, it can be a bit trickier.
I always suggest testing small swatches preferably somewhere not super visible until you can get the color right.
When color matching stain, it's always better to opt for a stain that is slightly lighter than you are going for because you can layer multiple coats. There's nothing you can do if your stain goes on too dark.
Also, remember that wood stains often dry darker than they look when they are wet or straight out of the can so it's important to test the swatch and let it dry completely before committing.
Step 3: Blending Stainable Wood Filler with Surrounding Wood
One of the hardest parts of staining wood filler is blending the wood filler areas with the surrounding wood.
Avoid dark rings
First, you want to avoid getting a dark ring around your wood stain. This occurs when the wood is already stained, then gets a second coat from the patch job, making it double-dark.
To avoid this, consider sanding the area right around the wood filler enough to lighten it slightly. You can do this before or after applying the stain, but before applying a top coat.
Feather the stain
Use a light touch with the paint brush and feather the stain outward from the center of the wood filler area to create a gradual transition into the surrounding wood.
It can be helpful to use a damp cloth or rag to help gently blend the stain.
Work in small areas
It is always best to stain small sections at a time. This prevents the stain from drying before you are happy with your blending!
Follow the grain
Always stain in the direction of the wood grain, even on wood filler. This can help to mimic the grain and lines of the surrounding wood!
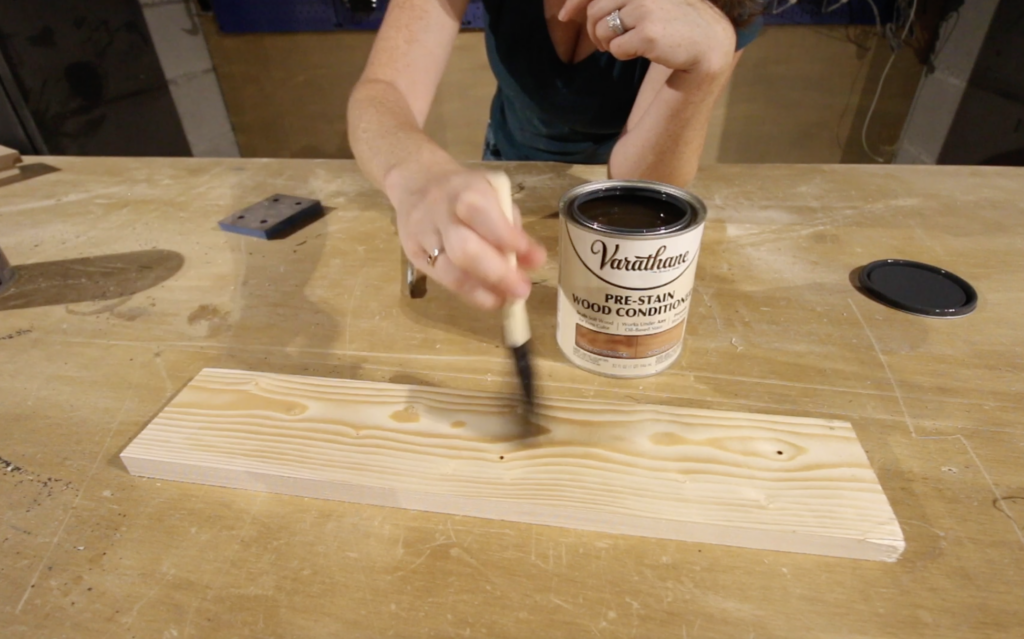
Try conditioner
If your wood filler is too absorbent and getting dark, consider treating the filler with wood conditioner before staining. This will reduce the amount of stain that the wood filler absorbs.
Step 4: Drying and Sealing
It is important to allow the stain to dry completely before proceeding to seal the wood filler.
If you seal it before it s fully dry, it might stay tacky or sticky forever.
We recommend polyurethane to seal the stained wood filler and ensure long-lasting results.
Debunking Common Myths
There are some common misconceptions and myths about staining wood filler, such as the belief that it never looks like real wood or that it cannot be matched to the wood's color.
While staining wood filler isn't easy and isn't always perfect, it is generally possible to get pretty good results if you are willing to put in the time.
Stainable Wood Filler Never Looks Like Real Wood
High-quality stainable wood filler is formulated with wood fibers or sawdust to mimic the absorption properties of natural wood.
It generally looks best when used in small spaces, such as cracks or nail holes. When it comes to large sections of wood filler - it is very hard to mimic the texture of actual wood.
Stainable Wood Filler Cannot Be Matched to the Wood's Color
It is actually pretty easy to color match wood filler. You might have trouble with off-the-shelf pre-colored wood putties, but I have good luck with matching stain to existing projects.
Stainable wood filler is designed to be stainable and allows for customization of the stain color to match the wood's tone.
You might need to experimenting with layering different stain shades or using pre-stain conditioners. Always test a small spot before committing to a big stain project!
Stainable Wood Filler Only Works on Light-Colored Wood
Stainable wood filler is suitable for use on both light and dark wood surfaces. It is just going to be harder to color match.
When it comes to darker wood, you might want to consider using an opaque stain to cover the underlying light color of the wood filler.
Stained Wood Filler Will Always Stand Out From the Rest of the Wood
Proper application techniques, such as feathering and blending the stain, help achieve a seamless transition between the wood filler and the surrounding wood.
Stainable Wood Filler Cannot Be Used for Large Repairs
Stainable wood filler can be used for repairs of various sizes, from small nail holes to larger gaps and cracks.
The best way to match large wood filler areas to the rest of the wood is to re-stain the entire surface and to use an opaque stain. Transparent stain is a lot harder to make look great on a large area of wood filler.
Stainable Wood Filler is Inferior to Other Repair Materials
Wood filler is easy to use and apply. It is not as durable as things like Bondo, but it is durable enough for many situations and is your best bet at staining and color-matching a wood patching product (without painting it).
Stainable Wood Filler Does Not Last or Maintain Its Color
When properly applied and sealed, stainable wood filler can maintain its color over time.
Sealing the stained wood filler will also enhance its durability and resistance to wear and tear.
Staining Wood Filler Is a Complicated Process
Staining wood filler can be a straightforward process with the right techniques and tools.
Tips and Troubleshooting
- Uneven Stain Absorption: If the wood filler absorbs stain unevenly, lightly sand the area to even out the surface and then you can reapply the stain.
- Color Mismatch: If the stained wood filler does not match the surrounding wood, experiment with layering different stain colors or use a pre-stain conditioner to achieve better color absorption.
- Stain Not Taking to Wood Filler: Ensure that the wood filler is labeled as stainable. Some wood fillers repel stain and can only be painted.
- Dark Rings Around Wood Filler: Dark rings are usually caused by adding a second coat of stain to wood around the wood filler. Try to avoid this. It can be lightly sanded to lighten it up.
- Inconsistencies in Finish: Sand the stained wood filler carefully to achieve a smooth, consistent finish that seamlessly blends with the surrounding wood.
- Addressing Stain Blemishes: If the stained wood filler has imperfections or blemishes, lightly sand and re-stain the area to correct the issue.
- Fixing Stain Mistakes: If you make a mistake during the staining process, promptly clean the area with mineral spirits and/or sand the wood filler to remove the stain before reapplying.
- Sealer Issues: Ensure the sealer is compatible with the stain and apply it according to the manufacturer's instructions to achieve a protective finish.
- Color Darkening After Drying: Keep in mind that the color of the stain may darken slightly after drying. Test the stain on a small area and allow it to dry before committing to staining the entire project.
- Patience and Practice: Staining wood filler may require practice and patience to achieve the desired results. Don't be discouraged by initial challenges and keep refining your technique!
Any more questions about how to stain wood filler?

Looking for something?
We've been doing this since 2012 so we have a LOT of blog posts!
Search stuff like: Ceiling Projects | DIY Plant Stands | Thrift Flips

Hello, I'm Morgan, half of the creative force behind CharlestonCrafted.com! With a passion for DIY that dates back to 2012, I've transformed three homes and now I'm dedicated to helping others craft their dream spaces. Let's turn your house into a home together!


