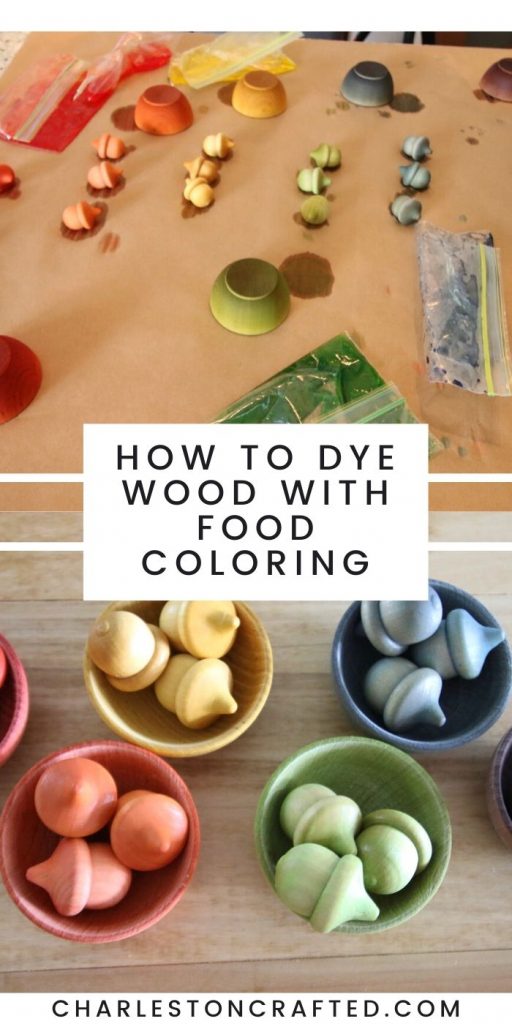
Want to dye wood in bright, vibrant colors with everyday items? Do you want to color wooden kids toys with a food-safe, mouthing safe option? Here is a step by step guide and video on how to dye wood with food coloring!
I have recently gotten very interested in wooden kid's toys. Luke is starting to get to an age where he really plays with toys and I am loving seeing his imagination start to grow.
We have toys of all type - fabric, plastic, metal, and wood. Wood has a special appeal to me with Sean being a woodworker - it means that we can DIY hack many of the items that I see for sale!
Click here to pin this project to your Pinterest board!
Whether you are a woodworker making wooden kids toys - or any small wooden object - or if you are buying unfinished wooden toys and want to color them yourself - this tutorial is for you.
I pieced this method of dying wood together from a variety of discussion threads in wooden toy Facebook groups.
I have tried it a few times now and feel confident that it works really well!
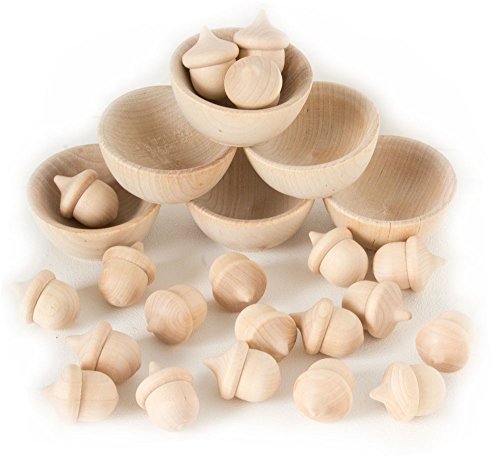
This method works best for small, unfinished wooden items. They need to be able to fit in a plastic baggie.
If your item is larger, you might try painting the dye on and then wiping it off after letting it sit a bit - but I have not tried that.
Be sure to check that your item has no finish on it. It should feel like raw wood and not glossy or waxy at all.
When in doubt with pre-made items, give them a quick wipe down with sand paper for a fresh, porous surface.
Free printable project planner
Need help getting organized? Our free printable DIY project planner will help you get it all organized and planned on one page!
Why dye?
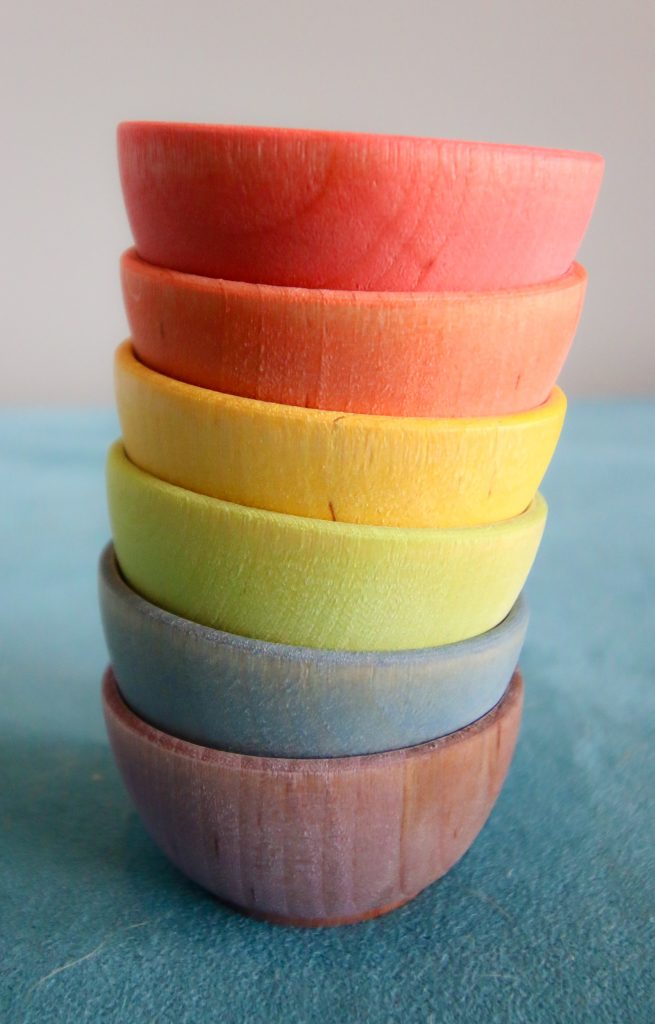
Dying wood is basically like staining it. It adds a transparent coat of color to your wood surface.
Dying your wood with food coloring is simply applying a food safe wood dye.
Why dye and not stain?
Dye is most appropriate when you want to color things a lot of different colors. Food coloring is much cheaper than buying 5-10 different colors of wood stain.
Plus, food coloring is food safe and therefore totally fine to be mouthed by supervised children. Wood stain may or may not be baby-safe.
If you are looking for a DIY nontoxic wood stain, food coloring is a great option!
Here are all of the methods I have used for making DIY wood stains!
Why dye and not paint?
Paint tends to ding, scratch, and chip because it sits on the surface of the wood. Dye soaks into the wood grain instead of coating it, meaning that the only dings or scratches will be those in the wood itself.
Plus, dye allows the natural grain of the wood to shine through. It's a transparent colorful coat that still leaves your wood looking like wood.
Check out my tutorial + video on how to stain wood with coffee!

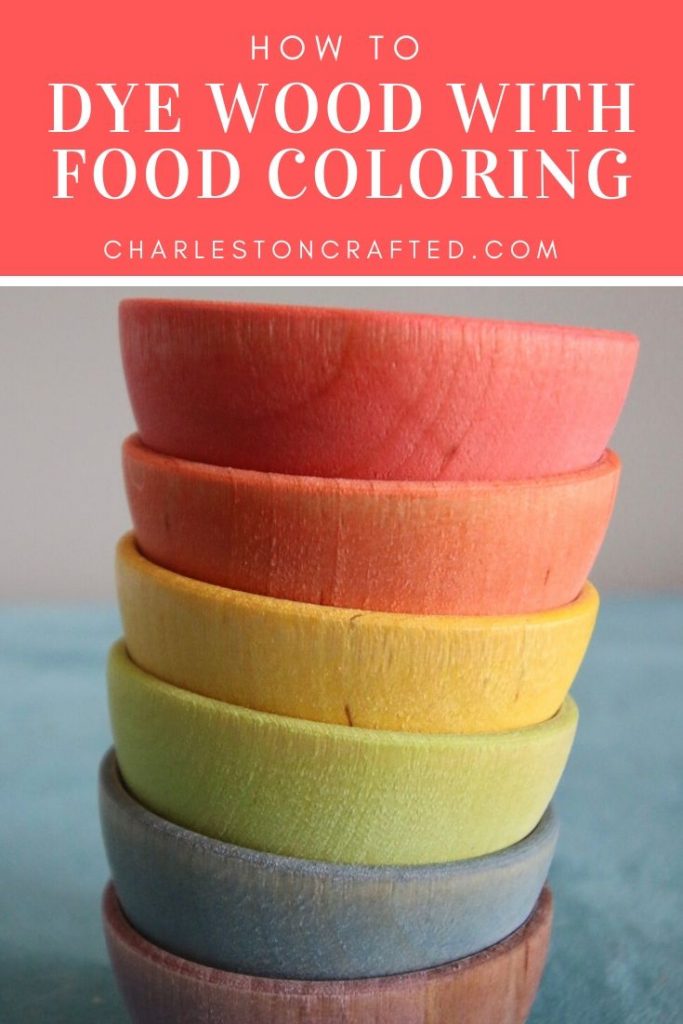
How to dye wood with food coloring
Click here to get this project in a FREE printable PDF!
Wondering how to make your own DIY wood dye using food coloring and other simple items you can find in your kitchen? Here is how!
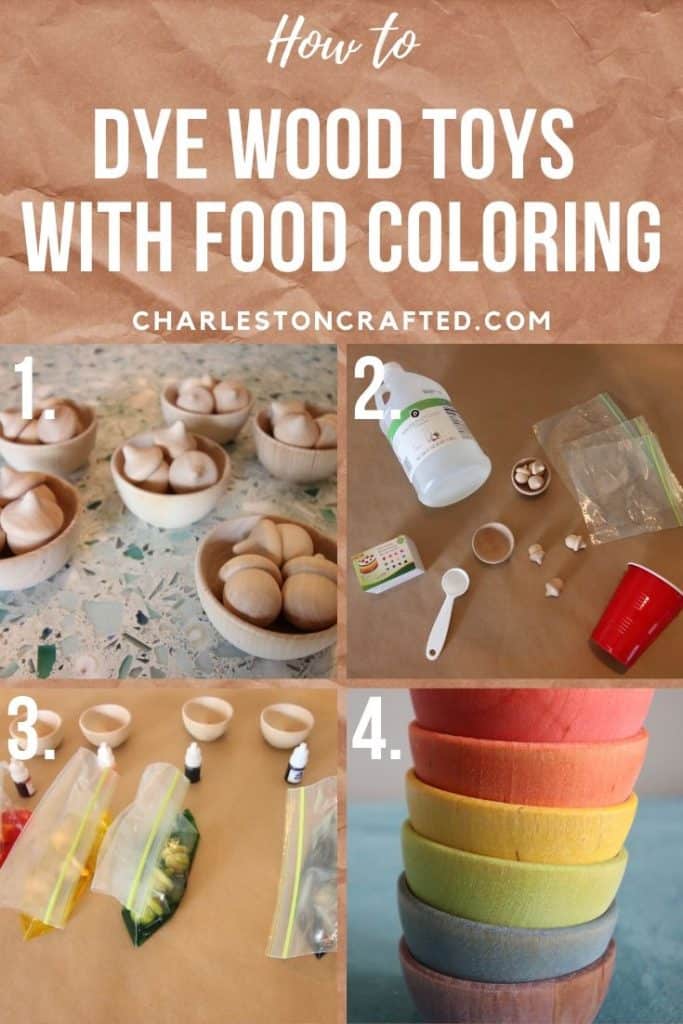
Supplies needed:
- Wooden shapes, toys, or any cuts - sanded but unfinished
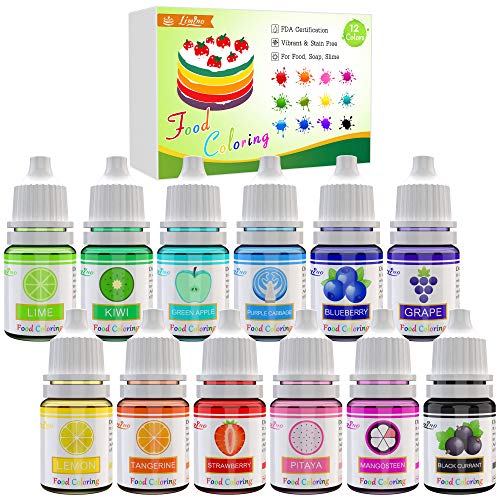
- Food coloring of choice
- White distilled vinegar
- One plastic baggie per dye color
- Plastic cup (optional)
- Newspaper/etc to cover your work surface
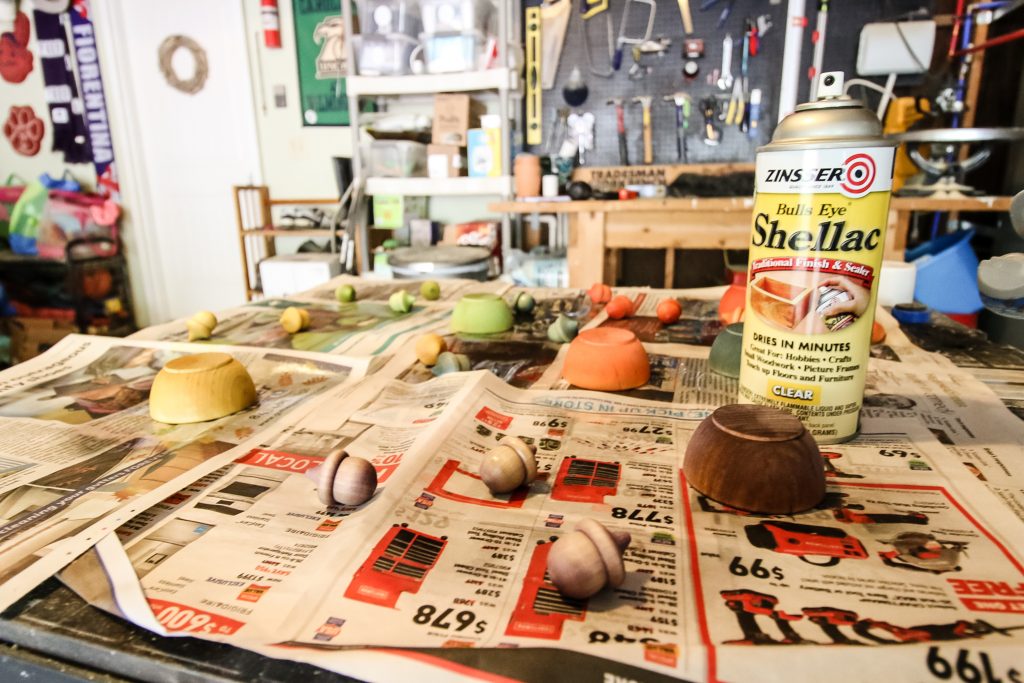
- Spray sealant (I use Shellac)

Steps to dye wood with food coloring:
- Cover your work surface completely. You can use newspaper, paper towels, a drop cloth, anything that you don't mind getting dye on.
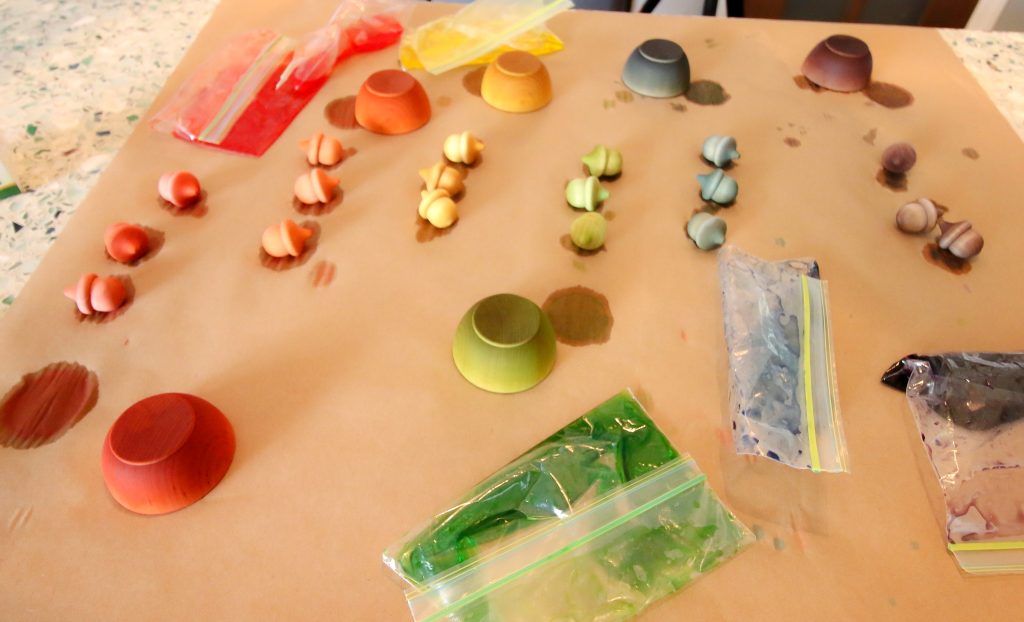
- Separate your wooden toys or pieces of wood into piles by color that you plan to dye them.
- Select your food coloring colors (or 2 colors to mix!) and set them with each pile.
- Add 3 tablespoons of white vinegar to a plastic baggie. It's easier for me if I set the baggie inside a plastic cup to hold it open while doing this.
- Add your dye to the vinegar - I use 20-25 drops of food coloring per 3 tablespoons of vinegar. Lighter colors need 25+ drops. If you want a more vibrant or darker look, add more dye. For a lighter, more pastel look, add less dye.
- Gently slosh the bag back and forth to mix the vinegar and food coloring.
- Add your wooden pieces to the dye. You may need to work in batches. Seal the baggie and toss to coat completely.
- Place the baggie down on your surface. Shake/flip it every 60 seconds or so to have it evenly coated.
- Let sit for 8-10 minutes. Monitor it while flipping to see when you feel happy with the coverage.
- Open the bag and remove the wooden pieces from the dye. Lay on your surface until it dries completely - at least overnight, 24 hours preferred.
- Repeat for any other pieces or colors. You can reuse each bag of dye many times!
- Once fully dry, you will want to seal your item.
- Lay your pieces out on newspaper or similar in a well ventilated area.
- Spray with spray sealant - I used Shellac. Follow the directions on the can, but use many light coats instead of one heavy coat to avoid drips. Spray at the objects from many angles to hit all the sides.
- Allow to dry for one hour. Flip and seal the other side.
- Allow to dry over night.
- If you feel that the final texture is a bit rough or the grain feels raised, very very lightly sand by hand with 220 grit sandpaper. You will want to just barely rub the surface, don't push hard or stick to any on area for more than a wipe or two.
- Enjoy!
Click here to pin this project to your Pinterest board!
Frequently Asked Questions
Can I mix the dye with water instead?
It is important to use vinegar and not water as the base of your dye. Water tends to leave a splotchy finish, while I find vinegar to have a very nice even finish.
Should I let the items fully submerge in dye for longer than ten minutes?
Feel free to experiment - that is the fun in making! However, I would not try this with anything precious/expensive/irreplaceable.
Vinegar tends to dry out wood. It will go on fine, but if wood sits in it too long, it can form cracks as it dries.
I try to keep my items in dye (not fully submerged) for under 10 minutes. If the color is not coming out dark enough, add more dye to the liquid.
What are some good non-toxic sealant options?
If non-toxic is important to you, then you definitely want to be sure to use a non-toxic sealant! That is what will actually come in contact with your hands when touching your dyed wood.
I use spray Shellac because it's super easy to spray and dries with a nice matte finish. Spray Modge Podge is another good option - just be sure to check if you have matte or glossy!
What food coloring should I use?
You can use any food coloring! This is the pack that I got from Amazon. The same brand also makes a 18 color pack if you don't want to mix your own colors.
You can also use gel food coloring. Gel is traditionally more pigmented and needs way less drops than traditional food coloring.
Do you get dye transfer from these dyed toys?
Nope! The dye is pretty diluted in the vinegar, which definitely helps with this. But, sealing prevents the dye from staining hands, fingers, or mouths!
What are some good pre-made wooden kid's toys that I can start trying dying with?
How to dye wood with food coloring
Want to dye wood with food coloring? Here is a step by step guide for how to easily and inexpensively dye wood!
Materials
- Wood toys or pieces to dye
- Food coloring
- White distilled vinegar
- One plastic baggie per dye color
- Spray sealant
Tools
- Plastic cup
- Tablespoon
- Newspaper to cover surface
- 220 grit sandpaper (optional)
Instructions
- Cover your work surface with newspaper or any other covering to protect it from dye stains.
- Separate your wooden pieces into piles by color that you plan to dye them.
- Select your food coloring and assign a color to each pile of wooden pieces.
- Set an open plastic bag in a plastic cup to help hold it open. Add 3 tablespoons of white vinegar to the bag.
- Add dye to your bag of vinegar. I use 20-25 drops of regular food coloring per 3 tablespoons of vinegar. You can add more drops for a darker more vibrant color. For a more pastel look, add less dye.
- Seal the bag and shake gently to mix the dye and vinegar.
- Add your wooden pieces. You may want to work in batches - you can use the bag of dye many times. Seal the bag and toss to coat completely.
- Place the baggie down on your surface. Shake and flip it about every 60 seconds to allow pieces to get evenly coated.
- Let sit for 8-10 minutes. Check your pieces as you toss and flip them to see if you feel satisfied with the coverage.
- Open the bag and remove the wooden pieces, laying flat on newspaper to dry. Dry overnight or for 24 hours.
- Repeat this process for any pieces or colors you want to dye.
- Once fully dry - seal your pieces.
- Lay all wood on newspaper or a similar surface covering in a well ventilated area - outdoors preferred.
- Apply spray sealant - I use Shellac - following the instructions on the can. Use many light coats instead of one heavy coat to avoid drips. Come from many angles for full coverage.
- Allow to dry for one hour, flip, and spray the other side.
- Allow to dry at least over night.
- Assess the texture. If it feels rough, you can very very gently hand sand using 220+ grit sandpaper.
- Enjoy!
Recommended Products
As an Amazon Associate and member of other affiliate programs, I earn from qualifying purchases.


Any more questions for me?

Looking for something?
We've been doing this since 2012 so we have a LOT of blog posts!
Search stuff like: Ceiling Projects | DIY Plant Stands | Thrift Flips

Hello, I'm Morgan, half of the creative force behind CharlestonCrafted.com! With a passion for DIY that dates back to 2012, I've transformed three homes and now I'm dedicated to helping others craft their dream spaces. Let's turn your house into a home together!