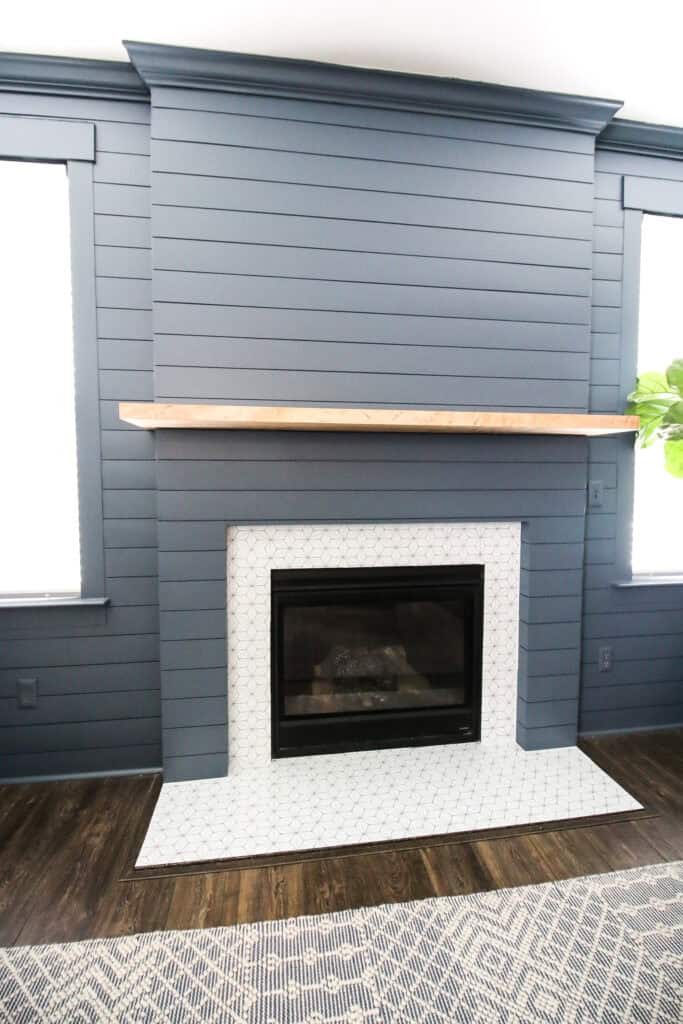
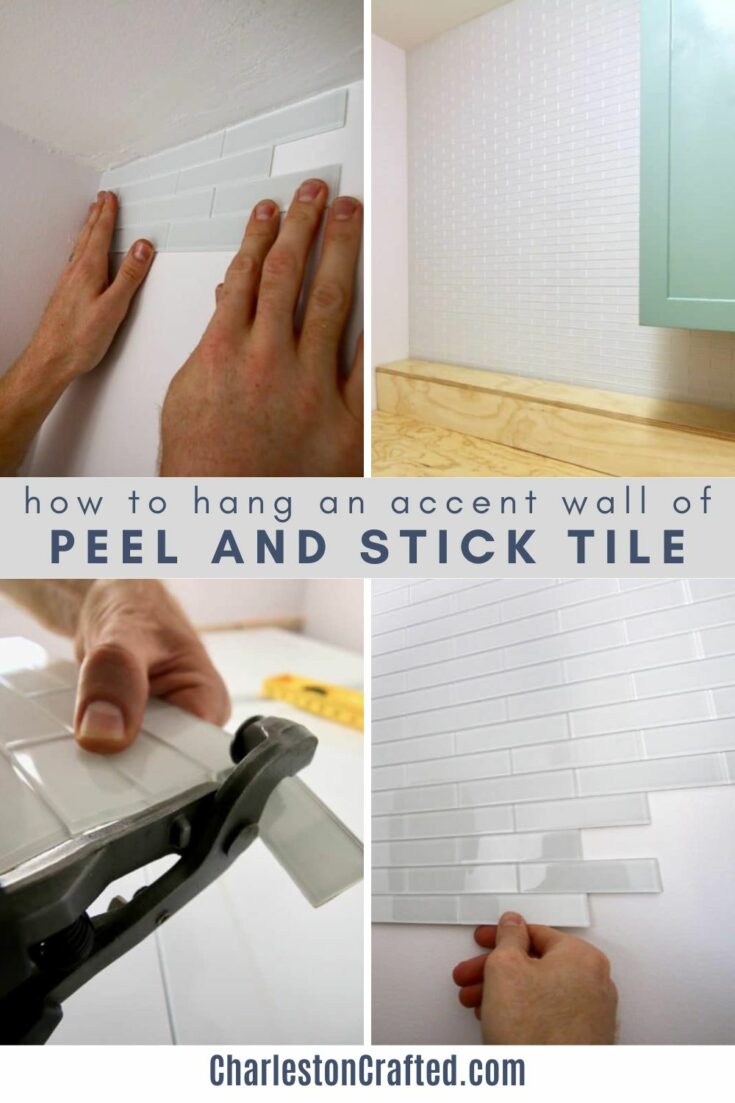
Want to update your fireplace? Here is a tutorial for how we covered our granite fireplace surround with peel and stick tiles!
As a part of our fireplace makeover, we decided that we wanted to update the granite surround on our fireplace.
I actually got several comments on Instagram about how dare I cover nice granite with cheap peel and stick.
For the record:
- This peel and stick is completely removable and won't damage the granite underneath. It's temporary.
- Removing the granite and adding new tile would have been a BIG, hard, expensive project. We wanted something cheap and simple.
If you like the granite, good for you. I personally do not like the look of granite and I really didn't like this black granite in this space.
I am a firm believer that you should decorate your home for you. Don't keep something because it's "nice". If you don't like it, change it.
Unless you plan to sell your home in the next 2 years, don't worry about resale when making small cosmetic changes. Craft the home that the people who actually live in it will love and enjoy!
Anyways, rant over, back to the project.
Free printable project planner
Need help getting organized? Our free printable DIY project planner will help you get it all organized and planned on one page!
Can you tile over granite fireplace surround?
Yes, traditional or peel and stick tile can be applied directly over an existing granite fireplace surround. Just note that if there are seams or uneven areas in the granite, it may cause some issues in lining up the tile.
Can I use peel and stick tile on a fireplace surround?
This depends on your fireplace type and your tile sticker type.
If you have a wood burning fireplace then you need to follow very specific fire codes and not have anything flammable near the fire box.
The tiles that we used WILL NOT WORK FOR A WOOD BURNING FIRE PLACE.
Our fireplace is gas with a glass front. It's actually considered a "gas appliance" and no flames come out, there is no risk of ash or ember or a fire hazard.
In the newer version of our home's floorplan the builder is actually building them with no surround at all.
The biggest worry is that the heat of the fire could warm the adhesive of the tiles and loosen them so they fall.
This was a very inexpensive project for us (2 boxes of tile added up to right around $20) so it was worth the risk that they might loosen over time. We will re-assess if they do.
You can also purchase heat resistant peel and stick tiles. We will see if we regret not going that way!
Let me repeat - DO NOT DO THIS IF YOU HAVE A WOOD BURNING FIREPLACE OR ANY FIREPLACE WITH EXPOSED FIRE.
This would work great with a "fake" electric fireplace that's just basically a video of fire, too!
Can you place peel and stick tile over tile?
Yes, you can apply peel and stick tiles directly over other tiles, assuming that they are level and secure. You will want to clean them well so that the adhesive sticks properly. If the tile is damaged or loos, your peel and stick will be wobbly, so plan to do any necessary repairs before covering it.
Benefits of peel & stick fireplace tiles
Peel and stick fireplace tiles have several advantages and benefits compared to traditional tiling methods.
- typically less expensive than real tile
- no saw needed
- can be done in phases as you have time
- less intimidating to beginner DIYers
- can be "renter friendly" if you choose a removable option
You really can't beat the convenience and affordability of peel and stick tiles as a DIY solution for updating a fireplace.
What are the types of peel and stick tiles?
There are 3 main types of peel and stick tiles:
- Vinyl (what we used!)
- Real tiles (glass or stone - see that in our old laundry room!)
- Contact paper
We have used and LOVED peel and stick glass wall tiles in the past (you don't even miss the grout lines it's perfect).
But, for this project, we didn't want the added thickness. Those tiles are at least ¼ inch thick and would look weird on the floor portion of our fireplace surround.
I looked for contact paper but couldn't find any with a pattern I loved!
We wanted this to be quick cheap and easy so vinyl fit the bill.
Peel and Stick Tile Design Options
There are tons of design options and styles available for peel and stick fireplace tiles, such as different colors, patterns, and textures.
While you can always browse in stores or online, focus on choosing the right tile design to complement the overall aesthetic of the room or to achieve a specific desired look.
Do you want the tile to be the star of the room or fade into the background? You can choose a bold or more neutral tile.
I suggest trying to choose a material or color that appears elsewhere in your home to help keep the space feeling cohesive!
How to prepare the surface for peel & stick tile
Here are some tips for how to properly prepare the granite fireplace surround before applying the peel and stick tiles.
- Clean the Surface: Start by thoroughly cleaning the granite surface to remove any dirt, dust, or residue. Use a mild soap or stone cleaner and a soft cloth or sponge to gently clean the surface. Rinse with clean water and allow it to dry completely before proceeding.
- Sand or Smooth Uneven Areas: Inspect the granite surface for any uneven areas, rough patches, or seams that could affect the adhesion of the peel and stick tiles. If you notice any imperfections, use fine-grit sandpaper or a sanding block to smooth them out. This step helps create a level and smooth surface for the tiles.
- Remove Sealants or Coatings (if necessary): If the granite fireplace surround has any existing sealants, coatings, or waxes, it's important to remove them before applying the peel and stick tiles. Use a granite-safe sealer remover or stripper as directed by the product instructions. Make sure to clean the surface again after removing any sealants to ensure it is free from residue.
- Fill in Grout Lines (optional): If your granite fireplace surround has grout lines, you may consider filling them in for a seamless appearance. Choose a color-matched grout or a grout that complements your peel and stick tile design. Follow the grout manufacturer's instructions to properly fill the grout lines, allowing it to cure fully before moving on to the next step.
- Ensure Dry and Dust-Free Surface: Before applying the peel and stick tiles, ensure that the granite surface is completely dry and free from any dust or debris. Use a clean, lint-free cloth to wipe the surface and remove any remaining particles.
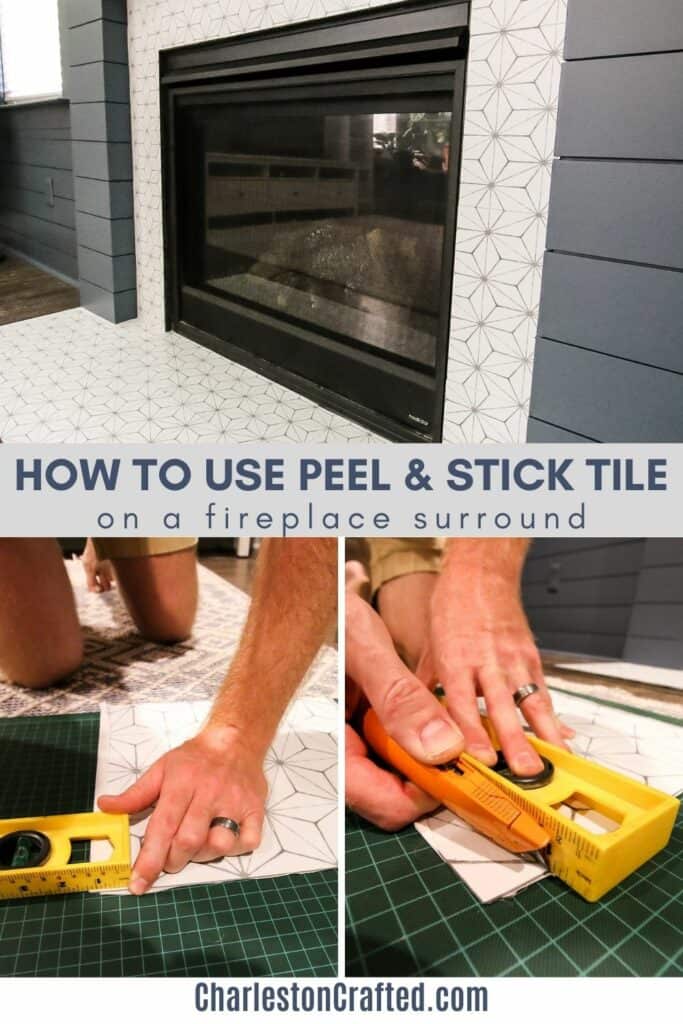
How to use peel and stick tile on a fireplace surround
It's super easy to cover your fireplace surround with peel and stick tile. Here's how to do it!
What you need:
- Peel and stick tile - I used these
- Measuring tape
- Pen
- Cutting mat or cutting board
- Straight edge like a long ruler
- Utility knife
- White caulk + caulk applicator
How to do a fireplace makeover with peel and stick tile:
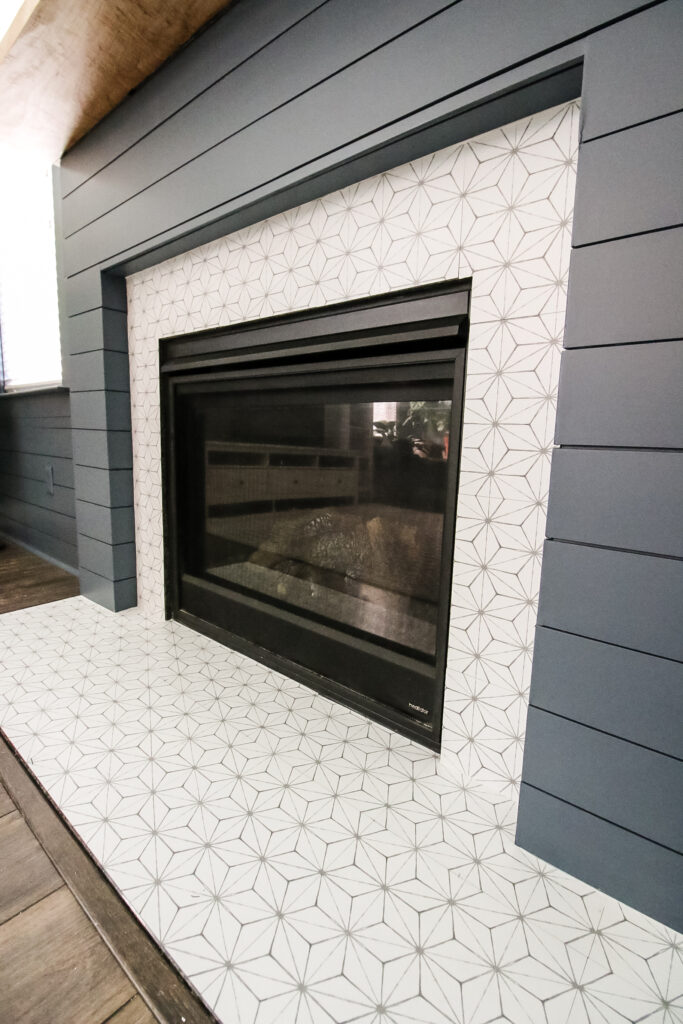
STEP 1: Pick a starting place
Choose a starting place. We wanted our design to be centered, so we chose front and center on the flat portion of the fireplace surround.
STEP 2: Peel and stick
Peel the backing off of your tile and press into place.
Now, you will have some wiggle room here, but not much. The adhesive is very sticky.
Once set, press into place. We actually used a rolling pin to really press ours down well!
Then, grab the next tile, rotate to match the pattern, and repeat.
We did find some variance in the pattern from tile to tile, so definitely TEST them in advance to be sure they line up before peeling the backing.
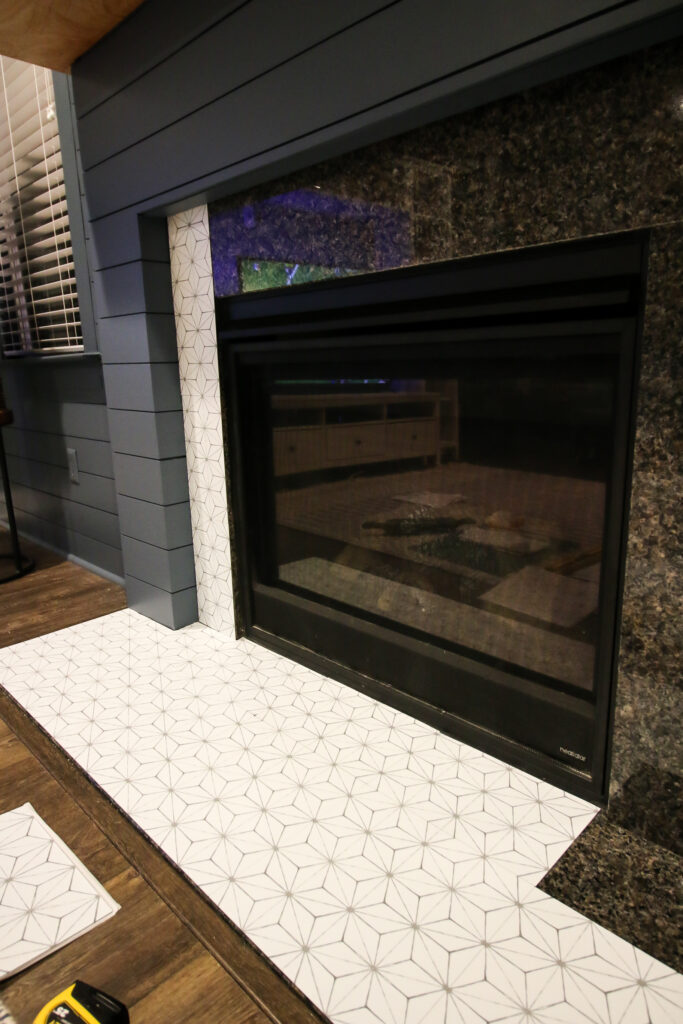
STEP 3: Repeat
Continue this process until your whole surface is covered. You will need to cut some of the pieces which is easy using a utility knife (see detailed instructions below).
STEP 4: Caulk the outside edges
Finally, we opted to add white caulk along the edges just for a clean look. This is optional, but something you would do with real tile, so a nice touch I think!
Can you use grout on peel and stick tile?
You can apply grout to real glass or stone peel and stick tile. I would not apply grout to vinyl peel and stick tiles - use simple caulk, instead.
How to use peel and stick tile on a fireplace surround
Here's how to use peel & stick tile on your fireplace surround.
Materials
- Peel and stick tile
- White caulk + caulk applicator
Tools
- Measuring tape
- Pen
- Cutting mat or cutting board
- Straight edge like a long ruler
- Utility knife
Instructions
- 1. Choose a starting place. We wanted our design to be centered, so we chose front and center on the flat portion of the fireplace surround.
- 2. Peel the backing off of your tile and press into place.
- 3. Grab the next tile, rotate to match the pattern, and repeat.
- 4. Continue this process until your whole surface is covered.
- 5. Add white caulk along the edges just for a clean look.
How to cut FloorPops peel and stick tiles
It's actually very easy to cut these adhesive tiles!
The hardest part is measuring your area, lining up the tile perfectly, and marking where you need to make your cuts.
Then, set the tile on a cutting surface. We have a cutting mat but a cutting board works, too. Pick something that you don't mind getting sliced.
Line a straight edge - like a ruler - along your marked line. Press the utility into the tile and cut along the straight edge.
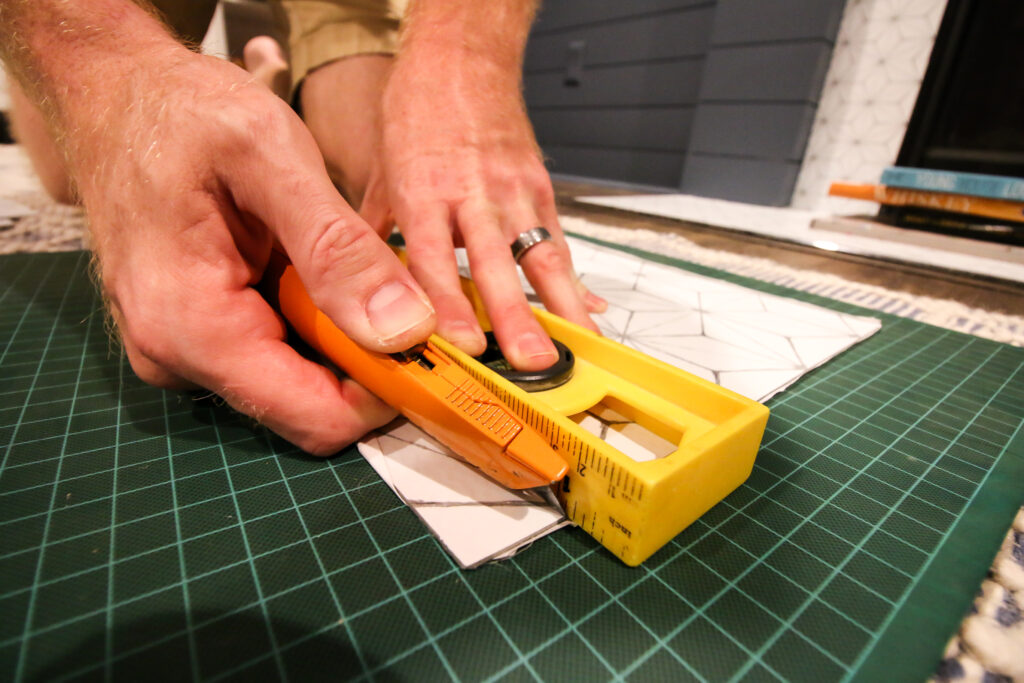
Your knife might jump at first, you have to get a hang of the cutting. It's great if you can do a practice cut.
I found that pointing the blade down at a 45 degree angle into the straight edge worked best.
Then, you can snap the cut portion off from the rest of the tile easily.
Position and stick to the wall.
Common Challenges
Here are some common challenges when hanging a peel and stick tile fireplace surround.
Uneven tile
If the stone or tile underneath is uneven, the tile will not lay flat. If there is a seam in the stone, apply grout or caulk to help even it out before applying the tile on top of it. Additionally, you can use a leveling compound or filler to even out the surface if needed.
Lining up the pattern
The #1 frustration that we had was lining up the pattern. Having to make cuts led to a lot of waste. Try to "dry fit" you tile by laying it on the floor to line up the patterns before you begin.
Air Bubbles
Air bubbles can sometimes form beneath the peel and stick tiles during installation, affecting the overall appearance and adhesion. This is most common with very thin peel and stick tiles.
To prevent air bubbles, apply the tiles slowly and carefully, smoothing them down gradually as you go. Use a soft cloth or a rubber roller to press the tiles firmly onto the surface, starting from the center and working your way outward.
Heat Exposure
Heat from a fireplace can potentially affect the adhesive properties of peel and stick tiles, especially if they are not specifically designed for heat resistance.
Over time, the tiles may loosen or peel off. If you have a gas fireplace with a glass front, it is important to monitor the tiles closely and assess their durability. Consider using heat-resistant peel and stick tiles for best results.
How hot does a fireplace surround get?
A properly installed fireplace surround can get up to 150 degrees. If the fireplace is not installed properly, it can get much hotter. That's why its very important to use caution when working in this dangerous area.
Cutting and Trimming
You may need to cut and trim the peel and stick tiles to fit around corners, edges, or obstacles on the fireplace surround. Use a sharp utility knife or scissors to make precise cuts.
Remember to measure carefully and make practice cuts on spare tiles or scraps before cutting the actual tiles to ensure accuracy.
Removing or Repositioning Tiles
If you make a mistake during installation or need to reposition a tile, removing it without damaging the surface can be challenging.
To remove a peel and stick tile, gently heat it with a hairdryer or heat gun to soften the adhesive. Then, slowly peel it off, taking care not to damage the granite surface.
If any adhesive residue remains, clean it with a residue remover or adhesive solvent suitable for the granite material. You cannot reuse a piece once you peel it off, it will loose it's sticky.
Safety concerns
When using peel and stick tiles for a fireplace, it's important to consider the following safety precautions:
Fireplace Type
Different types of fireplaces have specific safety requirements. Ensure that the peel and stick tiles are suitable for your fireplace type.
For example, if you have a wood-burning fireplace, it is generally not recommended to use peel and stick tiles due to the risk of heat exposure and flammability.
Consult your fireplace manufacturer or the tile manufacturer to determine if peel and stick tiles are safe for your specific fireplace.
Heat Resistance
Fireplaces generate heat, and the heat can potentially affect the adhesive properties of peel and stick tiles.
If your fireplace produces significant heat, consider using heat-resistant peel and stick tiles explicitly designed for high-temperature environments.
These tiles are formulated to withstand the heat without compromising adhesion or releasing harmful substances.
Clearance and Ventilation
Ensure that there is proper clearance between the fireplace and any flammable materials, including the peel and stick tiles.
Follow the manufacturer's guidelines and local building codes to determine the appropriate clearance distances.
Adequate ventilation is also crucial for safety, as it helps dissipate heat and prevent the buildup of harmful gases.
Ensure that the installation of the tiles does not obstruct ventilation openings or affect the proper functioning of the fireplace.
Fire Codes and Regulations
Be aware of any specific fire codes and regulations in your area regarding the use of materials near fireplaces.
These regulations are in place to ensure the safety of occupants and prevent fire hazards. Consult local authorities or professionals to understand and comply with the relevant codes and regulations.
Manufacturer's Recommendations
Always follow the manufacturer's instructions and recommendations regarding the safe use of peel and stick tiles.
Manufacturers may provide specific guidelines for fireplace applications or offer heat-resistant variants of their products. Adhering to their instructions will help ensure the safety and longevity of the installation.
Regular Monitoring
Once the peel and stick tiles are installed, periodically monitor their condition, especially if your fireplace generates heat.
Check for any signs of loosening, peeling, or damage to the tiles or adhesive. If you notice any issues, take appropriate action, such as reapplying or replacing the affected tiles, or consulting a professional if needed.
Remember, safety should always be a top priority when working with fireplaces. If you have any doubts or concerns about using peel and stick tiles, consult professionals, such as fireplace manufacturers, contractors, or fire safety experts, who can provide specific guidance based on your fireplace setup and local regulations.
Any questions about installing peel and stick fireplace tiles?!

Looking for something?
We've been doing this since 2012 so we have a LOT of blog posts!
Search stuff like: Ceiling Projects | DIY Plant Stands | Thrift Flips

Hello, I'm Morgan, half of the creative force behind CharlestonCrafted.com! With a passion for DIY that dates back to 2012, I've transformed three homes and now I'm dedicated to helping others craft their dream spaces. Let's turn your house into a home together!