• Skip to primary navigation
  • Skip to main content
  • Skip to primary sidebar
Charleston Crafted
  • DIY
  • Woodworking
  • Popular Posts
  • Blog
  • About
  • Shop
menu icon
go to homepage
  • DIY
  • Woodworking
  • Popular Posts
  • Blog
  • About
  • Shop
search icon
Homepage link
  • DIY
  • Woodworking
  • Popular Posts
  • Blog
  • About
  • Shop
×
Home » Kids Projects

DIY wooden toy barn

Published: Jun 8, 2020 by Sean · As an Amazon Associate, we earn from qualifying purchases. This site contains affiliate links. ·

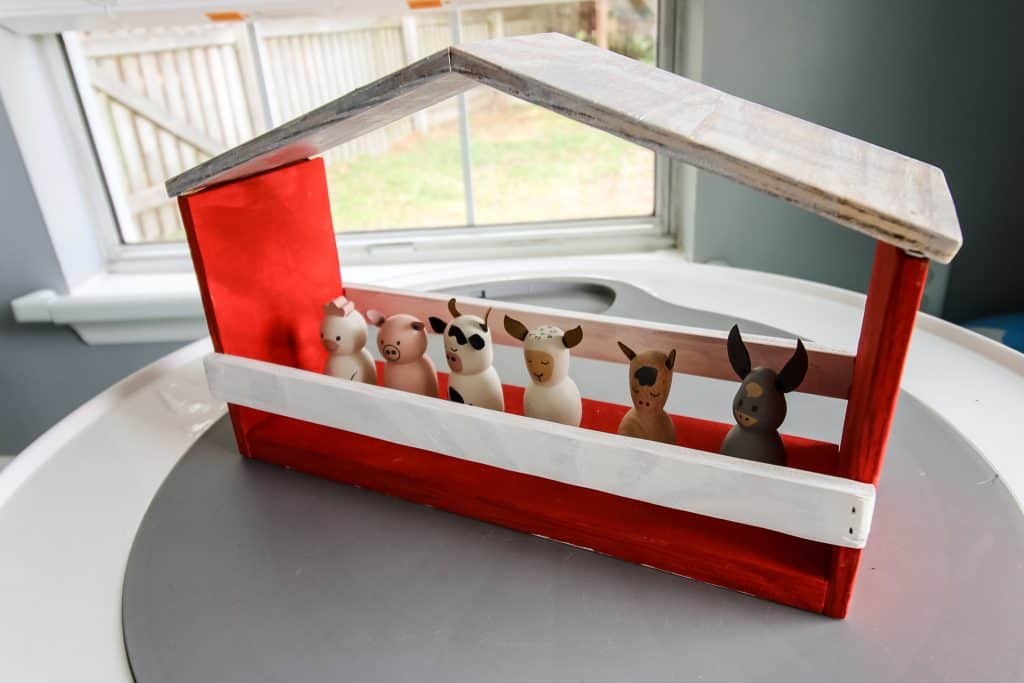
This simple DIY wooden toy barn is perfect for housing small animal figurines and won't take tons of room in your home! It's an easy project with plywood and craft paint and will give your kid's little animals a home!

DIY wooden toy barn - Charleston Crafted

How to build a toy barn

This project is simple to build and customize. It's made with plywood and held together with nails and wood glue. Then, it's customized with craft paint.

Hearth and Home Play Animals barn

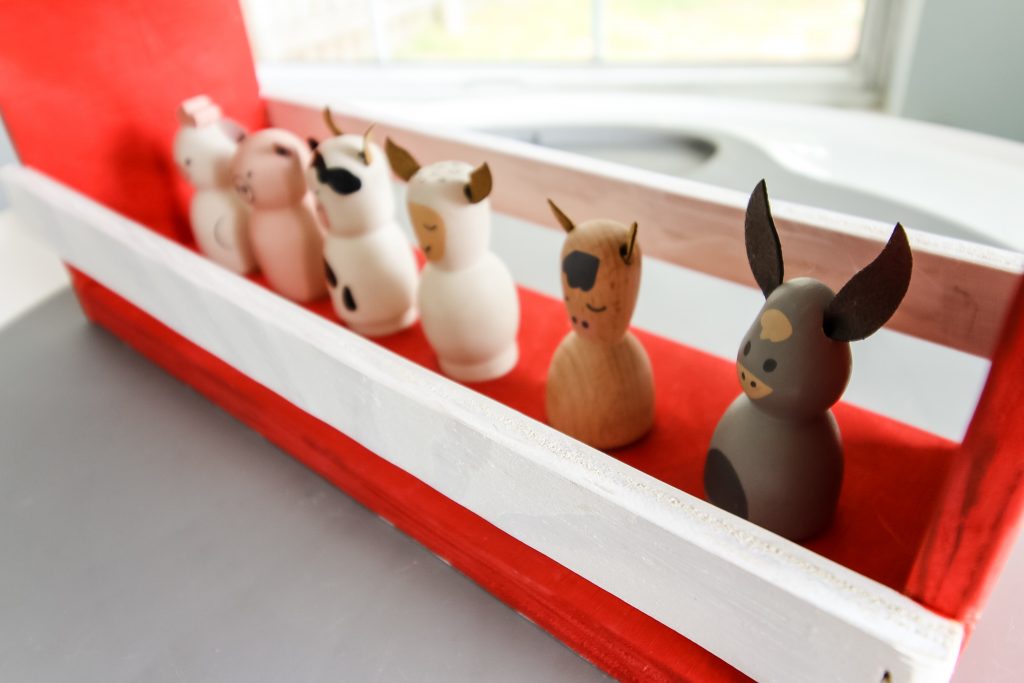
This DIY toy barn was specifically built to house the 6 pack of wooden animals from Hearth and Home at Target. We bought the animals and wanted somewhere to put them.

Hearth and Hand Wooden Animals

The Hearth and Home line also has a toy barn that you can purchase for wooden animal figurines, but it is much more complex and more expensive. We wanted something more simple and easy to use.

DIY toy barn construction

Elaborate toy barns are great and perfect for some situations, but this is a small toy option for small figurines and smaller spaces. If you're looking for a large scale barn doll house, our friend Kati at Houseful of Handmade built an amazing one.

This wooden barn is made from seven pieces of wood. Two sides, two tops, a bottom and two railings. Each is made from plywood.

Cut list:
- (2) Sides- 6"x4"x½"
- (2) Roof- 7"x4"x½"
- (2) Railings- 13"x1"x½"
- (1) Bottom- 12"x4"x¾"

The first step to make this barn work for the Hearth and Home animals is to drill holes for each animal to sit in. Mark six equidistant spots along the center line of the bottom. Use a 1" Forstner bit and drill about halfway through the base. Skip this step if you're using for other play animals.

Building DIY wooden toy barn

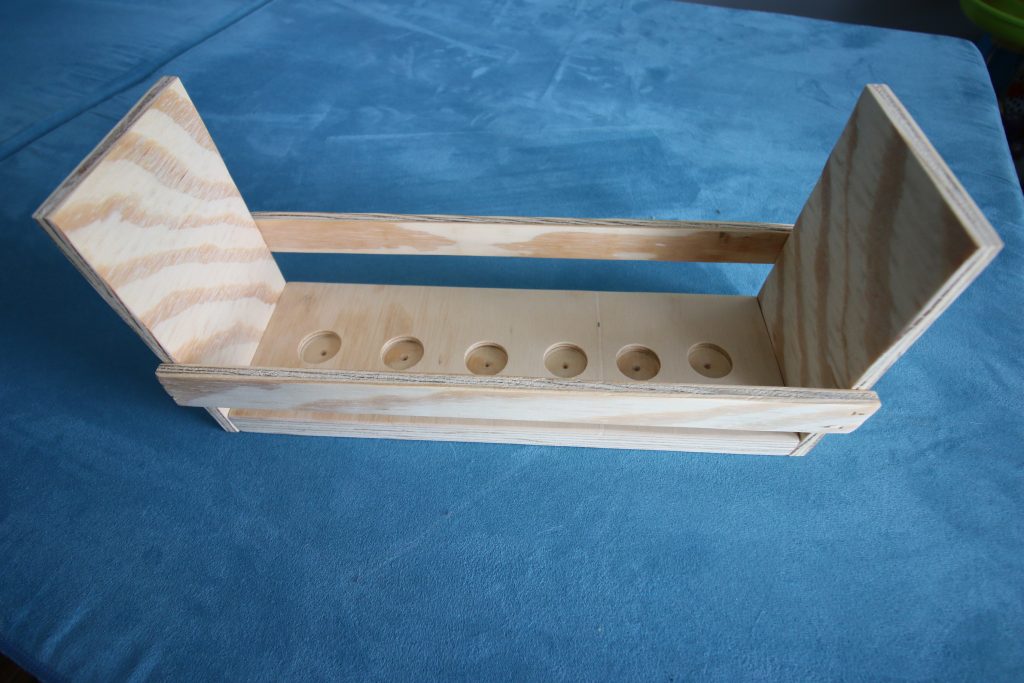
To build the barn, start by attaching the two sides to the outside of the bottom, using nails and wood glue.

Then, attach the railings to the sides an inch up from the bottom, using nails and wood glue.

Building wooden toy barn roof

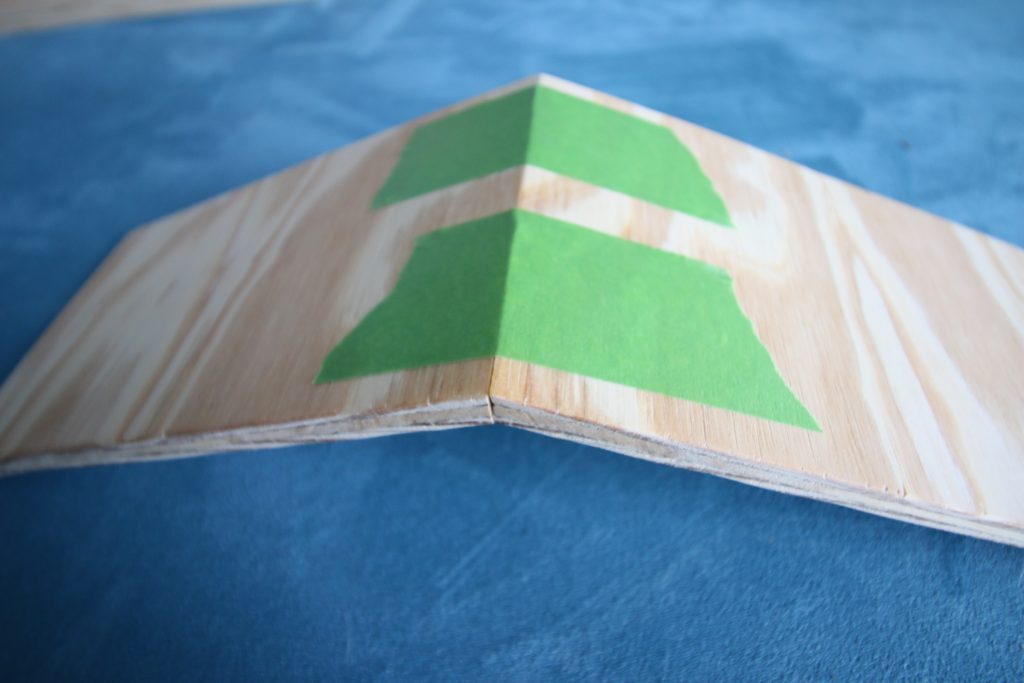
Next, build the roof. Cut a 20 degree beveled edge on one short edge of each piece. Apply wood glue to those edges and bind with painter's tape and let dry.

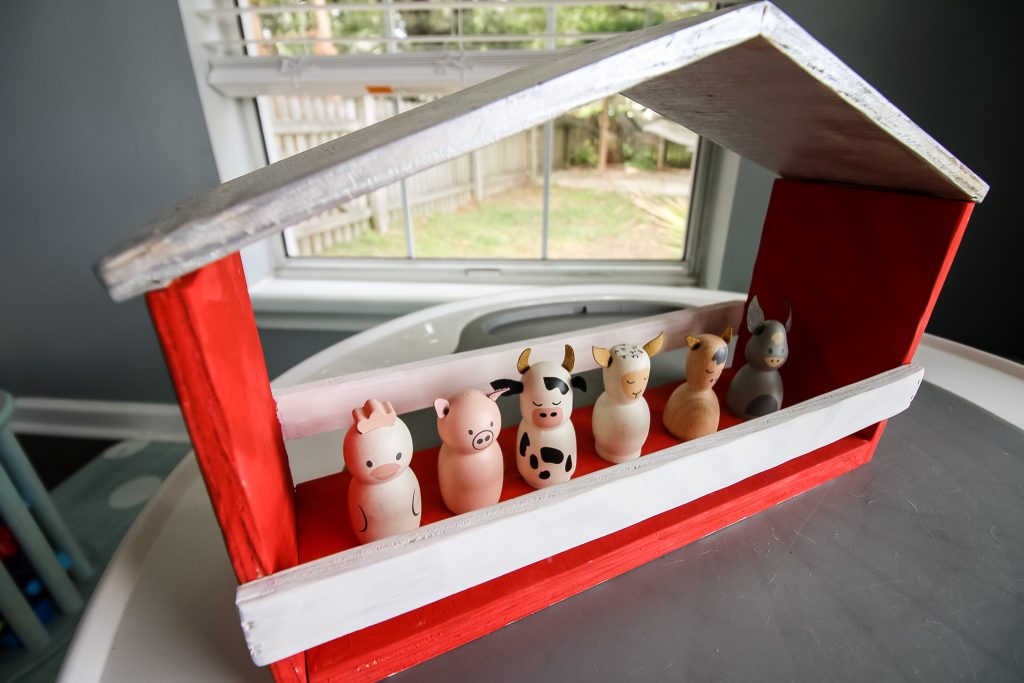
Once the roof is dry, take time to paint the barn and the roof using craft paint. We went for an authentic "barn red" for the base and a silver "tin" for the roof.

Once it's dry, use nails to attach the roof to the base.

Final DIY toy barn

Also check out our mini picnic table build to use with other figurines!

Kids wooden play barn

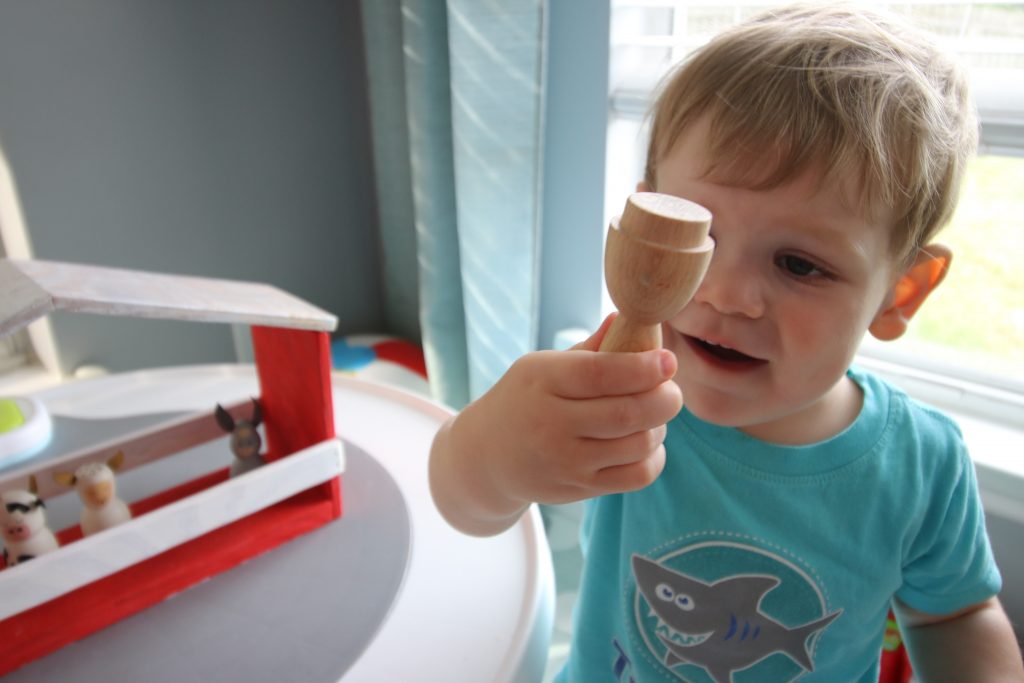
This DIY wooden play barn is perfect to use with animal figurines. It works great. Our son loves putting his animals in the barn and pulling them out.

Playing with wooden toy barn and Hearth and Home wooden animals

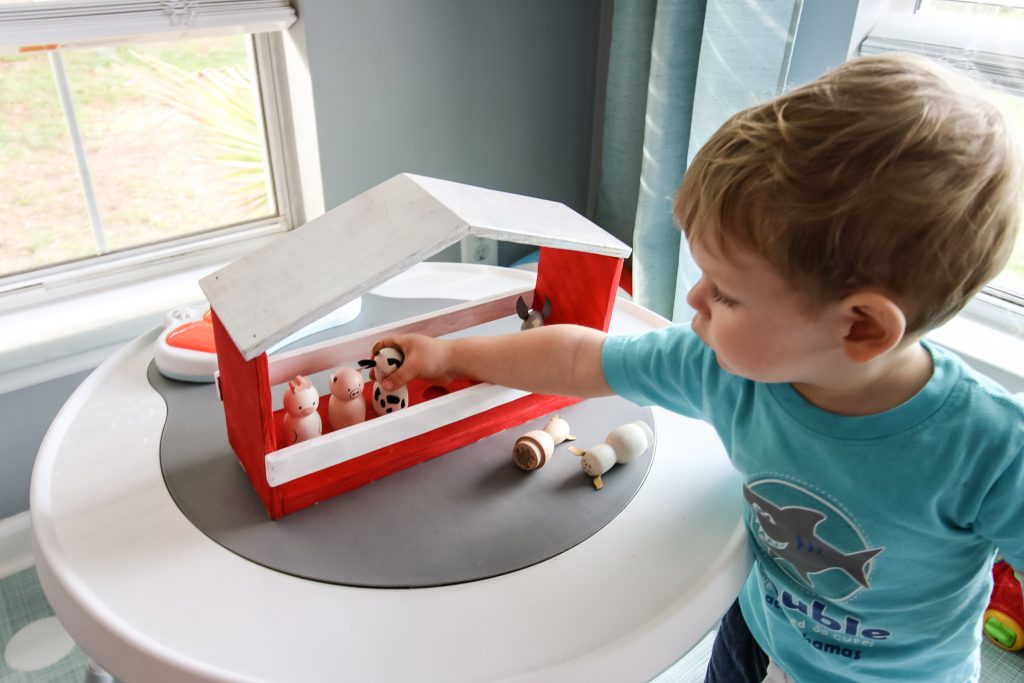
This is a great and aesthetically-pleasing toy and storage for barnyard toys.

Playing with toys

Looking for more adorable wooden toys?

[show_shopthepost_widget id="4020750"]

Charleston Crafted Signature

Follow us on:
Pinterest | Instagram | TikTok | YouTube | Facebook | Amazon Storefront | LTK Shop

Looking for something?

We've been doing this since 2012 so we have a LOT of blog posts!
Search stuff like: Ceiling Projects | DIY Plant Stands | Thrift Flips

Charleston Crafted logo banner
Sean headshot cropped
Sean

Hey there, I'm Sean, the woodworking enthusiast and builder behind CharlestonCrafted.com! Since 2012, I've been sharing the magic of turning raw materials into beautiful creations. I love teaching others the art and satisfaction of woodworking and DIY. I try to inspire fellow crafters to make something extraordinary out of nothing at all.

More Kids Projects

  • DIY kids step stool - Charleston Crafted
    DIY kids step stool
  • DIY busy board - Charleston Crafted
    How to build a DIY busy board for toddlers
  • DIY spider web decorations for Halloween
    15 DIY Spider Web Decorations for Halloween
  • How to build DIY Lego Table - Charleston Crafted
    How to build a DIY LEGO table

Primary Sidebar

Charleston Crafted about us image

Hey y'all!

We are Morgan & Sean McBride and we are crafting our home together in Charleston, South Carolina.

More about us

Popular Posts

  • DIY Coffered Ceiling
    DIY Coffered Ceiling
  • How to Make DIY Concrete Pumpkins via Charleston Crafted
    How to Make DIY Concrete Pumpkins
  • How to Make a Cupid's Arrow Valentine's Day Wall Hanging with felt on the Cricut
    How to make a Cupid's Arrow Valentine's Day Wall Hanging
  • Our Tropical Oasis - A backyard Hammock area - Charleston Crafted
    Our Tropical Oasis

Recent Posts

  • fisherman aesthetic home inspiration
    Fisherman Aesthetic Decor for Your Home
  • Senix Tools Review- Charleston Crafted
    Are Senix power tools any good?
  • Your Weekend To-Do List: 15 Things to Do for Summer Home Upkeep
    Your Weekend To-Do List: 15 Things to Do for Summer Home Upkeep
  • How to build a DIY gate pergola- Charleston Crafted
    How to build a DIY gate pergola

Privacy Policy

Footer

↑ back to top

Navigation

  • Home
  • Blog
  • Contact Us
  • Terms of Use
  • Disclaimer

Newsletter

  • Sign up for emails and updates
  • Follow us on Instagram
  • Work with Us

Browse by Category

  • Woodworking
  • Home Projects
  • Paint Colors
  • Room Reveals

© 2025 The Charleston Crafted Blog LLC DBA “Charleston Crafted” and “CharlestonCrafted” (also known as N/A) / All Rights Reserved.
Official Website: (Charleston Crafted)
Registered in USA (Co. Reg. No.: 565586)
Address: Charleston, USA 29414, South Carolina
Contact Phone: Not applicable — contact is via email: sean@charlestoncrafted.com

DISCLAIMER: The content on this website is provided for general informational purposes only and is not intended as professional advice. The Charleston Crafted Blog LLC and The Charleston Crafted Blog LLC make no representations or warranties—express or implied—regarding the accuracy, completeness, or suitability of the information contained herein. Any reliance you place on this information is strictly at your own risk. In no event shall The Charleston Crafted Blog LLC or The Charleston Crafted Blog LLC be liable for any loss or damage, including without limitation, indirect or consequential loss or damage, arising from the use or inability to use this website. This website is the official website of The Charleston Crafted Blog LLC.

AFFILIATE DISCLOSURE: This website contains affiliate links. If you click through and make a purchase, we may earn a commission at no extra cost to you.

As an Amazon Associate, I earn from qualifying purchases.

Site Editor: Morgan Smith McBride

Copyright © 2025 Charleston Crafted