
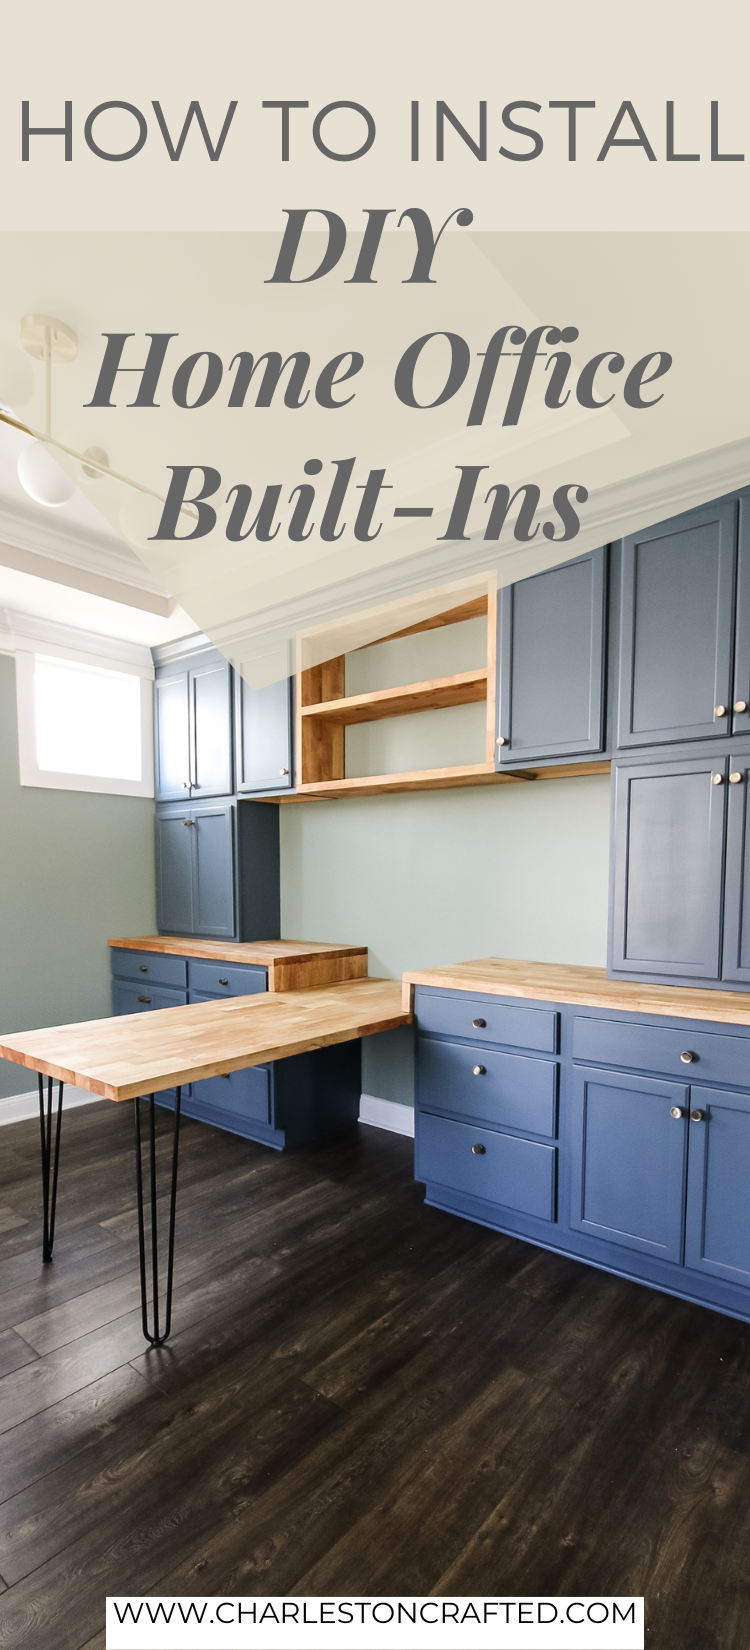
Check out how we used unfinished cabinets to make DIY home office built ins with a butcher block desk and tons of storage!
The main feature of our home office was going to be a huge wall of built-ins. Our temporary office (for the first 2 1/2 years of living here lol) was just two plywood desks with hairpin legs and two storage cabinets for everything we own.
Click here to see our original office built in ideas!
We run our entire business from home, so we need a good, cozy, functional place to work and store all of our office and craft supplies.
To create our home office, we had to fill a doorway with drywall and then remove all of the elements of the space looking like a dining room.
That consisted of removing a lot of picture frame wainscoting and chair railing from the wall.
Check out what we did on the other side of the doorway we filled in!
With the blank slate ready to go, it was time to start building in our new home office.
Let’s show you how we created our DIY home office built-ins with a butcher block desk and how you can do it too!
How to install home office built-ins
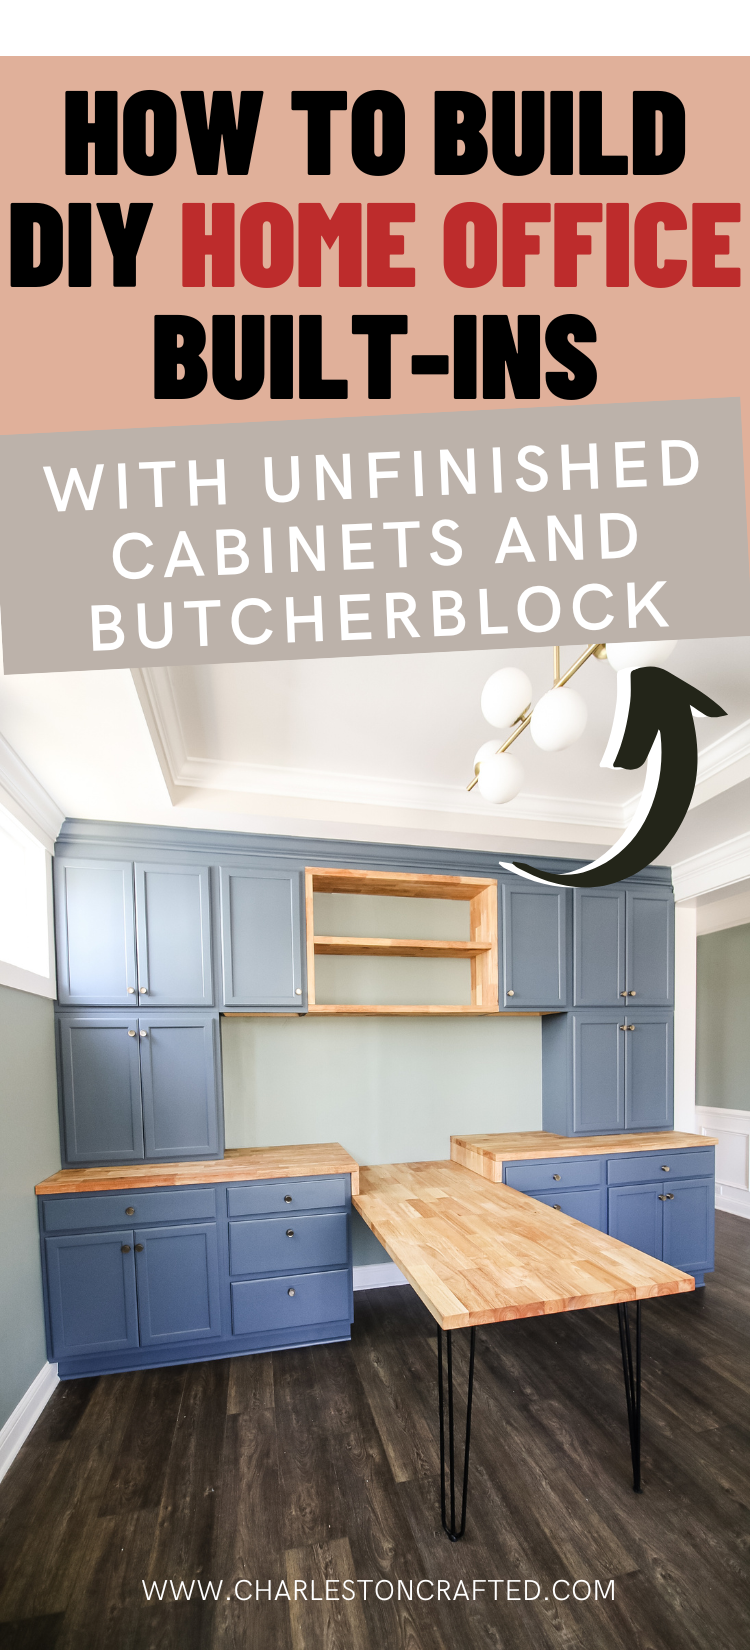
Our home office built-ins consist of base cabinets, wall cabinets, desk, workspace and a display shelf.
Lots of design ideas can feature these pieces in different ways or any option you want. If you are doing a DIY office built-in, you can really choose any configuration you want that will suit your needs.

For us, we had a few big goals when designing our home office:
- beautiful statement piece
- maximize storage
- flexible work surface
We needed this space to be a statement piece because it is literally the first thing you see as you walk in our front door. Our office needed to be a reflection of who we are and what we do.
Storage was also essential. We were paring down from two storage cabinets that were sent to use two weeks after we moved in and combining that with all the junky office supplies and devices we had out on the plywood table before. All of that needed to be hidden.
And finally we needed a flexible work surface. We mostly work off of laptops, but we have a desktop for certain tasks and do crafting and collaborative work that needed a better way to work together.
With all that in mind, we got to work on our home office design.
DIY home office built-in wall cabinets
The first step for us was choosing our built-in office cabinets. After filling in the doorway to the kitchen, we had a very long wall to fill and maximize space.
How to choose cabinets for home office built-ins
There are a number of options for office built-in cabinets to choose from based on what you are comfortable doing, what style you want and how much money you want to spendl
- completely DIY and build custom cabinets from plywood
- buy custom cabinetry from any big box or speciality store
- buy unfinished pre-made cabinets and customize to your needs
The benefit of building your own cabinets from plywood is that you can literally create anything you want. Any configuration, any size, anything at all. However, you needs skills, time and money.
Building custom cabinets is great, but plywood prices are at an all-time high, making this not a super budget friendly option anymore. Plus, factor in the time it would take to make them from scratch.
Buying custom cabinetry is going to be the most expensive option, but you’re likely to get a larger variety of choices and get exactly what you want.
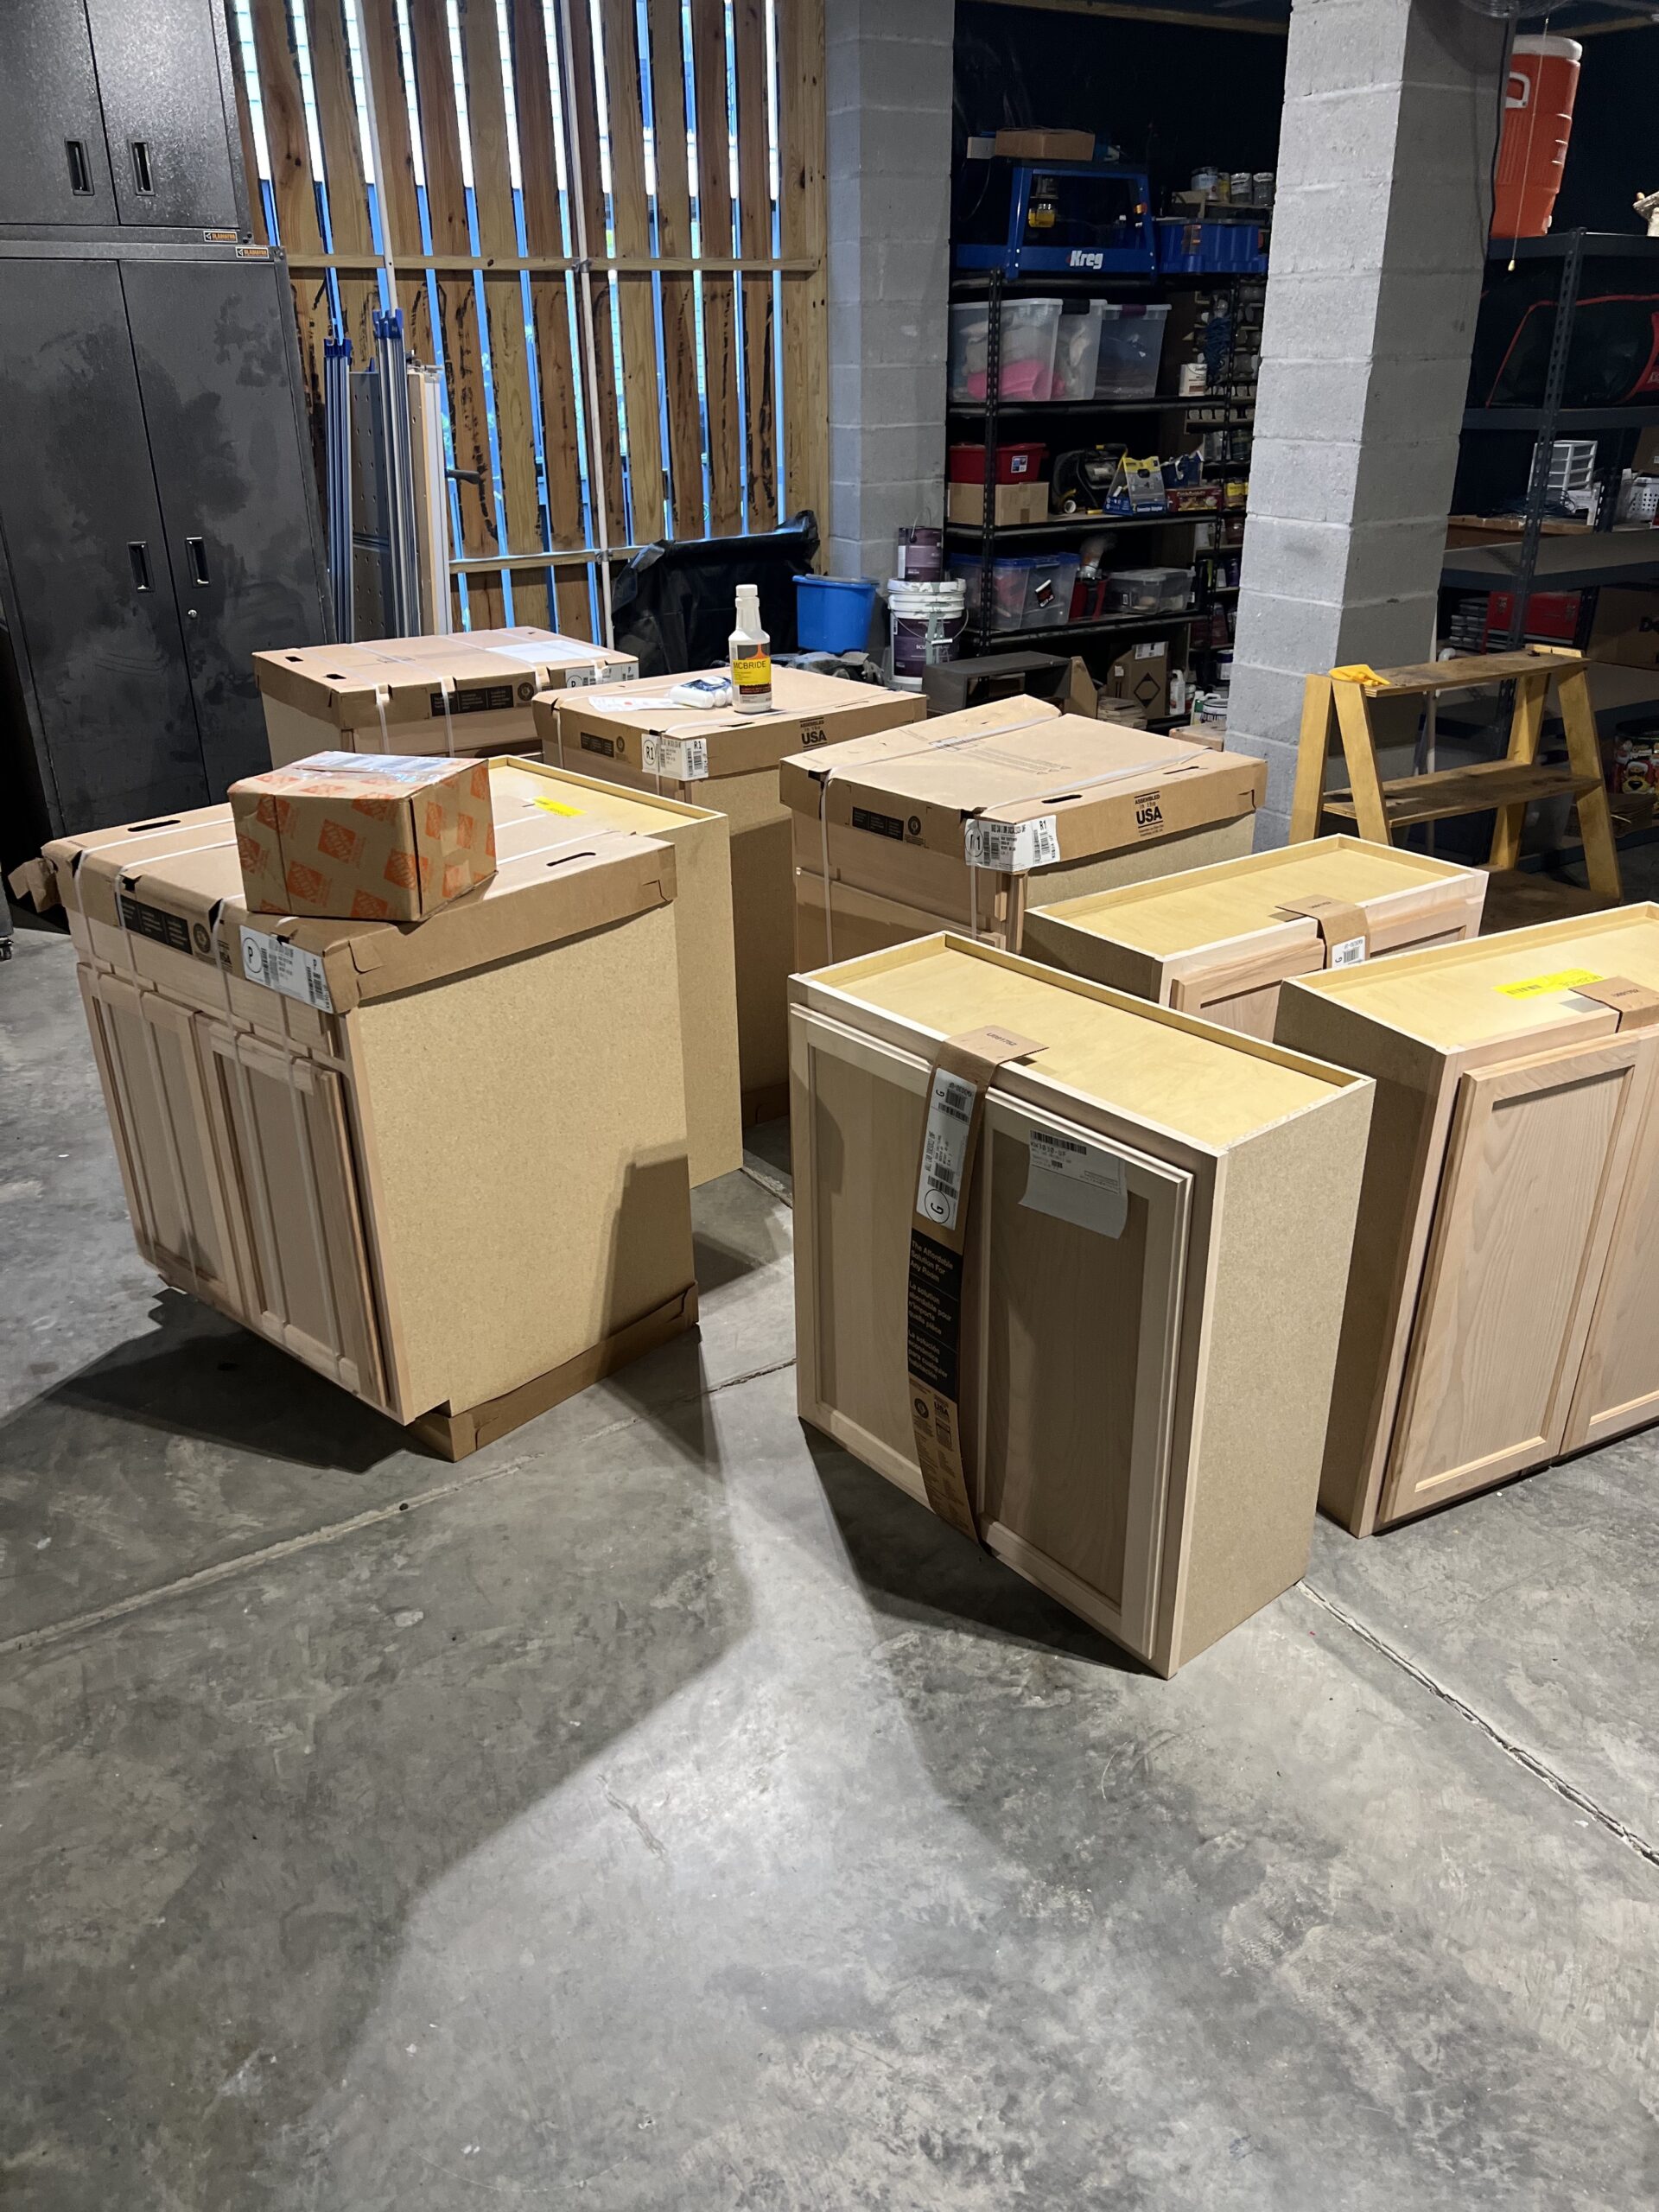
For us, we chose to buy unfinished cabinets from Home Depot and create a layout that worked for us.
This option seemed best because the cabinet prices were pretty good in the end and they were ready to go.
The only problem is that they are kitchen cabinets, so base cabinets are too high for working at, so we needed to work around that (more to follow).
Using unfinished cabinets for our DIY home office built-ins
After settling on our final design, here are the unfinished cabinets we ended up buying:
- (2) base cabinets with doors and one drawer
- (2) base cabinets with three drawers
- (4) upper wall cabinets with doors
- (2) upper wall cabinets with one door

Once we had the cabinets, we did a dry fit to see how they looked in the space. We put a piece of butcher block down in between the base cabinets and the wall cabinets we were stacking on top. This gives it all one cohesive look.
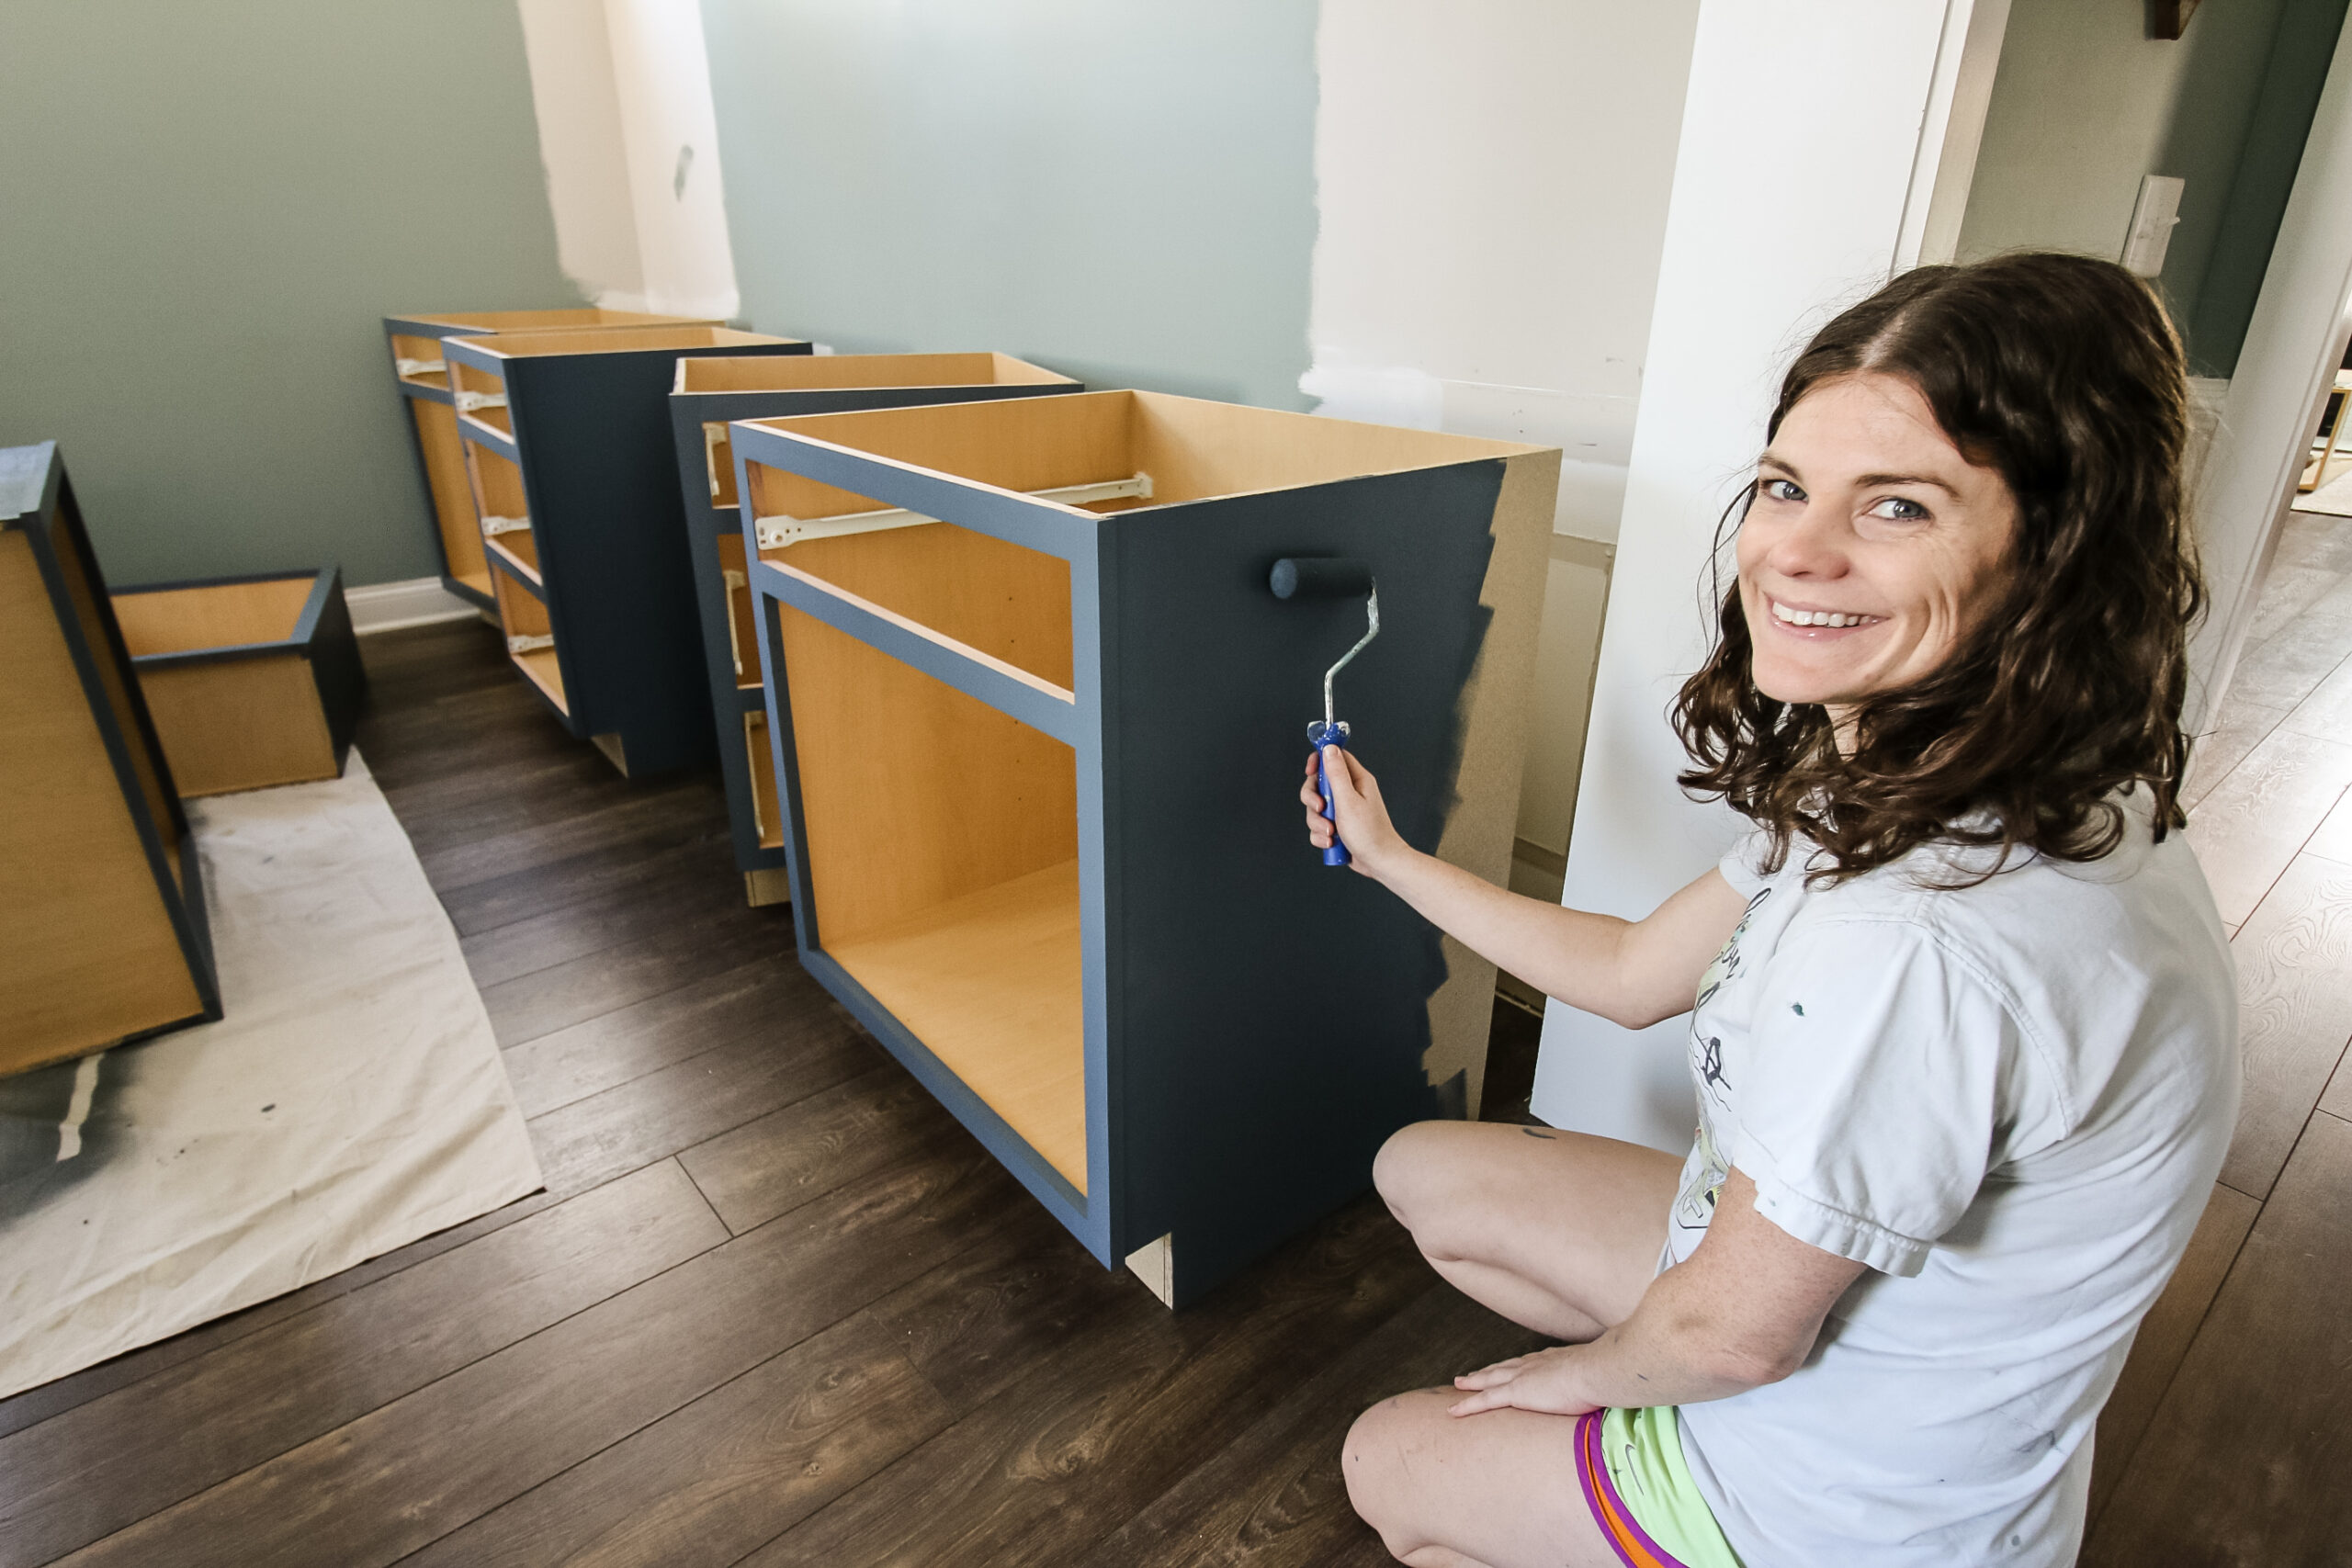
After we decided it would all look good, we took everything down and painted the cabinets in Behr “NYPD,” which is the same blue we used for our built-in mudroom lockers and our shiplap fireplace.
Once painted, we pushed the lower cabinets in place and put the cut butcherblock top on top of them. The lower cabinets are kitchen counter height with a toe kick, so they work well for standing but not sitting.
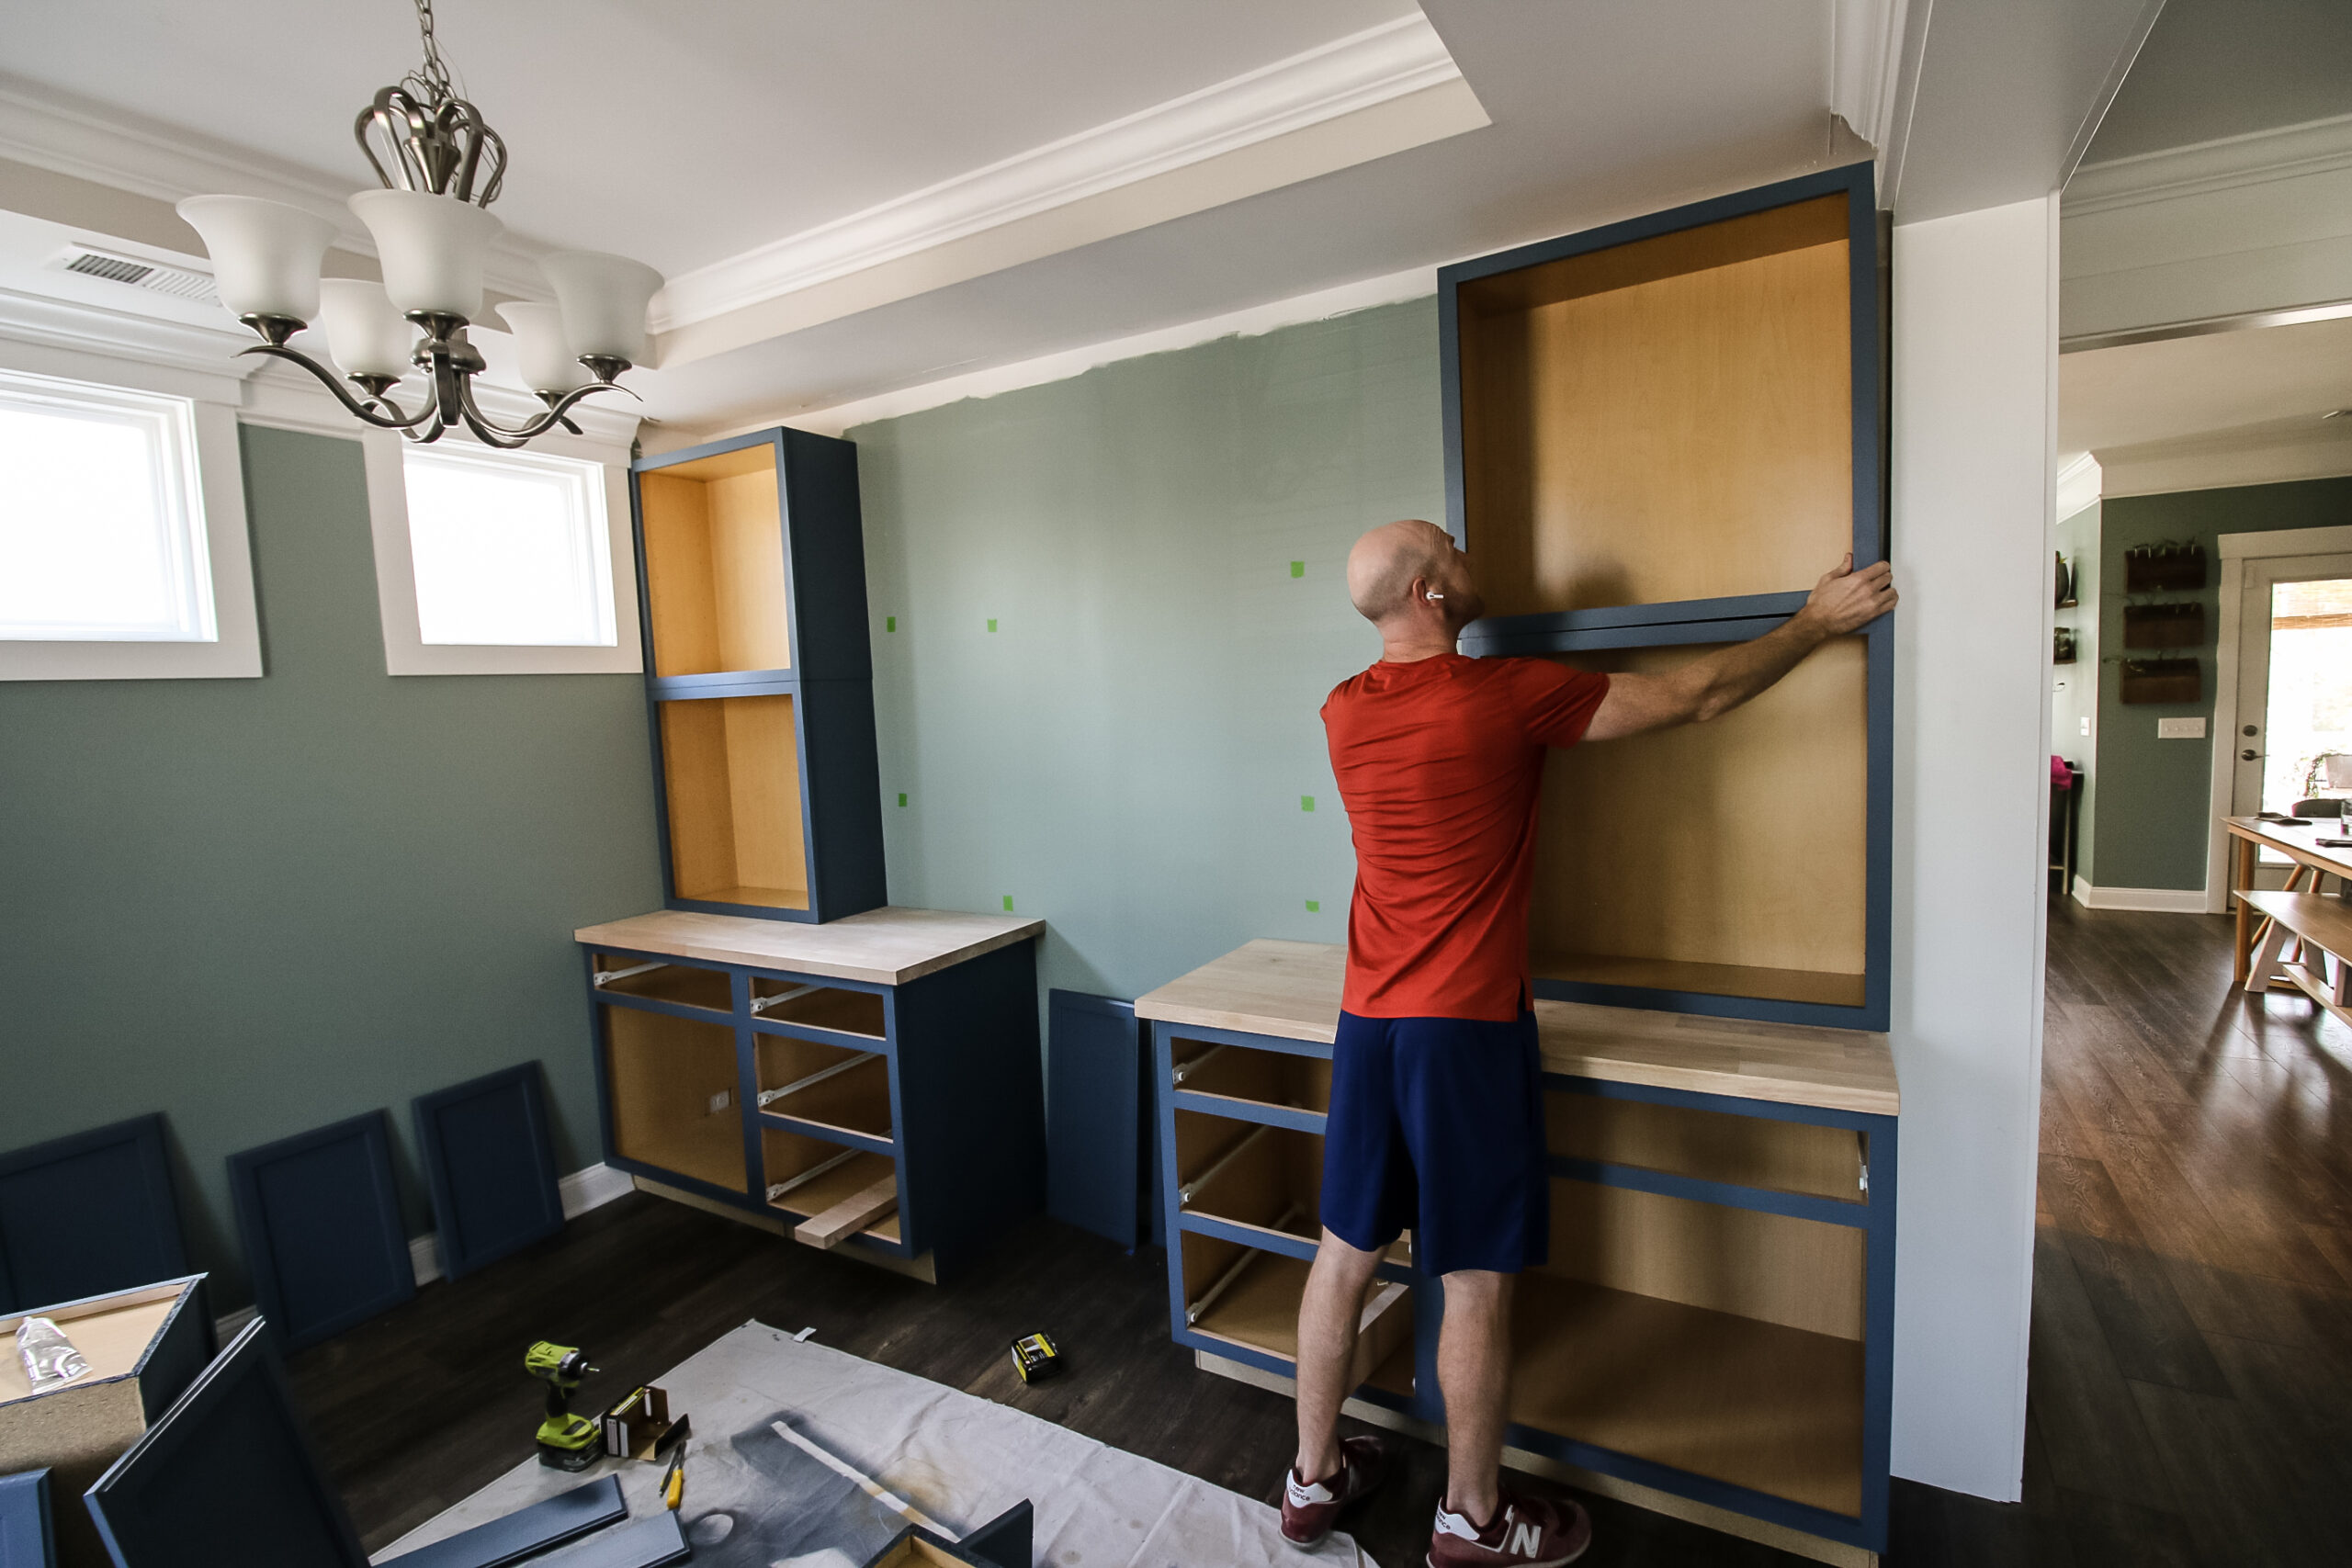
Then, we stacked the upper wall cabinets on top of the butcherblock to create a storage tower on both sides.
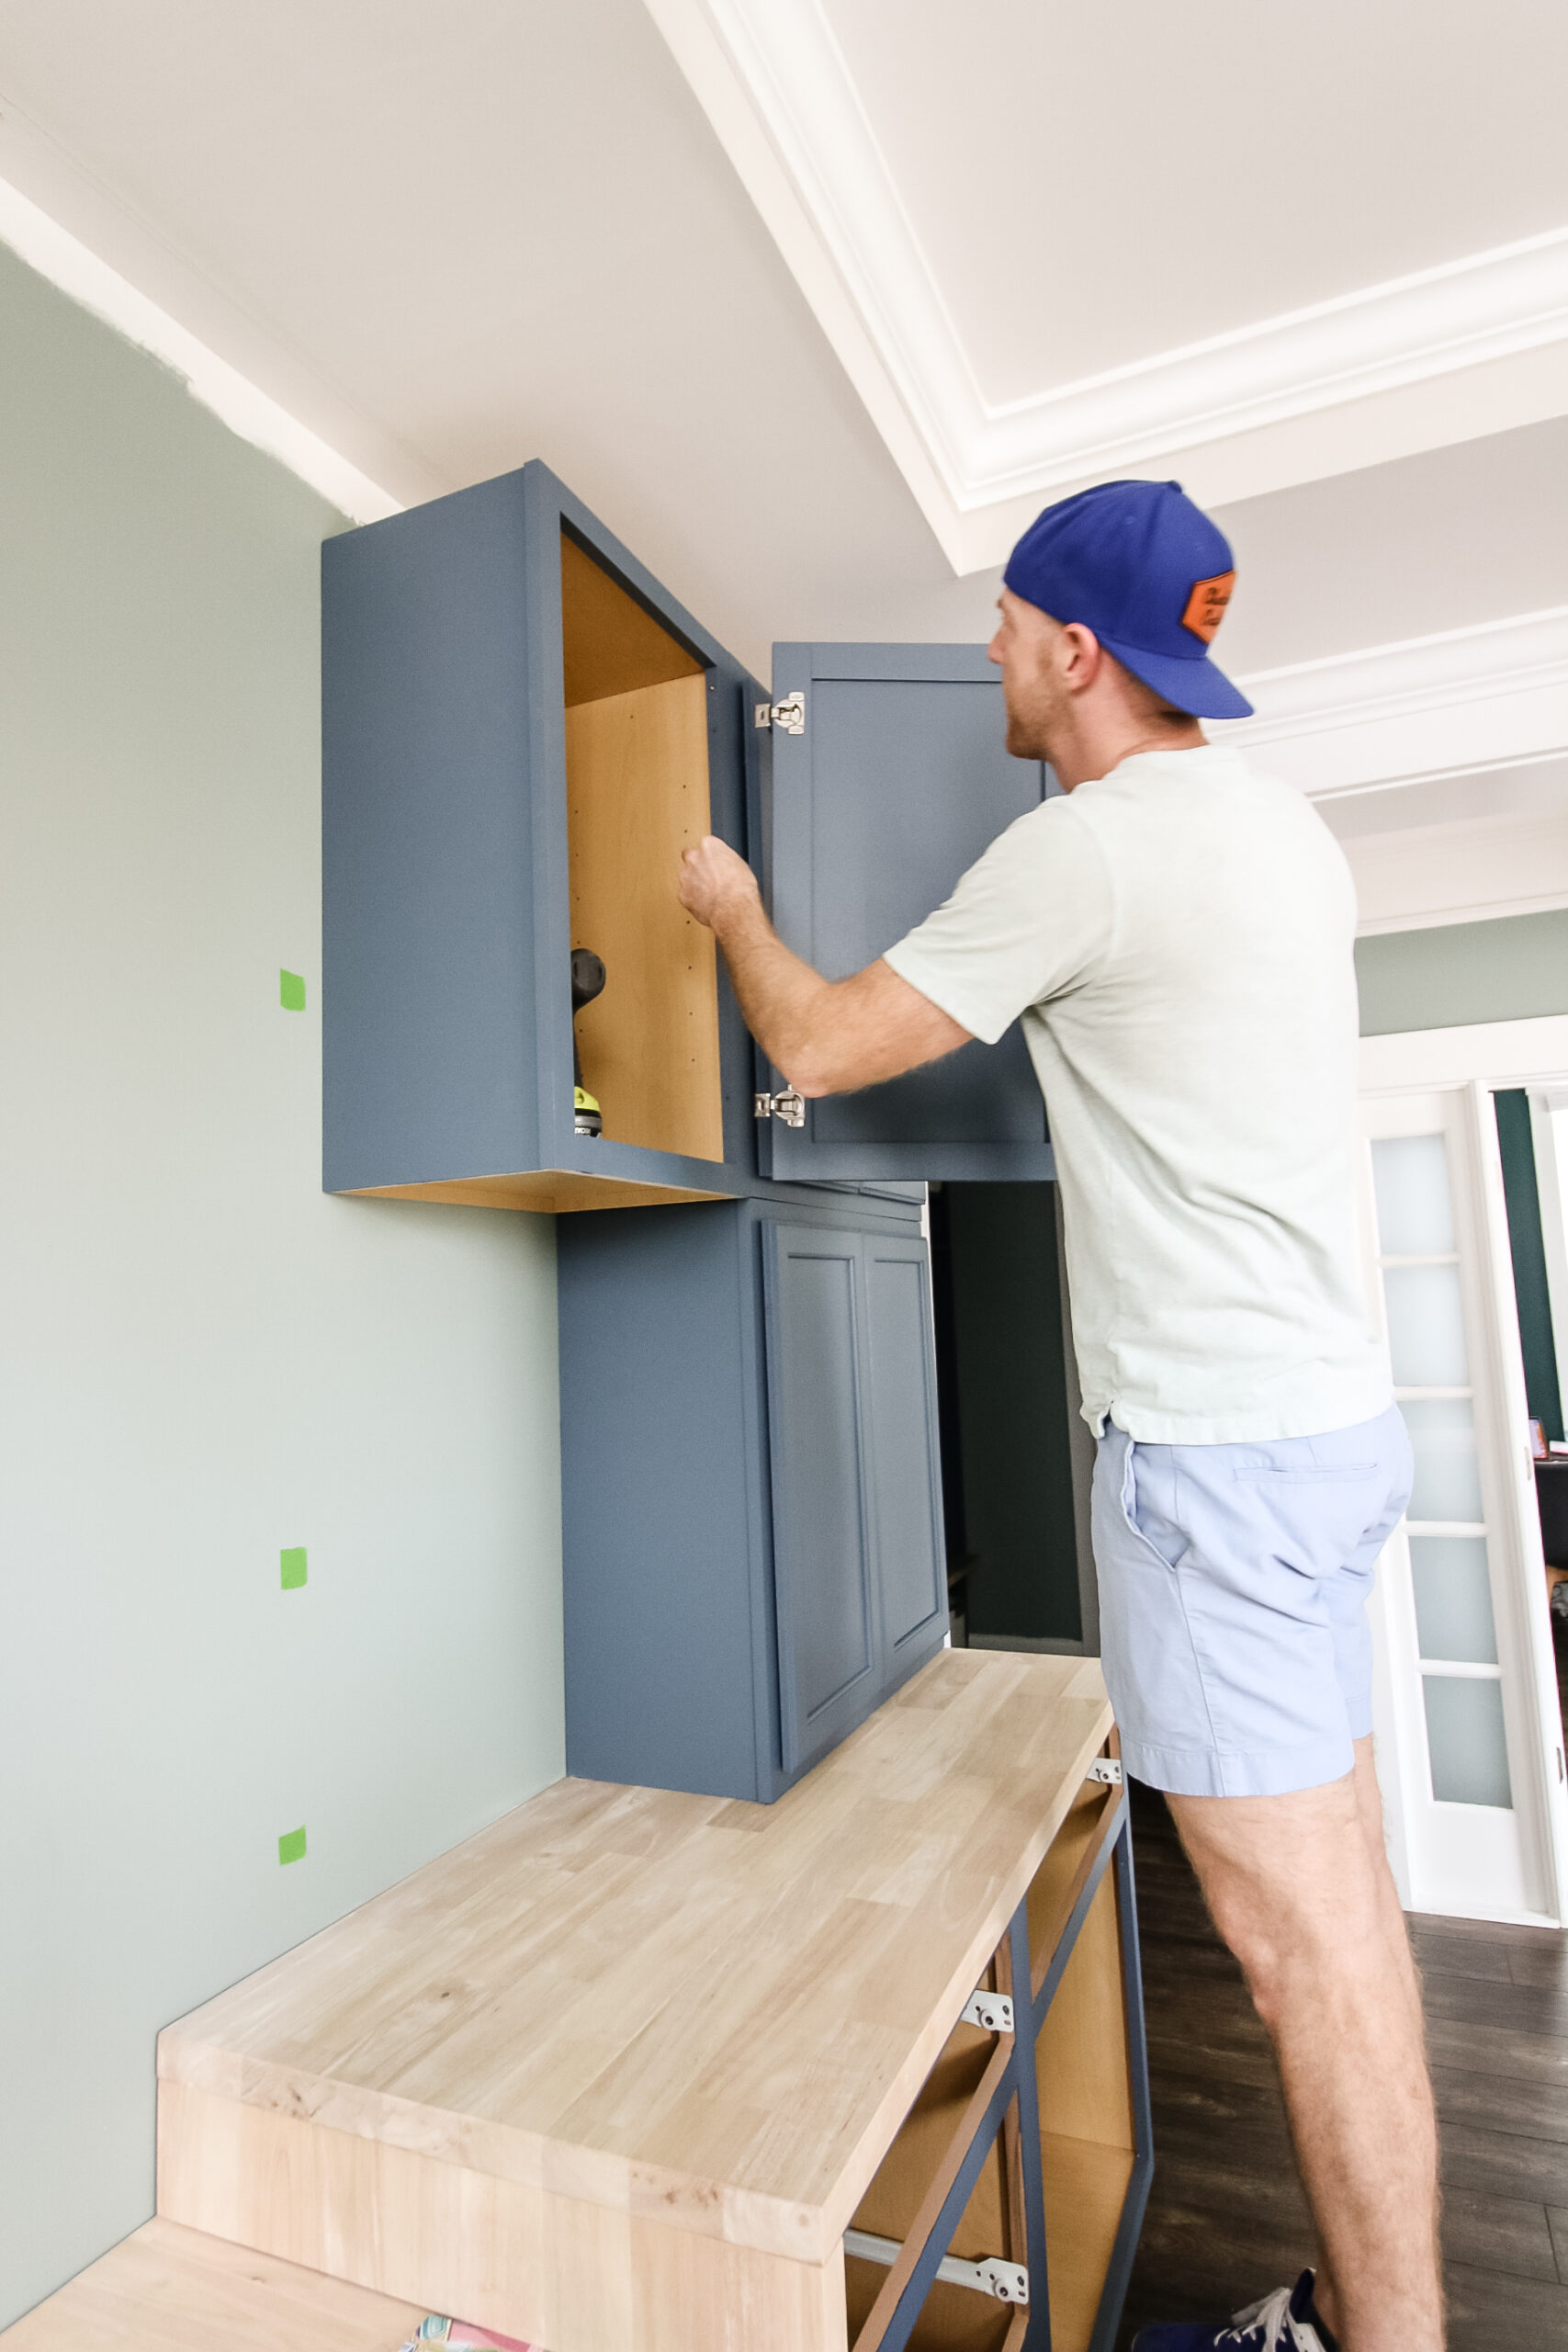
In our original design, we planned to just put long floating shelves between these cabinets, but after seeing the huge open space, we decided that was too much open shelving and decided to add two more cabinets up high.
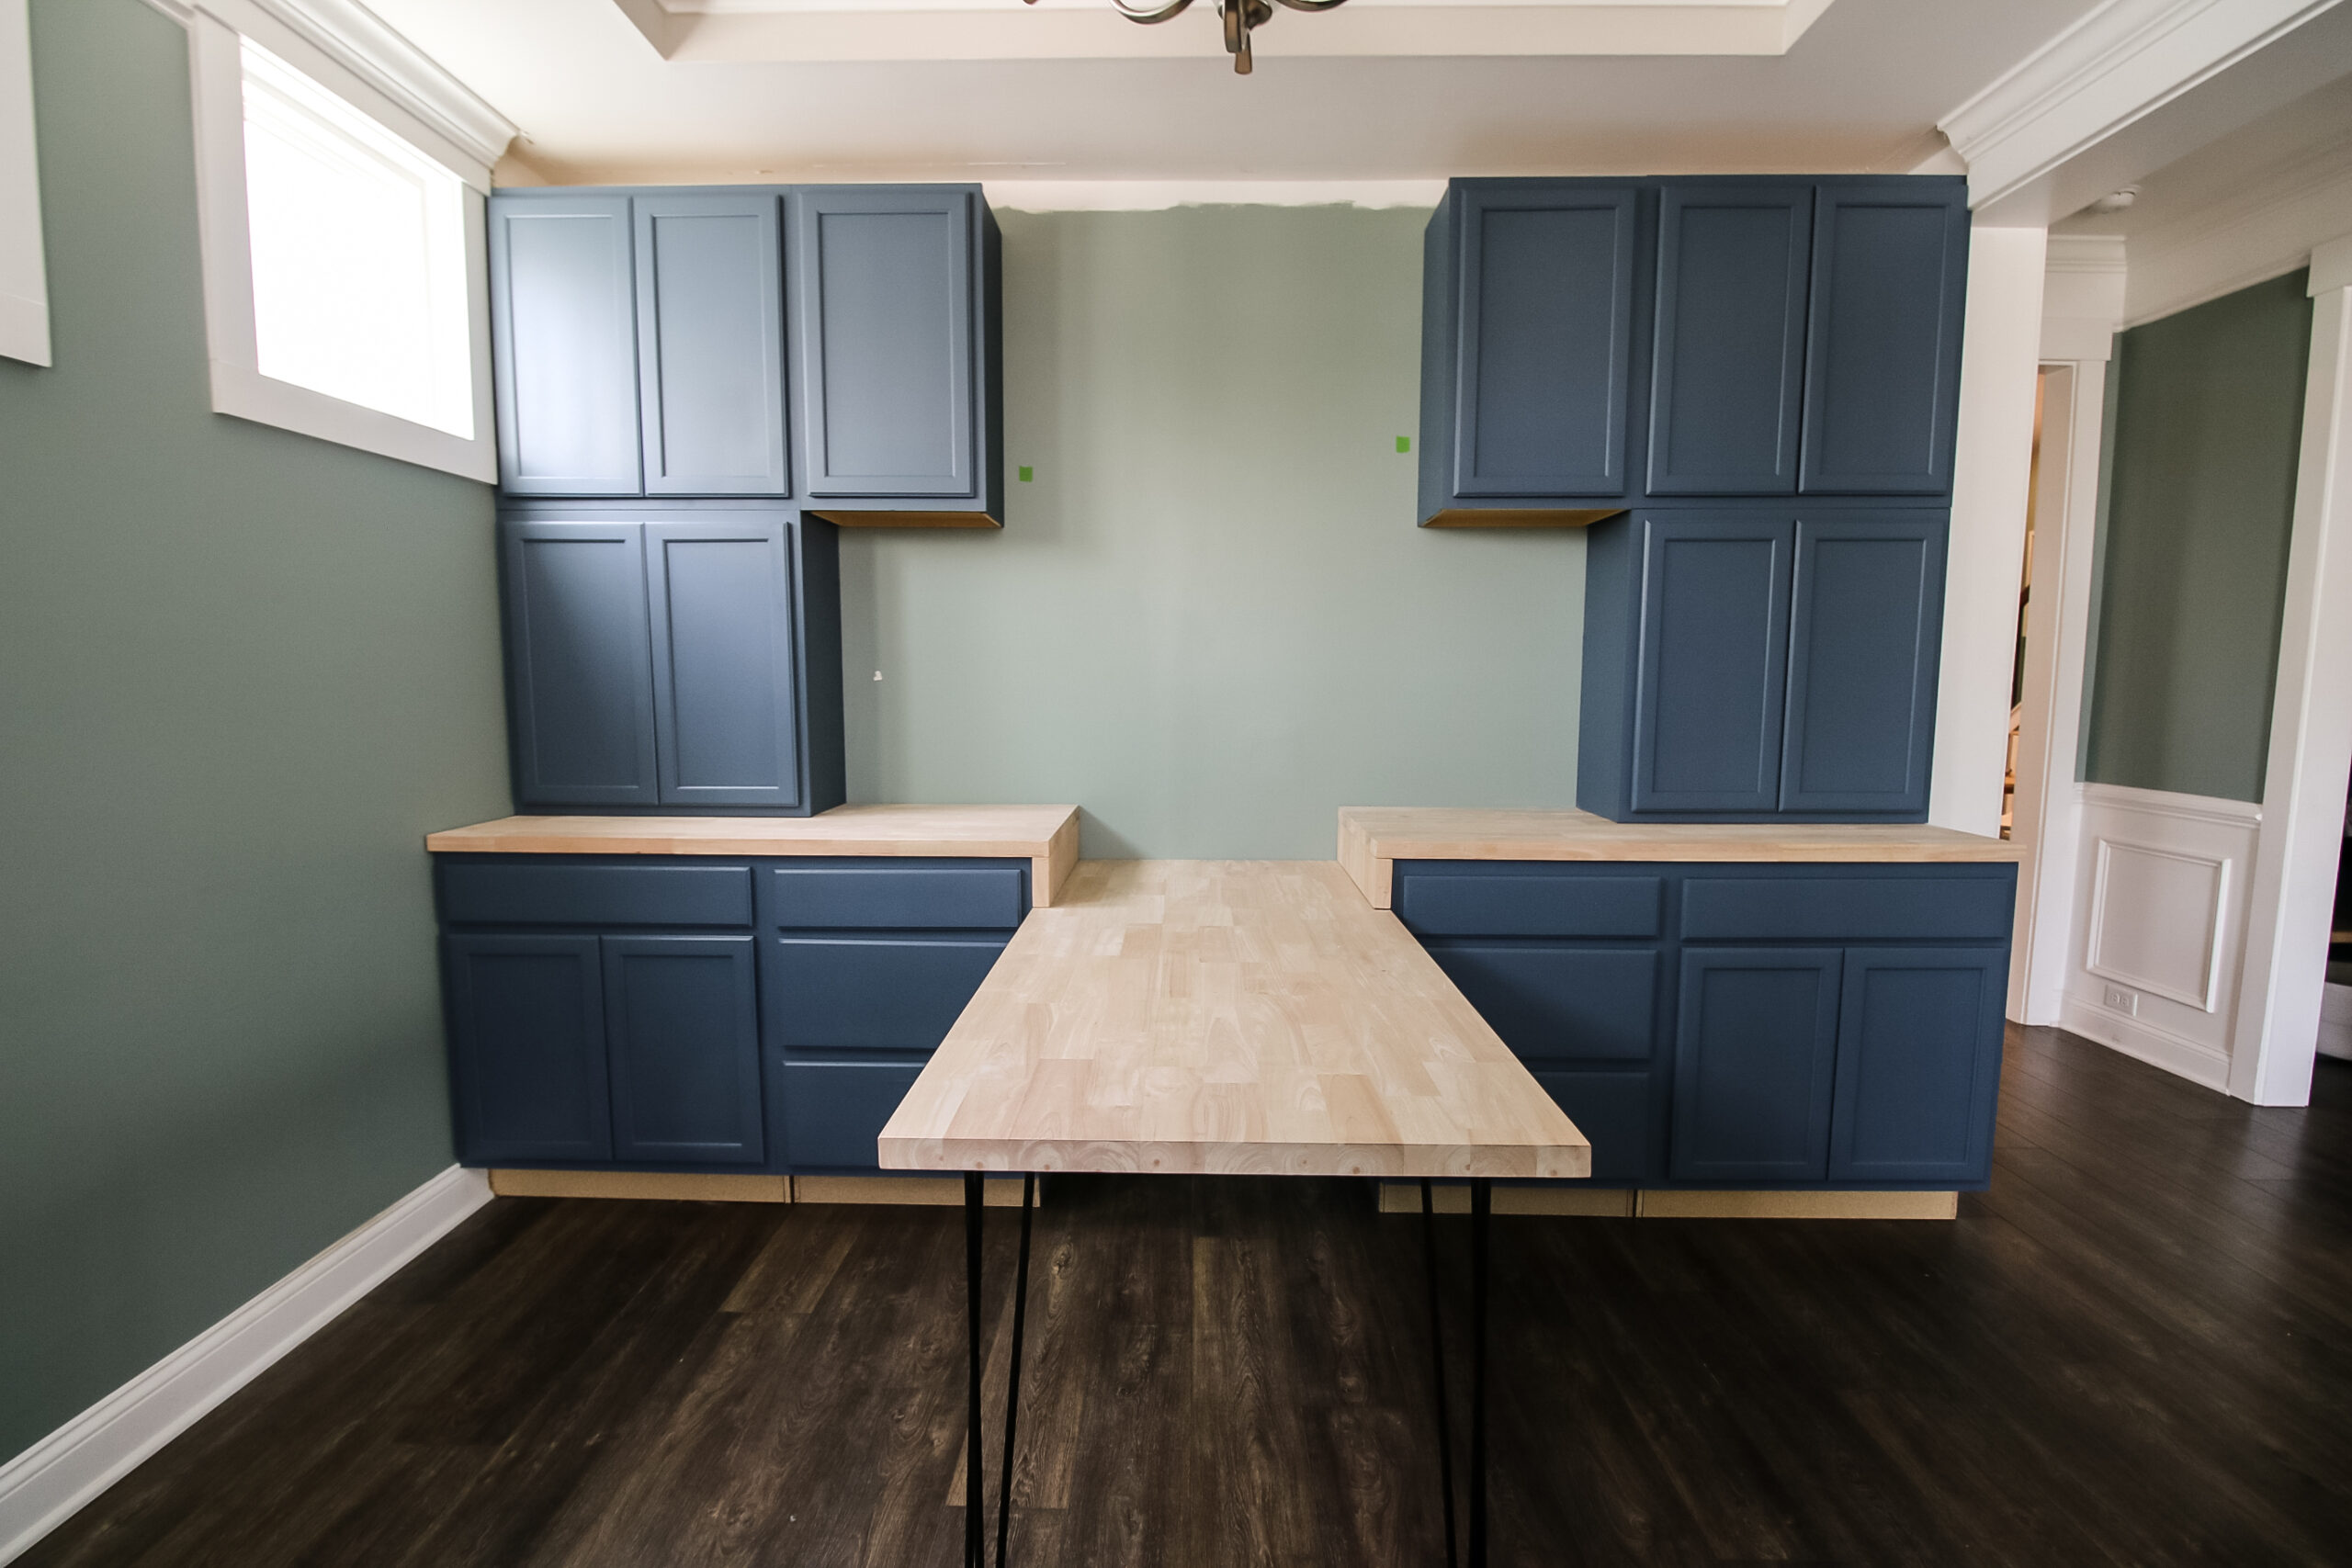
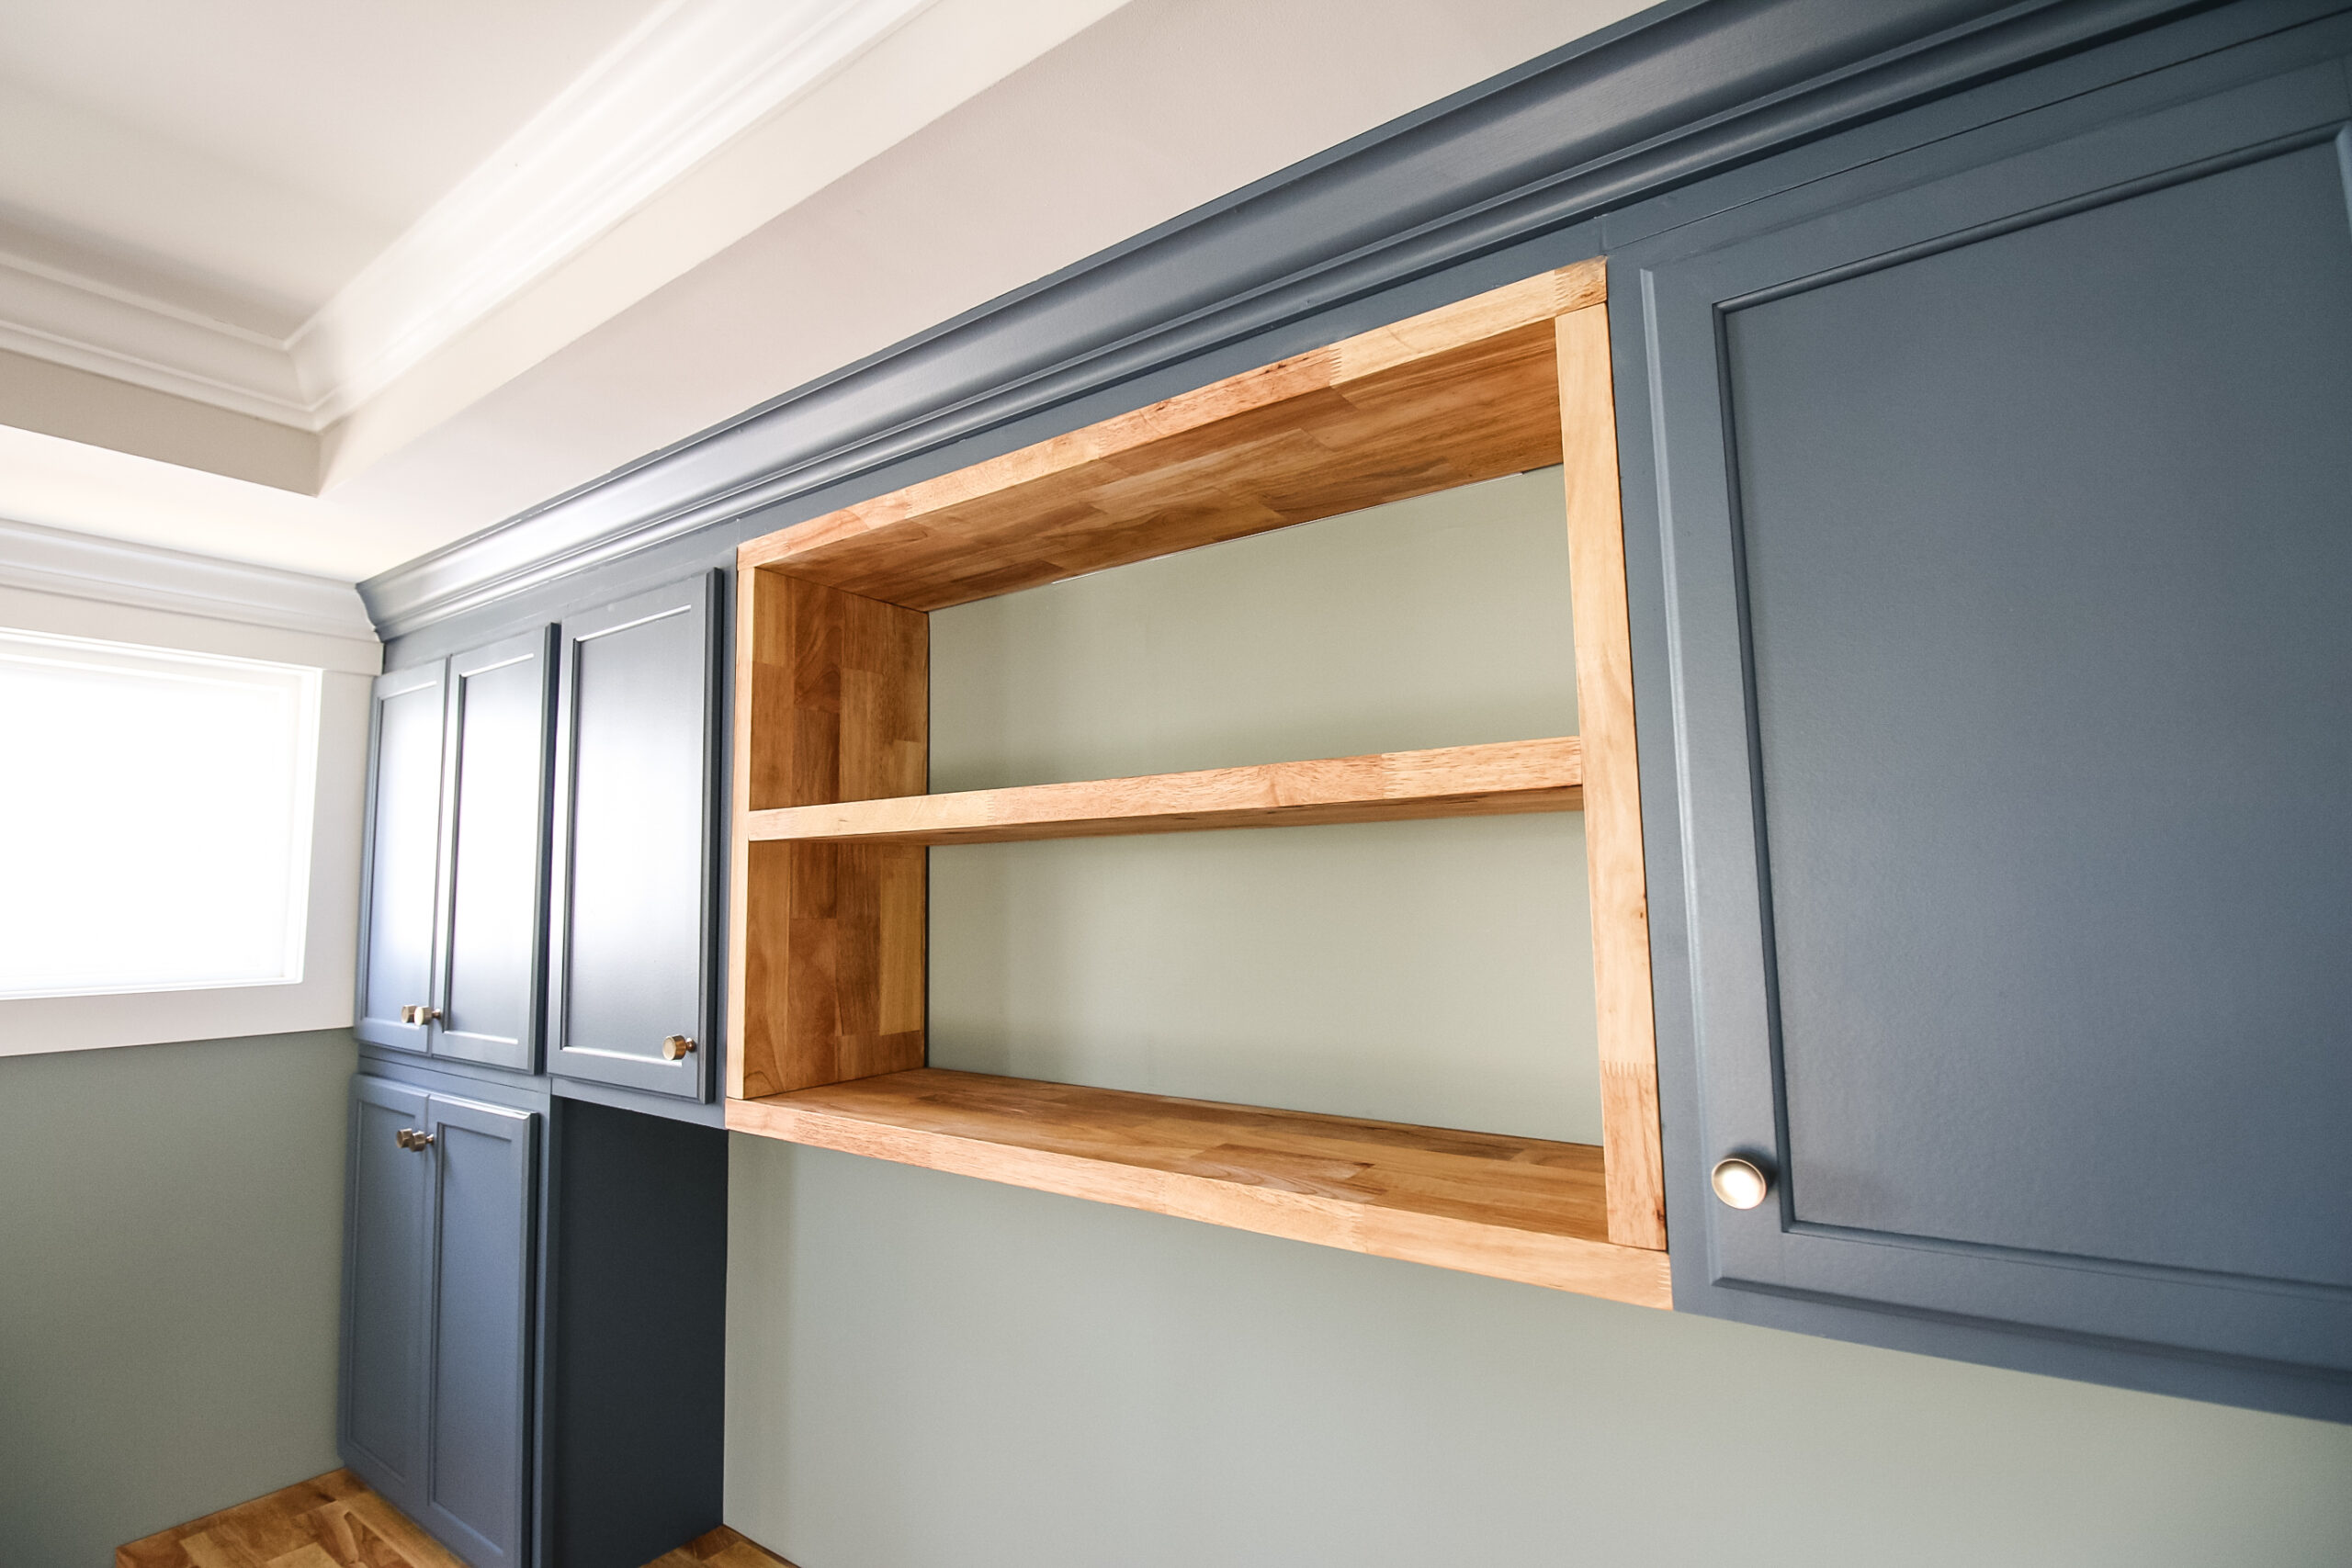
Between those cabinets, we built a custom shelf using more butcherblock. This was going to really tie into the desk below and look super cohesive.
DIY home office built-ins with desk
Once the cabinets were fully secured in place, it was time to add the desk portion of our built-in.
To do this, we created a T-shaped desk sticking out from the wall and the built-in wall unit. Again, we used a large slab of butcherblock from Floor and Decor.

We took off two of the hairpin legs from those old plywood desks and added them to one end of the butcherblock.
Leveling out the desktop, we then added wooden supports on the back wall and on the walls of the lower cabinets.
The final touch was to cut off two more pieces of butcher block to create a waterfall edge from the top on the cabinets down to the desk.
We could have made a 45 degree miter that would have technically looked nicer than the butt joint, but we were cutting it very VERY close and didn’t have any room for error.
But once in place, they were hardly noticeable.
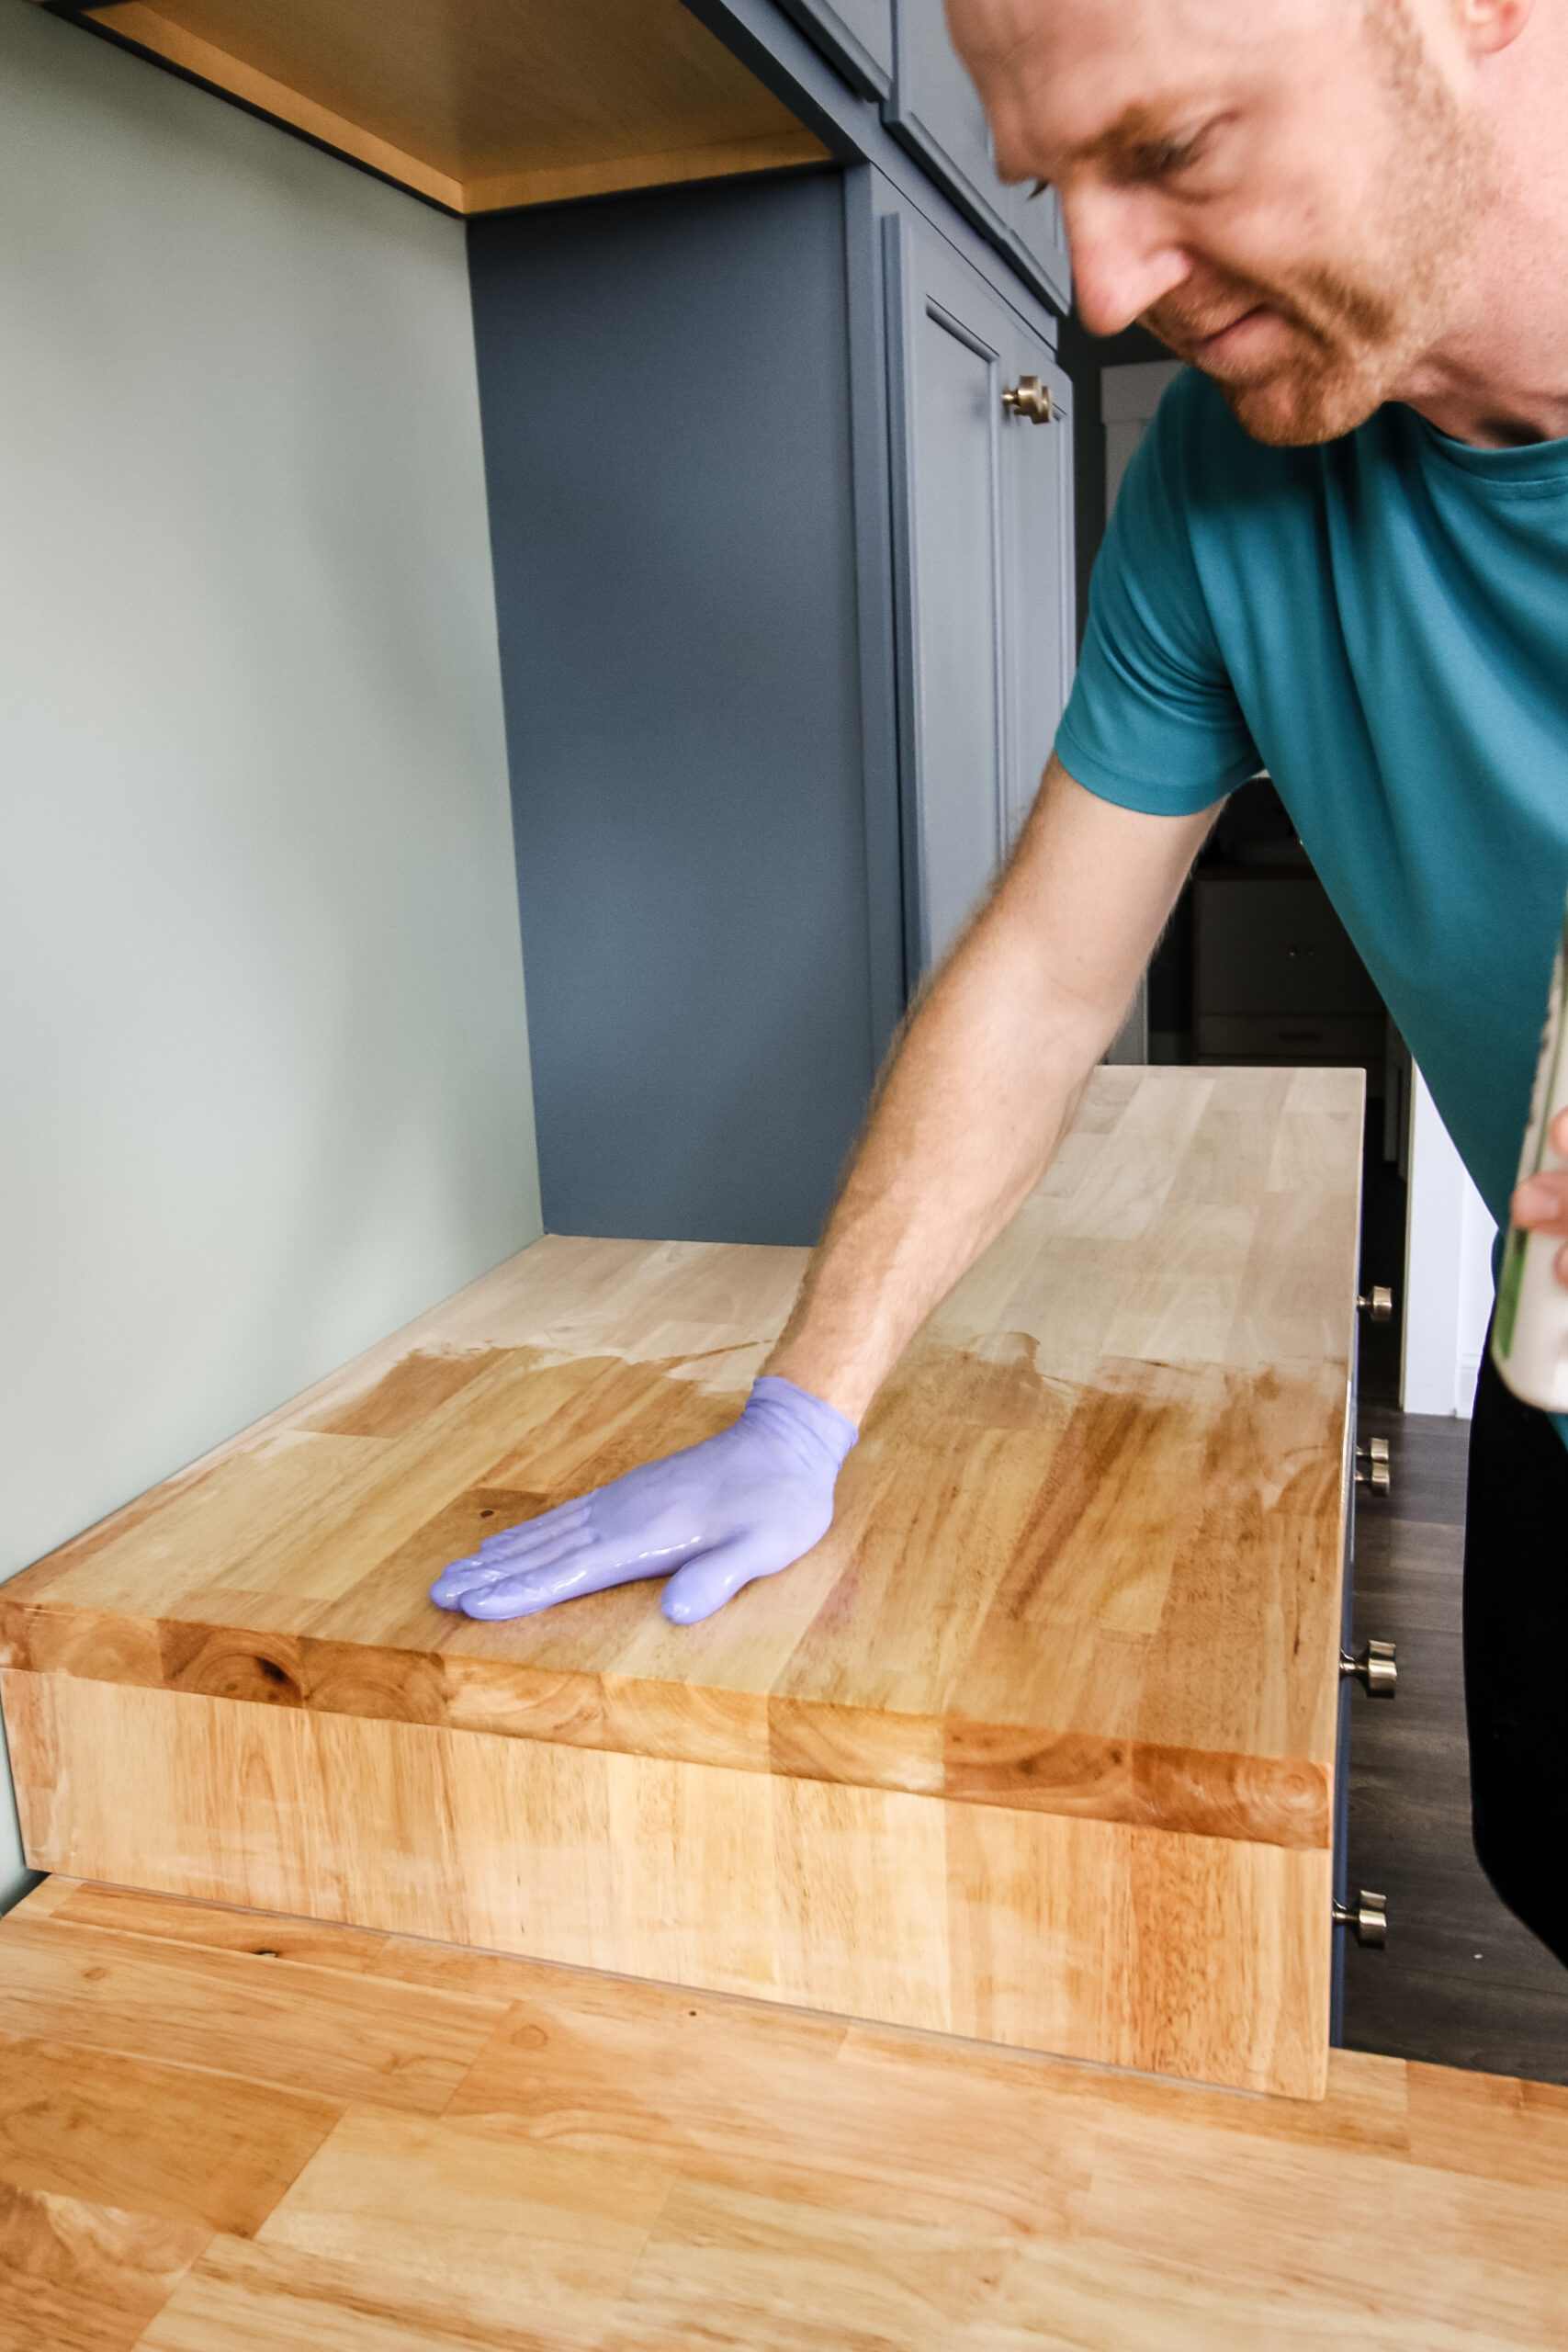
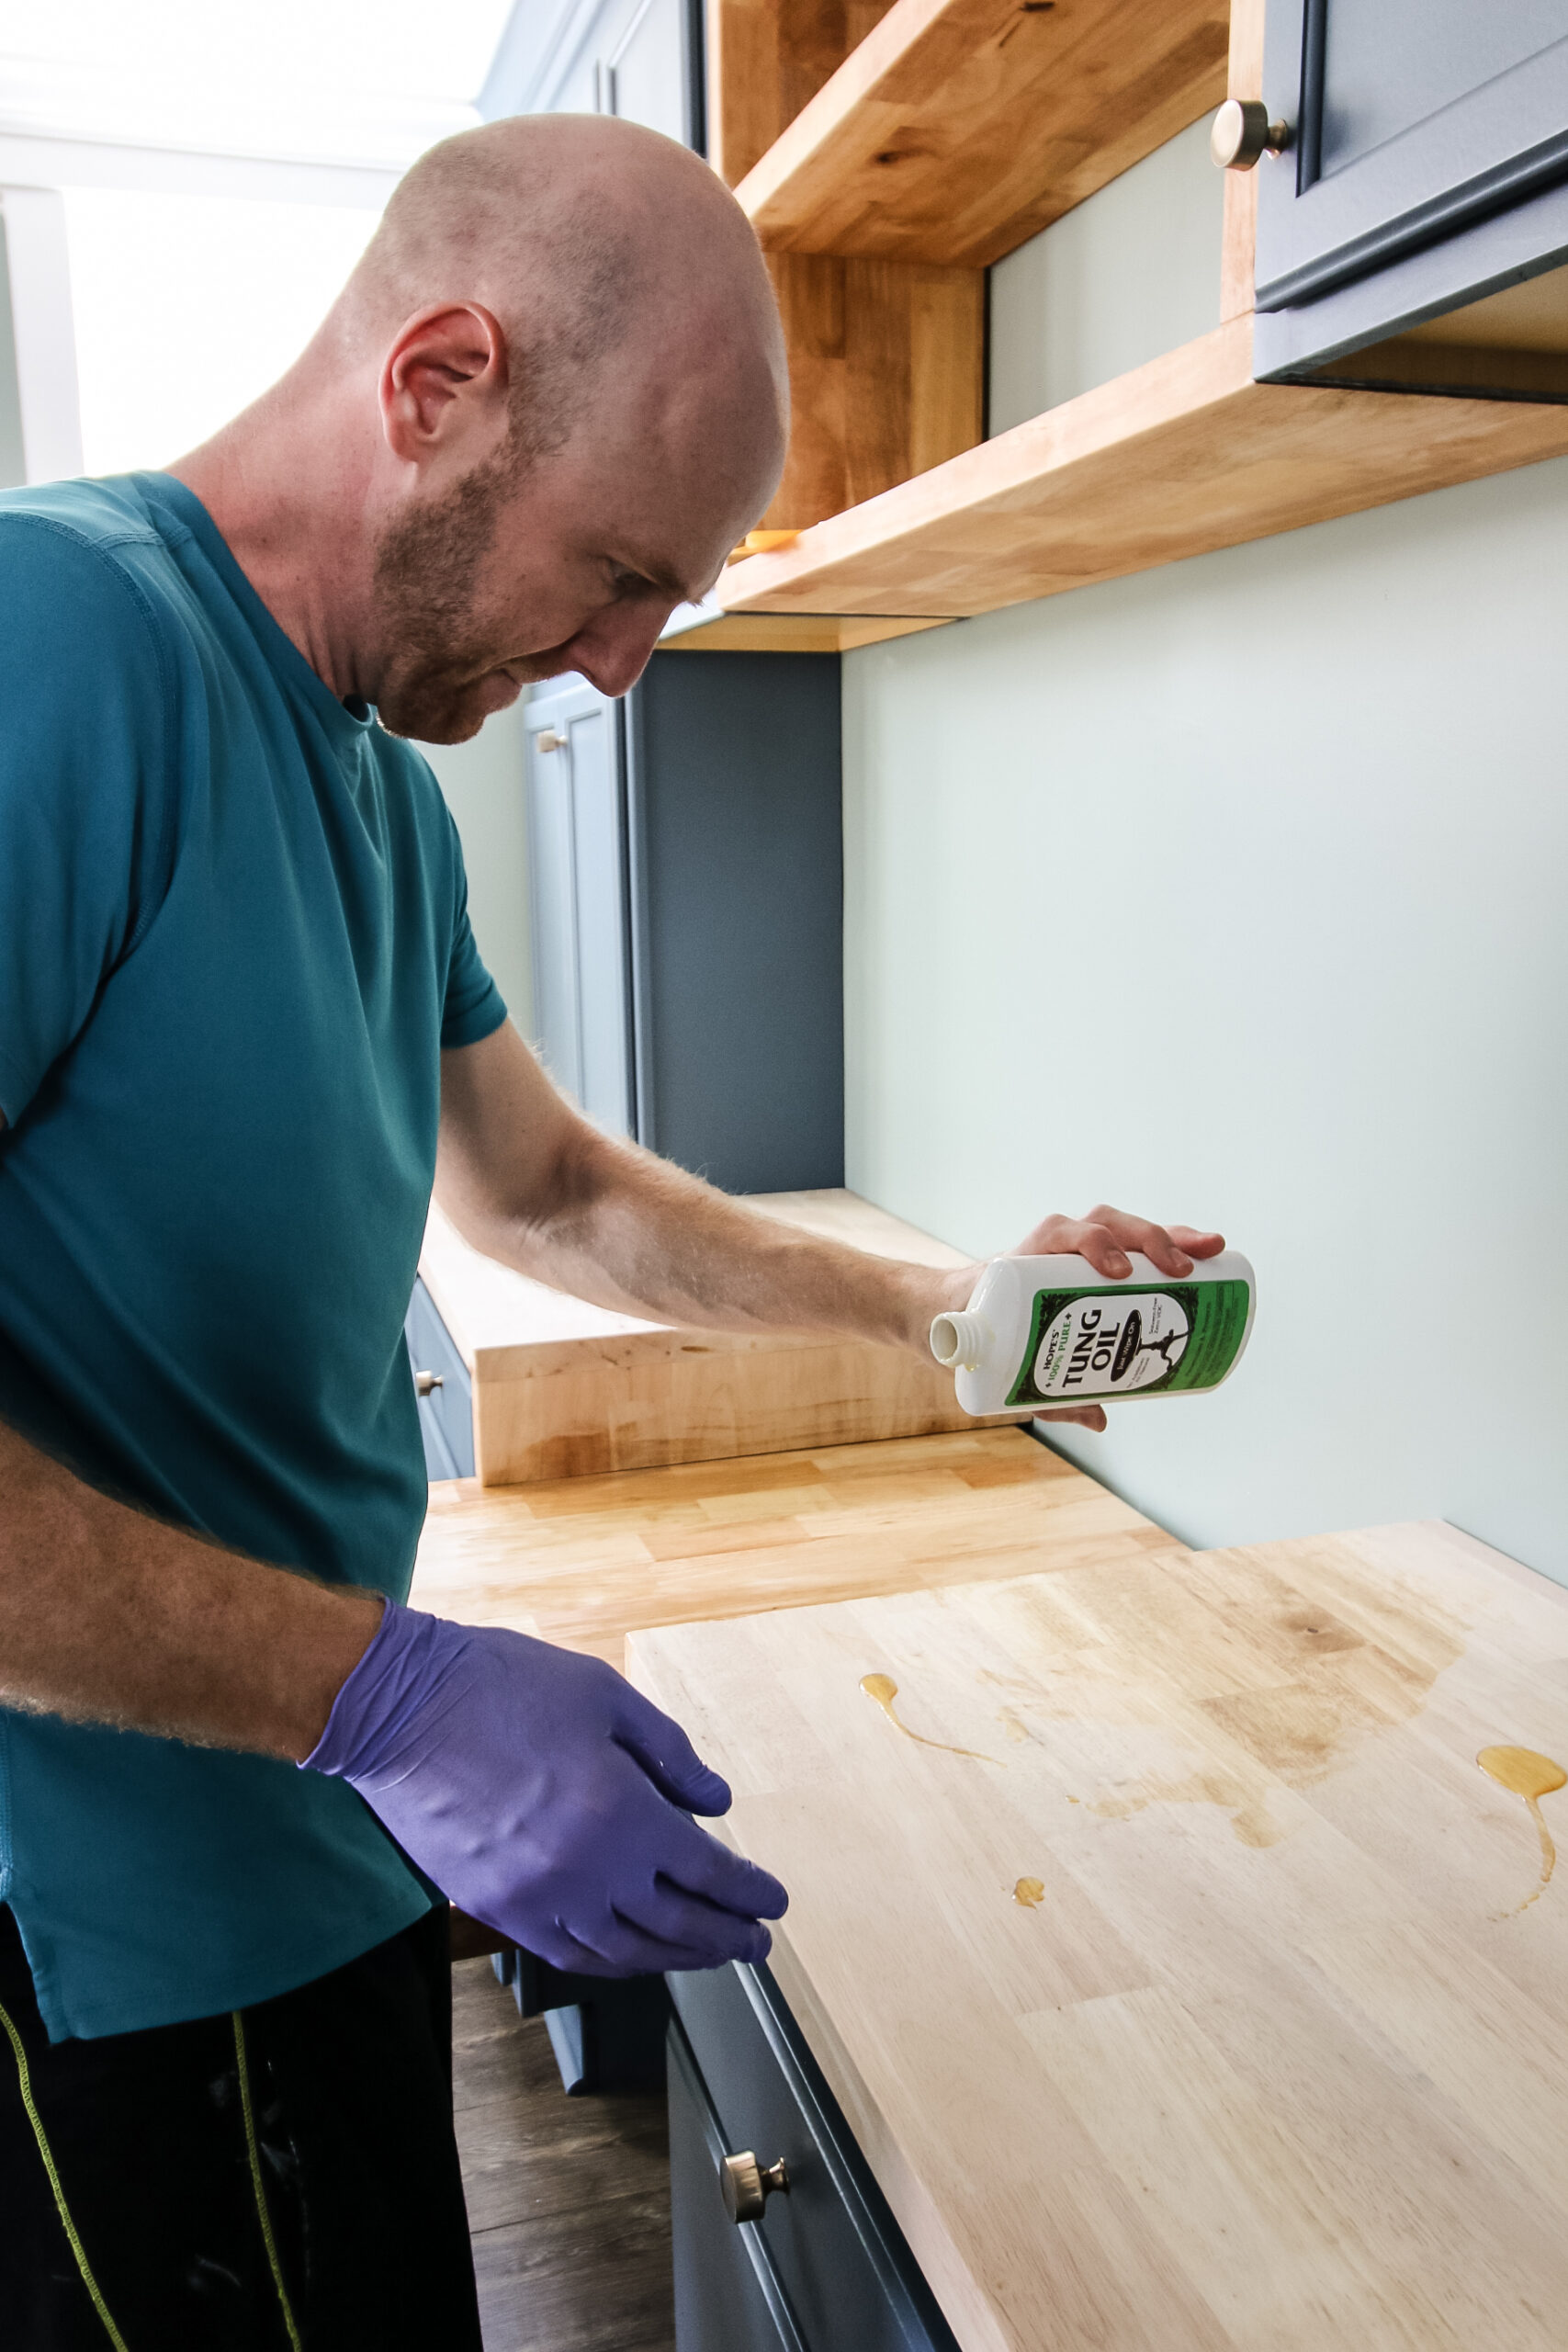
Once all the butcher block was in place, we coated the whole desk with tung oil.
Ideally, we would have done this before installing the cabinets, but also I’m glad we didn’t because over the course of the construction, they would have gotten dirty and dinged with the oil on there and it’s better they weren’t oiled.
Click here to see our test on the best natural sealant options!
Home office built-ins finishing touches
The finishing touches on the home office built-ins included the hardware installation and adding baseboards and crown molding.
Once all those parts were in place, we were able to start moving on with storage and organization.
Stay tuned for the full details on the rest of the parts of our office!
Hampton Bay cabinet recall instructions
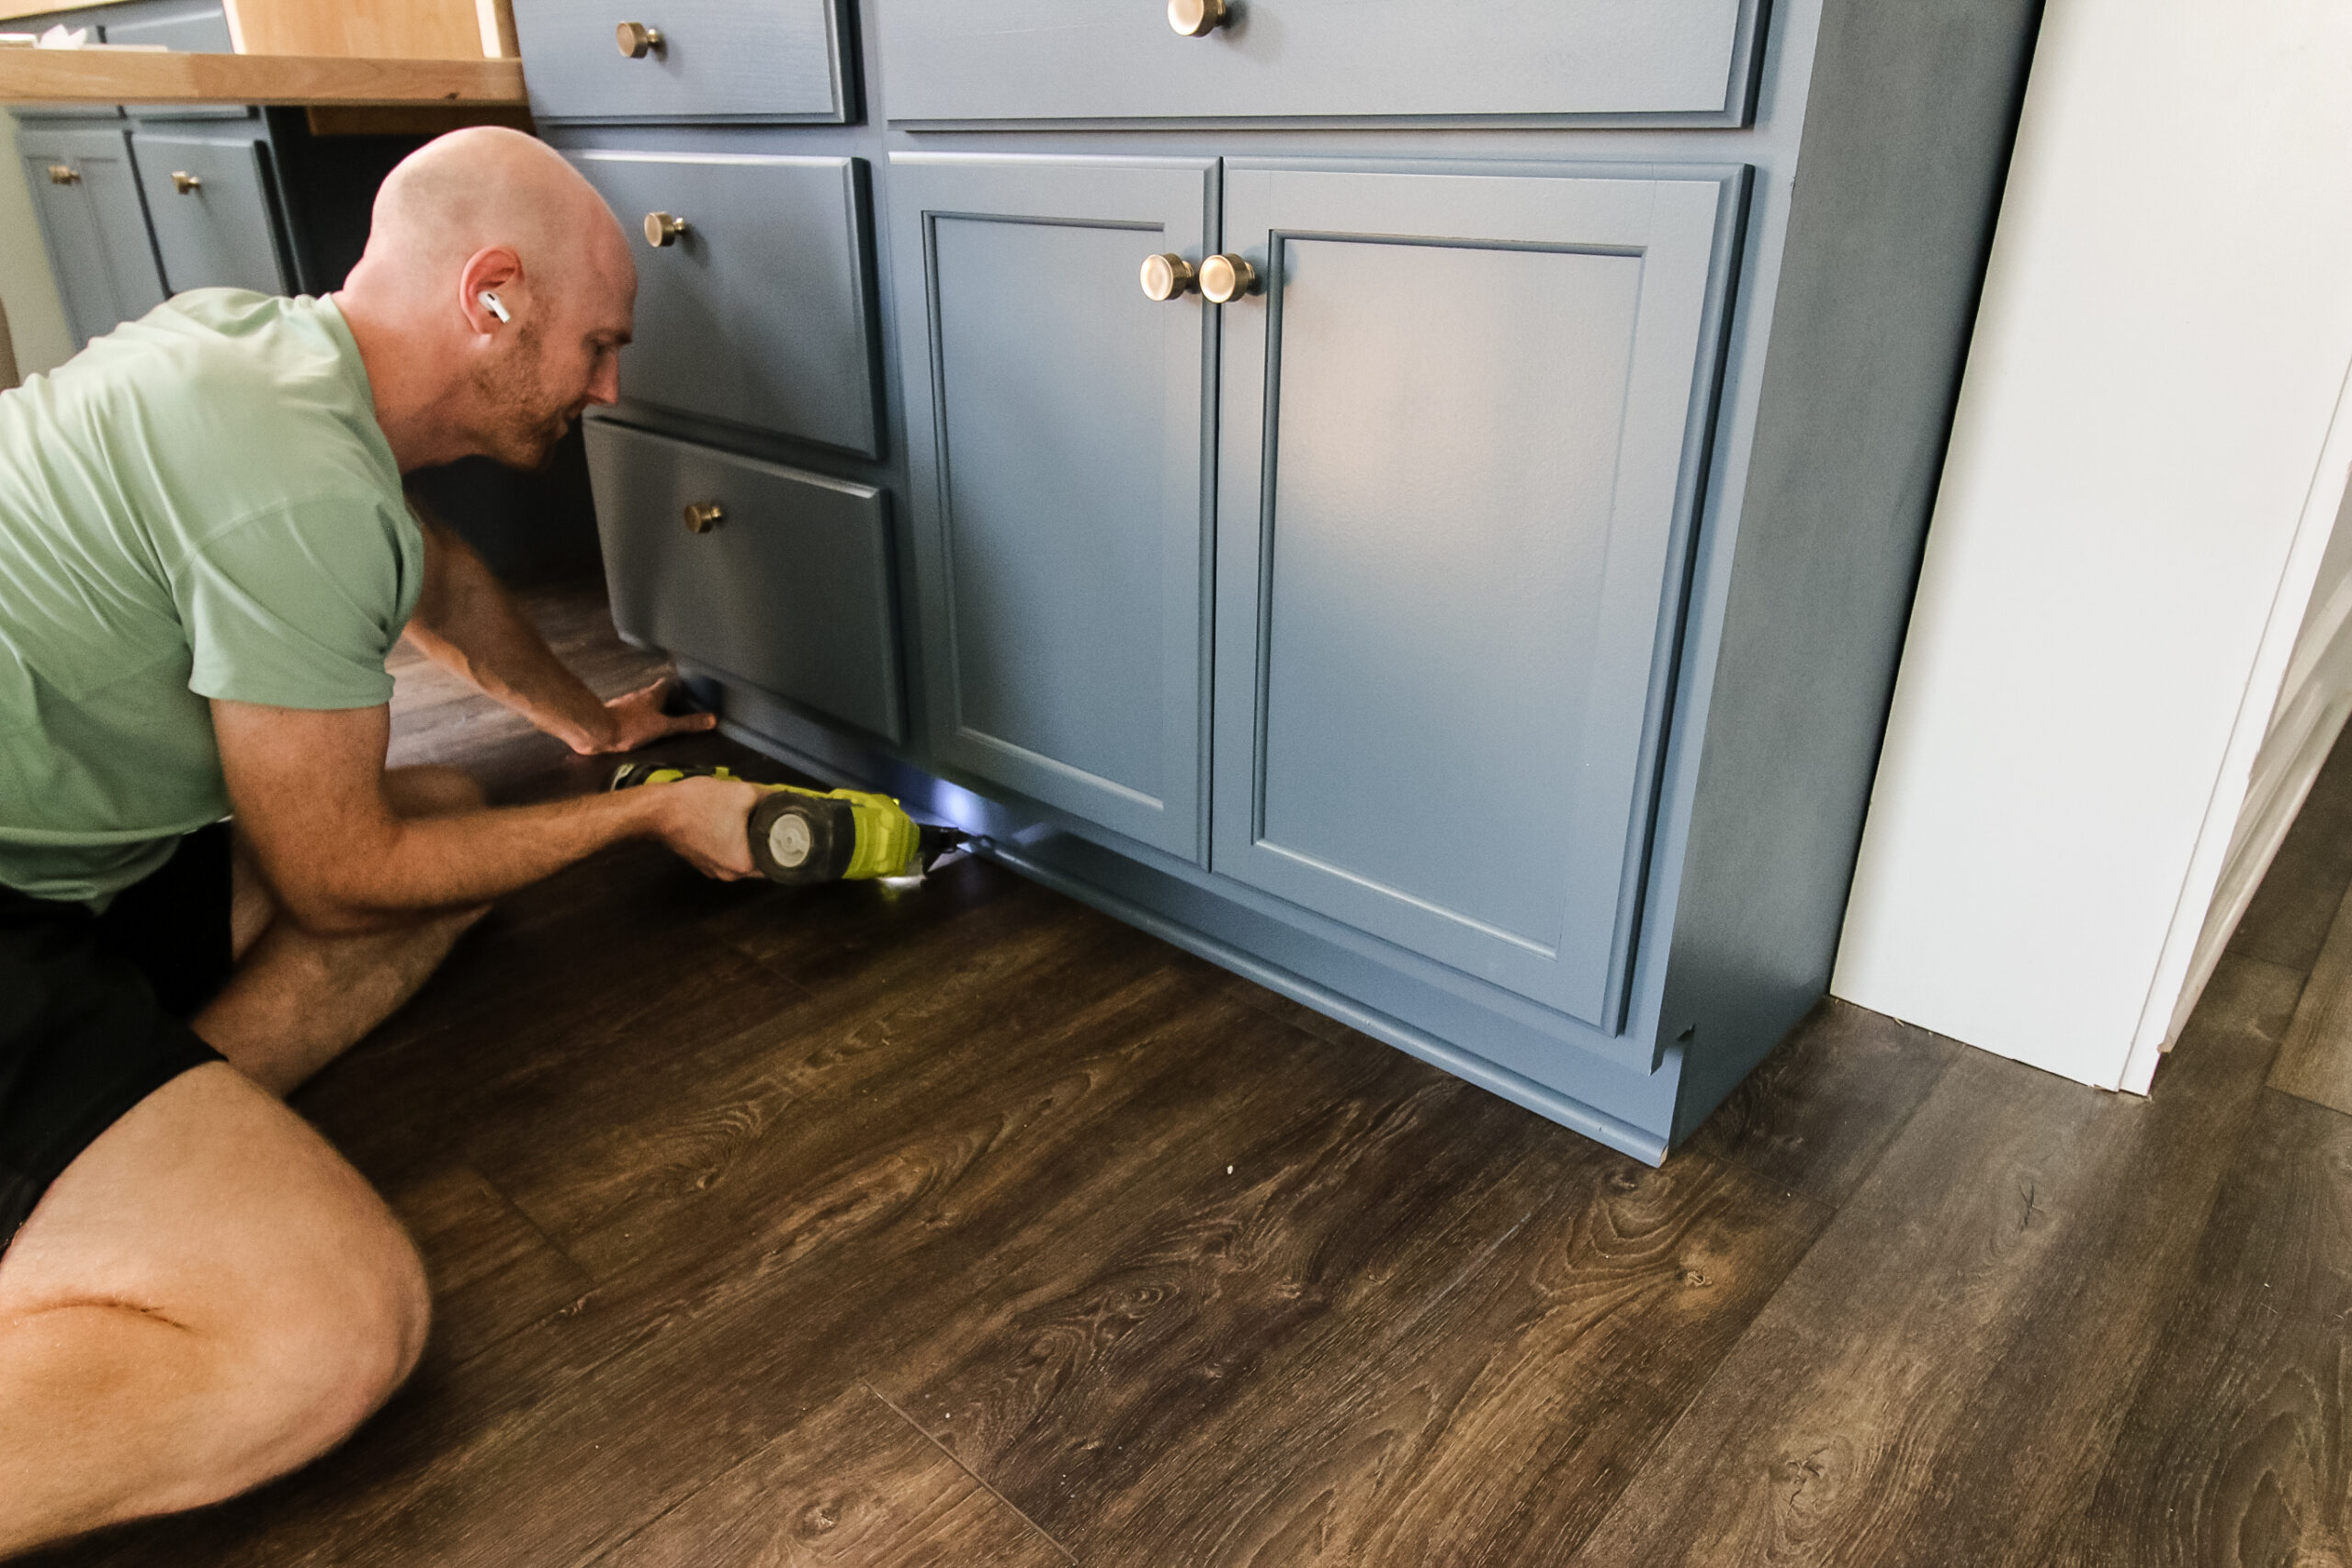
After we wrote this post, we were notified of a recall being put out by American Woodwork, the parent company of the Hampton Bay line of cabinets that we installed.
The cabinets were recalled because some were having issues where the sides were coming loose from the backs and then falling. The recall allowed for us request the fix for each cabinet we got.
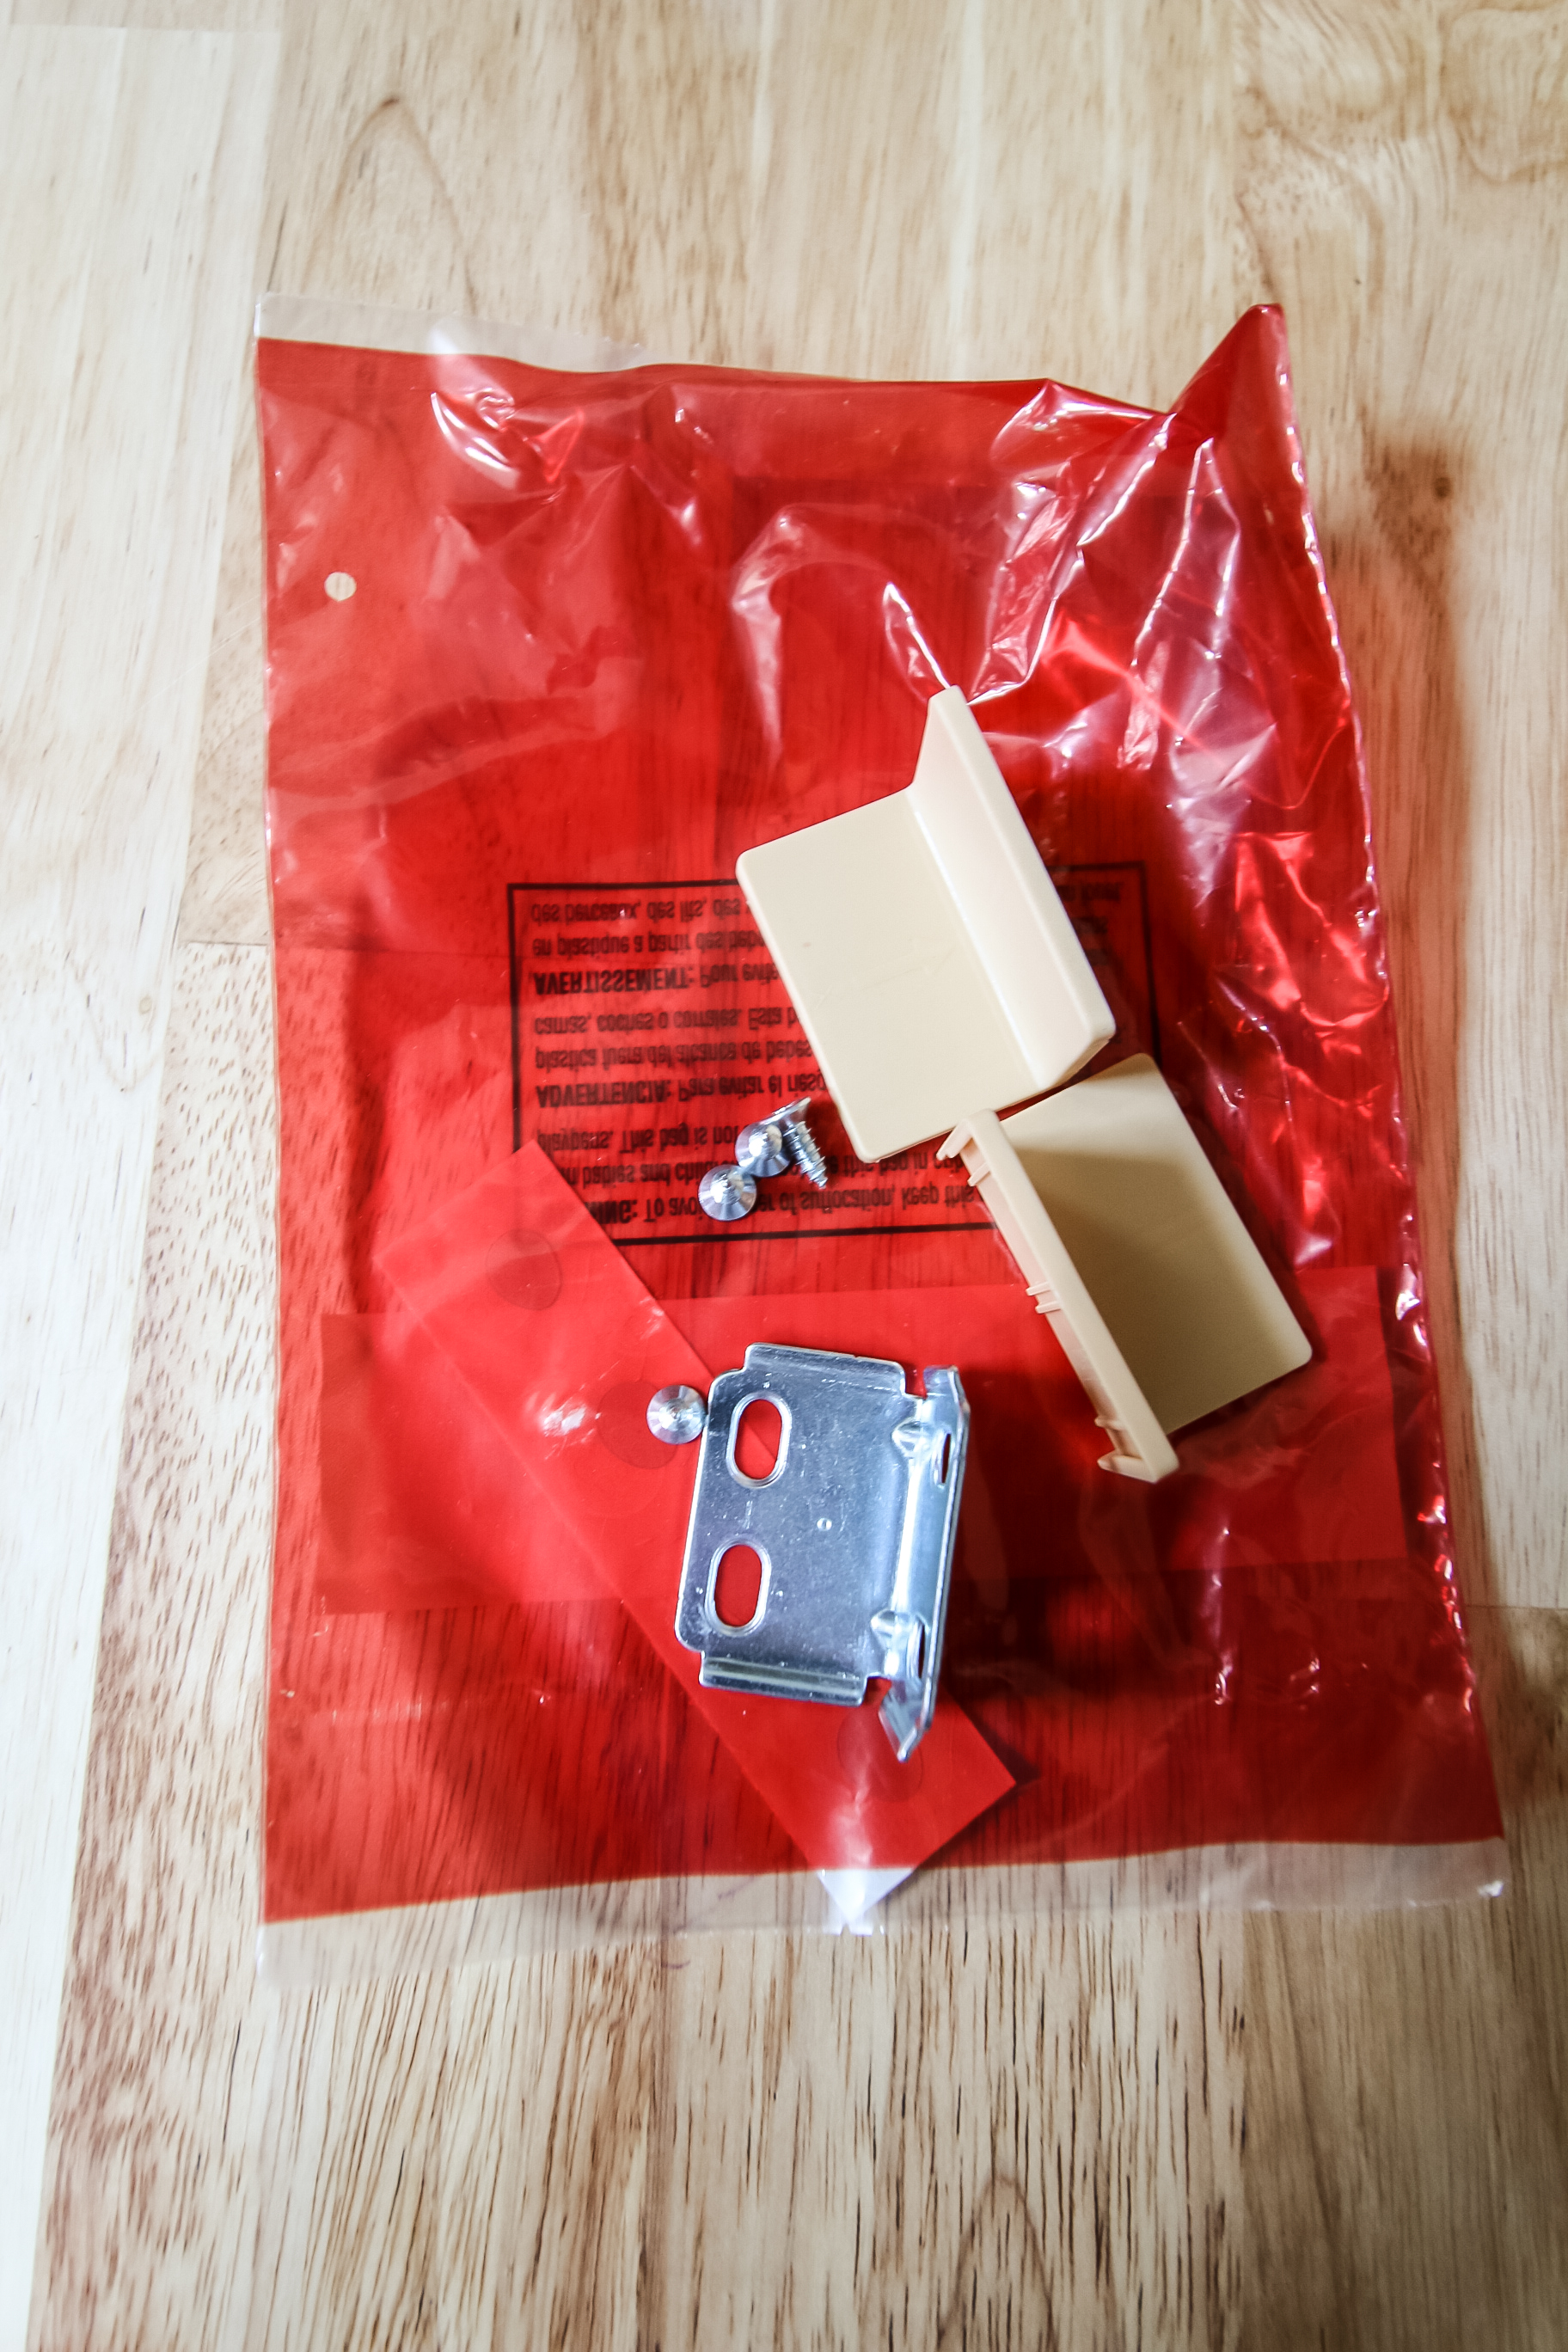
The solution they sent was two corner braces for each cabinet we got. We’ll show you how to install them here!
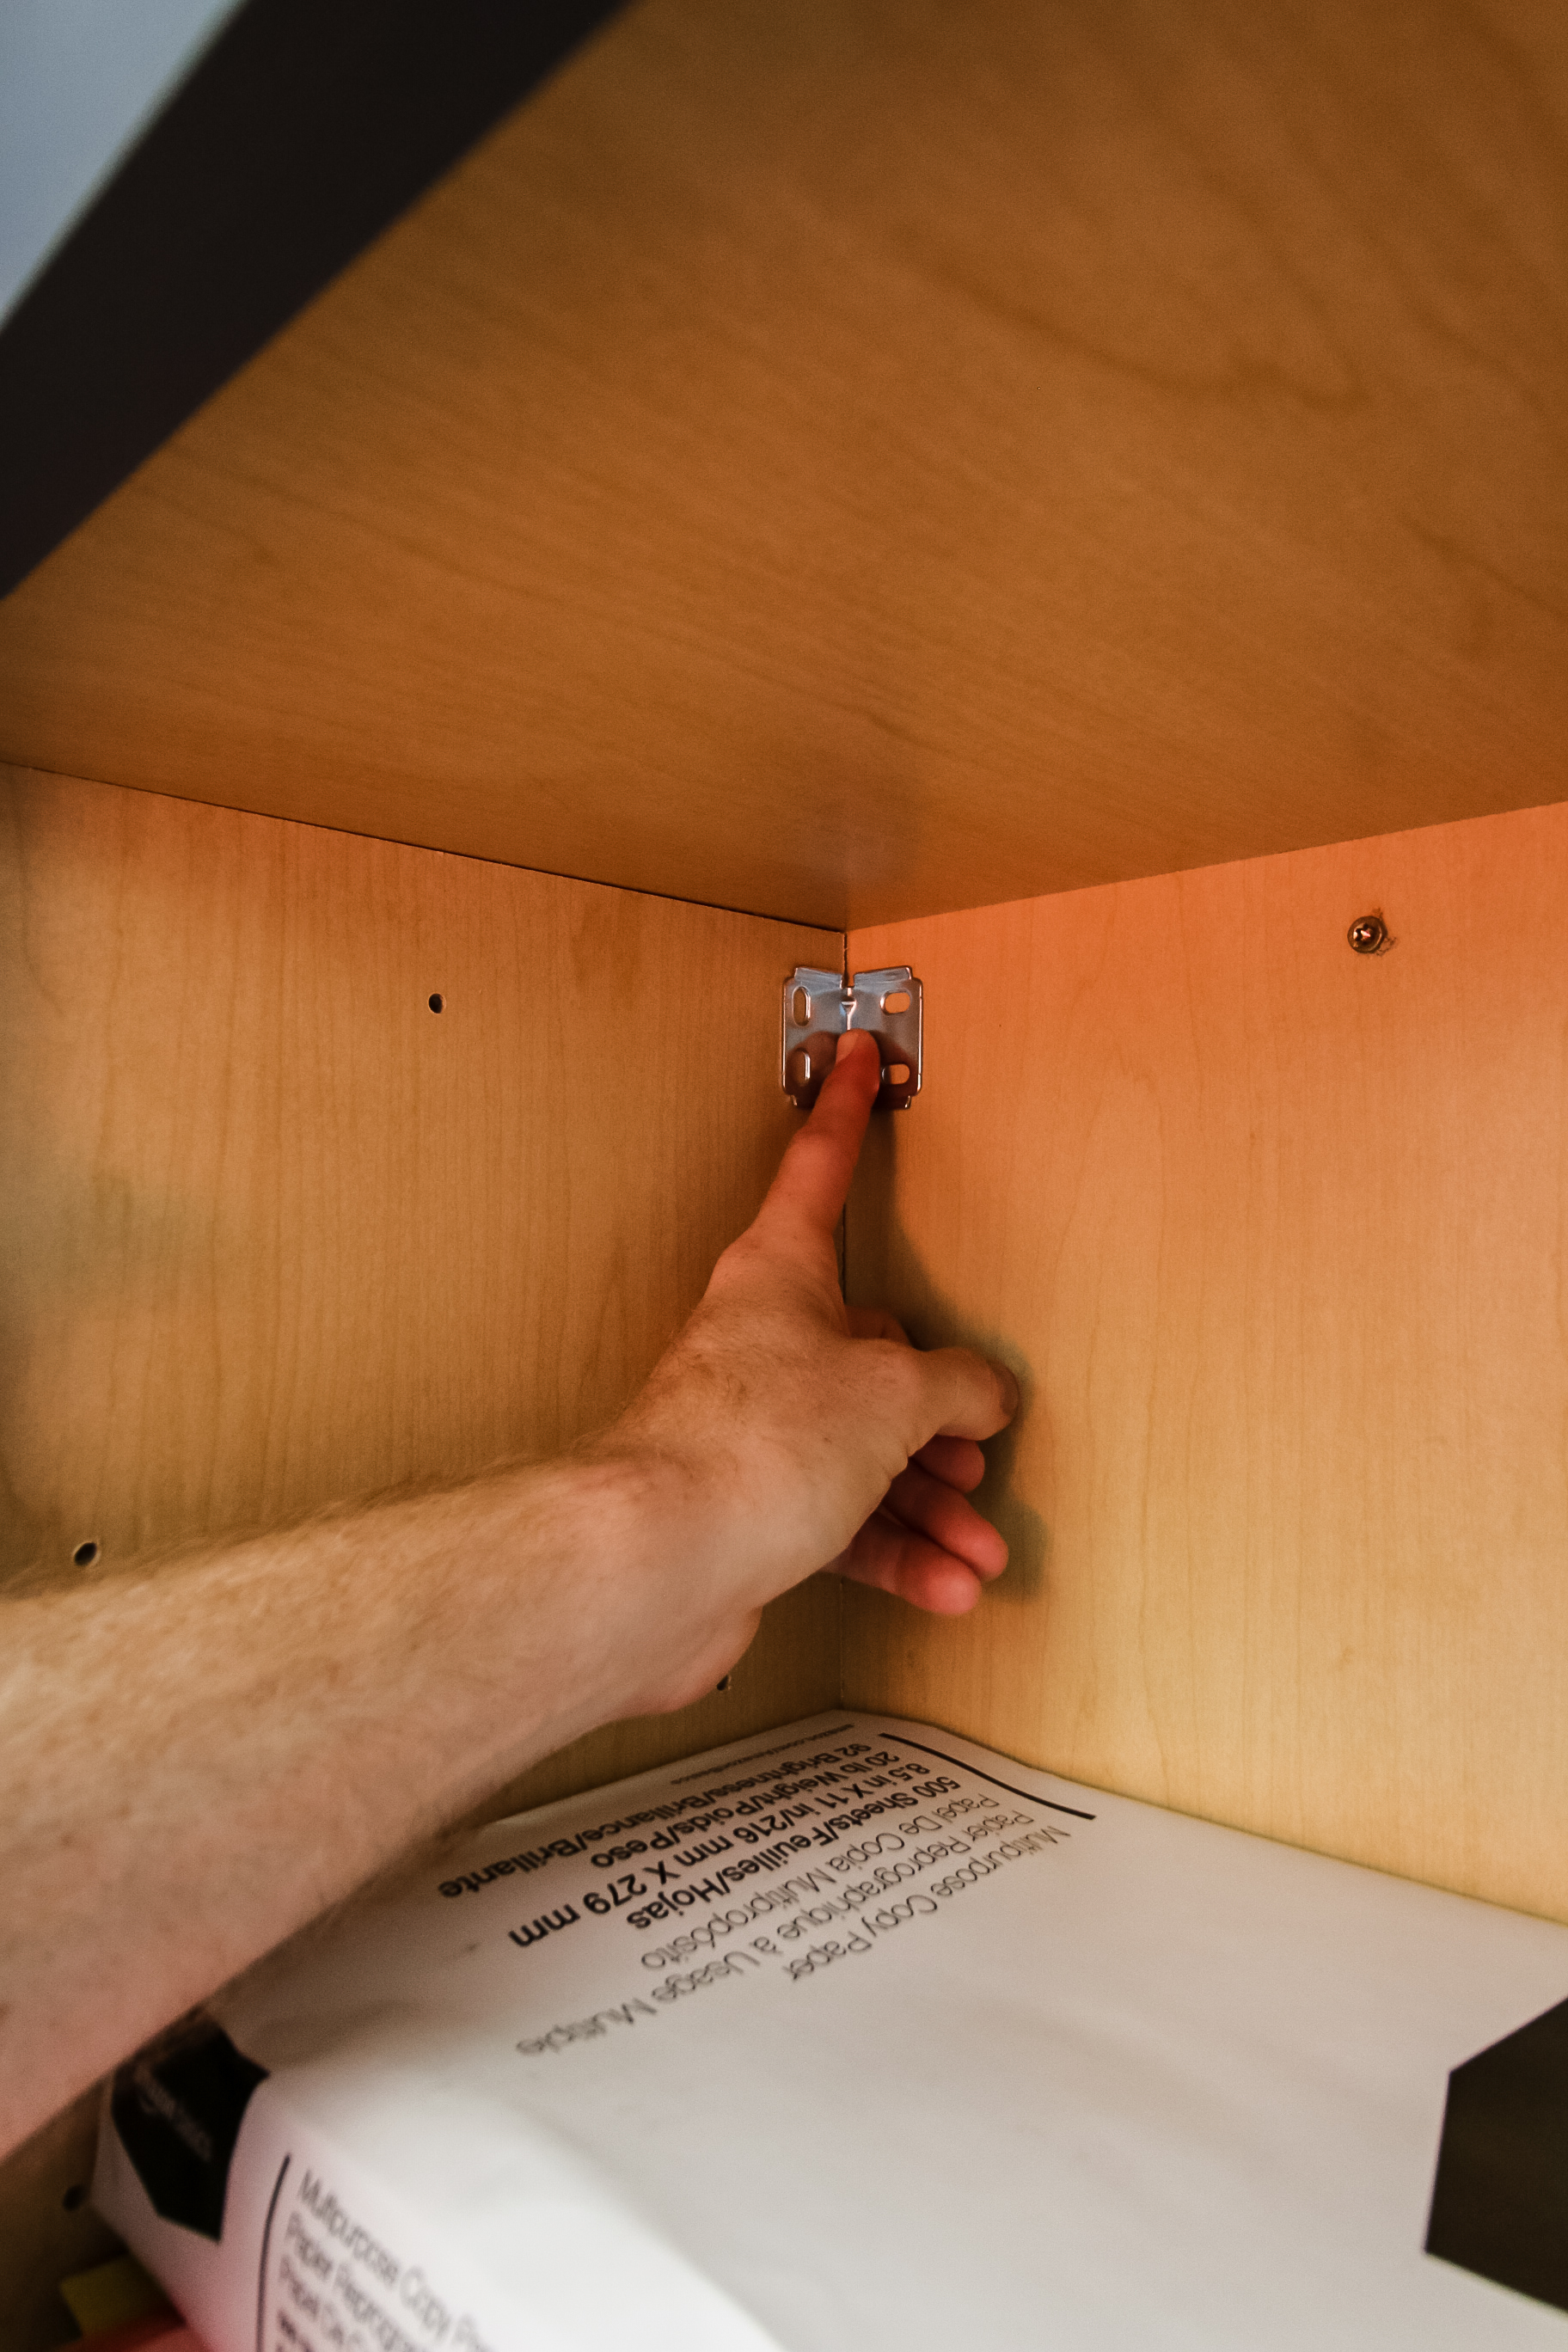
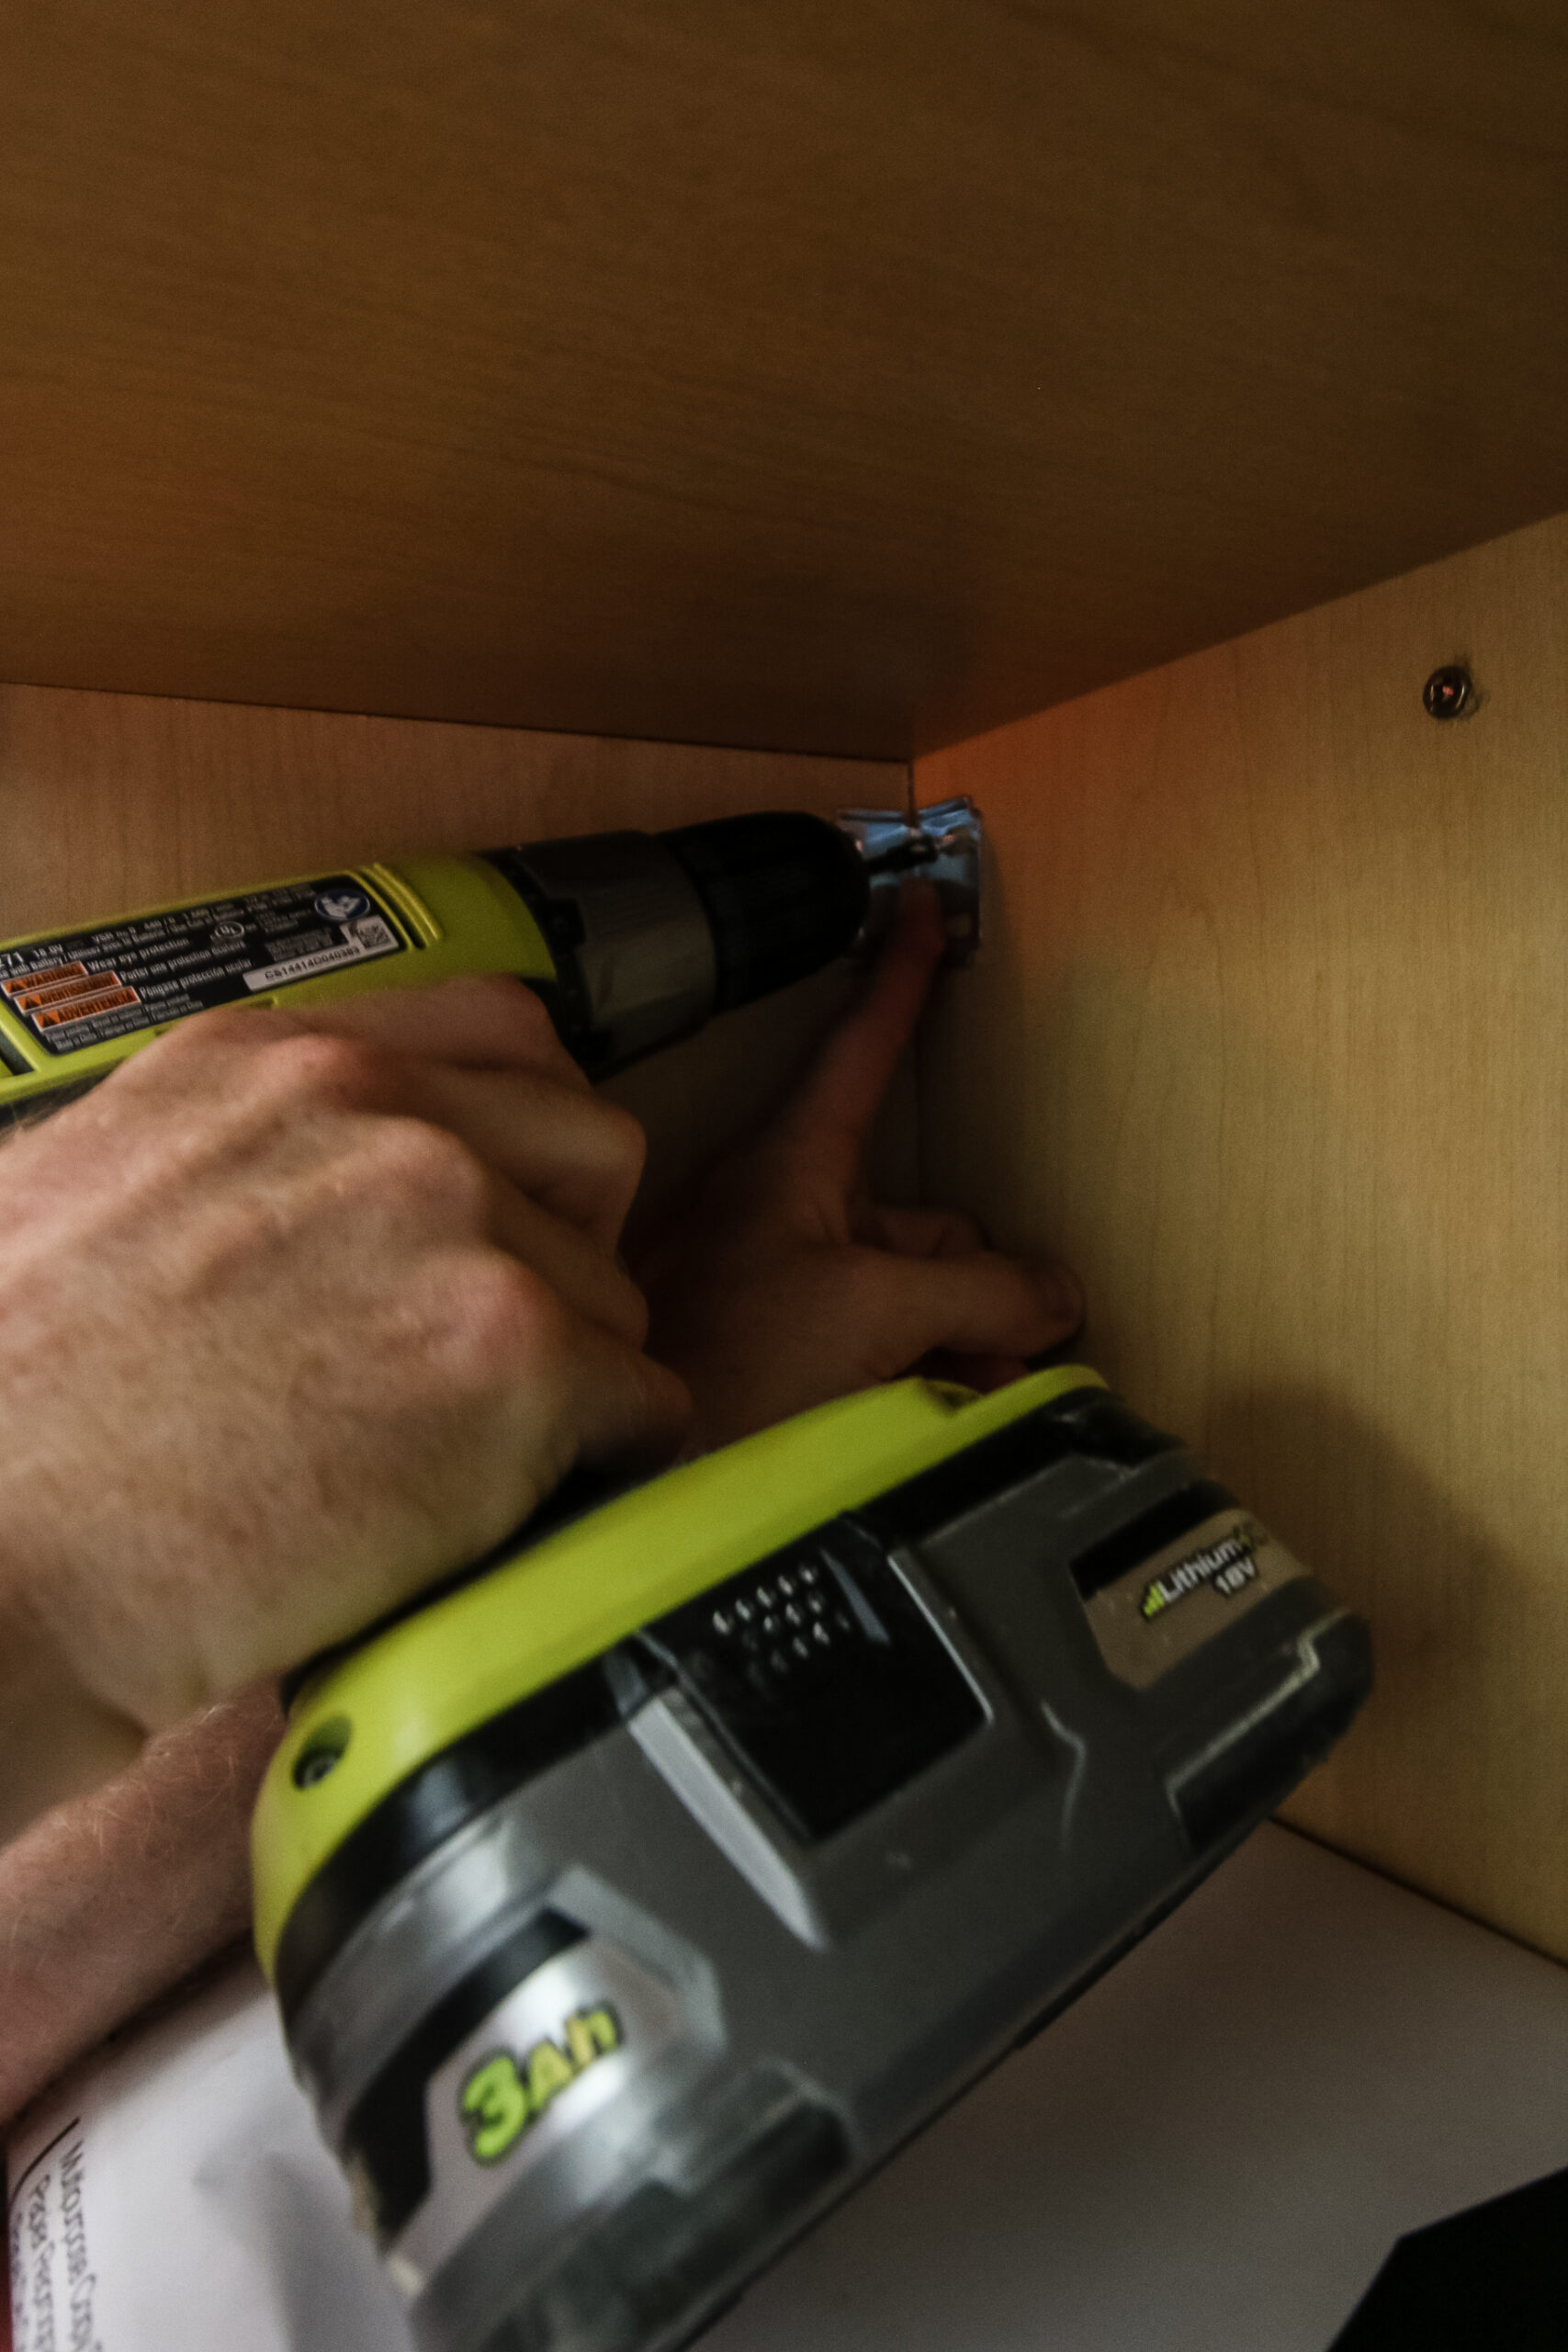
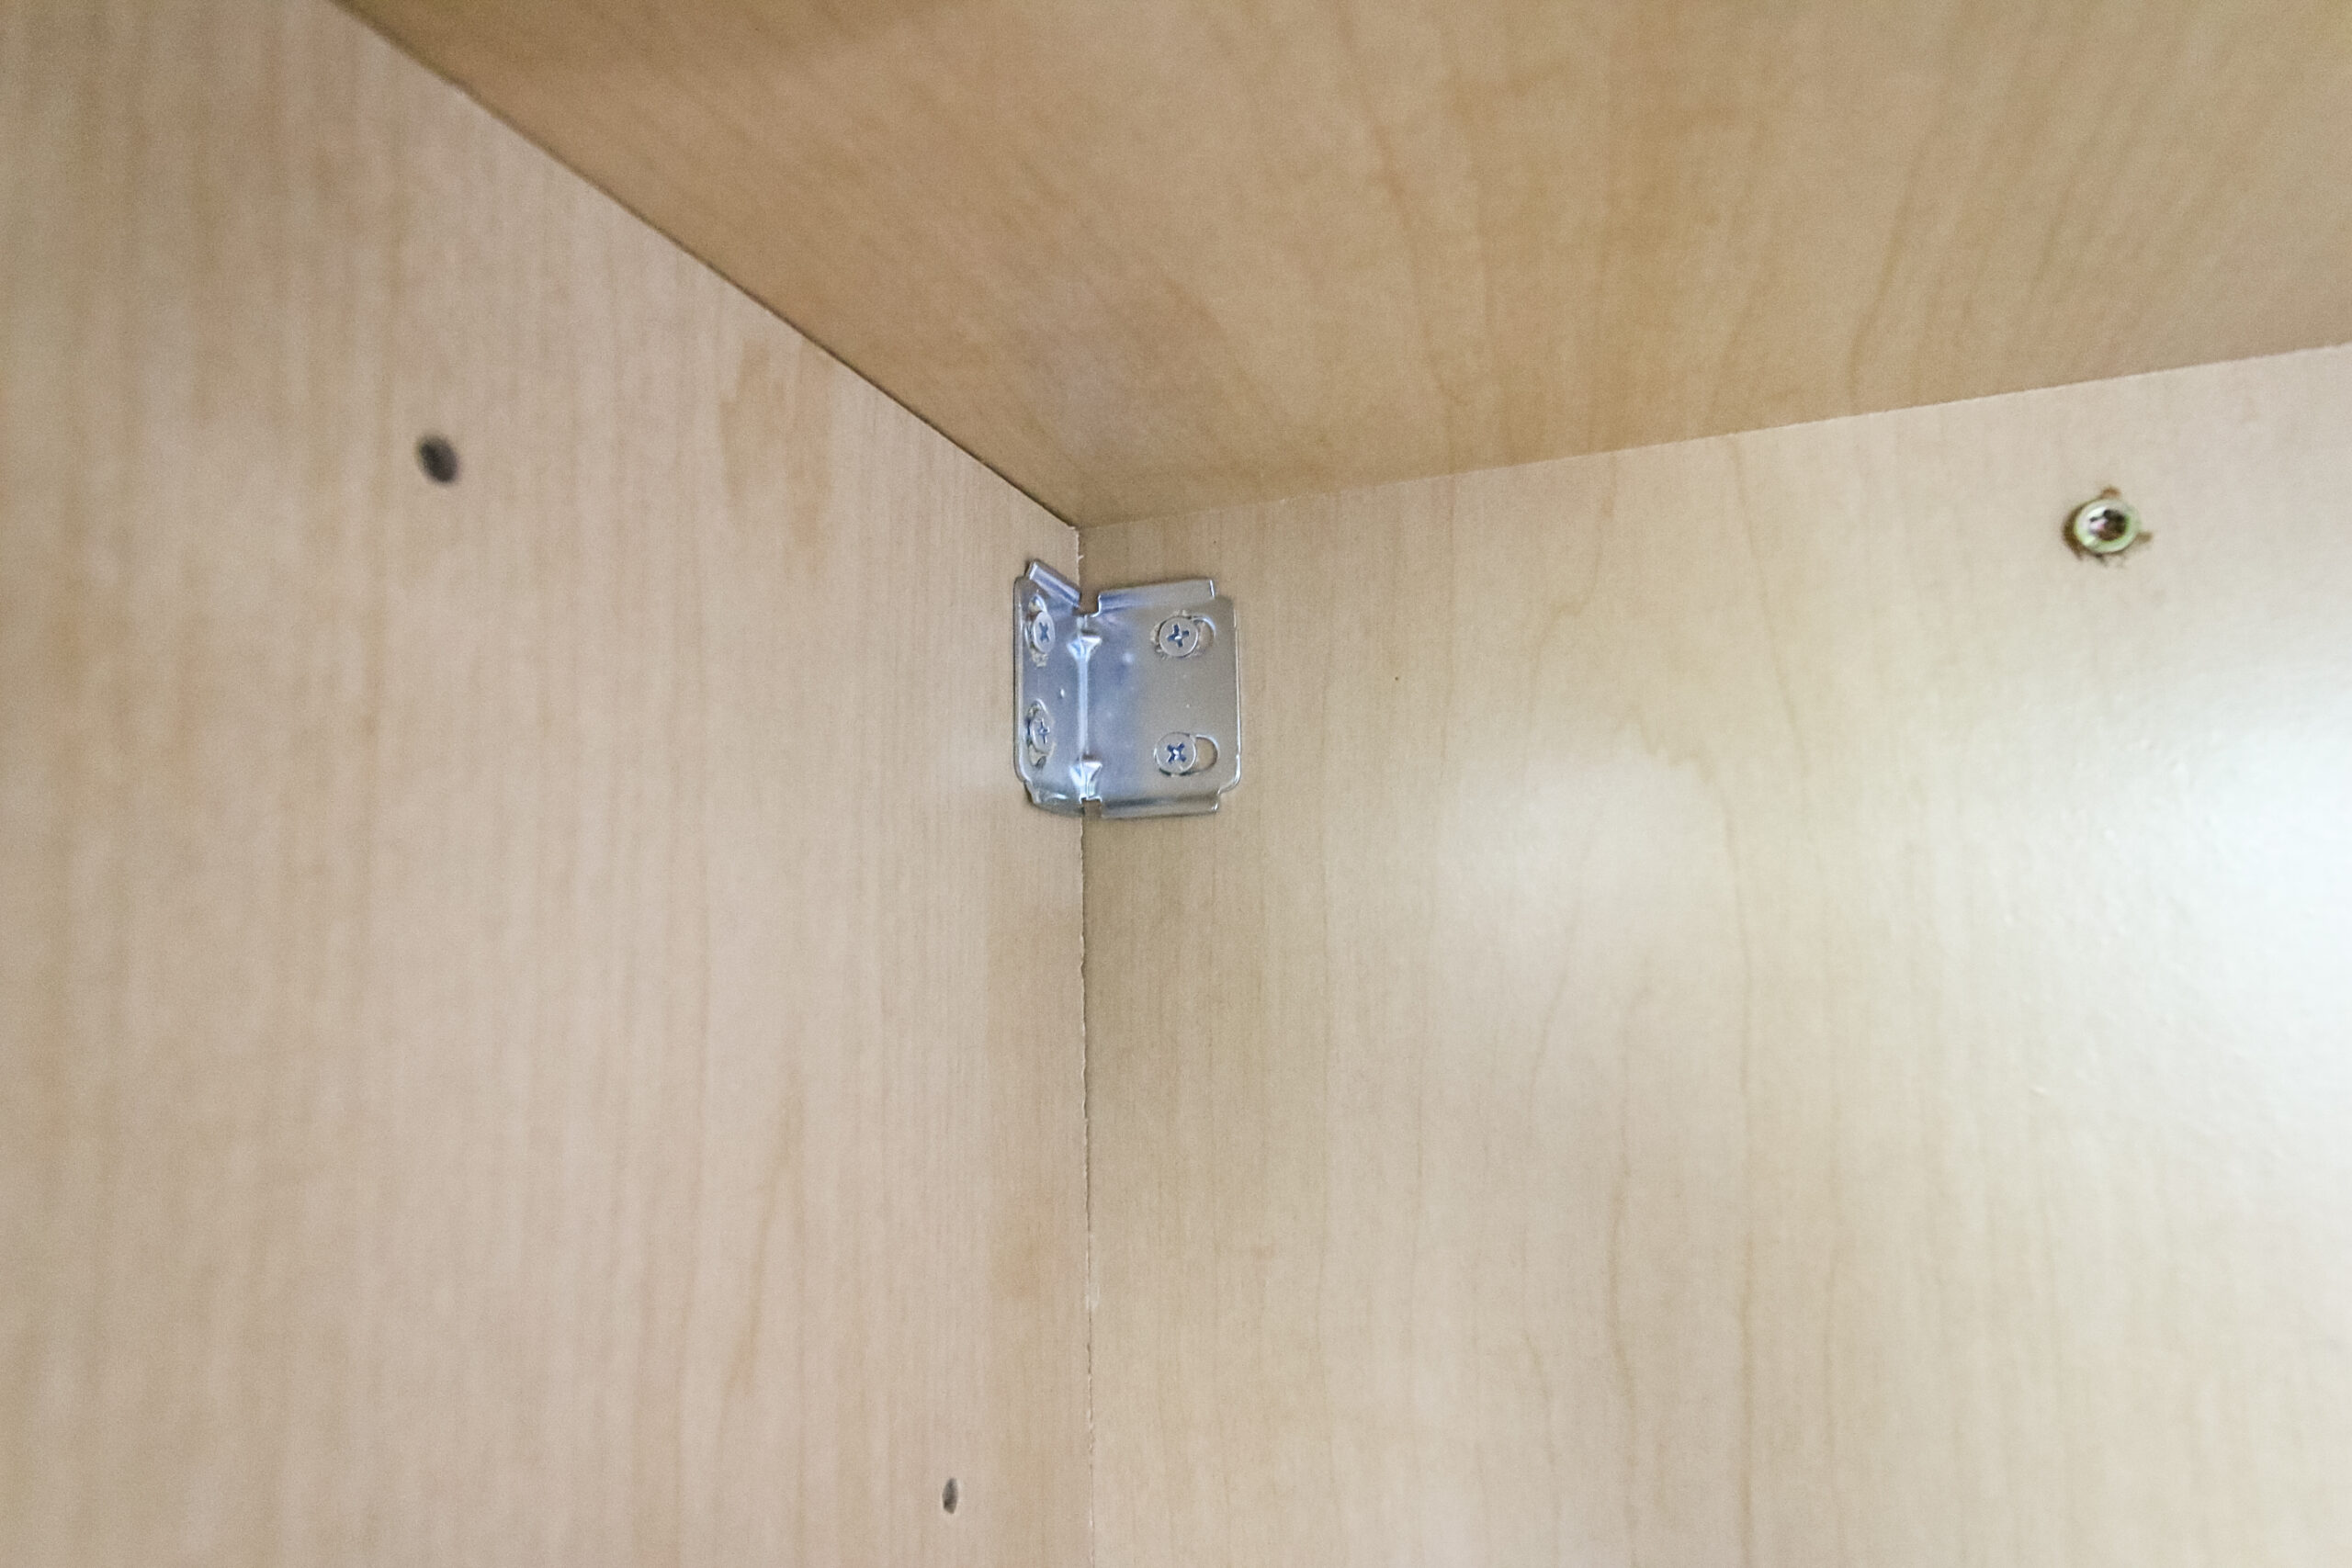
These brackets were very simple to install in the cabinet. You install them between 1/4″ and 2″ from the top of the cabinet and use the included screws to attach the brace to the back. Then you repeat to attach the corner brace to the side of the cabinet.
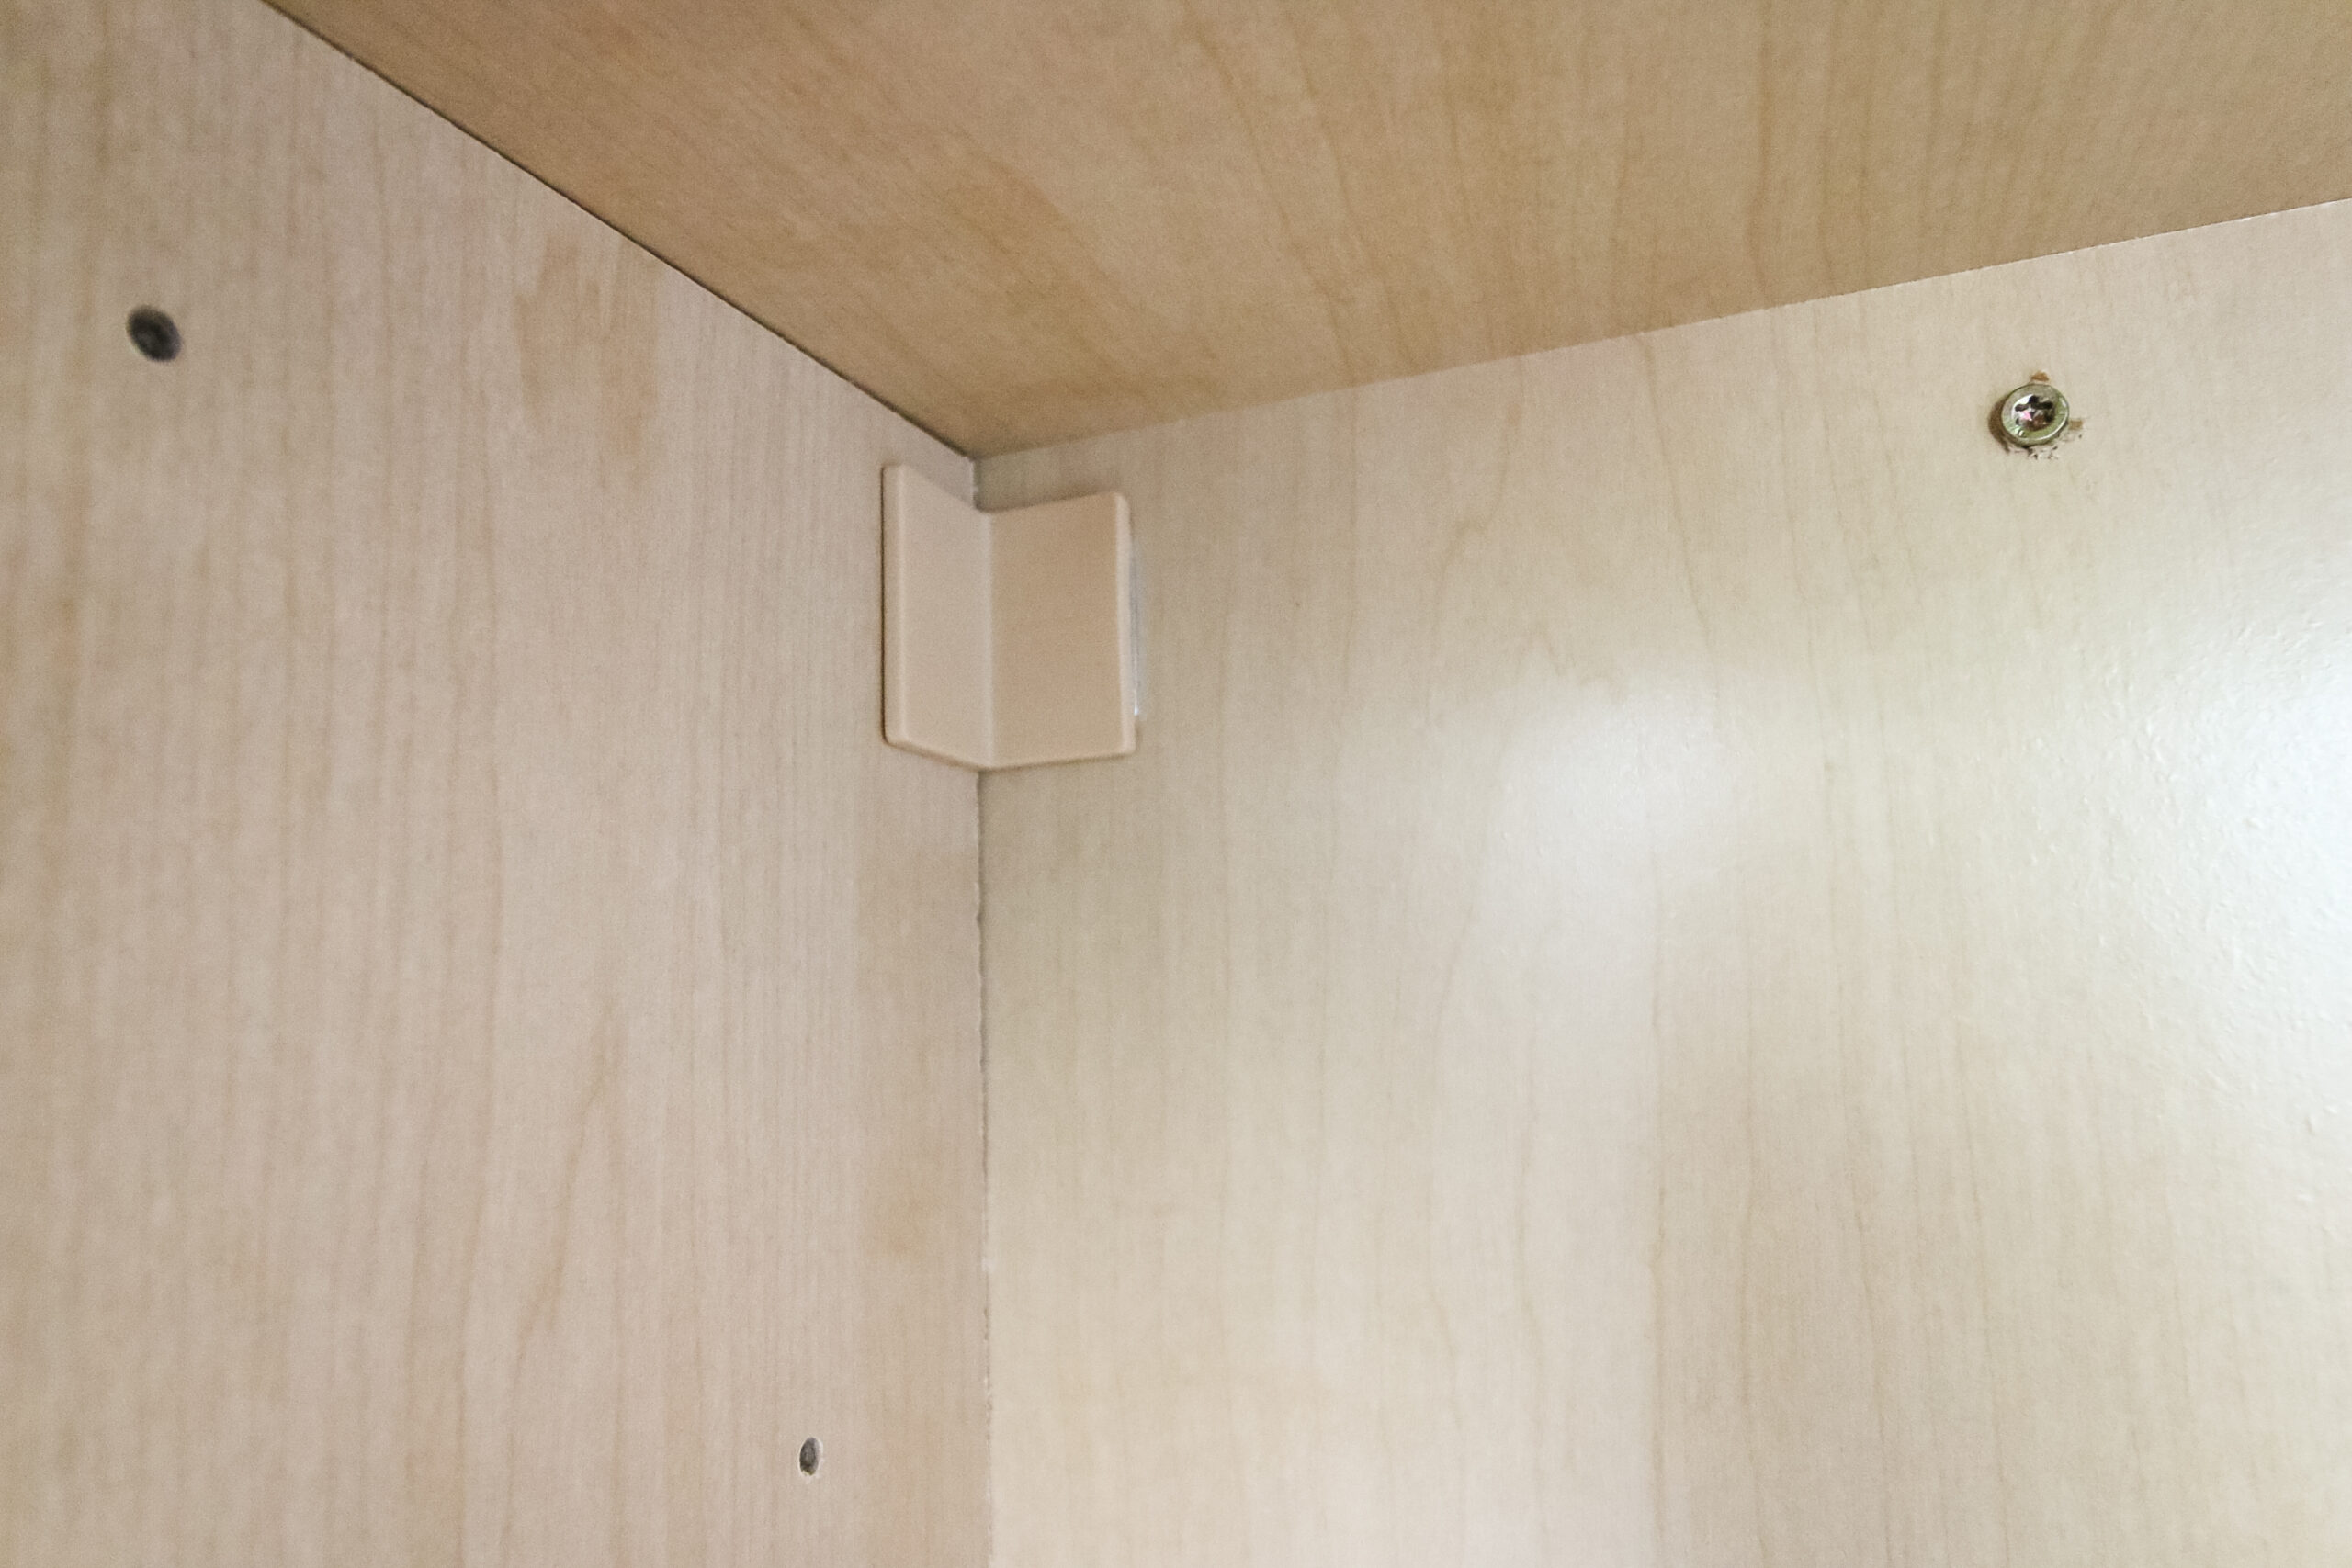
After you repeat on the other side, you can install the “decorative” cover that mostly blends in with the inside of the cabinet. Slide these on from the front and they will click in place on the back.
You should file for the safety braces even if you don’t think that your cabinets will actually be affected. It’s a quick and simple fix!


Looking for something?
We’ve been doing this since 2012 so we have a LOT of blog posts!
Search stuff like: Ceiling Projects | DIY Plant Stands | Thrift Flips


Hey there, I’m Sean, the woodworking enthusiast and builder behind CharlestonCrafted.com! Since 2012, I’ve been sharing the magic of turning raw materials into beautiful creations. I love teaching others the art and satisfaction of woodworking and DIY. I try to inspire fellow crafters to make something extraordinary out of nothing at all.