• Skip to primary navigation
  • Skip to main content
  • Skip to primary sidebar
Charleston Crafted
  • DIY
  • Woodworking
  • Popular Posts
  • Blog
  • About
  • Shop
menu icon
go to homepage
  • DIY
  • Woodworking
  • Popular Posts
  • Blog
  • About
  • Shop
search icon
Homepage link
  • DIY
  • Woodworking
  • Popular Posts
  • Blog
  • About
  • Shop
×
Home » Concrete Projects

How to add Polymeric Sand to Quikrete Walkmaker Pavers

Published: Feb 19, 2018 · Modified: Jul 4, 2020 by Sean · As an Amazon Associate, we earn from qualifying purchases. This site contains affiliate links. ·

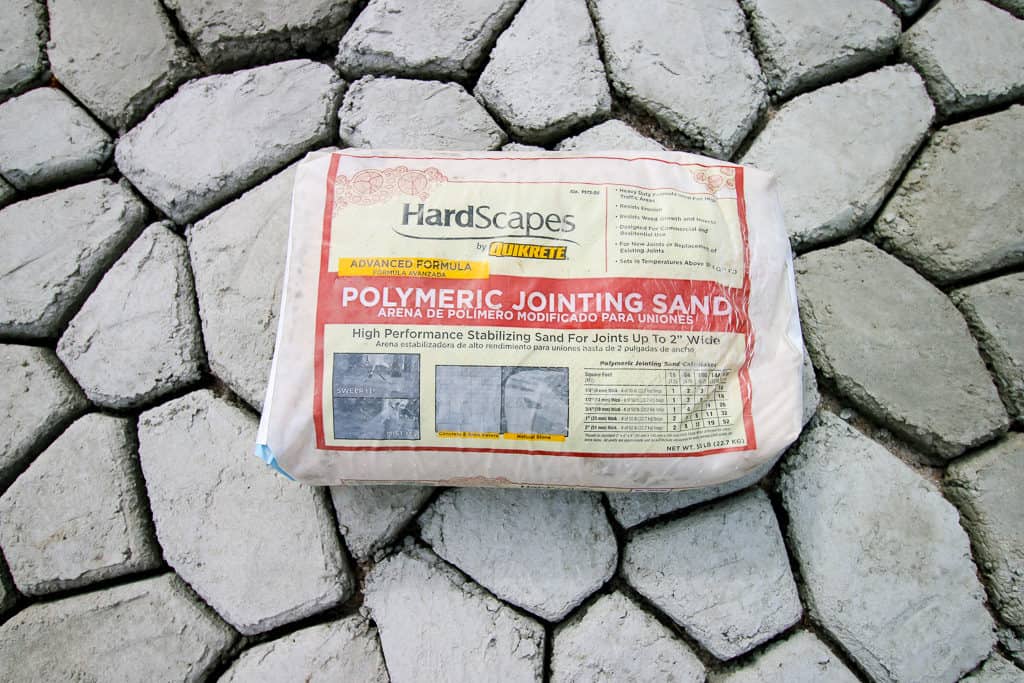
Today we are back with the final step of our DIY patio - the jointing! After doing some research, we decided to add Quikrete Polymeric Jointing Sand in between our concrete pavers to give us the best long-term results for the patio.

The benefit of the polymeric sand is that it is firm but has some give to it.

If the ground shifts over time, this can slightly shift with it and your patio won't crack.

Knowing how to add polymeric sand to quikrete walkmaker pavers is the last step in your next patio or walkway project!

Click here to download this project tutorial in a free printable PDF

How to add Polymeric Sand to Quikrete Walkmaker Pavers via Charleston Crafted

In case you missed it:

How we removed our old patio

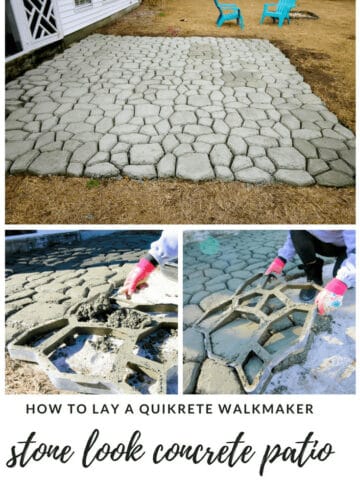
How we laid the Quikrete Walkmaker concrete patio

Don't forget to scroll down as we have a YouTube video of the whole process below!

How to add Polymeric Sand to Quikrete Walkmaker Pavers

What you need:

  • Quikrete Polymeric Jointing Sand - via your home improvement store
  • Broom
  • Clean soft paintbrush
  • Hose with spray nozzle
How to add Polymeric Sand to Quikrete Walkmaker Pavers via Charleston Crafted

What you do:

  1. Once your patio is completely cured, pour the polymeric sand onto the pavers. You want to focus the sand on the joints, but it is okay at this point for it to be on the pavers.
    Fill them as high/level as you want them to be.
  2. Use a broom to sweep the sand off of the pavers and into the joints.
  3. You might want to go back with a dry clean paintbrush to fully brush the sand off of each stone.
    Once it gets wet, it will harden in place, so take the time to get as much as possible into the joints.
  4. Spray down your patio. We used the "shower" setting on the hose and then went back on the "flood" setting and flooded over each stone.
  5. We sprayed the patio down 4 times, about an hour apart each.
  6. Let the sand fully cure. It will become firm but still have some give to it.
How to add Polymeric Sand to Quikrete Walkmaker Pavers via Charleston Crafted

We decided to make a video showing the entire process of laying the Quikrete Walkmaker patio and adding the polymeric jointing sand.

We are obsessed with our new patio and can't wait to get it furnished!

Charleston Crafted Signature

Follow us on:
Pinterest | Instagram | TikTok | YouTube | Facebook | Amazon Storefront | LTK Shop

Looking for something?

We've been doing this since 2012 so we have a LOT of blog posts!
Search stuff like: Ceiling Projects | DIY Plant Stands | Thrift Flips

Charleston Crafted logo banner
Sean headshot cropped
Sean

Hey there, I'm Sean, the woodworking enthusiast and builder behind CharlestonCrafted.com! Since 2012, I've been sharing the magic of turning raw materials into beautiful creations. I love teaching others the art and satisfaction of woodworking and DIY. I try to inspire fellow crafters to make something extraordinary out of nothing at all.

More Concrete Projects

  • How to make a QUIKRETE WalkMaker stone look concrete patio via Charleston Crafted
    How to make a QUIKRETE WalkMaker patio
  • How to Make DIY Concrete Pumpkins via Charleston Crafted
    How to Make DIY Concrete Pumpkins

Reader Interactions

Comments

  1. Lorian Bartle says

    April 07, 2018 at 1:55 pm

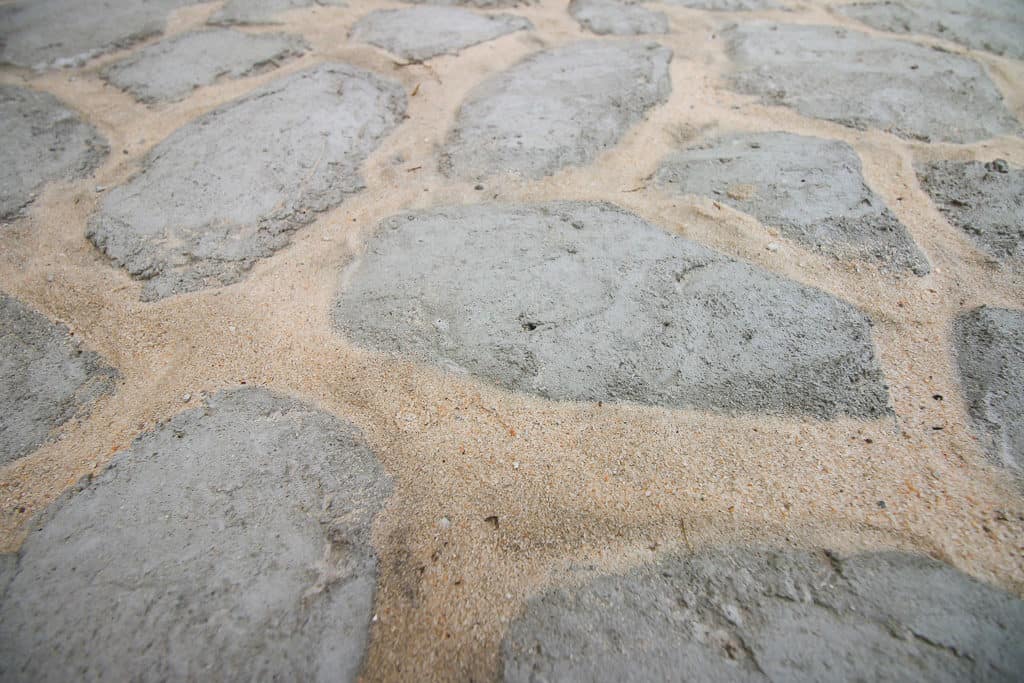
    Looks good and I appreciate the close-up photos of the result. It looks like approximately 1" spacing between the paves, is that accurate?

    Lorian Bartle

    • Morgan says

      April 07, 2018 at 1:58 pm

      it varies depending on the spot, but that would be about the max!

  2. Amy says

    July 24, 2018 at 11:43 am

    How many bags of sand did you need for this space?

    • Sean says

      July 25, 2018 at 8:59 am

      Hey Amy, we used about six bags of sand for this area. Thanks for stopping by!

  3. Carlos says

    August 06, 2018 at 8:37 pm

    Hi. I wonder how is it looking after almost 6 months? Have the stones moved?

    • Morgan says

      August 07, 2018 at 1:08 pm

      No, they definitely have not moved! It looks fantastic!

  4. Barb Myers says

    April 28, 2019 at 12:08 pm

    So 6x7 rows of molds = 42 molds or 12x14 area. How much concrete? I am hoping to do 18 x 18 area plus fire pit surround.

    • Sean says

      April 28, 2019 at 2:18 pm

      Hey Barb. You only need two molds really. 42 moldings, but only using 2 actual molds at a time. We found that we needed two bags of concrete for every three molds. So if you're hoping to do an 18x18 area, that would be 9x9 rows of molds, so you would probably need around 54 bags for that.

  5. CarmenMero says

    May 06, 2019 at 9:46 am

    Where did you purchase the sand? I could not find it on Home Depot or Lowe’s websites.
    Love the project. Im considering doing this for a portion of my milk cow barn. Do you think the stones will shift under cow traffic?

    • Sean says

      May 06, 2019 at 10:01 am

      Hi! We purchased at Lowe's. You're right, I'm not sure why it isn't online at either store. I'm heading to Lowe's this afternoon and will take a look. It was definitely there last year in stores!

  6. Bev says

    June 17, 2019 at 12:23 pm

    Thanks for passing along the grout cement Info. How do you tint the mold since I prefer a more natural color than gray cement color.

    • Sean says

      June 18, 2019 at 9:02 am

      Hi Bev! I have never died concrete myself. But, Quikrete makes a dye you can add to the mix as you are mixing it up. I would try that!

  7. Ian says

    July 06, 2019 at 12:21 pm

    How much polymeric sand did you end up using? We have a
    14' x 20' patio we are doing right now with the same country stone walkmaker forms and are unsure how much of the sand we'll need because the gaps are so wide. Thanks.

    • Morgan says

      July 07, 2019 at 10:17 am

      We used 6 bags of polymeric sand for a 14x14' patio. I would over buy and return so you can not run out halfway thru!

Primary Sidebar

Charleston Crafted about us image

Hey y'all!

We are Morgan & Sean McBride and we are crafting our home together in Charleston, South Carolina.

More about us

Popular Posts

  • DIY Coffered Ceiling
    DIY Coffered Ceiling

  • How to Make a Cupid's Arrow Valentine's Day Wall Hanging with felt on the Cricut
    How to make a Cupid's Arrow Valentine's Day Wall Hanging

  • Our Tropical Oasis - A backyard Hammock area - Charleston Crafted
    Our Tropical Oasis

  • DIY Cat Play Gym via Charleston Crafted
    DIY Cat Play Gym

Recent Posts

  • How to create a whole house color scheme
    How to create a whole house color scheme

  • DIY modern rolling storage table - Charleston Crafted
    DIY modern rolling storage table

  • how to organize a pantry with zones
    How to Organize Your Pantry in Zones (And Why It’s a Game Changer)

  • Keep outdoor rug from blowing up - Charleston Crafted
    How to keep your outdoor rug in place

Privacy Policy

Footer

↑ back to top

Navigation

  • Home
  • Blog
  • Contact Us
  • Terms of Use
  • Disclaimer

Newsletter

  • Sign up for emails and updates
  • Follow us on Instagram
  • Work with Us

Browse by Category

  • Woodworking
  • Home Projects
  • Paint Colors
  • Room Reveals

© 2025 The Charleston Crafted Blog LLC DBA “Charleston Crafted” and “CharlestonCrafted” (also known as N/A) / All Rights Reserved.
Official Website: (Charleston Crafted)
Registered in USA (Co. Reg. No.: 565586)
Address: Charleston, USA 29414, South Carolina
Contact Phone: Not applicable — contact is via email: sean@charlestoncrafted.com

DISCLAIMER: The content on this website is provided for general informational purposes only and is not intended as professional advice. The Charleston Crafted Blog LLC and The Charleston Crafted Blog LLC make no representations or warranties—express or implied—regarding the accuracy, completeness, or suitability of the information contained herein. Any reliance you place on this information is strictly at your own risk. In no event shall The Charleston Crafted Blog LLC or The Charleston Crafted Blog LLC be liable for any loss or damage, including without limitation, indirect or consequential loss or damage, arising from the use or inability to use this website. This website is the official website of The Charleston Crafted Blog LLC.

AFFILIATE DISCLOSURE: This website contains affiliate links. If you click through and make a purchase, we may earn a commission at no extra cost to you.

As an Amazon Associate, I earn from qualifying purchases.

Site Editor: Morgan Smith McBride

Copyright © 2025 Charleston Crafted