• Skip to primary navigation
  • Skip to main content
  • Skip to primary sidebar
Charleston Crafted
  • DIY
  • Woodworking
  • Popular Posts
  • Blog
  • About
  • Shop
menu icon
go to homepage
  • DIY
  • Woodworking
  • Popular Posts
  • Blog
  • About
  • Shop
search icon
Homepage link
  • DIY
  • Woodworking
  • Popular Posts
  • Blog
  • About
  • Shop
×
Home » Painting

How To Paint an Exterior Door With a Paint Sprayer

Published: Aug 23, 2017 · Modified: Aug 4, 2024 by Morgan · As an Amazon Associate, we earn from qualifying purchases. This site contains affiliate links. ·

Want to paint your exterior door? It's easiest to do if you remove the door from the hinges, but here's how to do it without!

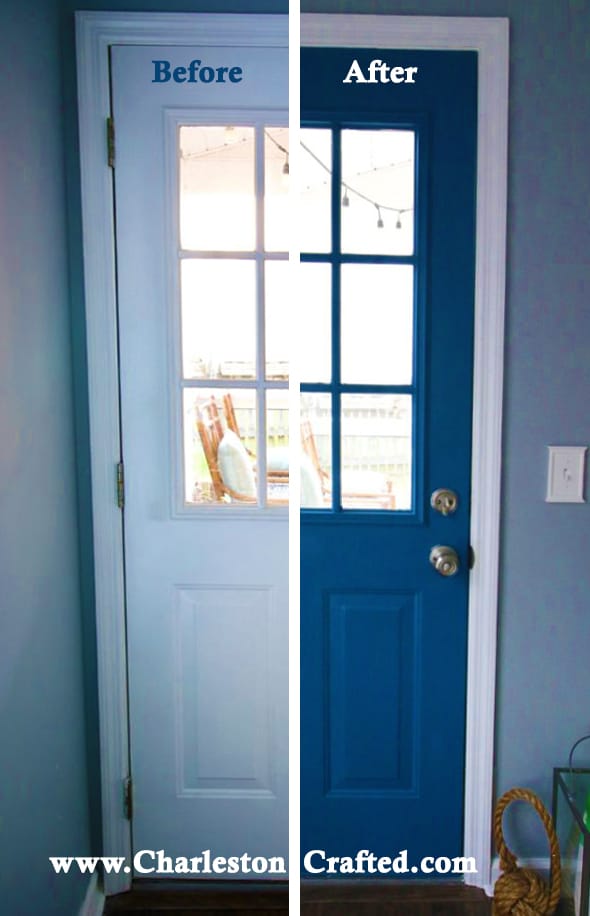
I am all about a colored door! Especially since our walls are all gray, painting a door was a great way to bring a pop of color into a room.

We rolled paint on our front door, but wanted to try something different on the back door. So, we decided to use a paint sprayer to see how it turned out. If you are interested in using a paint sprayer to paint an exterior door, it is really simple and fast to do.

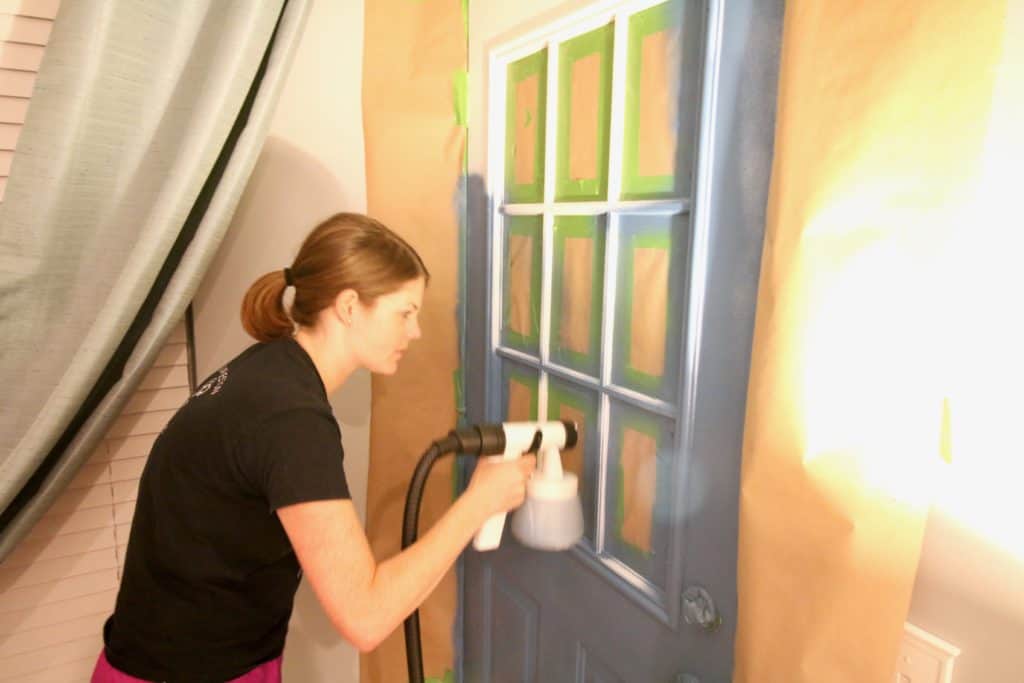
The paint sprayer that we used is the Wagner Home Decor Paint Sprayer. It is very easy to use and really easy to clean as well. We really love the rotating nozzle so you can spray horizontally, vertically, or at an angle.

Here's how you do it.

How To Paint an Exterior Door With a Paint Sprayer

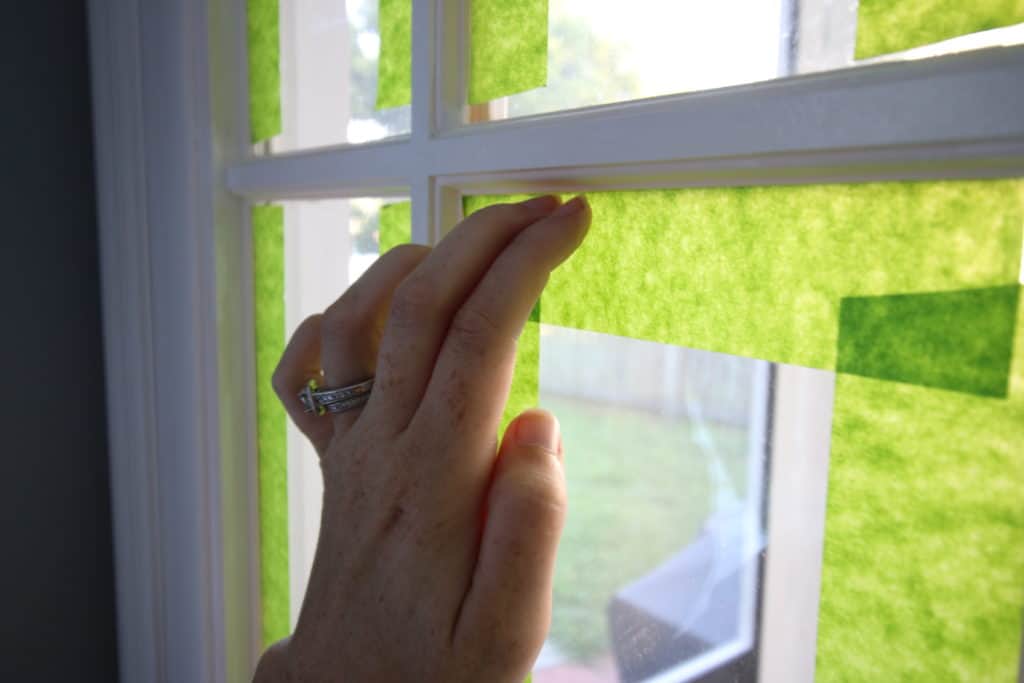
The most time consuming part of spraying anything is the prep work. Since we decided not to take the door off the hinges and spray it outside (it was over 100 degrees and this is a door to the outside - we didn't want no door on our house for hours!) we had to tape everything off really well.

We used Frog Tape and kraft paper to cover everything that we didn't want painted like the knob, glass windows, and door frame. Do a good job taping - you don't want to miss spots because they were covered with ⅛th an inch of tape - trust me.

How To Paint an Exterior Door With a Paint Sprayer - Charleston Crafted

Fill your sprayer. We poured ½ of a quart of exterior semi gloss paint (the color is Sherwin Williams Georgian Bay) into the reservoir of the paint sprayer. We ended up using less than the ½ quart, so we will need something else to paint this blue :).

Screw the reservoir back onto the sprayer. We did a test on a piece of scrap wood in the garage to be sure that we liked how it was spraying - remember to hold the sprayer only about 3" away from the thing that you are painting.

To spray your door, plug in the sprayer, and push the on button. Hold the sprayer 3 inches from the door and continuously move slowly across your surface. Work all in horizontal directions with the nozzle set to the up and down setting or in vertical directions with the nozzle set to the left and right. When we thought we were done, we shone a flashlight all over the door to see if we missed any spots and then touched them up.

How To Paint an Exterior Door With a Paint Sprayer - Charleston Crafted

We let the paint dry for about 30 minutes before removing the tape. You want the paint to still be wet when you remove your painters tape so you get a clean line (dry paint tends to peel off, wet paint has more give) but right after finishing the paint was really wet, so that 30 minutes let it get just a bit tacky so I was less worried about bumping it.

Here is a live facebook video that we shared while painting!

How To Paint an Exterior Door With a Paint Sprayer - Charleston Crafted

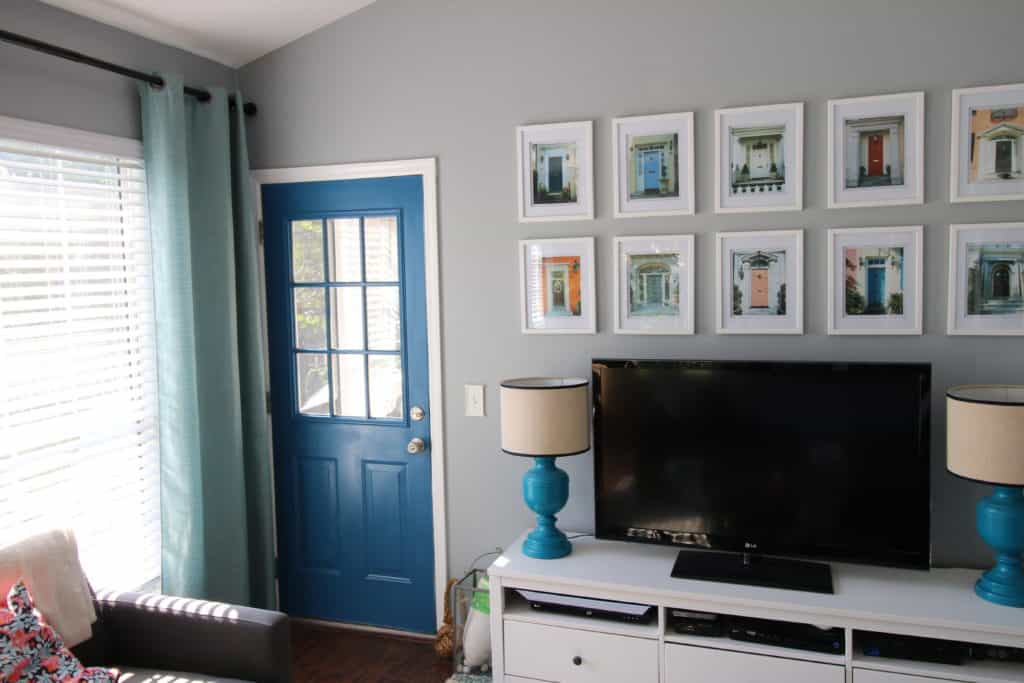
I am SO happy with how this turned out. The spraying took less than 15 minutes and it was an hour long project total. I can't wait to find more things to paint with my sprayer!

Have you ever used a paint sprayer?

This post contains affiliate links. That means if you click through and make a purchase we receive a small percentage of the sale. Thanks for supporting the brands that make Charleston Crafted possible. 

Charleston Crafted Signature

Follow us on:
Pinterest | Instagram | TikTok | YouTube | Facebook | Amazon Storefront | LTK Shop

Looking for something?

We've been doing this since 2012 so we have a LOT of blog posts!
Search stuff like: Ceiling Projects | DIY Plant Stands | Thrift Flips

Charleston Crafted logo banner
Morgan headshot cropped
Morgan

Hello, I'm Morgan, half of the creative force behind CharlestonCrafted.com! With a passion for DIY that dates back to 2012, I've transformed three homes and now I'm dedicated to helping others craft their dream spaces. Let's turn your house into a home together!

More Painting

  • how to paint kitchen cabinets
    How to paint kitchen cabinets - for a perfect finish!
  • how to prep cabinets for painting
    How to prep cabinets for painting
  • Best spray paints for outdoor furniture
    Best spray paints for outdoor furniture
  • the best paint for metal outdoor furniture
    The best paint for outdoor metal furniture

Reader Interactions

Comments

  1. Anna says

    August 23, 2017 at 10:14 am

    Love this! Do you think you could use this same method to paint the exterior-side of the door? Or do you think you need to fully remove hinges/sand/prime etc?

    • Morgan says

      August 23, 2017 at 10:23 am

      You 100% could and we probably will! You just have to tape/paper off anything within about 6 inches that you don't want to get paint on. The biggest thing with exterior doors is how dirty they get! Ours was embarrassingly dusty and needs a really good wipe down before paint would stick. Thanks so much for reading!

Primary Sidebar

Charleston Crafted about us image

Hey y'all!

We are Morgan & Sean McBride and we are crafting our home together in Charleston, South Carolina.

More about us

Popular Posts

  • DIY Coffered Ceiling
    DIY Coffered Ceiling
  • How to Make DIY Concrete Pumpkins via Charleston Crafted
    How to Make DIY Concrete Pumpkins
  • How to Make a Cupid's Arrow Valentine's Day Wall Hanging with felt on the Cricut
    How to make a Cupid's Arrow Valentine's Day Wall Hanging
  • Our Tropical Oasis - A backyard Hammock area - Charleston Crafted
    Our Tropical Oasis

Recent Posts

  • fisherman aesthetic home inspiration
    Fisherman Aesthetic Decor for Your Home
  • Senix Tools Review- Charleston Crafted
    Are Senix power tools any good?
  • Your Weekend To-Do List: 15 Things to Do for Summer Home Upkeep
    Your Weekend To-Do List: 15 Things to Do for Summer Home Upkeep
  • How to build a DIY gate pergola- Charleston Crafted
    How to build a DIY gate pergola

Privacy Policy

Footer

↑ back to top

Navigation

  • Home
  • Blog
  • Contact Us
  • Terms of Use
  • Disclaimer

Newsletter

  • Sign up for emails and updates
  • Follow us on Instagram
  • Work with Us

Browse by Category

  • Woodworking
  • Home Projects
  • Paint Colors
  • Room Reveals

© 2025 The Charleston Crafted Blog LLC DBA “Charleston Crafted” and “CharlestonCrafted” (also known as N/A) / All Rights Reserved.
Official Website: (Charleston Crafted)
Registered in USA (Co. Reg. No.: 565586)
Address: Charleston, USA 29414, South Carolina
Contact Phone: Not applicable — contact is via email: sean@charlestoncrafted.com

DISCLAIMER: The content on this website is provided for general informational purposes only and is not intended as professional advice. The Charleston Crafted Blog LLC and The Charleston Crafted Blog LLC make no representations or warranties—express or implied—regarding the accuracy, completeness, or suitability of the information contained herein. Any reliance you place on this information is strictly at your own risk. In no event shall The Charleston Crafted Blog LLC or The Charleston Crafted Blog LLC be liable for any loss or damage, including without limitation, indirect or consequential loss or damage, arising from the use or inability to use this website. This website is the official website of The Charleston Crafted Blog LLC.

AFFILIATE DISCLOSURE: This website contains affiliate links. If you click through and make a purchase, we may earn a commission at no extra cost to you.

As an Amazon Associate, I earn from qualifying purchases.

Site Editor: Morgan Smith McBride

Copyright © 2025 Charleston Crafted