• Skip to primary navigation
  • Skip to main content
  • Skip to primary sidebar
Charleston Crafted
  • DIY
  • Woodworking
  • Popular Posts
  • Blog
  • About
  • Shop
menu icon
go to homepage
  • DIY
  • Woodworking
  • Popular Posts
  • Blog
  • About
  • Shop
search icon
Homepage link
  • DIY
  • Woodworking
  • Popular Posts
  • Blog
  • About
  • Shop
×
Home » Home Projects

It's a Dog Eat Wall World Out There - How to Repair a Dog Chewed Wall

Published: Dec 14, 2012 · Modified: Dec 14, 2023 by CharlestonCrafted · As an Amazon Associate, we earn from qualifying purchases. This site contains affiliate links. ·

Looking to repair a dog chewed wall? Here's what worked for us when we needed to fill in the wall that was chewed up! 

***UPDATE: wow, this post has really taken off on pinterest! If you are a first time visitor, I hope that you will check out our DIY page for some of our more current work. We did this project in 2012 - when we very first started blogging, before we had a single power tool.

If we did it again now, we would use an electric sander to get it extra smooth before painting it, or sand it for much longer. Unfortunately, we no longer live in this place and can't go back and fix it now. The heart of this tutorial is still great and could be used to repair and dog chewed wall in your home!***

Everyone knows that puppies chew on things. Sometimes it's cute.

It's not so cute when someone else's puppy chews on crucial structures in the home and then that renter moves out and leaves it for you when you buy the home.

Well, lucky for us, it's an easy fix. For us, the dog had chewed the wooden post in between the french doors to the porch and chewed the door frame in the bathroom.

If a dog has chewed up a wooden structure of your home, you can definitely fix it yourself with just a few tools and a little bit of time.

Here is how to repair a dog chewed or scratched wall or door frame.

How to Repair a Dog Chewed Wall

As long as your dog hasn't messed up the structural integrity of a wall or beam, you can fix the surface value of it. If your area is actually broken, consult someone who can replace it.

If you just need a surface level fix and need it to look nice again, here's how to fix your dog chewed wall.

Here's what you'll need to fix a dog-chewed wall

  • Wood filler
  • Putty knife
  • Sander
  • Paint

Step one: sand damaged area

Start by sanding down the damaged area as best you can.

The main thing you want to make sure of is to get rid of any loose chips or broken areas. The smoother the area, the better the wood filler will adhere to the area.

Fixing a dog-chewed wall - Charleston Crafted

Step two: apply wood filler

Get your hands on some wood filler or Bondo. Not sure what the difference is? Here's our post comparing the four most popular brands of wood filler.

Then, use a scraper to smooth clumps of the wood filler into the spot that needs it.

Fixing a dog-chewed wall - Charleston Crafted

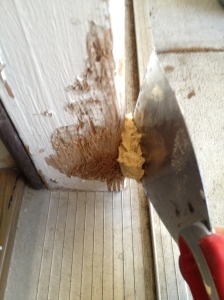
Make sure you pack it in enough and smooth it out until it forms a flat surface.

I found that for this project, since it was on a corner, it was easier to just use my fingers to smooth it out.

Fixing a dog-chewed wall - Charleston Crafted

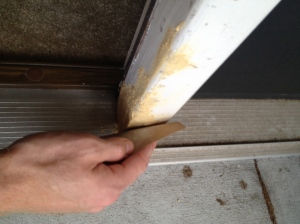
Step three: sand smooth

Let the wood filler dry completely, which might take a little while if you've had to put it on extra thick.

Next, sand it down with sand paper, but be gentle, making sure to shape out the corner if you have one. You don't want to have a flat spot where there should be a corner.

Fixing a dog-chewed wall - Charleston Crafted

Step four: paint

Finally, paint over it with the right color. You'll want to make sure you paint it with a matching paint and try to feather the paint to blend it as best you can.

Fixing a Dog Chewed Wall-Charleston Crafted

TA-DA!! An easy fix for you for fixing up a little dog chewed wood.

This can also be used for any part of a wall that gets a chunk knocked out of it or you bump furniture into when moving. Just paste, sand and paint!

Have you ever fixed wood like this? What repair projects are you working on?

 
Charleston Crafted Logo heart
 
Charleston Crafted Logo facebook

 
Charleston Crafted Logo insta

 
Charleston Crafted Logo pinterest

 
Charleston Crafted Logo twitter

Charleston Crafted email newsletter sign up
CharlestonCrafted

More Home Projects

  • DIY floating corner shelves - Charleston Crafted
    How to make floating corner shelves
  • how to assess your home renovation needs
    How to assess your home renovation needs
  • Top Mistakes to Avoid When Renovating Your Home
    Top Mistakes to Avoid When Renovating Your Home
  • How to create a DIY home renovation plan
    How to create a DIY home renovation plan

Reader Interactions

Comments

  1. Pattie says

    January 02, 2016 at 2:56 am

    Disappointed with the final results as seen in post, should have of sanded more.

    • Sean says

      January 03, 2016 at 11:12 am

      Thanks for reading Pattie. This was done when we very first purchased our condo and we did not have an electric sander at the time - only sheets of sandpaper. It was a quick fix upon our move into a short sale where we couldn't request any repairs be made. Before we sell the unit, we will definitely hit it with our new electric sander and get it smooth as you suggested. Sometimes "good enough" is good enough for now 🙂

      • Leigh says

        February 26, 2019 at 11:12 am

        We’re dealing with the same problem right now as we try to get our house in sell-worthy condition. This basic fix looks like the perfect solution for our doggie-damaged door facing. Thanks for the post!

        • Morgan says

          February 26, 2019 at 11:52 am

          I'm so glad that this helped you!

  2. Andrei says

    October 31, 2019 at 5:57 am

    I'm interested if I can fix the corner with transparent epoxy. Our asshole beagle is... no longer with us, so I would like to 'preserve' the chew marks so they can be seen, but also fix the door frame as it looks terrible.

    Any advice on that?

    • Sean says

      October 31, 2019 at 8:28 am

      Sorry to hear about your beagle, but that's a really sweet idea. Yes, I think you could do that. The best way I can think of would be to use Gorilla Glue Two-Part Epoxy and spread it on there. It has a very fast dry time and is thick, so you can mix it in a cup and then spread it on. Might need a couple of coats depending how deep the marks are, but you can definitely do it. Please share a picture with us if it works!

Trackbacks

  1. Upcycle Chairs – apinterestinglifesite says:
    October 24, 2016 at 12:13 pm

    […] Craft number one will be to fix the horribly chewed chair leg.  […]

Primary Sidebar

Charleston Crafted about us image

Hey y'all!

We are Morgan & Sean McBride and we are crafting our home together in Charleston, South Carolina.

More about us

Popular Posts

  • DIY Coffered Ceiling
    DIY Coffered Ceiling
  • How to Make DIY Concrete Pumpkins via Charleston Crafted
    How to Make DIY Concrete Pumpkins
  • How to Make a Cupid's Arrow Valentine's Day Wall Hanging with felt on the Cricut
    How to make a Cupid's Arrow Valentine's Day Wall Hanging
  • Our Tropical Oasis - A backyard Hammock area - Charleston Crafted
    Our Tropical Oasis

Recent Posts

  • fisherman aesthetic home inspiration
    Fisherman Aesthetic Decor for Your Home
  • Senix Tools Review- Charleston Crafted
    Are Senix power tools any good?
  • Your Weekend To-Do List: 15 Things to Do for Summer Home Upkeep
    Your Weekend To-Do List: 15 Things to Do for Summer Home Upkeep
  • How to build a DIY gate pergola- Charleston Crafted
    How to build a DIY gate pergola

Privacy Policy

Footer

↑ back to top

Navigation

  • Home
  • Blog
  • Contact Us
  • Terms of Use
  • Disclaimer

Newsletter

  • Sign up for emails and updates
  • Follow us on Instagram
  • Work with Us

Browse by Category

  • Woodworking
  • Home Projects
  • Paint Colors
  • Room Reveals

© 2025 The Charleston Crafted Blog LLC DBA “Charleston Crafted” and “CharlestonCrafted” (also known as N/A) / All Rights Reserved.
Official Website: (Charleston Crafted)
Registered in USA (Co. Reg. No.: 565586)
Address: Charleston, USA 29414, South Carolina
Contact Phone: Not applicable — contact is via email: sean@charlestoncrafted.com

DISCLAIMER: The content on this website is provided for general informational purposes only and is not intended as professional advice. The Charleston Crafted Blog LLC and The Charleston Crafted Blog LLC make no representations or warranties—express or implied—regarding the accuracy, completeness, or suitability of the information contained herein. Any reliance you place on this information is strictly at your own risk. In no event shall The Charleston Crafted Blog LLC or The Charleston Crafted Blog LLC be liable for any loss or damage, including without limitation, indirect or consequential loss or damage, arising from the use or inability to use this website. This website is the official website of The Charleston Crafted Blog LLC.

AFFILIATE DISCLOSURE: This website contains affiliate links. If you click through and make a purchase, we may earn a commission at no extra cost to you.

As an Amazon Associate, I earn from qualifying purchases.

Site Editor: Morgan Smith McBride

Copyright © 2025 Charleston Crafted