• Skip to primary navigation
  • Skip to main content
  • Skip to primary sidebar
Charleston Crafted
  • DIY
  • Woodworking
  • Popular Posts
  • Blog
  • About
  • Shop
menu icon
go to homepage
  • DIY
  • Woodworking
  • Popular Posts
  • Blog
  • About
  • Shop
search icon
Homepage link
  • DIY
  • Woodworking
  • Popular Posts
  • Blog
  • About
  • Shop
×
Uncategorized

How to paint candles with wax

Published: Nov 19, 2024 by Morgan · As an Amazon Associate, we earn from qualifying purchases. This site contains affiliate links. ·

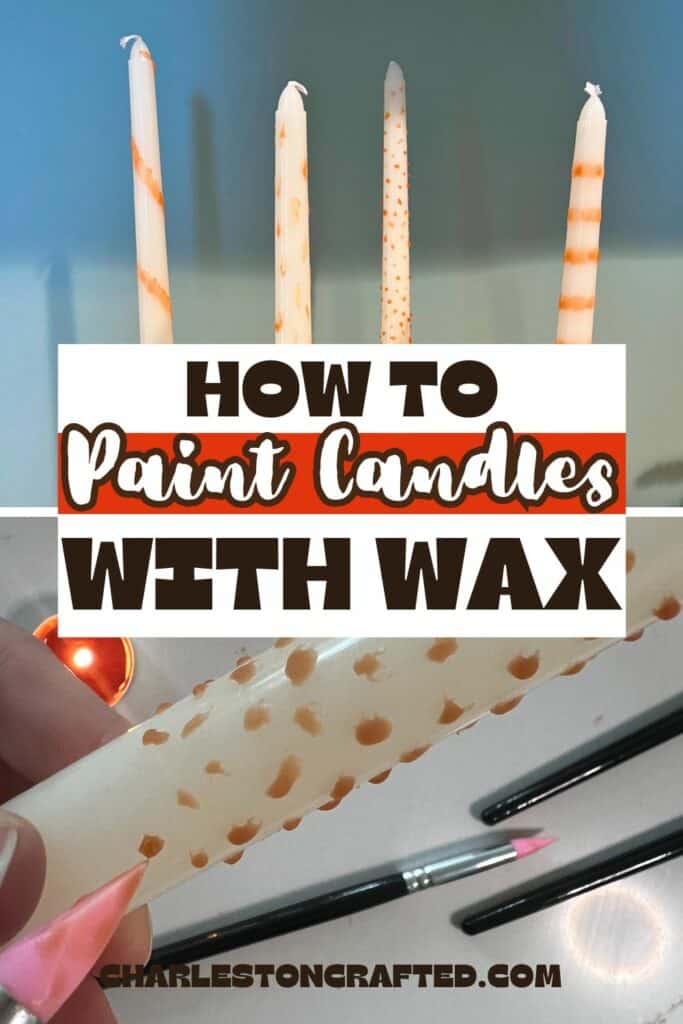
Want to make custom candles for a holiday, home decor, or for a gift? Here's a complete tutorial on how to paint candles with wax!

I love decorating with candles. There is something so elegant and romantic about a cluster of candlesticks as a centerpiece or on the mantel.

Recently, I have been noticing a lot of patterned candlesticks for sale. They are so cute, but often way overpriced for only 2 candles at a time.

So, being the DIY-er that I am, I had to try my best to make my own set.

Prefer to shop? Click here for a ton of ready-to-buy painted candle options!

Of course, you could just paint onto candlesticks with paint, or use paint pens even! That's a totally fine option.

But, I'm going to show you how I used wax to paint designs on my wax candles.

It was super easy, though slow going, and very therapeutic and fun to do!

how to paint candles with wax

How to paint candles with wax

Here's how easy it is to paint candles - with wax!

Supplies needed:

  • Candles - taper or pillar style
  • tea light candles in a contrasting wax color
  • silicone paint brushes
  • Candlestick holders (for tape candles)
supplies to paint candles with wax

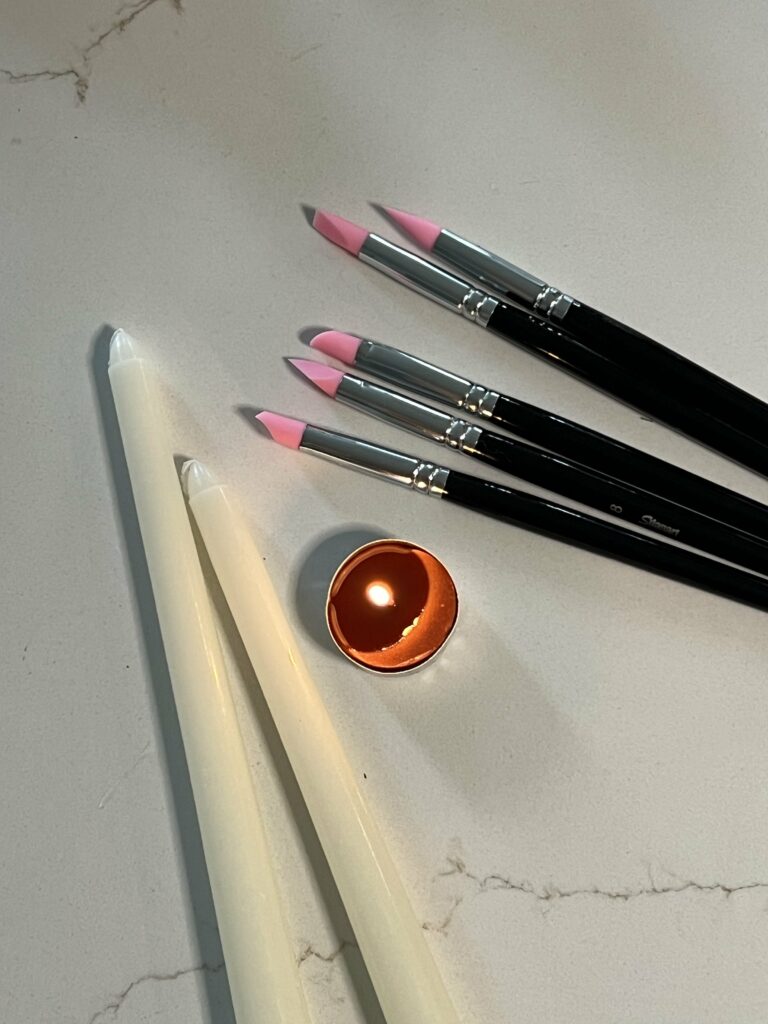
Warning: this craft involves working with hot wax. Hot wax can burn you. Be careful, use common sense. Don't touch the flame with yourself. Don't touch melted wax with your skin. It's hot. Ouch!

Steps to make the candles:

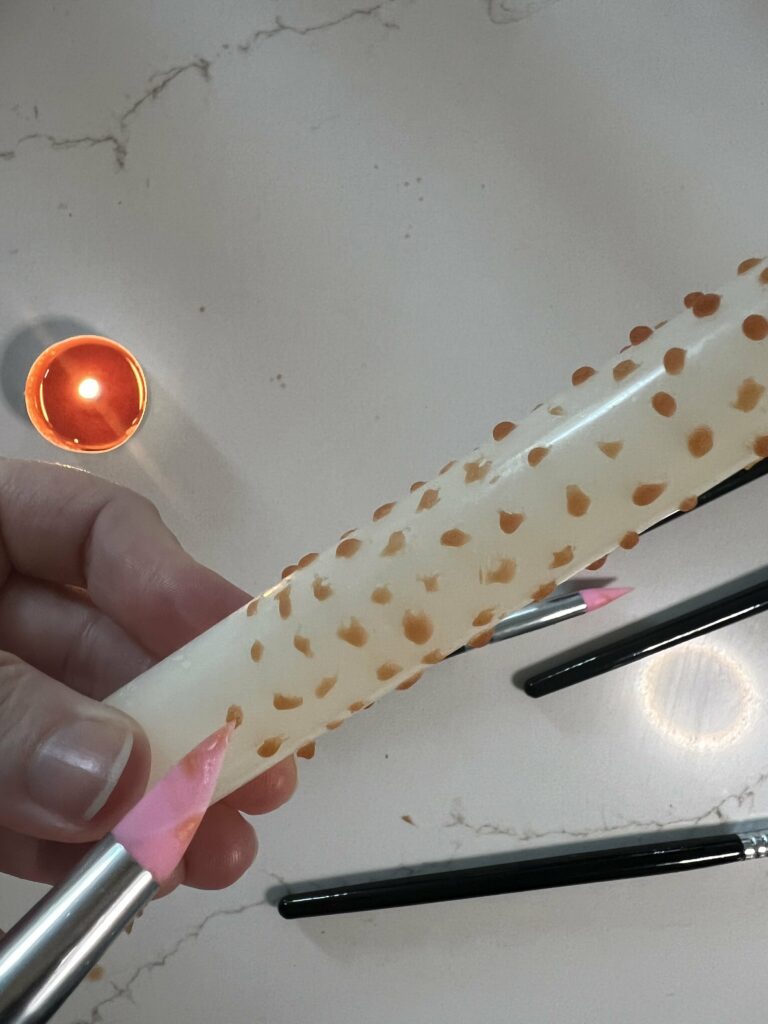
Step 1: Light your tea light

Light your tea light. Let it sit for 5+ minutes so the wax is nice and melted.

Step 2: Dip and paint

Once the wax is melted, dip the silicone tip of your paint brush into the hot wax. Quickly move the brush to your candle and paint your design.

This is a bit slow going - you can't get too much wax at once. Go bit by bit to paint on your design.

Avoid getting the silicone of the brush into the flame - wax only!

Repeat over and over until you are happy with the design.

painting candles with wax

Step 3: Let dry completely

Place upright or in a candle holder and let the wax dry completely before handling!

candlesticks painted with wax

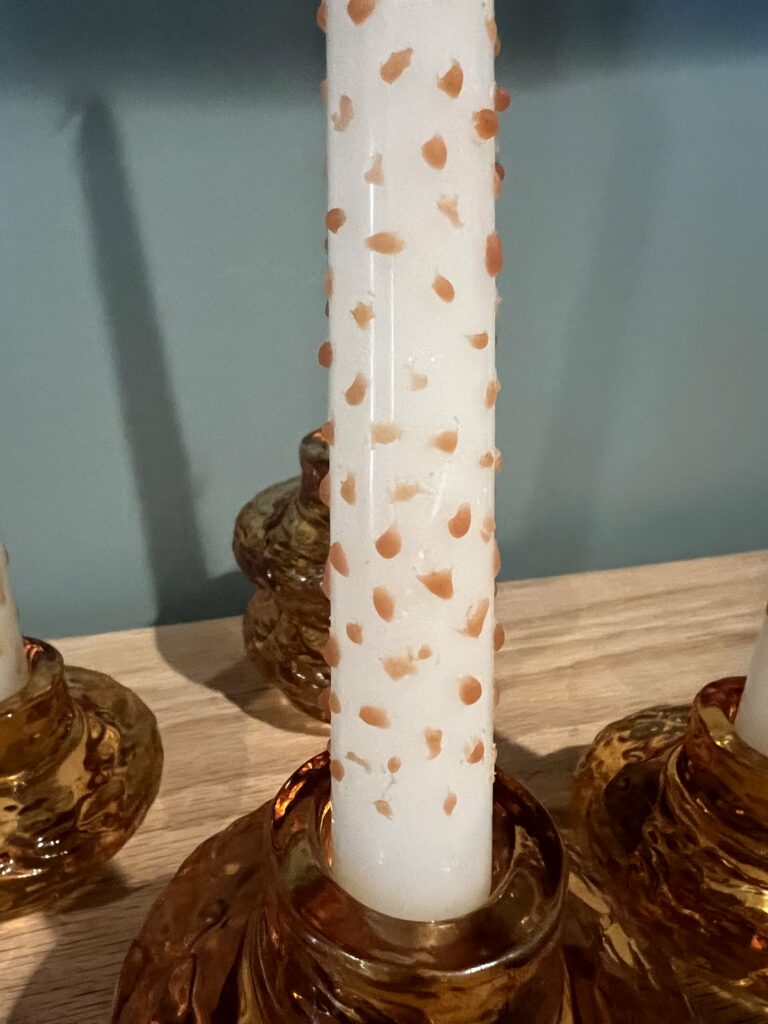
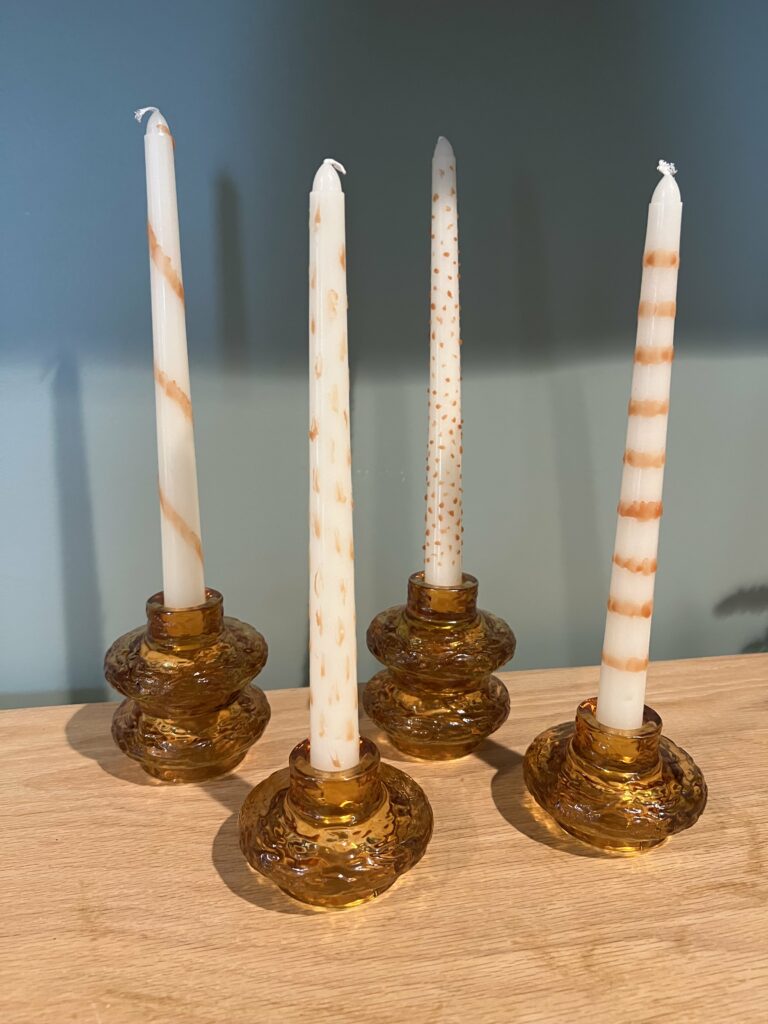
I just love how these candles turned out. You could do these for any holiday or color combination. They could be personalized for a gift!

how to paint candles with wax

While it is slow going, it's easy, and a great way to get crafty and creative!!

Charleston Crafted Signature

Follow us on:
Pinterest | Instagram | TikTok | YouTube | Facebook | Amazon Storefront | LTK Shop

Looking for something?

We've been doing this since 2012 so we have a LOT of blog posts!
Search stuff like: Ceiling Projects | DIY Plant Stands | Thrift Flips

Charleston Crafted logo banner
Morgan headshot cropped
Morgan

Hello, I'm Morgan, half of the creative force behind CharlestonCrafted.com! With a passion for DIY that dates back to 2012, I've transformed three homes and now I'm dedicated to helping others craft their dream spaces. Let's turn your house into a home together!

More Uncategorized

  • bedroom corner siting area
    Bedroom Corner Sitting Area
  • String art 2x4 Valentine - Charleston Crafted
    String art 2x4 Valentine
  • home amazon prime day deals
    All of the best Black Friday Home Deals (updated list!)
  • how to get into woodworking as a hobby
    How to get into woodworking as a hobby

Primary Sidebar

Charleston Crafted about us image

Hey y'all!

We are Morgan & Sean McBride and we are crafting our home together in Charleston, South Carolina.

More about us

Popular Posts

  • DIY Coffered Ceiling
    DIY Coffered Ceiling
  • How to Make DIY Concrete Pumpkins via Charleston Crafted
    How to Make DIY Concrete Pumpkins
  • How to Make a Cupid's Arrow Valentine's Day Wall Hanging with felt on the Cricut
    How to make a Cupid's Arrow Valentine's Day Wall Hanging
  • Our Tropical Oasis - A backyard Hammock area - Charleston Crafted
    Our Tropical Oasis

Recent Posts

  • fisherman aesthetic home inspiration
    Fisherman Aesthetic Decor for Your Home
  • Senix Tools Review- Charleston Crafted
    Are Senix power tools any good?
  • Your Weekend To-Do List: 15 Things to Do for Summer Home Upkeep
    Your Weekend To-Do List: 15 Things to Do for Summer Home Upkeep
  • How to build a DIY gate pergola- Charleston Crafted
    How to build a DIY gate pergola

Privacy Policy

Footer

↑ back to top

Navigation

  • Home
  • Blog
  • Contact Us
  • Terms of Use
  • Disclaimer

Newsletter

  • Sign up for emails and updates
  • Follow us on Instagram
  • Work with Us

Browse by Category

  • Woodworking
  • Home Projects
  • Paint Colors
  • Room Reveals

© 2025 The Charleston Crafted Blog LLC DBA “Charleston Crafted” and “CharlestonCrafted” (also known as N/A) / All Rights Reserved.
Official Website: (Charleston Crafted)
Registered in USA (Co. Reg. No.: 565586)
Address: Charleston, USA 29414, South Carolina
Contact Phone: Not applicable — contact is via email: sean@charlestoncrafted.com

DISCLAIMER: The content on this website is provided for general informational purposes only and is not intended as professional advice. The Charleston Crafted Blog LLC and The Charleston Crafted Blog LLC make no representations or warranties—express or implied—regarding the accuracy, completeness, or suitability of the information contained herein. Any reliance you place on this information is strictly at your own risk. In no event shall The Charleston Crafted Blog LLC or The Charleston Crafted Blog LLC be liable for any loss or damage, including without limitation, indirect or consequential loss or damage, arising from the use or inability to use this website. This website is the official website of The Charleston Crafted Blog LLC.

AFFILIATE DISCLOSURE: This website contains affiliate links. If you click through and make a purchase, we may earn a commission at no extra cost to you.

As an Amazon Associate, I earn from qualifying purchases.

Site Editor: Morgan Smith McBride

Copyright © 2025 Charleston Crafted