Does your baby have a ton of headbands and hair bows? Here is the easiest DIY way to display and organize them!
Today's tutorial is a bit of an exercise in admitting defeat.
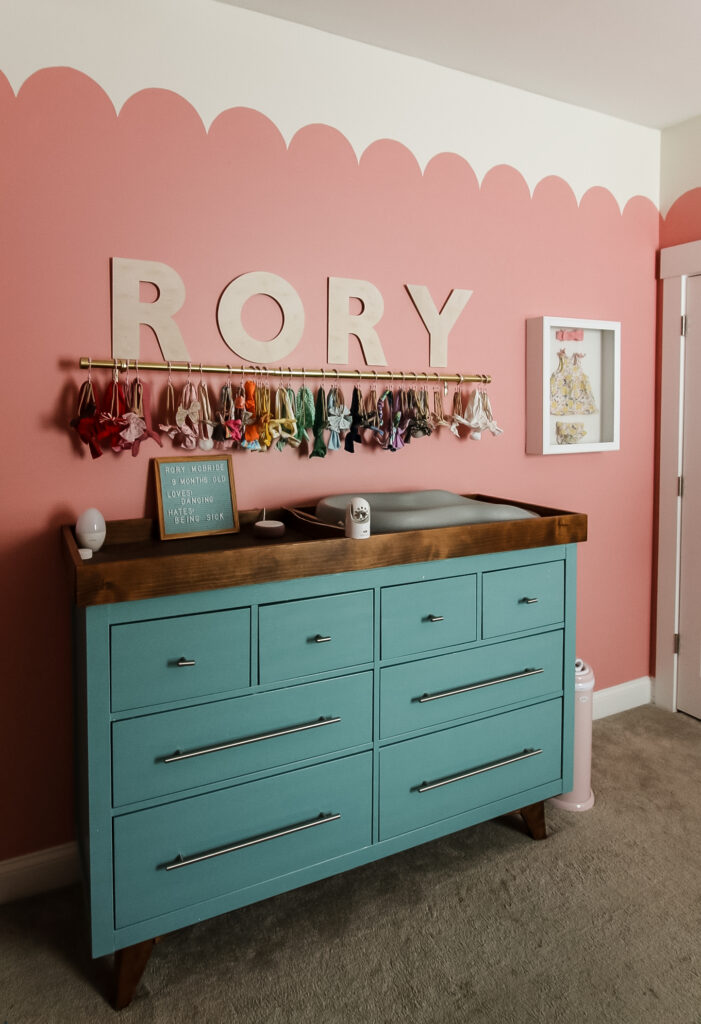
You see, about six months ago, we made Rory a custom wooden hair bow holder.
It's made from wooden letters and it was a LOT of work to hand screw in all those hooks.
But honestly, it never really worked in our space - it was instantly too crowded and the hanging bows made it so you couldn't read the letters.
It just looked busy and confusing.
So, I found it in me to admit that this wasn't working and pivot.
Luckily, the wooden letters can be re-used as just general wall decor so it's just lost time.
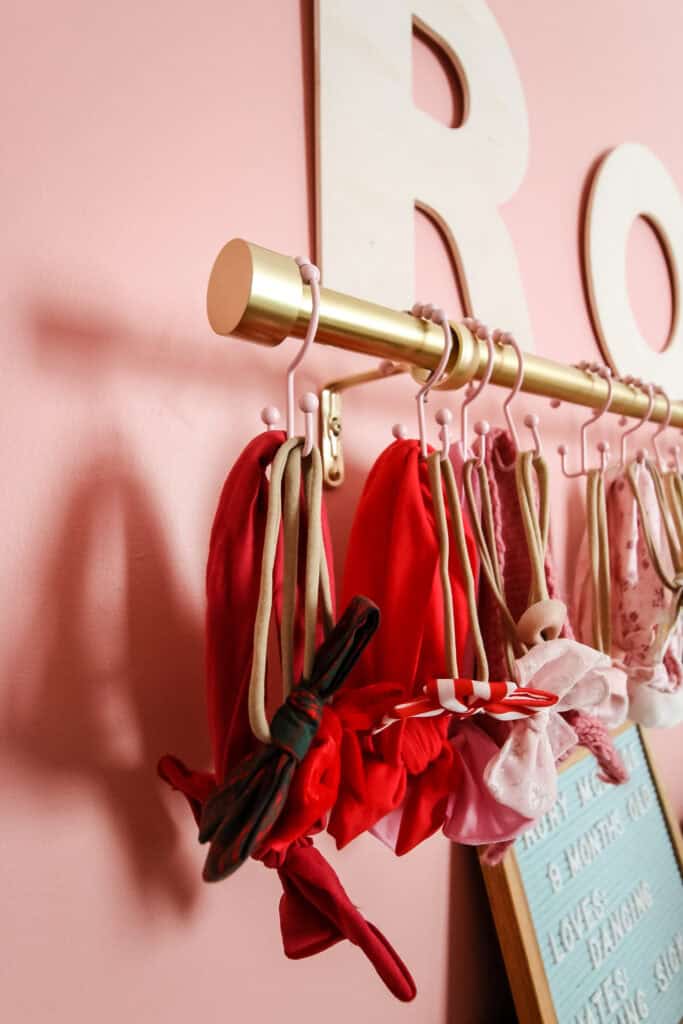
Anyways, I decided to make a simpler bow storage using a curtain rod!
My initial thought was that I wanted to use a clear acrylic rod - but then I realized those sell for well over $100 each. Not worth it for a bow holder!
Instead, I got a brushed bronze rod to match her lamp and the rest is history!
How to make a curtain rod into baby headband storage
It's super easy to make a DIY baby hairbow organizer using a curtain rod and shower curtain rings!
Tools needed:
- Drill
- Tape measure or level
Supplies needed:
- Curtain rod of choice (and hardware to mount, should be included)
- Shower curtain rings
- Hair bows
What curtain rings should I use?
You have a few options for rings to hang your baby headbands:
- Standard C rings
- Curtain rings with little clips
- Double hook rings
The clip rings look nice but only work with one headband at a time - otherwise they all fall off when you unclip it.
I love these double hook rings - they each have 2 hooks. The hooks are big enough for 1 headband or up to 3 of the bows with nylon headbands!
Otherwise, just pick a color of finish that works with your nursery decor.

Steps to hang a curtain rod to organize hair bows
STEP 1: Decide your placement
Decide exactly where you want the rod. Hold up the bracket and use a pencil to mark where the screws will go.
STEP 2: Add anchors
Drill a hole into the wall and then hammer an anchor into the hole. This will make sure it is secure and won't fall off the drywall!
STEP 3: Screw in the brackets
Use a drill or screwdriver to screw the brackets into the anchors.
STEP 4: Add the rod
Slide the rod into the brackets and twist on the end caps to hold in place. My brackets had small screws to tighten to hold the rod.
STEP 5: Add the hooks
Simply slip the hooks over the rod and into place! I used 2 packs (24 hooks total).
STEP 6: Hang your bows!
Hang your bows on the hooks - I went in rainbow order - and enjoy!
Tour our girl's pink nursery here!
See our son's jungle nursery here!
What if I need to organize hair bow clips?
This system works great for clips, too. Just instead of hooks, loop ribbon over the rod. And clip the hair clips to the tail of the ribbon! Instant bow organizer!
I hope that this easy DIY headband holder gets your girls headbands up and organized!
How are you storing hair bows?

Looking for something?
We've been doing this since 2012 so we have a LOT of blog posts!
Search stuff like: Ceiling Projects | DIY Plant Stands | Thrift Flips

Hello, I'm Morgan, half of the creative force behind CharlestonCrafted.com! With a passion for DIY that dates back to 2012, I've transformed three homes and now I'm dedicated to helping others craft their dream spaces. Let's turn your house into a home together!